manuals.online logo
Brands
  1. Home
  2. •
  3. Brands
  4. •
  5. Lansay
  6. •
  7. Toy
  8. •
  9. Lansay MONSTER HIGH CUTIE STIX ORIGINAL User manual

Lansay MONSTER HIGH CUTIE STIX ORIGINAL User manual

NOTICE
INSTRUCTIONS
GEBRUIKSAANWIJZING
ANLEITUNG
INSTRUCCIONES
INFORMATIVA
CONTENU / CONTENT / INHOUD / INHALT / CONTENIDO / CONTENUTO
REF. : 33134
Atelier de découpe
ÊCutting unit
Snijmachine
Schneidatelier
Unidad de corte
ïLaboratorio di taglio
1x
1
Atelier de perçage
ÊCoring unit
Gaatjesdrukker
Atelier zum Durchbohren
Unidad de perforado
ïLaboratorio di foratura
1x
2
Boîtes plastiques
ÊPlastic boxes
Plastic doosjes
Kunststoffbehälter
Cajitas de plástico
ïScatole in plastica
2x
4
Baguette
ÊStick
Ring
Stab
Varilla
ïBacchetta
1x
5
Tige poussoir
ÊPush rod
Hendel
Kolben zum Drücken
Enhebrador
ïBastoncino per spingere
1x
6
Moules de découpe
ÊCutting molds
Snijvormpjes
Schneidformen
Moldes de corte
ïStampi da taglio
2x
3
Grands
ÊMighty
Grote
Großen
Grande
ïGrandi
2x STIX
9
 Bobines de fil élastique
ÊSpools
Spoelen
Rollen mit Gummibändern
Bobinas de hilo
ï Rocchetti di filo
2x
7
Fermoirs
ÊClasps
Sluitingen
Verschlüsse
Cierres
ïFermagli
8x
8
Moyens
ÊCutie
Midden
Mittlere
Medianos
ïMedi
13x STIX
10
Planche d’autocollants
ÊSheet of stickers
Stickervel
Bogen mit Aufklebern
Hoja de pegatinas
ïFoglio di adesivi
1x
11
8+
1
2
4
5
9
6
7
3
8
10
11
1

Attention ! Ne convient pas aux enfants de moins de 36 mois. Présence de petites pièces. Danger d’étouffement. Message aux parents : Lire les instructions en présence de
l’enfant avant utilisation, s’y conformer et les garder comme référence. Ne pas laisser les éléments du jouet à la portée des enfants de moins de 6 ans. À utiliser sous la surveillance d’un
adulte. Ne pas avaler. Bien jeter les surplus de STIX une fois les STIX percés. Ne pas introduire les Stix dans le nez ou les oreilles. Si un nombre important de Stix est avalé, ou si un Stix est
inséré dans le nez ou les oreilles, consultez un médecin immédiatement. Apportez le guide d'instructions et quelques Stix avec vous. Les jouets contiennent des bords tranchants
fonctionnels et inaccessibles. Ne jamais insérer le doigt dans les différentes machines Cutie Stix. Ne jamais démonter les ateliers de découpe et de perçage. N'ouvrez jamais la porte de
sécurité de l'atelier de perçage pendant le processus de perçage. Si un problème fonctionnel est détecté, n'essayez pas de réparer la machine. Il est recommandé de bien enlever toutes
les attaches en plastique et autres éléments de protection ne faisant pas partie du jouet avant de le donner à l’enfant. Informations à conserver. Les couleurs et décorations peuvent varier.
Ê
Warning! Not suitable for children under 36 months. Contains small parts. Choking hazard. Message to parents: Read the instructions with your child before using. Be sure to
follow them and keep them as a reference. Do not leave toy pieces within reach of children under the age of 6. Use under adult supervision. Do not swallow. Throw away the excess STIX
once the STIX are drilled. Do not insert Stix into the nose or ears. See a doctor immediately if your child swallows a large number of Stix, or if a Stix is inserted into the nose or ears. Bring
the instructions and a few Stix with you. Toys contain functional and inaccessible sharp edges. Never insert your finger into the various Cutie Stix machines. Never disassemble cutting unit
and coring unit. Never open the safety door of the coring unit during the drilling process. If a functional problem is detected, do not attempt to repair the machine. Please remove all plastic
tags, ties, and any other protective elements which do not make up part of the toy, before giving it to the child. Please retain information for future reference. Colours and contents may
vary from those shown.

Waarschuwing! Niet geschikt voor kinderen jonger dan 36 maanden. Bevat kleine onderdelen. Verstikkingsgevaar. Bericht aan de ouders: Lees de instructies als uw kind
erbij is vóór het gebruik, volg ze na en bewaar ze voor raadpleging. Laat geen onderdelen van het speelgoed binnen bereik van kinderen jonger dan 6 jaar achter. Alleen voor gebruik onder
toezicht van een volwassene. Niet inslikken. Gooi de restjes STIX weg als ze al doorboord zijn. Steek de Stix niet in de neus of in de oren. Als een groot aantal Stix worden ingeslikt, of als
een Stix in de neus of in de oren wordt gestoken, raadpleeg dan direct een dokter. Neem de gebruikershandleiding en enkele Stix mee naar de dokter. Het speelgoed heeft scherpe randen,
maar deze zijn niet toegankelijk. Steek echter wel nooit je vinger in het Cutie Stix-gereedschap. Demonteer ook nooit de snijmachine of de gaatjesdrukker. Open nooit het veiligheidsluik
van de gaatjesdrukker terwijl je aan het gaatjes maken bent. Als er een storing zou optreden, probeer dan nooit om de machine te repareren. Het wordt aanbevolen om alle plastic
bevestigingen en beschermingsonderdelen die geen deel uitmaken van het speelgoed te verwijderen voordat u het aan het kind geeft. Bewaar deze informatie. De kleuren en versieringen
kunnen variëren.

Achtung! Nicht für Kinder unter 36 Monaten geeignet. Enthält Kleinteile. Erstickungsgefahr. Hinweis an die Eltern: Die Anweisungen sind im Beisein des Kindes vor dem
Gebrauch sorgfältig zu lesen, zu befolgen und als Nachweis aufzubewahren. Dieses Spielzeug ist für Kinder unter sechs Jahren unzugänglich aufzubewahren. Unter der Aufsicht eines
Erwachsenen zu verwenden. Nicht verschlucken. Der überschüssige Rest der STIX ist nach dem Durchbohren zu entsorgen. Die Stix nicht in die Nase oder die Ohren einführen. Wenn eine
große Anzahl von Stix verschluckt wurde oder wenn ein Stix in die Nase oder in die Ohren eingeführt wurde, suchen Sie sofort einen Arzt auf. Nehmen Sie die Bedienungsanleitung und
einige Stix mit. Das Spielzeug enthält scharfe Kanten an funktionalen und unzugänglichen Stellen. Stecke niemals deine Finger in die Cutie Stix-Werkzeuge. Nimm niemals die Schneid-
und Bohrwerkzeuge auseinander. Öffne niemals die Sicherheitsklappe des Bohrwerkzeugs während eines Bohrvorgangs. Sollte das Werkzeug nicht funktionieren, versuche nicht, es zu
reparieren. Es wird empfohlen, alle Kunststoffstecker und andere Schutzteilchen, die kein Bestandteil des Spielzeugs sind, zu entfernen, bevor das Spielzeug dem Kind gegeben wird.
Information aufbewahren. Farben und Muster können variieren.
∑
¡Advertencia! No conviene para niños menores de 36 meses. Presencia de partes pequeñas. Peligro de atragantamiento. Mensaje a los padres: Leed las instrucciones con el
niño antes de empezar a jugar. Seguidlas, y guardadlas para futuras consultas. No dejar las piezas del juego al alcance de niños de menos de 6 años. Utilizar con la supervisión de un
adulto. No tragar. Retira los restos de STIX una vez realizados los agujeros. No se deben introducir los Stix en nariz u orejas. Si por accidente se ingiere un número importante de Stix, o se
introducen en nariz u orejas, consulte inmediatamente con un médico. Lleve las instrucciones y algunos Stix consigo. Los juguetes contienen bordes cortantes funcionales e inaccesibles.
No se debe introducir el dedo en las distintas unidades Cutie Stix. No se deben desmontar las unidades de corte y perforación. En ningún caso debe abrirse la puerta de seguridad del taller
de perforado mientras se está utilizando. Aunque detecte un problema de funcionamiento, no intente reparar la unidad. Se recomienda retirar bien todos los complementos de plástico y los
demás elementos de protección que no forman parte del juguete antes de dárselo al niño. Conservar las instrucciones. Los colores y los adornos pueden variar.
ï
Avvertenza! Non adatto a bambini di età inferiore a 36 mesi. Contiene piccole parti. Rischio di soffocamento. Messaggio per i genitori: Leggere le istruzioni in presenza del
bambino prima dell'utilizzo, attenersi a quanto letto e conservare come riferimento futuro. Non lasciare i pezzi del gioco alla portata di bambini con età inferiore ai 6 anni. Da utilizzare con
la sorveglianza di un adulto. Non inghiottire. Eliminare bene l'eccesso di STIX una volta perforati gli STIX. Non introdurre gli Stix nel naso o nelle orecchie. Se si inghiottiscono tanti Stix o se
uno Stix viene inserito nel naso o nelle orecchie, consultare immediatamente un medico. Portare con sé le istruzioni e qualche Stix. Questi elementi da gioco contengono dei bordi taglienti
funzionali e inaccessibili. Non inserire mai le dite nei diversi apparecchi Cutie Stix. Non smontare mai i laboratori di taglio e perforazione. Non aprire mai lo sportello di sicurezza del
laboratorio di perforatura in fase di utilizzo. In caso si rilevasse un problema funzionale, non provare a riparare l'apparecchio. Si raccomanda di rimuovere tutte le fascette in plastica e gli
altri elementi protettivi che non fanno parte del giocattolo prima di darlo al bambino. Informazioni da conservare. I colori e le decorazioni possono variare.

Message aux parents : Avant de commencer, lisez attentivement la notice d’utilisation avec l’enfant. Vous
pourrez également visionner un tutoriel vidéo en scannant le code QR ou en vous rendant sur www.lansay.fr.
Ê
Message to parents: Prior to starting, carefully read the instructions with the child. You can also watch a video
tutorial by scanning the QR code or by visiting the Lansay website at www.lansay.fr.

Bericht aan de ouders:
Lees de gebruiksaanwijzing aandachtig met het kind voordat u begint. U kunt ook een instructievideo bekijken door
de QR-code te scannen of door naar www.lansay.fr te gaan.

Mitteilung an die Eltern: Lesen Sie die Gebrauch-
sanweisung sorgfältig mit Ihrem Kind, bevor Sie beginnen. Sie können sich auch eine Video-Anleitung ansehen,
indem Sie den QR-Code scannen oder auf die Website www.lansay.fr gehen.
∑
Mensaje para los padres: Antes
de empezar,leed con atención las instrucciones con el niño/a. También podéis consultar el videotutorial escaneando
el código QR o visitando la página www.lansay.fr.
ï
Messaggio per i genitori: Prima di inizare, leggere attentam-
ente il foglietto illustrativo con il bambino. Si può inoltre visionare un video tutorial scansionando il codice QR o
visitando il sito www.lansay.fr.
NOTICE
112 quai de Bezons
95100 Argenteuil - FRANCE
www.lansay.fr
© 2020 Lansay SAS
MONSTER HIGH™ and associated trademarks and trade dress are owned by,
and used under license from, Mattel, ©2023 Mattel.
8+
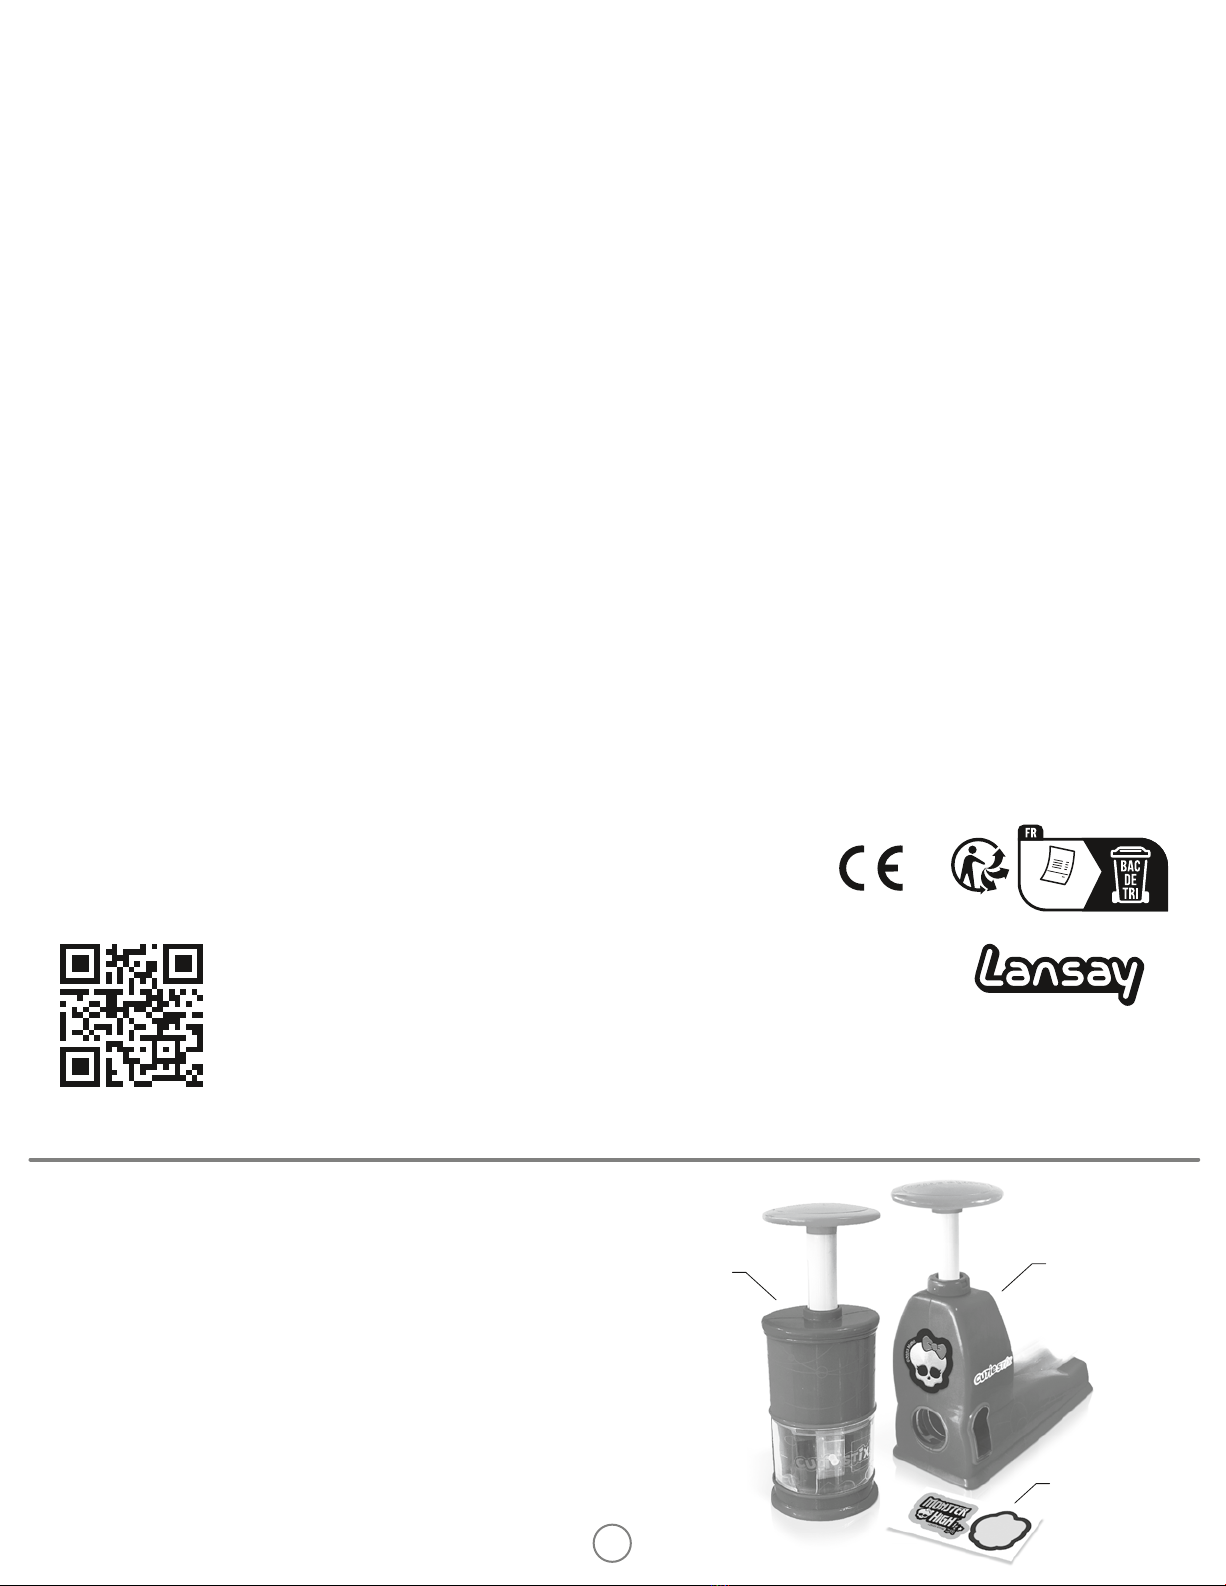
 Colle les autocollants Monster High sur ta machine à couper et à percer.
Ê Attach the Monster High stickers to your cutting and coring units.
 Plak de stickers van Monster High op je snij- en prikapparaat.
 Klebe die Monster High-Aufkleber auf deine Werkzeuge zum Schneiden und Bohren.
 Decora tu unidad de corte y perforado con las pegatinas Monster High.
ï Incolla gli adesivi Monster High sul tuo apparecchio per tagliare e perforare.
AVANT DE COMMENCER / BEFORE YOU BEGIN
VOORDAT JE BEGINT / BEVOR DU BEGINNST
ANTES DE EMPEZAR / PRIMA DI INIZIARE
ATELIER DE DÉCOUPE
CUTTING UNIT
SNIJMACHINE
SCHNEIDATELIER
UNIDAD DE CORTE
LABORATORIO DI TAGLIO
ATELIER DE PERÇAGE
CORING UNIT
GAATJESDRUKKER
ATELIER ZUM DURCHBOHREN
UNIDAD DE PERFORADO
LABORATORIO DI FORATURA
PLANCHE D’AUTOCOLLANTS
SHEET OF STICKERS
STICKERVEL
BOGEN MIT AUFKLEBERN
HOJA DE PEGATINAS
FOGLIO DI ADESIVI
2
STIX
COUPE / CUT / SNIJDEN
ZUSCHNITT / CORTE / TAGLIO
STIX
MOULE DE DÉCOUPE / CUTTING MOLD
SNIJVORMPJE / SCHNEIDFORM
MOLDE DE CORTE / STAMPO DA TAGLIO
 Insère le moule de découpe (Grands ou Moyens STIX) dans l’atelier de découpe.
Ê Insert the cutting mold (Large and Medium STIX) in the cutting unit.
 Plaats het snijvormpje (Mighties of Cuties) in de snijmachine.
 Setze die Schneidform (für Große oder Mittlere STIX) in das Schneidatelier ein.
 Introduce el molde de corte (Stix Grandes o Medianos) en la unidad de corte.
ï Inserisci lo stampo da taglio (STIX Grandi o Medi) nel relativo laboratorio.
 Insère bien le STIX grâce à la baguette. Assure-toi de bien pousser le STIX
jusqu’au fond afin d’obtenir une coupe parfaite.
Ê Insert the STIX properly using the stick. Make sure you push the STIX right to
the bottom to get a perfect cut.
 Druk goed aan met behulp van het aanduwstokje. Zorg ervoor dat de STIX
helemaal op de bodem van het vormpje liggen. Zo krijg je namelijk de mooiste
parelvorm.
 Führe den STIX richtig mit dem Stab ein. Drücke den STIX ganz nach unten,
damit der Schnitt perfekt wird.
 Introduce bien el STIX ayudándote con la varilla. Comprueba que has empujado
el STIX hasta el fondo para obtener un corte perfecto.
ï Inserisci bene lo STIX aiutandoti con la bacchetta. Assicurati di spingere bene
lo STIX fino in fondo per ottenere un taglio perfetto.
 Presse le bouton poussoir vers le
bas pour couper le STIX.
Ê Press the push button down to
cut the STIX.
 Druk de blauwe knop naar
beneden om je STIX te snijden.
 Drücke den Kolben nach unten,
um den STIX zu zerschneiden.
 Empuja el botón hacia abajo
para cortar el STIX.
ï Premi il pulsante verso il basso
per tagliare lo STIX.
 APRÈS CHAQUE COUPE : incline l’atelier de découpe afin de faire sortir la coupe
et le reste du STIX.
Ê AFTER MAKING EACH CUT: tilt the cutting unit to take out the cut STIX and
the remainder.
 NA ELKE SNIJBEWEGING: kantel de snijmachine om de snijvorm uit de machine
te halen samen met de rest van de STIX.
 NACH JEDEM SCHNITT: Hebe das Schneidatelier an einer Seite an, um das
geschnittene Stück und den Rest des STIX herauszuholen.
 DESPUÉS DE CADA CORTE: inclina la unidad de corte para hacer salir el corte, y
el sobrante de STIX.
ï FOPO OGNI TAGLIO: inclina il laboratorio da taglio fino a far uscire il pezzo tagliato
e lo STIX rimanente.
1
 Introduis le STIX de ton choix dans le moule.
Ê Place the STIX you want to use in the mold.
 Leg de STIX die je wilt snijden, in het vormpje.
 Lege den STIX deiner Wahl in die Form.
 Introduce el STIX de tu elección en el molde.
ï Inserisci lo STIX che desideri nello stampo.
2
COUPE TES STIX POUR RÉALISER TES PERLES / CUT YOUR STIX TO MAKE YOUR BEADS
SNIJD DE STIX EN MAAK PARELS / SCHNEIDE DEINEN STIX ZURECHT, UM PERLEN HERZUSTELLEN
CORTA LOS STIX PARA OBTENER TUS ABALORIOS / TAGLIA GLI STIX PER REALIZZARE LE TUE PERLINE
34
5
BONNE INSERTION / PROPERLY INSERTED
GOED AANGEDRUKT / RICHTIG EINGEFÜHRT
BIEN INSERTADO / INSERIMENTO CORRETTO
MAUVAISE INSERTION / WRONGLY INSERTED
NIET GOED AANGEDRUKT / FALSCH EINGEFÜHRT
MAL INSERTADO / INSERIMENTO SCORRETTO
BAGUETTE / STICK
RING / STAB
VARILLA / BACCHETTA
3
ORIENTATION DE LA BOÎTE / BOX DIRECTION / PLAATSING VAN HET SNIJDOOSJE
AUSRICHTUNG DER BOX / CÓMO COLOCAR LA CAJA / ORIENTAMENTO DELLA SCATOLA
3 4
1
2
PERÇAGE DES GRANDS STIX (GRAND TROU)
DRILLING LARGE STIX (LARGE HOLE)
GEPERFOREERDE MIGHTIES (GROOT GAATJE)
DURCHBOHREN DER GROSSEN STIX (GROSSES LOCH)
PERFORAR STIX GRANDES (AGUJERO GRANDE)
FORATURA DEGLI STIX GRANDI (FORO GRANDE)
PERÇAGE DES MOYENS STIX (PETIT TROU)
DRILLING MEDIUM STIX (SMALL HOLE)
GEPERFOREERDE CUTIES (KLEIN GAATJE)
DURCHBOHREN DER MITTLEREN STIX (KLEINES LOCH)
PERFORAR STIX MEDIANOS (AGUJERO MEDIANO)
FORATURA DEGLI STIX MEDI (FORO PICCOLO)
TROU LATÉRAL (VERTICAL)
SIDE HOLE (VERTICAL)
GAATJE AAN DE ZIJKANT (VERTICAAL)
LOCH SEITLICH (VERTIKAL)
AGUJERO LATERAL (VERTICAL)
FORO LATERALE (VERTICALE)
TROU CENTRAL (HORIZONTAL)
CENTRE HOLE (HORIZONTAL)
GAATJE IN HET MIDDEN (HORIZONTAAL)
LOCH MITTIG (HORIZONTAL)
AGUJERO CENTRAL (HORIZONTAL)
FORO CENTRALE (ORIZZONTALE)
 Sélectionne la boîte adaptée à la taille de la coupe de ton STIX.
Ê Select the box which matches the cutting size of your STIX.
 Kies het snijdoosje die past bij de afmetingen van jouw STIX.
 Wählen die Box aus, die zu der Schnittgröße deines STIX passt.
 Selecciona la caja del tamaño adecuado al tamaño de tu STIX.
ï Seleziona la scatola più adatta alle dimensioni del taglio dello STIX.
Ouvre le couvercle de la boîte, insère la coupe de STIX et referme la
boîte (l’exemple correspond à un Grand STIX).
ÊOpen the box lid, insert the cut STIX and close the box (the example
shows a Large STIX).
 Open het deksel van het snijdoosje en stop het snijvompje erin.
Sluit het doosje weer (op de afbeelding zie je het doosje voor de
mighties, de Grote STIX).
 Öffne den Deckel der Box, setze den zurechtgeschnittenen STIX ein
und schließe die Box (das Beispiel zeigt einen Großen STIX).
 Abre la tapa de la caja, introduce el STIX cortado y cierra la caja (en
el ejemplo se ve un STIX Grande).
ïApri il coperchio della scatola, inserisci lo STIX tagliato e richiudi la
scatola (l’esempio illustrato corrisponde a uno STIX Grande).
 Ouvre la porte de l’atelier de perçage.
Ê Open the coring unit door.
 Open het deurtje van de gaatjesdrukker.
 Öffne die Klappe des Ateliers zum Durchbohren.
 Abre la puerta de la unidad de perforado.
ï Apri lo sportello del laboratorio di foratura.
 L’emplacement du trou de ton STIX coupé (central ou latéral) est déterminé par l’orientation choisie lors
de l’insertion de la boîte dans l’atelier de perçage.
Ê The hole made in your cut STIX (in the centre or on the side) depends on which way round you insert the
box into the coring unit.
 Waar het gaatje in jouw gesneden STIX komt (in het midden of aan de zijkant) hangt af van hoe je het
snijdoosje in de gaatjesdrukker plaatst.
 Die Position des Lochs im zurechtgeschnittenen STIX (mittig oder seitlich) wird durch die Ausrichtung der
Box bestimmt, während sie in das Atelier zum Durchbohren eingelegt wird.
 El agujero del STIX (central o lateral) se determina en función del sentido en el que introduzcas la caja en
la unidad de perforado.
ï La posizione del foro dello STIX tagliato (centrale o laterale) è determinata dall'orientamento scelto
durante l'inserimento della scatola nel laboratorio di foratura.
 Presse le bouton poussoir vers le
bas pour couper le STIX.
Ê Press the push button down to
cut the STIX.
 Druk de blauwe knop naar
beneden om je STIX te snijden.
 Drücke den Kolben nach unten,
um den STIX zu zerschneiden.
 Empuja el botón hacia abajo
para cortar el STIX.
ï Premi il pulsante verso il basso
per tagliare lo STIX.
 APRÈS CHAQUE COUPE : incline l’atelier de découpe afin de faire sortir la coupe
et le reste du STIX.
Ê AFTER MAKING EACH CUT: tilt the cutting unit to take out the cut STIX and
the remainder.
 NA ELKE SNIJBEWEGING: kantel de snijmachine om de snijvorm uit de machine
te halen samen met de rest van de STIX.
 NACH JEDEM SCHNITT: Hebe das Schneidatelier an einer Seite an, um das
geschnittene Stück und den Rest des STIX herauszuholen.
 DESPUÉS DE CADA CORTE: inclina la unidad de corte para hacer salir el corte, y
el sobrante de STIX.
ï FOPO OGNI TAGLIO: inclina il laboratorio da taglio fino a far uscire il pezzo tagliato
e lo STIX rimanente.
PERCE TES STIX POUR RÉALISER TES PERLES / DRILL YOUR STIX TO MAKE YOUR BEADS
BOOR EEN GAATJE IN DE STIX EN MAAK PARELS / DURCHBOHRE DEINEN STIX, UM PERLEN HERZUSTELLEN
AGUJEREA TUS STIX PARA CONVERTIRLOS EN ABALORIOS / FORA GLI STIX PER REALIZZARE LE TUE PERLINE
4
ORIENTATION HORIZONTALE / HORIZONTAL DIRECTION
HORIZONTALE POSITIONERING / HORIZONTAL
ORIENTACIÓN HORIZONTAL / ORIENTAMENTO ORIZZONTALE
ORIENTATION VERTICALE / VERTICAL DIRECTION
VERTICALE POSITIONERING / VERTIKAL
ORIENTACIÓN VERTICAL / ORIENTAMENTO VERTICALE
5
OU / OR / OF / ODER / O / O
EXEMPLE / EXAMPLE / VOORBEELD / BEISPIEL / EJEMPLO / ESEMPIO
 Insère la boîte à la verticale dans l’atelier de perçage pour un trou latéral.
Ê Inserts the box vertically in the coring unit for a side hole.
 Schuif het doosje verticaal in de gaatjesdrukker als je een gaatje aan de zijkant wilt.
 Lege die Box vertikal in das Atelier zum Durchbohren ein, um ein Loch an der Seite zu erhalten.
 Introduce la caja en sentido vertical en la unidad de perforado si quieres un agujero lateral.
ï Inserisci la scatola verticalmente nel laboratorio di foratura per un foro laterale.
 L’ORIENTATION EST VERTICALE : le perçage va donc s’effectuer sur la longueur de ton STIX coupé (trou latéral).
Ê THE DIRECTION IS VERTICAL: the drill hole will therefore be made along the length of your cut STIX (side hole).
 ALS HET DOOSJE VERTICAAL STAAT: zal het gaatje over de lengte van de gesneden STIX komen
(gaatje aan de zijkant).
 VERTIKALE AUSRICHTUNG: Das Loch wird längs des geschnittenen STIX gebohrt (seitliches Loch).
 EN SENTIDO VERTICAL: el perforado va a realizarse a lo largo de tu STIX (agujero lateral).
ï L’ORIENTAMENTO È VERTICALE: la foratura deve essere quindi effettuata sulla lunghezza dello STIX tagliato
(foro laterale).
 Insère la boîte à l’horizontale dans l’atelier de perçage pour un trou central.
Ê Insert the box horizontally in the coring unit for a central hole.
 Schuif het doosje horizontaal in de gaatjesdrukker als je een gaatje in het midden wilt.
 Lege die Box horizontal in das Atelier zum Durchbohren ein, um ein Loch in der Mitte zu erhalten.
 Introduce la caja en sentido horizontal en la unidad de perforado si quieres un agujero en el centro.
ï Inserisci la scatola orizzontalmente nel laboratorio di foratura per un foro centrale.
5
8
7
6
 NOTE : le perçage s’effectue uniquement si la porte est correctement fermée. Ne jamais ouvrir cette porte pendant le perçage.
Ê NOTE: Drilling is only carried out if the door is correctly closed. Never open this door during drilling.
 WAARSCHUWING: de perforatie gebeurt alleen als het deurtje goed gesloten is.
Open het deurtje nooit als je nog aan het gaatjes drukken bent.
 HINWEIS: Das Durchbohren ist nur bei ordnungsgemäß geschlossener Klappe möglich. Diese Klappe niemals während
des Durchbohrens öffnen.
 AVISO: el perforado solo puede realizarse si la puerta está correctamente cerrada. En ningún caso debe abrirse la puerta durante
el perforado.
ï NOTA BENE: la foratura può essere effettuata solo se lo sportello è correttamente chiuso. Non aprire mai lo sportello durante la foratura.
CONSEIL : pour les Grands STIX, renouvelle l’opération en pressant une seconde fois pour assurer un perçage
complet de ta perle.
Ê TIP: for Large STIX, press down a second time to ensure your bead is completely drilled.
 TIP: voor de mighties (de Grote STIX) kan je best nogmaals drukken om zeker te zijn dat je parel goed is
geperforeerd.
 TIPP: Wiederhole bei den Großen STIX den Vorgang ein zweites Mal, damit die Perle ganz sicher vollständig
durchbohrt wird.
 CONSEJO: con los STIX Grandes repite la operación y empuja el botón una segunda vez para estar seguro de que
se agujerea completamente el abalorio.
ï CONSIGLIO: per gli STIX Grandi, ripeti l'operazione premendo una seconda volta per assicurarti una foratura
completa della perlina.
 Ferme la porte de l’atelier de perçage.
Ê Close the coring unit door.
 Sluit het deurtje van de gaatjesdrukker.
 Schließe die Klappe des Ateliers zum Durchbohren.
 Cierra la puerta de la unidad de perforado.
ï Chiudi lo sportello del laboratorio di foratura.

Ouvre la porte de l’atelier de perçage et récupère la boîte
contenant ta perle.
Ê
Open the door of the coring unit and take out the box
containing your bead.
 Open het deurtje van de gaatjesdrukker en verwijder het
doosje met jouw parel erin.
 Öffne die Klappe des Ateliers zum Durchbohren und
entnimm die Box mit der Perle.
 Abre la puerta de la unidad de perforado y recupera la caja
con tu abalorio.
ï Apri lo sportello del laboratorio di foratura e recupera la
scatola che contiene la perlina.
 Presse fermement le bouton poussoir. Tu obtiens une jolie perle !
Ê Press the push button down firmly. You get a pretty bead!
 Druk de blauwe knop stevig in. Ziezo, je mooie parel is klaar!
 Drücke den Kolben kräftig nach unten. Fertig ist die hübsche Perle!
 Empuja firmemente el botón. ¡Obtendrás un hermoso abalorio!
ï Spingi con forza sul pulsante. Otterrai così una bellissima perlina!
6
 Ouvre la boîte et récupère ta perle.
Ê Open the box and take out your bead.
 Open nu het doosje en haal je parel eruit.
 Öffne die Box und entnimm die Perle.
 Abre la caja y recupera tu abalorio.
ï Apri la scatola e recupera la tua perlina.

Si tu as fini de percer toutes tes perles, stocke les deux boîtes plastiques dans ton atelier de perçage.
Ê
If you have finished drilling all your beads, store both plastic boxes in your coring unit.
 Als je al jouw parels hebt geperforeerd, kan je de twee doosjes in jouw gaatjesdrukker opbergen.
 Wenn du alle Perlen durchbohrt hast, bewahre die beiden Plastikboxen in deinem Atelier zum Durchbohren auf.
 Si has terminado de agujerear todos tus abalorios, guárdalos en las dos cajas de plástico de tu unidad de corte.
ï Se hai finito di forare tutte le perline, riponi le due scatole in plastica nel tuo laboratorio di foratura.
 Utilise la tige poussoir pour retirer le surplus de STIX de ta perle. Bien jeter les surplus de STIX une fois les STIX percés.
Ê Use the push rod to remove the excess STIX from your bead. Throw away the excess STIX once the STIX are drilled.
 Gebruik de drukknop om de restjes STIX van je parel te verwijderen. Gooi de restjes STIX weg als ze al doorboord zijn.
 Verwende den Stößel, um den Rest des STIX zu entfernen. Der überschüssige Rest der STIX ist nach dem Durchbohren zu entsorgen.
 Utiliza el enhebrador para retirar el sobrante de STIX de tu abalorio. Retira los restos de STIX una vez realizados los agujeros.
ï Utilizza l'asticella per togliere l'eccesso di STIX dalla perlina. Eliminare bene l'eccesso di STIX una volta perforati gli STIX.
11
10
9
FACE AVANT / FRONT SIDE / VOORKANT
VORDERSEITE / PARTE DELANTERA / LATO ANTERIORE
FACE ARRIÈRE / REAR SIDE / ACHTERKANT
RÜCKSEITE / PARTE TRASERA / LATO POSTERIORE
7
 Ouvre la boîte et récupère ta perle.
Ê Open the box and take out your bead.
 Open nu het doosje en haal je parel eruit.
 Öffne die Box und entnimm die Perle.
 Abre la caja y recupera tu abalorio.
ï Apri la scatola e recupera la tua perlina.
4
5
1
2
3
 Coupe une longueur de fil correspondant à ta réalisation. Utilise une paire de ciseaux sécurisée (non incluse).
La supervision d’un adulte est recommandée.
Ê Cut a length string long enough for the jewelry you want to create. Use a pair of safety scissors (not included).
Adult supervision is recommended.
 Snij een deel van de draad af volgens de lengte nodig voor wat je maakt. Gebruik een veilige schaar
(niet meegeleverd). Toezicht van een volwassene is aanbevolen.
 Schneide den Faden in der Länge ab, die du für deine Kreation benötigst. Verwende eine kindersichere Schere (nicht im Lieferumfang enthalten).
Die Aufsicht eines Erwachsenen wird empfohlen.
 Corta el largo de hilo que corresponda con la pieza que vas a realizar. Utiliza unas tijeras de seguridad (no incluidas).
Se recomienda la supervisión de un adulto.
ï Taglia il filo della lunghezza corrispondente alla tua creazione. Utilizza un paio di forbici sicure (non incluse).
Si consiglia la supervisione da parte di un adulto.
 Enfile les STIX sur ton fil.
Ê Thread the STIX on the string.
 Rijg de STIX op de draad.
 Führe den Faden durch die STIX.
 Enfila los STIX en el hilo.
ï Infila gli STIX sul filo.
 Insère le premier embout du fermoir, fais un double nœud et tire le fil afin qu’il se coince dans le fermoir.
Ê Insert the first half of the clasp, tie a double knot and pull the string until it catches in the clasp.
 Steek het ene uiteinde in de sluiting, maak een dubbele knoop en trek aan de daad tot hij in de sluiting vastzit.
 Führe den Faden durch das erste Ende des Verschlusses, binde einen Doppelknoten und ziehe dann den Faden so durch, dass er im Verschluss stecken bleibt.
 Pasa el hilo por el cierre, haz un doble nudo y tira hasta que se quede bien enganchado en el cierre.
ï Inserisci la prima estremità del fermaglio, fai un doppio nodo e tira il filo fino a quando resterà bloccato nel fermaglio.
 Ta création terminée, insère le deuxième embout du fermoir, fais un double nœud et tire sur le fil afin qu’il se coince dans le fermoir.
Ê Once you are done, insert the second half of the clasp, tie a double knot and pull the string until it catches in the clasp.
 Als het juweel klaar is, steek dan het andere uiteinde in de sluiting, maak een dubbele knoop en trek aan de daad tot hij in de sluiting vastzit.
 Sobald deine Kreation fertig ist, führe den Faden durch das zweite Ende des Verschlusses, binde einen Doppelknoten und ziehe dann den Faden so durch, dass er im
Verschluss stecken bleibt.
 Cuando hayas terminado tu creación, enfila el otro extremo del cierre, haz un doble nudo, y tira para que se quede encajado en el cierre.
ï Una volta terminata la creazione, inserisci la seconda estremità del fermaglio, fai un altro doppio nodo e tira il filo fino a bloccarlo nel fermaglio.
 Coupe le surplus de fils aux deux extrémités, si besoin.
Ê Cut the excess thread at both ends, if necessary.
 Snijd eventuele overtollige draad aan de uiteinden weg.
 Schneide das Band an beiden Enden ab, wenn es zu lang sein sollte.
 Corta el exceso de hilo en los dos extremos si fuese necesario.
ï Taglia l'eccesso di filo alle due estremità, se necessario.
 Joins les deux fermoirs pour fermer ta réalisation.
Ê Attach the two clasps to close your creation.
 Verbind de twee sluitingen om je eigen juweel te sluiten.
 Stecke beide Verschlussteile zusammen, um deine Kreation zu schließen.
 Une los dos cierres y podrás cerrar tu creación.
ï Unisci i due fermagli per chiudere la tua creazione.
ASSEMBLE TES BIJOUX / ASSEMBLE YOUR JEWELRY / MAAK JE EIGEN JUWELEN
SETZE DEINEN SCHMUCK ZUSAMMEN / FABRICA TUS JOYAS / MONTA I GIOIELLI
BRACELET / BRACELET / ARMBAND
ARMBÄND / PULSERA / BRACCIALE : 17 cm
COLLIER / NECKLACE / HALSSNOER
HALSKETTE / COLLAR / COLLANA : 50 cm
6
8

This manual suits for next models

1

Other Lansay Toy manuals

Lansay Disney Frozen II My Light-Up Glitter Globe User manual

Lansay

Lansay Disney Frozen II My Light-Up Glitter Globe User manual

Lansay ZAG HEROEZ Miraculous Pixelo User manual

Lansay

Lansay ZAG HEROEZ Miraculous Pixelo User manual

Lansay PIXELO Metallic User manual

Lansay

Lansay PIXELO Metallic User manual

Lansay FABRIKID 15250 User manual

Lansay

Lansay FABRIKID 15250 User manual

Lansay REPRO MAGIC 2IN1 Operation and maintenance manual

Lansay

Lansay REPRO MAGIC 2IN1 Operation and maintenance manual

Lansay Mini Licious 17846 User manual

Lansay

Lansay Mini Licious 17846 User manual

Lansay minideices 17865 User manual

Lansay

Lansay minideices 17865 User manual

Lansay mini delices User manual

Lansay

Lansay mini delices User manual

Lansay Mini-Licious User manual

Lansay

Lansay Mini-Licious User manual

Lansay Mini-Délices 17880 User manual

Lansay

Lansay Mini-Délices 17880 User manual

Lansay Glitterizz My Electronic Glitter Studio User manual

Lansay

Lansay Glitterizz My Electronic Glitter Studio User manual

Lansay Fabrikid User manual

Lansay

Lansay Fabrikid User manual

Lansay mini delices 17904 User manual

Lansay

Lansay mini delices 17904 User manual

Lansay Disney Frozen II My light-up jewellery User manual

Lansay

Lansay Disney Frozen II My light-up jewellery User manual

Lansay BLOpens fashion User manual

Lansay

Lansay BLOpens fashion User manual

Lansay Peche aux Canards User manual

Lansay

Lansay Peche aux Canards User manual

Lansay mini licious User manual

Lansay

Lansay mini licious User manual

Lansay Mini-Délices 17846 User manual

Lansay

Lansay Mini-Délices 17846 User manual

Lansay Pixelo 20272 User manual

Lansay

Lansay Pixelo 20272 User manual

Lansay mini-licious 17903 User manual

Lansay

Lansay mini-licious 17903 User manual

Lansay BLOpens User manual

Lansay

Lansay BLOpens User manual

Popular Toy manuals by other brands

iTOUCH Playzoom Snapcam Duo quick start guide

iTOUCH

iTOUCH Playzoom Snapcam Duo quick start guide

Elenco Electronics EP-50 user guide

Elenco Electronics

Elenco Electronics EP-50 user guide

Mattel Disney Pixar Cars DOUBLE DECKER SPEEDWAY instructions

Mattel

Mattel Disney Pixar Cars DOUBLE DECKER SPEEDWAY instructions

Wild Planet SpyGear LAZER TRIPWIRE manual

Wild Planet

Wild Planet SpyGear LAZER TRIPWIRE manual

REVELL REXX user manual

REVELL

REVELL REXX user manual

Faller 272573 quick start guide

Faller

Faller 272573 quick start guide

Eduard Albacore quick start guide

Eduard

Eduard Albacore quick start guide

Costway TY327955 user manual

Costway

Costway TY327955 user manual

Eduard F-100C quick start guide

Eduard

Eduard F-100C quick start guide

Fisher-Price Guitar user manual

Fisher-Price

Fisher-Price Guitar user manual

Hasbro TRANSFORMERS BOTBOTS E4139 Quick assembly guide

Hasbro

Hasbro TRANSFORMERS BOTBOTS E4139 Quick assembly guide

LEGO CHIMA 70200 instructions

LEGO

LEGO CHIMA 70200 instructions

Crayola Art-To-Go Rainbow Easel instruction manual

Crayola

Crayola Art-To-Go Rainbow Easel instruction manual

Fisher-Price GEO TRAX K3115 user manual

Fisher-Price

Fisher-Price GEO TRAX K3115 user manual

CIC Solar Rover Assembly & instruction manual

CIC

CIC Solar Rover Assembly & instruction manual

Eduard Yak-130 quick start guide

Eduard

Eduard Yak-130 quick start guide

Mega Construx ILLUMINATION DESPICABLE ME3 FDX85 manual

Mega Construx

Mega Construx ILLUMINATION DESPICABLE ME3 FDX85 manual

IMAGINARIUM Mini Rc Outboard Boat operating manual

IMAGINARIUM

IMAGINARIUM Mini Rc Outboard Boat operating manual

manuals.online logo
manuals.online logoBrands
  • About & Mission
  • Contact us
  • Privacy Policy
  • Terms and Conditions

Copyright 2025 Manuals.Online. All Rights Reserved.