manuals.online logo
Brands
  1. Home
  2. •
  3. Brands
  4. •
  5. Larson Electronics
  6. •
  7. Security System
  8. •
  9. Larson Electronics SPWASN-HRN-PA-ATMOD1 User manual

Larson Electronics SPWASN-HRN-PA-ATMOD1 User manual

Ver.0718-2
SPWASN-HRN-PA-AT-MOD1 Larson Electronics LLC 1
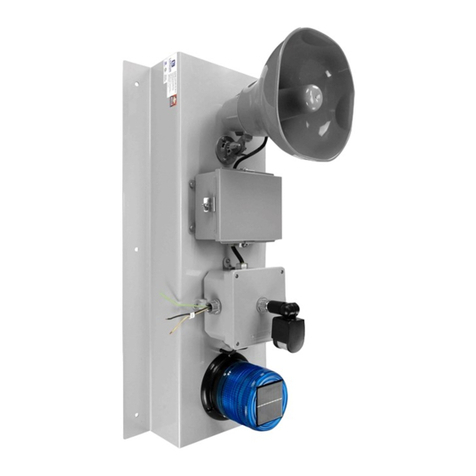
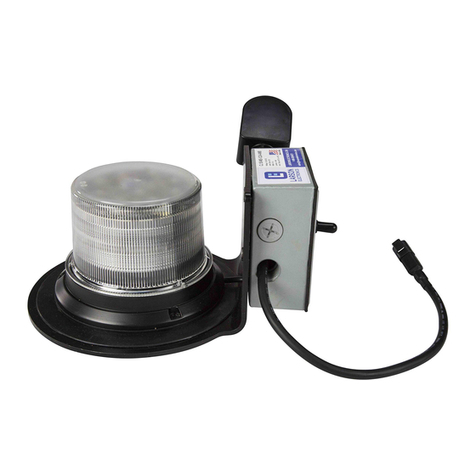
Thank you for purchasing the Larson Electronics SPWASN-HRN-PA-AT-
MOD1 solar powered LED light beacon. Follow the steps below for installing
and maintaining your unit.
IMPORTANT
READ CAREFULLY BEFORE OPERATING THIS UNIT. SAVE THESE INSTRUCTIONS FOR
FUTURE REFERENCE.
WARNING: IF UNSURE ABOUT ANY SECTION OF THESE INSTRUCTIONS, CONSULT
A QUALIFIED PROFESSIONAL TO INSTALL THIS DEVICE.
WARNING: DEVICE IS SUITABLE FOR INSTALLATION IN WET LOCATIONS.
WARNING: ALTHOUGH BEACON IS WATERPROOF, IT IS NOT DESIGNED OR
INTENDED TO BE SUBMERGED.
WARNING: DO NOT ALLOW DETACHABLE WIRES TO BECOME SUBMERGED!
•IF DROPPED OR DAMAGED, THE UNIT MAY NO LONGER BE WATERPROOF AND
SHOULD BE REPLACED.
•TO AVOID HAZARDS TO CHILDREN, ACCOUNT FOR ALL PARTS AND DESTROY
PACKING MATERIALS.
•ON SOME UNITS, THE BASE CONTAINS A MAGNET. PEOPLE WITH PACEMAKERS
SHOULD CONSULT THEIR PHYSICIAN(S) BEFORE USE. ELECTROMAGNETIC
FIELDS IN CLOSE PROXIMITY TO HEART PACEMAKER COULD CAUSE
PACEMAKER INTERFERENCE OR PACEMAKER FAILURE.
HOW SOLAR LIGHT WORKS
Solar light must be placed outdoors. The solar panel collects and converts
sunlight into DC power while the pre-installed rechargeable batteries store
the energy to power the light at night.
Solar light illumination time
It depends on the seasonal sunlight availability in your geographical area
under certain weather conditions. Stronger or longer sunlight hours enable
batteries to store more energy which provides more lighting hours. On the
contrary, weaker or shorter sunlight hours reduce the lighting hours and its
brightness as well.
Solar panel mounting locations
Solar panel must be placed outdoor at a location with its solar panel
receiving direct sunlight at least five hours each day. Shadowed locations
will not allow batteries to be fully charged and will reduce both the
brightness of the light and the lighting hours. Precautions (prior to first time
use)
1. To maximize battery capacity, the solar panel should be fully
charged by direct sunlight for five hours before initial use.
2. Under extremely cold temperatures, the batteries may not charge
fully. In such cases, the Solar Lights may not stay illuminated as
long.
MOUNTING SOLAR PANEL
This solar panel includes
a permanent mounting
system that allows for
mounting to square/round
poles or flat surfaces such
as a wall or post shown in
figure 1.
Position the solar panel in
a location that receives
the maximum amount of
sunlight throughout the
day. This may need adjusted depending on the season. With pole mounting,
loosen the adjustment bolts to fit solar panel onto pole. Once mounted,
tighten bolts snug to secure panel to pole. For surface mounting, remove
additional plate and use the existing mounting holes to mount directly to
surface.
MOUNTING HORN
Connect the speaker to the horn with #14 AWG wire minimum to obtain full
performance. Wiring length should be limited to 200 feet. Longer wire
lengths require increased wire gauge.
The metal cabinet must be grounded and may be mounted in either a
horizontal or vertical position.
MULTI-SOUND SIREN MODULE
WARNING: Failure to follow all safety precautions and instructions may
result in property damage, serious injury or death. Always disconnect power
to the Siren Amplifier prior to installation or adjustment of the Multi-sound
Siren Module.
Operation Guide
Ver.0718-2
SPWASN-HRN-PA-AT-MOD1 Larson Electronics LLC 2
The Multisound Siren Module is designed to operate with the Siren Amplifier
and the optional Channel Sound Expander. The Multisound Siren Module is
easily installed by plugging the module into the Siren Amplifier. The
designed single tone operation is selected by setting the Rotary Switch to
the corresponding number. An optional Remote Control Cable may be
purchased, which will allow for the remote operation of four of the sound
selections (please see charts below).
HORN OPERATION
Apply power to activate the Audible Horn. Use an insulated screwdriver
when adjusting the volume or selecting a sound tone. A power switch on the
solar panel will enable power to the unit.
ROTARY SWITCH OPERATION
Use the Rotary Switch to select the number corresponding with the desired
single tone. The factory default is S3. Then simply apply power to the Siren
Amplifier. For your safety, ALWAYS turn off the Siren Amplifier during
installation of the Multisound Siren Module or when adjusting the Rotary
Switch.
PROGRAMMABLE TIMER
A programmable timer ensures accurate and automated operation of once
per hour from 6:30AM to 5:30PM. Locate the controller and ensure it is set
to the current time for correct operation.
The timer is located in the solar panel. Follow the steps below to access the
timer:
1. Place the solar panel on a workbench with the lens facing down.
You will need to remove the back plate.
2. Use a 3/16” allen wrench to remove all screws securing the back
plate.
3. Lift the panel lid off revealing the timer and batteries.
Follow the steps below to set your current time.
To set the time:
1. From the Power up menu press ESC to
navigate to the Main menu.
2. Scroll down until you see the RTC Set
Option, Press OK.
3. Once in the RTC Menu press select to
begin adjusting the time.
Pressing Left/Right will change between
year, month, hour, minute. Pressing
up/down will adjust the value.
4. Once time is set, Press OK and then ESC
to navigate back to the main menu.
Once done, replace the back cover of the solar panel. Ensure it is secure
and replace all screws. Ensure there are no gaps between the back cover to
maintain weatherproofing.
TIMER TROUBLESHOOTING
Should the timer not react
accordingly, access the timer
while energized and view the
status on the LCD screen. It
should appear as FIGURE 1.
If it looks like FIGURE 2, press
the ESC key once to navigate
to the main menu (FIGURE 3).
Scroll down to the RUN option
and press OK then scroll to
YES and press OK.
MAINTENANCE
If the lens or solar panel becomes dirty, wipe down with a mild soap and
FIGURE 1
FIGURE 2
FIGURE 3
>>
Ver.0718-2
SPWASN-HRN-PA-AT-MOD1 Larson Electronics LLC 3
water solution.
Keep snow and debris clear of the solar panel so the batteries can charge. If
the panels are covered by snow or debris for an extended period of time,
allow the battery to charge in full direct sunlight for at least 5 hours for the
battery to reach its full capacity.
It is recommended to occasionally inspect the unit for any defects.
SOLAR PANEL TROUBLESHOOTING
If for any reason the LED beacon does not power on:
Batteries not fully charged: Make sure the fixture is placed in an
area where the solar panel gets the maximum amount of full, direct
sunlight every day. If the solar panel does not receive enough sunlight
during the day (e.g. due to cloudy or overcast weather conditions), it
will be recharged on the next sunny day and resume operation.
Other light sources: (For units equipped with a day/night sensor.) If
your solar light is located too close to street lights, porch lights or
other lights, the solar panel may turn off the fixture. Relocate the solar
panel or eliminate those other light sources.
Not enough direct sunlight: Ensure that the fixtures are not installed
in a shady area, for example, in the shadow of a tree or a house. If
necessary, move the fixtures to an area that gets full direct sunlight.
Switch is in the OFF position: (For units equipped with a power
switch.) Cycle power button in a dark room. The light(s) should come
on when the switch is in the on position if the unit is fully charged.
See video guide below for accessing solar panel internals
to replace batteries or adjust timer.
https://youtu.be/ytWR-AkZxqg
9419 US-HWY 175
Kemp, TX 75143 USA
P: 800-369-6671 | INTL: 903-498-3363 F: 903-498-3364
sales@larsonelectronics.com
www.larsonelectronics.com

Other Larson Electronics Security System manuals

Larson Electronics SLEDB-CL1B-MS-MT-AT-PA-12V User manual

Larson Electronics

Larson Electronics SLEDB-CL1B-MS-MT-AT-PA-12V User manual

Larson Electronics SLEDB-110V-MS-PA User manual

Larson Electronics

Larson Electronics SLEDB-110V-MS-PA User manual

Larson Electronics CL1B-MS-1227 User manual

Larson Electronics

Larson Electronics CL1B-MS-1227 User manual

Larson Electronics SLEDB-110V-6C User manual

Larson Electronics

Larson Electronics SLEDB-110V-6C User manual

Larson Electronics CL1B-MS-1224 User manual

Larson Electronics

Larson Electronics CL1B-MS-1224 User manual

Popular Security System manuals by other brands

Scolmore ESP beacon BA4ZM Installation and operation manual

Scolmore

Scolmore ESP beacon BA4ZM Installation and operation manual

Siemens FDM223-Ex Technical manual

Siemens

Siemens FDM223-Ex Technical manual

Techko Safe Pool S189A Operation manual

Techko

Techko Safe Pool S189A Operation manual

Birth Alarm Mobile Premium manual

Birth Alarm

Birth Alarm Mobile Premium manual

DSC Power632 PC1555 instruction manual

DSC

DSC Power632 PC1555 instruction manual

CSI Controls CS1200 Setup manual

CSI Controls

CSI Controls CS1200 Setup manual

Conrad EW01 Operating and safety instructions

Conrad

Conrad EW01 Operating and safety instructions

WiLife Video Security System user guide

WiLife

WiLife Video Security System user guide

Fortinet FortiAnalyzer-800 quick start guide

Fortinet

Fortinet FortiAnalyzer-800 quick start guide

Motorola PMLN6530 manual

Motorola

Motorola PMLN6530 manual

DSC Power832 installation manual

DSC

DSC Power832 installation manual

Interlogix DC107 Series Installation sheet

Interlogix

Interlogix DC107 Series Installation sheet

Teletek electronics SR 120 installation guide

Teletek electronics

Teletek electronics SR 120 installation guide

Pima HUNTER-PRO 896 installation guide

Pima

Pima HUNTER-PRO 896 installation guide

Westec FirstGuard user manual

Westec

Westec FirstGuard user manual

Jaxon XTR CARP FLEX VT Operation manual

Jaxon

Jaxon XTR CARP FLEX VT Operation manual

Kerbl 322080 user guide

Kerbl

Kerbl 322080 user guide

Panasonic AW-HE100 Brochure & specs

Panasonic

Panasonic AW-HE100 Brochure & specs

manuals.online logo
manuals.online logoBrands
  • About & Mission
  • Contact us
  • Privacy Policy
  • Terms and Conditions

Copyright 2025 Manuals.Online. All Rights Reserved.