LeapFrog BOLT User manual

LEAP FORWARD
Leapfrog 3D Printers
User Manual
Version 1.68


DEAR VALUED CUSTOMER,
Thank you for purchasing the Leapfrog Bolt 3D Printer. We strive to make our machines
as easy to use as possible, but printing 3D objects invites a lot of creativity. New
solutions and unknown problems often require the user to stretch the limits and
capabilities of their machines. This manual ensures that you will achieve the best results
with your printer.
Please take the time to read through this manual as it was designed to help you get
familiar with your new printer and get you on your way to creating great looking 3D
models.
Keep in mind also that we have an eager and experienced Technical Support Team
standing by to assist you with any questions you may have. If you are new to 3D printing,
sometimes it is better to ask before trying something you are unsure of. Our Support
Team works best through our ticketing system and regularly updated solution articles,
both found on our website under support.
We hope that you enjoy your new Bolt 3D printer, and look forward to providing
assistance in any way we can.
Sincerely,
Your Leapfrog Customer Support Team
CONTACT INFORMATION
General
+31 172 50 36 25
Support
+31 852 08 08 25
Sales
+31 172 50 36 24

4
1!USEFUL'INFORMATION' 6!
1.1!PURCHASE'INVOICE'AND'WARRANTY' 6!
1.2!SUPPORT'INFORMATION' 7!
1.3!WHAT'IS'IN'THE'BOX' 7!
1.4!UNBOXING'THE'PRINTER' 8!
1.5!ELECTRIC'POWER'CORD'COMPATIBILITY'11!
2!ABOUT'THE'BOLT'12!
2.1!BOLT'OVERVIEW'12!
2.2!BOLT'SPECIFICATIONS'13!
2.3!LEAPFROG'USER'INTERFACE'OVERVIEW'15!
3!PRINTER'SETUP'19!
3.1!SETTING'UP'ADMIN'AND'USER'ACCOUNTS'20!
3.2!CONNECTING'THE'BOLT'21!
3.3!AUTOMATIC'UPDATE'FUNCTION'22!
3.4!CALIBRATE'PRINT'BED'22!
3.5!LOADING/UNLOADING'FILAMENT'23!
3.6!ADD'MATERIAL'28!
3.7!ADHESIVE'MATERIAL'28!
4!PRINTING'29!
4.1!STARTING'PRINT'JOBS'29!
4.2!FINISHING'PRINT'JOBS'31!
4.3!USING'DIFFERENT'PRINTING'MODES'32!
4.4!INFORMATION'AVAILABLE'ON'PRINT'JOBS'33!
4.5!ACCESSING'AND'UPLOADING'PRINT'JOBS'34!
5!CREATING'A'PRINTFILE'35!
5.1!CREATR'POWERED'BY'MATERIALISE'36!
5.2!PRINTER'SELECTION'36!
5.3!IMPORT'36!
5.4!TRANSFORM'37!
5.5!SELECT'NOZZLE'37!
5.6!PRINT'38!
5.7!PREVIEW'AND'GENERATE'G-CODE'39!
6!LEAPFROG'USER'INTERFACE'40!
6.1!LEAPFROG'USER'INTERFACE'FEATURES'40!
6.2!REMOTE'ACCESS'40!
6.3!CONNECTION'THE'BOLT'USING'YOUR'NETWORK'41!
6.4!USING'THE'WEBCAM'42!
6.5!PURGE'NOZZLES'42!
6.6!MATERIALS'42!
7!PRINT'SETTINGS'44!

5
7.1!PRINT'SPEED'VS'PRINT'QUALITY'44!
7.2!MATERIAL'PROFILES'44!
7.3!PRINT'MODE'44!
7.4!SLICING'STRATEGY'45!
7.5!BUILD'STRATEGY'45!
7.6!SUPPORT'STRATEGY'45!
8!MAINTENANCE'&'TROUBLE'SHOOTING'46!
8.1!INSTALLING'UPDATES'46!
8.2!CLEANING'THE'PRINT'BED'46!
8.3!CLEANING'THE'EXTRUDERS'46!
8.4!REPLACING'THE'EXTRUDERS'46!
8.5!LEVELLING'EXTRUDERS'46!
8.6!CALIBRATE'PURGE'WIPERS'47!
9!CONTACT'&'ADDITIONAL'SUPPORT'48!
9.1!TECHNICAL'SUPPORT'INFORMATION'48!
9.2!CREATR'SOFTWARE'ASSISTANCE'49!
9.3!COMPANY'INFORMATION'50!

6
1 USEFUL INFORMATION
We would like to provide you with some useful information to prevent any problems
which may occur in the future.
1.1 PURCHASE INVOICE AND WARRANTY
We would like to kindly ask you at the beginning to make sure that you keep track of
your original purchasing invoice that Leapfrog or one of our distributors sends after
payment before the printer has been received. This invoice helps to verify the warranty
of the printer, and it allows us to match it with our records to confirm authenticity of
purchase. Please note that consumables are not within the standard warranty.
Without a copy of the printer’s original purchase invoice, the amount of support that
Leapfrog provides on technical issues may be considerably delayed and/or limited.
Therefore, it is highly recommended that you maintain this document and provide it in
any Technical Support Ticket that you may create in troubleshooting issues so that we
can provide you with the best support possible.

7
1.2 SUPPORT INFORMATION
Keep in mind also that we have a Technical Support Team standing by to assist you with
any questions you may have. If you are new to 3D printing, do not hesitate to ask for
any support.
Our Support Team works best through our ticketing system and regularly updated
solution articles, both found on our website’s Support tab. This will direct you to
support.lpfrg.com. There are a lot of solutions already available so your solution might
already be there.
If your solution is not there, then creating a support ticket is the quickest means to get
help. By clicking new support ticket, you will create a personal communication channel
between you and our support team. They will help resolve your problem as fast and
efficient as possible.
1.3 WHAT IS IN THE BOX
Bolt 3D Printer
Power cable
USB stick
Bed adherence
Safety guide
Creatr Software Voucher

8
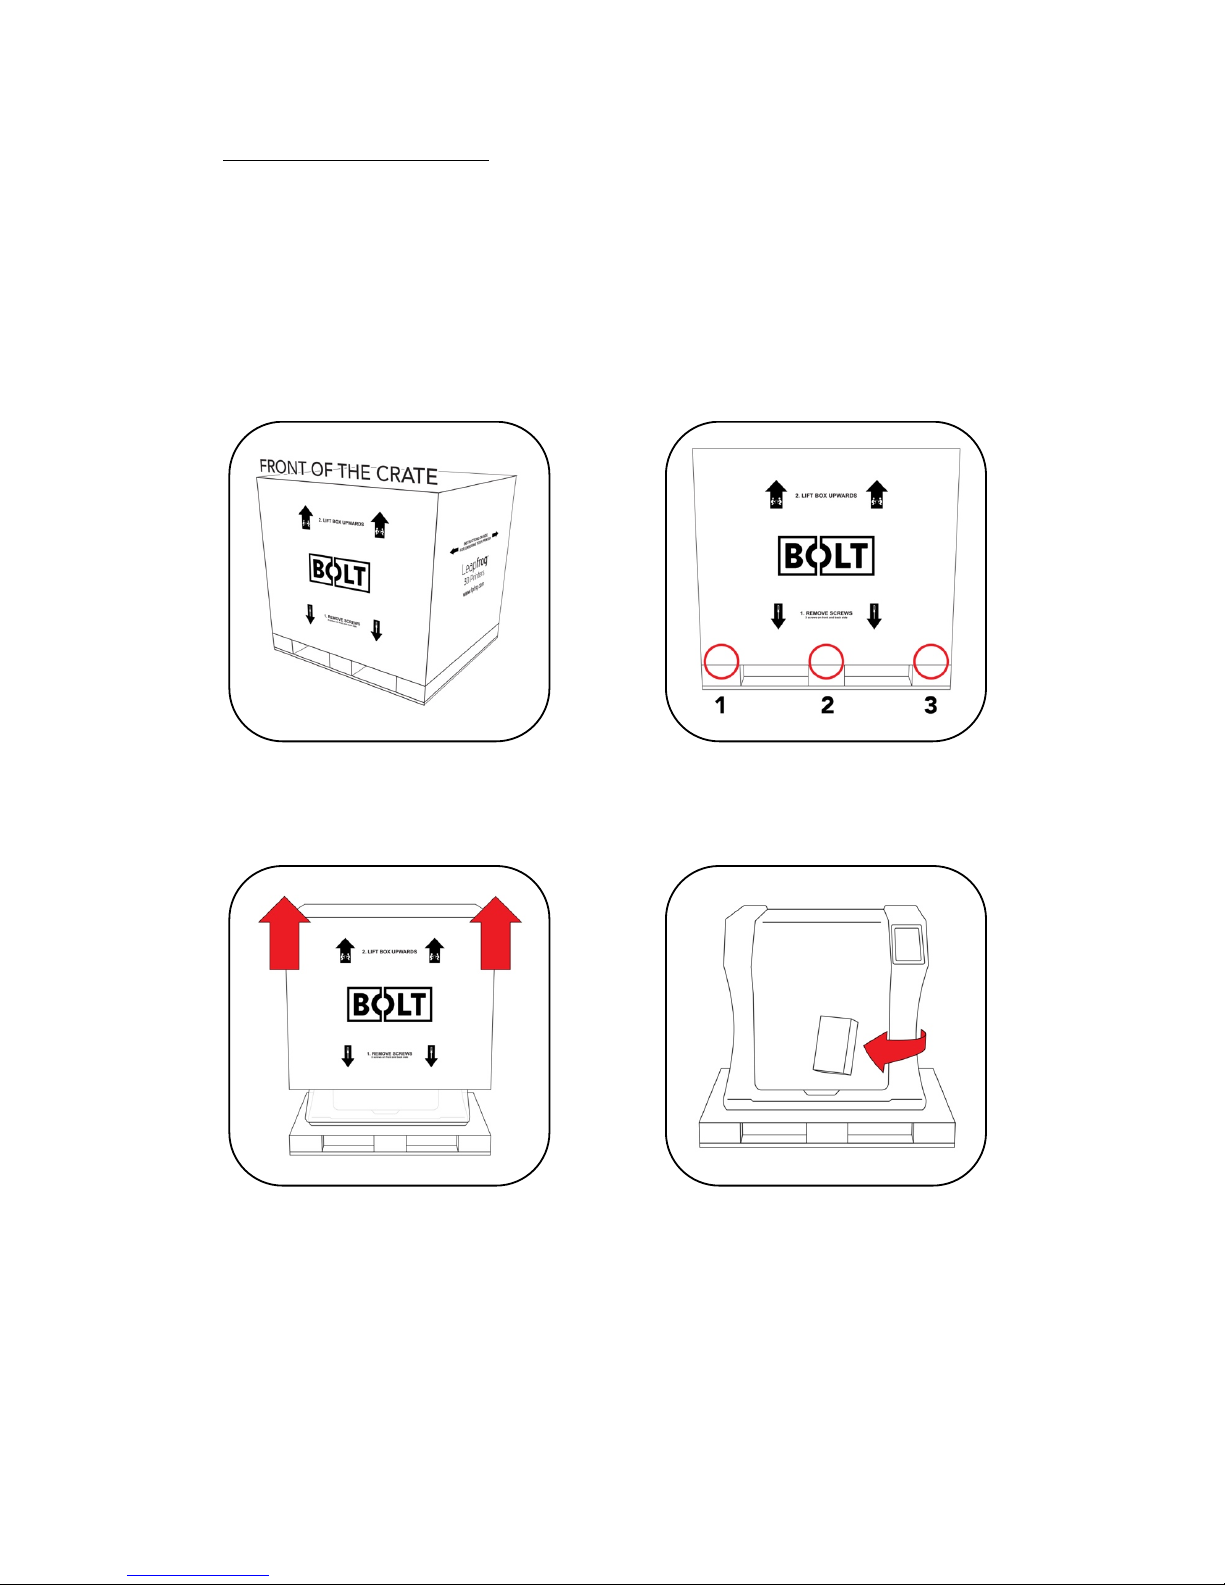
1.4 UNBOXING THE PRINTER
It is important to carefully unbox the printer according to the instructions in order not
to damage the printer. Never try to lift the printer by pulling it up on the print heads, X
or Y axis assemblies, or the print bed itself as this can throw off calibrations or possibly
even break part of the printer.
Place the box with the Box on the
ground.
3 screws can be found at the base of the
crate. Remove a total of 6 screws on the
front and the back of the crate.
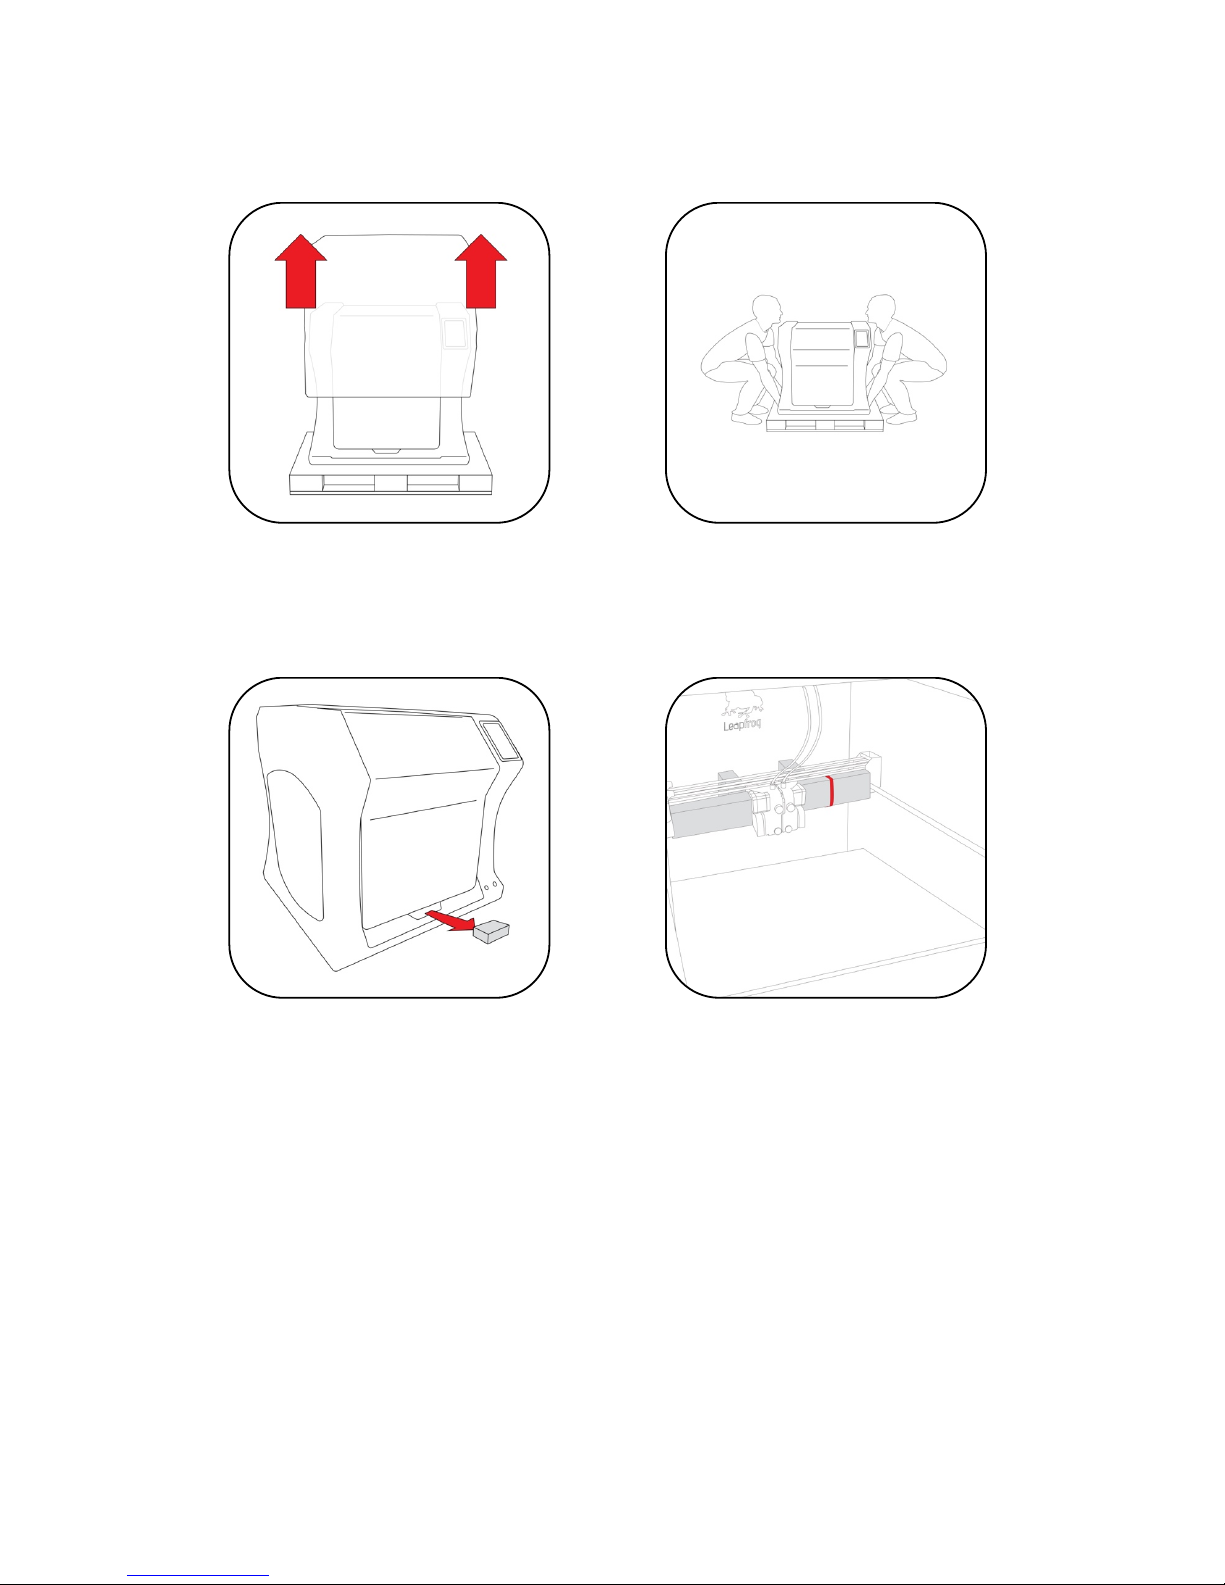
Lift the top of the box upwards with two
persons.
Remove the box containing the power
cable and other accessories.

9
Remove the cover protection on the
outside of the Bolt.
Place the Bolt securely on a table of
workbench.
Open the door and remove the piece of
foam between the Bolt and the door.
On the inside of the Bolt, cut the tie-
wrap found on the right side of the Print
heads.

10
Remove the 4 pieces of foam holding
the print heads in it is place. And
remove the piece of protection between
the two print heads.
Remove the two pieces of foam
underneath the front of the bed.
Get the power cable and plug this in the
back of the printer and plug the other
end in a grounded (!) wall outlet.
Remove any remaining foil, protecting
the exterior of the Bolt.

11
1.5 ELECTRIC POWER CORD COMPATIBILITY
Please check the power cord that came with the printer to see if the plug matches the
electrical wall outlet that your country typically uses. The Bolt has a power supply unit
that is switched-mode capable – meaning it will automatically switch between allowed
voltage input between 100 volts and 230 volts. However, make sure that the correct
power chord has been supplied along with your printer.
If this is not the case, please go to our website and open a support ticket, attaching a
copy of the printer’s original purchasing invoice and a photo of the power cable that
came with the printer; our Technical Support Team will place an order for the correct
power cable as soon as possible.
Once you have confirmed that you have the correct power cord, please connect the
power cord to the back of the Bolt in the appropriate slot and plug the other end into
a grounded (!) wall outlet. Failing to make sure that you have a grounded wall outlet
can result in the printer possibly being damaged by an electric power surge. In addition
to using a grounded power outlet, it is also recommended to use a surge protector.
At this point, you can safely turn on the power switch on the back of your printer.

12
2 ABOUT THE BOLT
2.1 BOLT OVERVIEW
1. Filament guide tube
2. Print head (one of two)
3. Print bed
4. Nozzle wiper (one of two)
5. Power switch (on the back of the Bolt)
6. Touchscreen
7. Activated HEPA Carbon filter vent
8. Filament compartment
9. On/off button and USB port

13
2.2 BOLT PRINTER HEAD OVERVIEW
1. Filament guide tube
2. Push-in coupling
3. Filament pinch wheel (used to control the grip on loaded filament)
4. Hot-end thumb screw (used to swap hot-ends tool-less)
5. Fan-duct
6. Hot-end (includes also nozzle)
7. Nozzle
8. Nozzle wipe

14
2.3 BOLT SPECIFICATIONS
Specification+
Metric+
++
Imperial+
Physical+dimensions+(DWH)+
723+
x+
831+
x+
801+
mm+
++
28.5+
x+
32.7+
x+
31.5+
inch+
Printer+weight+
61+
kg+
++
134+
lbs+
Input+voltage+range+
88-264VAC+
Input+frequency+
47+-+63+Hz+
Power+consumption+
600W+
Build+size+single+extruder+(DWH)+
320+
x+
330+
x+
205+
mm+
++
12.6+
x+
13.0+
x+
8.1+
inch+
Build+size+dual+extruder+(DWH)+
320+
x+
300+
x+
205+
mm+
++
12.6+
x+
11.8+
x+
8.1+
inch+
Build+size+replicator/mirror+mode+(DWH)+
320+
x+
164+
x+
205+
mm+
++
12.6+
x+
6.5+
x+
8.1+
inch+
Build+volume+
21.6+
L+
++
4.8+
gall.+
Heated+bed+max+temp+
90+
°C+
++
194+
°F+
Closed+chamber+
Yes+
Hot+end+Max+temp*+
360+
°C+
++
680+
°F+
Number+of+extruders+
2+
Extruder+size(s)+
0.35+
++
++
mm+
++
1.38E-02+
++
++
inch+
Filament+size+
1.75+
mm+
++
6.89E-02+
inch+
Layer+thickness+
0.05+
to+
0.35+
mm+
++
1.97E-03+
to+
1.38E-02+
inch+
Advised+printing+speed+(DW)+
6000+
mm+
min+
100+
mm+
s+
++
236+
inch+
min+
4+
inch+
s+
Max.+travel+speed+(DW)+
15000+
mm+
min+
250+
mm+
s+
++
591+
inch+
min+
10+
inch+
s+
Stepper+motors+
1.8°+Step+angle+with+1/32+micro+stepping+
Positioning+accuracy+(DW)+
0.008+
mm+
++
3.15E-04+
inch+
Positioning+accuracy+(H)+
0.010+
mm+
++
3.94E-04+
inch+
Body/frame+construction+
Aluminium+Framework+
Heated+bed+construction+
High+grade+glass+
Semi-automatic+print+bed+Z-levelling+
Yes+
Ethernet+connection+
Yes+
Wifi+connection+
Yes+
Internal+OS+
Linux+
USB+standalone+format+
.Gcode+format+
Printing+modes+
Single,+Dual+Material,+Replicator+mode,+Mirror+mode+
Open+ system+ print+ materials+ (*+
experimental)+
PLA,+ABS,+HIPS,+Flex,+Nylon,+Hybrid,+Woodfill,+PVA*,+Carbon*,+other*+
DWH:%Depth,%Width,%Height.%Coordinate%system%reference%Y,%X,%Z%
A%Low-temp%(max%250%degrees)%and%High-temp%hotend%(max%360%degrees)%is%supplied%

15
2.4 LEAPFROG USER INTERFACE OVERVIEW
PRINT TAB
1. Software refresh
2. Notifications area
3. Power power options
4. Shows information about
the selected print job.
5. Shows a preview of the
selected print job
6. Navigate to the Jobs tab to
select a print job
7. Shows the temperatures of
the nozzles and bed and
gives access to the built-in
webcam live view
8. Start a print job and select
the print mode
9. Loads the wizard to load or
unload filament for the left
and right extruder
10. Shows the current Print tab
11. Navigate to the Jobs tab
12. Navigate to the Settings tab

16
JOBS TAB
13. Software refresh
14. Notifications area
15. Power power options
16. Local and USB storage
17. Search storage
18. Sort storage
19. Filename
20. Print selected file
21. Show information on file
22. Additional information on
file.
23. Delete or copy file to USB
or local storage
24. Shows that the file is not yet
printed
25. Shows that the file is
successfully printed
26. Shows that the file wasn’t
successfully printed
27. Navigate to the Print tab
28. Shows the current Jobs tab
29. Navigate to the Settings tab

17
SETTINGS TAB
1. Software refresh
2. Notifications area
3. Power power options
4. General printer information
5. Navigate to maintenance
menu
6. Add, edit or remove
materials
7. Access built-in camera and
set/download created
timelapses
8. Add, edit or remove user
9. Connect to wireless
network and check IP
address.
10. Update the Bolt software
and firmware
11. Navigate to the Print tab
12. Navigate to the Jobs tab
13. Shows the current tab

18
SETTINGS TAB
1. Moves both print heads to
the front of the Bolt for
head maintenance
2. Moves both prints heads to
the back of the printer for
bed maintenance
3. Change the amount of
filament on the loaded
spools
4. Calibrate both extruders in
reference to each other
5. Calibrate the print bed in
reference to the nozzles
6. Purge left/right extruder
7. Close maintenance menu

19
3 PRINTER SETUP
Before you can start using the Bolt, some preparation is required. Also, be sure to read
Chapter 1.5: Electric Power Cord Compatibility.
The following chapters should be followed to make the Bolt operational and print
ready.
3.1 Setting up user accounts
3.2 Connecting the Bolt to the internet
3.3 Update the Bolt
3.4 Calibrate print bed
3.5 Load filament
3.6 Add materials (if necessary for 3.6)
3.7 Apply bed adhesive
You will be setting up admin and user accounts in order to control the amount of
privileges every user has on the Bolt
Connecting the to the internet and Wi-Fi is also highly recommended and fully use its
auto-updates and connectivity with your mobile phone and/or computer.
Calibrating the bed should be done at least once after transporting the Bolt. The wipers
will need to be check as well.
And finally filament should be loaded and the print bed should be prepared before
each print.

20
3.1 SETTING UP ADMIN AND USER ACCOUNTS
As our 3D printers are being used in shared office environments, Leapfrog 3D Printers
has designed the Bolt Software to have User accounts. Remote control will only be
accessible to users with an account and those that do have access may be limited to
what they can do based on their account settings.
Setting up an Admin account is highly recommended before providing the Bolt’s IP
address to the users in your office environment.
NOTE Replacing a forgotten password for an Admin account will be very difficult to
do, so please write it down in a location that you will be able to recover it if need be
later on.
To add a user, select the Settings tab and tap on the
Users menu option. Add a admin user and be sure
to set the check-box on green, next to Admin.
In the picture you see that user admin has
administrative privileges and ‘john’ is an active user.
To the right you see a pencil icon for editing this
user account, a key for locking the account, and a trash can for deleting the user
account.
NORMAL USERS These users can only upload files but cannot start prints from a remote
device.
ACTIVE USERS These users can upload and print, but cannot change settings from a
remote device.
ADMIN USERS Admin users can also upload and print as well as change settings on the
printer from a remote device.
Other manuals for BOLT
2
Table of contents
Other LeapFrog 3D Printer manuals

LeapFrog
LeapFrog Creatr HS User manual

LeapFrog
LeapFrog Bolt PRO User manual

LeapFrog
LeapFrog Creatr HS User manual

LeapFrog
LeapFrog Xeed User manual

LeapFrog
LeapFrog Creatr HS User manual

LeapFrog
LeapFrog 3d printer User manual

LeapFrog
LeapFrog Creatr HS User manual

LeapFrog
LeapFrog Bolt PRO User manual

LeapFrog
LeapFrog BOLT User manual

LeapFrog
LeapFrog Xeed User manual