Leica CV5030 User manual

Instruction Manual
Leica CV5030 - Robotic Coverslipper
V1.1 English - 11/2002
Alwa s keep the manual near the instrument!
Read it carefull prior to operating the instrument!
Leica CV5030
Robotic Coverslipper


3
Leica CV5030 - Robotic Coverslipper
The information, numerical data, notes and
value judgments contained in this manual rep-
resent the current state of scientific knowl-
edge and state-of-the-art technolog as we
understand it following thorough investigation
in this field.
We are under no obligation to update the
present manual according to the latest techni-
cal developments, nor to provide our custom-
ers with additional copies, updates etc. of this
manual.
For erroneous statements, drawings, techni-
cal illustrations etc. contained in this manual
we exclude liabilit as far as permissible ac-
cording to the national legal s stem applicable
in each individual case. In particular, no liabili-
t whatsoever is accepted for an financial
loss or consequential damage caused b or
related to compliance with statements or other
information in this manual.
Statements, drawings, illustrations and other
information as regards contents or technical
details of the present manual are not to be
considered as warranted characteristics of
our products.
These are determined onl b the contract
provisions agreed between ourselves and our
customers.
Leica reserves the right to change technical
specifications as well as manufacturing pro-
cesses without prior notice. Onl in this wa is
it possible to continuousl improve the tech-
nolog and manufacturing techniques used in
our products.
This document is protected under cop right
laws. An cop rights of this document are re-
tained b Leica Micros stems Nussloch
GmbH.
An reproduction of text and illustrations (or of
an parts thereof) b means of print, photo-
cop , microfiche, web cam or other methods –
including an electronic s stems and media –
requires express prior permission in writing b
Leica Micros stems Nussloch GmbH.
For the instrument serial number and ear of
manufacture, please refer to the name plate at
the back of the instrument.
© Leica Micros stems Nussloch GmbH
NOTE
Published b :
Leica Micros stems Nussloch GmbH
Heidelberger Str. 17 - 19
D-69226 Nussloch
German
Phone: +49 (0) 6224 143-0
Fax: +49 (0) 6224 143-200
e-mail: histo_info@leica-micros stems.com
Internet: http://www.histo-solutions.com

4Instruction Manual V1.1 - 11/2002
Table of contents
1. Important information ................................................................................................................................... 5
1.1 Symbols in this manual and their meaning .....................................................................................5
1.2 Designated use ................................................................................................................................... 5
2. Safety................................................................................................................................................................ 6
2.1 Safety regulations .............................................................................................................................. 6
2.2 Caution notes ...................................................................................................................................... 7
3. Unit components and specifications .......................................................................................................... 9
3.1 Overview Components / functions ............................................................................................... 9
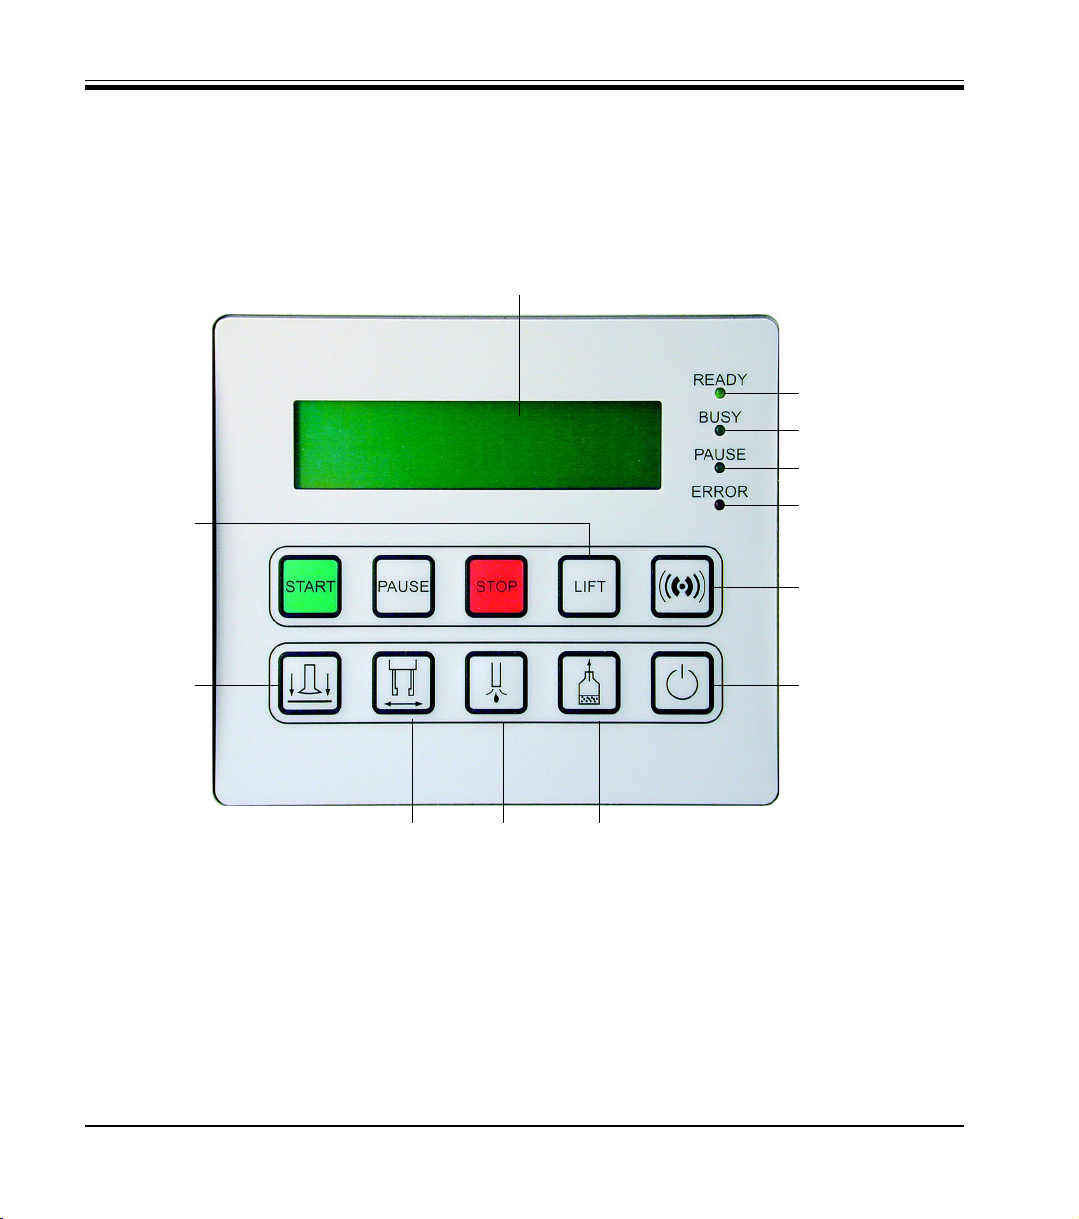
3.2 Functions of the control panel ........................................................................................................ 10
3.3 Scope of delivery .............................................................................................................................. 11
3.4 Technical data .................................................................................................................................. 12
4. Initial setup ................................................................................................................................................... 13
4.1 Location requirements..................................................................................................................... 13
4.2 Setup and initial operation .............................................................................................................. 13
4.3 Transport lock ................................................................................................................................... 16
4.4 Refilling consumables ...................................................................................................................... 16
5. Operating the V5030 .................................................................................................................................. 17
5.1 Electrical connection ....................................................................................................................... 17
5.2 Key designations and their functions ............................................................................................ 17
5.3 Program flow..................................................................................................................................... 19
5.4 User MENU........................................................................................................................................ 21
5.5 Priming ............................................................................................................................................... 24
5.6 Coverslipping..................................................................................................................................... 24
5.7 Interrupting the coverslipping process......................................................................................... 26
5.8 Process-based interruptions .......................................................................................................... 27
6. Operating the V5030 in connection with the TS5025 transfer station .............................................. 30
6.1 Differences compared to the CV5030 stand-alone operation ................................................... 30
6.2 Requests by the robotic color multistainer ST5020 ..................................................................... 30
6.3 Interruption by the user................................................................................................................... 31
6.4 Process-based interruptions .......................................................................................................... 32
7. Switching off the unit .................................................................................................................................. 33
7.1 Standby mode ................................................................................................................................... 33
7.2 Switching off the main switch ........................................................................................................ 33
8. leaning and maintenance ........................................................................................................................ 34
8.1 Daily cleaning.................................................................................................................................... 34
9. System and error messages ....................................................................................................................... 36
10. Accessories .................................................................................................................................................. 42
11. Warranty and service .................................................................................................................................. 44

5
Leica CV5030 - Robotic Coverslipper
1.1 Symbols in this manual and their
meaning
Caution notes
are highlighted in gray and marked by
a warning triangle.
Notes,
i.e. important information for the user,
are highlighted in gray and marked by
the symbol.
Numbers given in parentheses refer
to positions in illustrations.
Function keys to be pressed on the
control panel are printed in boldface
and with capital letters.
1. Important information
1.2 Designated use
The Leica CV5030 is a robotic coverslipper for
coverslipping tissue sections, cells or swabs
mounted on slides with coverslips made out of
glass using a variet of different coverslip me-
dia.
Any other use of the unit represents an
unauthorized operation.
(5)
RUN/
TOP

6Instruction Manual V1.1 - 11/2002
The safety and caution notes in this chapter must be observed at all times.
The user should read these notes even if he or she is familiar with the operation and use of
Leica equipment.
2. Safety
2.1 Safety regulations
This instruction manual contains important in-
structions and information for the operational
safet and maintenance of the unit.
It is an important component of the unit and
must be read carefull prior to setup and use
and kept close to the unit.
The instruction manual must be ex-
panded by corresponding instruc-
tions if this becomes necessary due
to existing national regulations on
accident prevention and environmen-
tal protection in the country where
the unit is operated.
Device type
All information contained in this instruction
manual applies solel to the device t pe listed
on the cover page.
A name plate with serial number is attached to
the rear of the unit.
This unit was manufactured and tested ac-
cording to the safet regulations for measure-
ment, control, automatic control and laborato-
r equipment:
• CE guidelines
• CSA.
To maintain this condition and ensure safe op-
eration, the user must observe all notes and
warnings contained in this instruction manual.
The protective devices located on the unit and the accessories must not be removed or
modified.
The unit must only be opened and repaired by service technicians authorized by Leica.

7
Leica CV5030 - Robotic Coverslipper
2. Safety
2.2 Caution notes
The safet devices attached to this unit b the manufacturer form onl
the basis for accident prevention.
The main responsibilit for accident-free operation lies primaril with
the businessperson where the unit is operated, as well as the persons
he or she designates for operating, maintaining or repairing the unit.
To ensure perfect operation of the unit, the following notes and cautions
must be observed.
Transport and installation
The unit must be transported in upright position only.
The unit must be connected only with the supplied power cable and only to a grounded
power receptacle. The protective function must not be removed through the use of an exten-
sion cord without protective conductor.
The use in hazardous areas is not allowed.
With extreme temperature differences between storage and installation site and high hu-
midity, condensation of water may occur. In this case, a two-hour waiting period must be
maintained before switching on the unit. If the waiting period is not maintained, the unit
may be damaged.
The device must be aligned perfectly before startup.

Instruction Manual V1.1 - 11/2002
Operating the unit
The unit may only be operated by trained laboratory personnel.
It may only be used according to its intended use and the instructions in this instruction
manual.
Avoid skin contact with solvents or coverslip media.
Ensure correct dosage of mounting media. Excessive media may spill from the specimen
slide onto the working surface and thereby obstruct the movement of parts of the unit (notes
on cleaning).
During operation, do not block motor-driven components through handling or objects. Dan-
ger of personal injury through broken glass!
Unit must be operated with vent, or fume tubing and activated carbon filter must be as-
sembled and connected properly. Warning against hazardous fire and poison through sol-
vent vapors.
Cleaning and maintenance
The unit may be opened for maintenance or repair work by authorized service technicians
only.
witch the unit off and unplug it before each cleaning.
Do not use any solvent containing acetone, chloride or xylene for cleaning the surface.
While operating and cleaning the unit, do not let any liquid enter the unit.
While handling cleaning materials, observe the safety regulations of the manufacturer and
the lab regulations.
Dispose of used reagents while observing applicable local regulations and the disposal
regulations of your company/lab.
2. Safety

9
Leica CV5030 - Robotic Coverslipper
3.1 Overview—Components / functions
3. Unit components and specifications
Fig. 1
Unit cover
On/Off switch
Control panel
display
Output rack guide
Bottle with mountant
Input door
Leveling feet
Maintenance
door
Coverslip
magazine
Dispenser
park position

10 Instruction Manual V1.1 - 11/2002
3. Unit components and specifications
3.2 Functions of the control panel
LED READY
LED BU Y
LED PAU E
LED ERROR
RELEA E
COVER LIP
TANDBY
RE POND/Acknowl-
edging an audible
alarm
RELEA E LIDE PRIME/
Open dispens-
ing valve
VENT MOUNTANT/
Bottle/Vent the bottle
with mountant
LCD display
Extract
output rack
Fig. 2

11
Leica CV5030 - Robotic Coverslipper
3. Unit components and technical data
3.3. Scope of delivery
The basic unit is operational without additional accessories. The standard equipment of Leica
CV5030 consists of:
• 1 basic unit,
• 1 accessor kit consisting of:
• 1 slide rack 30, plastic, pack of 5,
• 1 pack of coverslips, 24 x 50 mm (10x100 each),
• 1 Leica CV Ultra mountant, 6 bottles of 100 ml each,
• 2 bottles for mountant, 250ml, with cover,
• 1 mains cable set: - 1 mains cable UK ST/BU F-5A,
- 1 mains cable D,
- 1 mains cable USA-C-J,
• 1 single open-end wrench 13,
• 1 activated carbon filter (x lene),
• 1 CV5030 instructions for repacking,
• 1 Leica CV5030 instruction manual—E/F/G/S,
• 2 nozzles, 1x large – 18G, 1x small – 20G,
• 1 insert for Leica slide racks for 30 slides,
• 5 output racks for 30 slides,
• 3 coverslip magazines, MultiSizeTM 40-60x24 mm,
• 3 coverslip magazines, MultiSizeTM 40-60x22 mm,
• 1 pack of suction cups (2 pieces),
• 1 priming container,
• 1 fume tubing, 3 m long, 32 mm diameter ID,
• 1 "Leica" brush,
• 1 Allen ke , SW 2.5,
• 1 Allen ke , SW 3.0.
Not installed, but included:
• 1 dispensing module,
• 1 bath for receiving slides.
All listed consumables can be replaced b the user.

12 Instruction Manual V1.1 - 11/2002
3. Unit components and specifications
3.4. Technical data
Suppl voltages: 100 - 240 V AC, 100W; 50 - 60 Hz
Fuse: thermoelectric, integrated in the main power switch,
Tripping current: 5A
Operating environment: Temperature: 10 °C - 35 °C,
Absolute humidit : 10% - 80% (non-condensing)
Connections: RS 232C, serial communications for service
Slide throughput: 1 slide in approx. 9 s.
Slides catered for: high-qualit slides
with ground edges*
Coverslip magazine capacit :
depending on coverslip size 120 pcs. (22 - 24mm x 60mm),
160 pcs. (22 - 24mm x 40mm)
Coverslips catered for: 22 - 24mm x 40 - 60mm
Mountant bottle capacit : 250 ml
Mountant volume: individuall adjustable (volume and t pe)
Mountant t pes: all commercial media**
Dimensions and eight:
Width: 420 mm
Depth: 600 mm
Height: (with lid closed) 550 mm
Weight: approx. 57 kg
Manufacturing countr : Austria
* Contact our supplier for additional information!
** Recommendation: Leica CV UltraTM

13
Leica CV5030 - Robotic Coverslipper
4.1 Location requirements
The equipment location must meet the following requirements:
• Stable, plane, vibration-free lab table.
• Largel vibration-free floor.
• Space of approx. 25 cm on the left side of the unit (to open the side
door).
• Space behind the unit for connecting the fume tubing.
• Room temperature generall between +10 °C and +35 °C.
• Relative humidit 80% maximum, non-condensing.
The use of the unit in hazardous areas is not allowed.
4.2 Setup and initial operation
4. Initial setup
Fig. 3 Perform the repacking of the unit in reverse
order to the unpacking instructions. The pack-
ing material should, therefore, alwa s be kept
(unpacking instructions on the outside of the
transport packaging).
Mountant bottle must be taken from the unit.
Remove all residues from the s stem using a
suitable solvent.
The unit must be transported in upright posi-
tion onl as indicated b labels on the outside
of the transport box.
To lift the unit, pick it up b reaching under the
sides (at least 2 persons are required—the
device weighs approx. 57 kg) and lift it onto a
solid laborator table.
• Pull the protective plastic cover upwards to
remove it.
• Ensure that the delivered accessories are
complete in accordance with the order.
The chemicals used in the Leica
CV5030 are easily inflammable and
hazardous to health. The installation
location of the CV5030 must be well-
ventilated; there should be no igni-
tion sources there of any kind.
Adjust the height of the threaded feet (Fig. 3) to
ensure that the unit is level in all directions.

14 Instruction Manual V1.1 - 11/2002
4. Initial setup
• Fit the nozzle to the dispensing valve.
• Fill prime container halfwa with x lene or
x lene substitute (according to the moun-
tant used).
• Insert the dispensing valve in paused posi-
tion on the operating plate.
• Plug the cable to the dispensing valve into
the sleeve of the cover plate behind the
operating plate.
• Connect the tubing from the lid of the
mountant bottle with the pressure output in
the cover plate behind the operating plate.
• Place the insert according to the respec-
tive input rack in the bath and place it in the
input door.
• Operate the unit with the vent or insert acti-
vated carbon filter and properl connect
the fume tubing.
Fig. 4
Operate the unit with the vent or insert activat-
ed carbon filter and properl connect the
fume tubing (fig. 4).

15
Leica CV5030 - Robotic Coverslipper
4.2.1 Vent system
Replace the activated carbon filter ever six
months or when solvent vapors exit the air
outlet at the rear of the unit.
If xylene is used in the bath, the acti-
vated carbon filter must be replaced
every month!
1. Release the screw of the service flap (1) on
the left side of the unit.
2. Now release the Allen screw (2) and push
the cover up.
3. Insert the filter and tighten the screws in
the reverse order.
Use the supplied tools for assembl .
1
2
4.2.2 Coverslip collection tray and suction
cups
4. Initial setup
Fig. 5
Fig. 6
The coverslip collection tra is hung on the
right side on the slide ejector. It can be re-
moved for cleaning purposes.
Fig. 7
1
2
4.2.3 Changing the
needle
Insert the needle into
the needle retainer (1)
and turn one corner
counterclockwise
over the plate.

16 Instruction Manual V1.1 - 11/2002
4.4 Refilling consumables
4. Initial setup
• Fill the bath with x lene*.
• Fill the bottle (3) for the paused position of
the dispensing valve with x lene*.
• Insert the output rack (4) into the lateral
guide (on the left side of the unit.
124 3
4.3. Transport lock
• Slowl fill the mountant bottle with mountant
(1) (max. 250ml) to avoid air bubbles. It is es-
sential that the mountant bottle stands open
for several hours (overnight) in the vent.
• Screw the lid of the mountant bottle firml
onto the bottle.
• Select the coverslip magazine (2) for the de-
sired coverslip t pe (22mm or 24mm wide).
• Fill the coverslip magazine with coverslips
(length 40-60mm) and insert it.
Use the glass bottles from the stan-
dard delivery or suitable GLA con-
tainers – but never use PLA TIC con-
tainers.
Transport
lock for
coverslip
transfer module
Transport
lock for the
gripper
Fig. 9
Fig. 8
* xylene substitute, depending on the mountant
Fig. 10
Replace damaged or deformed suction cups.
To replace a suction cup, remove it b pulling it
downward and insert a new one.
Fig. 11

17
Leica CV5030 - Robotic Coverslipper
5.1 Electrical connection
The unit is dimensioned for:
100 to 240V AC; 100W; 50/60Hz.
5.2 Key designations and their functions
START starts the coverslipping process from READY and PAUSE mode
(exception: if PRIME is shown on the displa , PRIME must be carried out
first) and after removable errors (coverslip magazine is empt , coverslip
is broken). After pressing the STOP ke (displa shows “STOPPED BY
USER”), it causes a reinitialization of the unit (see section 4.3).
Pressing PAUSE interrupts the coverslipping process (BUSY LED lights
up) after the currentl processed slide is placed in the output maga-
zine; PAUSE LED lights up. Press START to continue.
Device parameters can be changed.
STOP interrupts the unit operation immediatel ; ERROR LED lights up in
red. Use START to reinitialize the unit.
Pressing LIFT raises the output rack to the extraction position (not avail-
able while the BUSY LED is lit).
After the output rack reaches the extraction position, all slides
must be removed before the process can be started (again). Non-
observance can lead to damage of the slide.
Pressing RESPOND acknowledges an audible alarm; in READY or PAUSE
mode, this ke is used to enter the menu (holding the ke pressed for 2 s)
to set the coverslip parameters.
The RELEASE COVER SLIP ke releases the suction devices on the cov-
erslip transfer arm (locked while the BUSY LED is lit), and the coverslip is
released.
5. Operating the V5030

1 Instruction Manual V1.1 - 11/2002
5. Operating the V5030
The RELEASE SLIDE ke opens the gripper jaws as long as the ke is
pressed (blocked while the BUSY LED is lit). After extended non-operat-
ing times, it ma take several seconds until the gripper opens.
The PRIME ke opens the dispensing valve as long as the ke is
pressed (blocked while the BUSY LED is lit).
The VENT MOUNTANT ke vents the bottle with the mountant (blocked
while the BUSY LED is lit).
Press the STANDBY key for 2 s: The unit switches to standb mode
(READY LED lights red), which can be exited onl through initialization
(pressing the STANDBY ke for 2 x 2 s).

19
Leica CV5030 - Robotic Coverslipper
5. Operating the V5030
5.3 Program flow
Activate power switch → device enters STANDBY mode (READY LED
red)
• if the transfer station is connected, the message TS 5025
PRESENT will be displa ed for 1s
[STANDBY] for 2s → device initialized
Welcome message
After initialization: priming required; extended warning signal if incor-
rect ke pressed (e.g. [START]); if ST5020 is connected, a regular 3s
warning sequence will be triggered as the CV5030 is not prepared to
accept a rack
Dispenser located at P&P, i.e. not in the prime position (after startup
or when [PRIME] is pressed; accompanied b characteristic audible
signal)
Appears after pressing [START] if the dispenser is in the prime posi-
tion (accompanied b characteristic audible signal); periodic alarm
when connected to ST5020
(n=1-4): device is read , process with parameter set n can be
launched b pressing [START]
Device coverslips with parameter set n (in this example, 1)
Appears in the second line when P&P grips below the preset level
when getting the cover glass. The message is not cleared until the
sensor recognizes a higher level and otherwise remains active when
READY, PAUSE, PROCESSING etc.

20 Instruction Manual V1.1 - 11/2002
If not enough coverslips are present at startup, this will not
be recognized until the first slide is coverslipped!
The factor setting for the limit value is approx. 40 coverslips.
[PAUSE] was pressed; this message appears while the coverslipping
of the current slide is completed.
CV5030 is paused; press [START] to continue the coverslipping pro-
cess with parameter set n (in this example, 1).
Coverslip magazine is empt ; coverslipping operation interrupted
(accompanied b continuous audible signal).
20s audible signal after completion of the process, FINISHED remains
on displa until a ke is pressed or the bath opened.
Bath not OK; either no bath found (vessel could not be initiated after
[START]) or bath guide not actuated since last FINISHED (occurs
when pressing [START] or when connecting to ST5020)
Bath guide open and [START] pressed or quer from ST 5020 (in this
case: regular 3s warning sequence)
Output rack either full or not present
The gripper could not take the slide in three attempts (slide crooked
or following slide too close)
A rack received from the ST5020 is processed with parameter set n
(in this example, 1)
5. Operating the V5030
Other manuals for CV5030
4
Table of contents
Other Leica Laboratory Equipment manuals

Leica
Leica SM2010 R User manual

Leica
Leica AutoStainerXL User manual

Leica
Leica CV5030 User manual

Leica
Leica EM TIC 3X User manual

Leica
Leica EM CPD300 User manual

Leica
Leica BOND-PRIME User manual

Leica
Leica ST4020 User manual

Leica
Leica Ivesta 3 Series User manual

Leica
Leica VT1200 User manual

Leica
Leica HistoCore Arcadia C User manual
Popular Laboratory Equipment manuals by other brands

Ameson
Ameson MINI AIR PRO user manual

Analytik Jena
Analytik Jena CyBio Well vario OL3381-25-300 operating manual

Rainin
Rainin Pipetman P-2 manual

RR Mechatronics
RR Mechatronics STARRSED RS Instructions for use

Velp Scientifica
Velp Scientifica DLH F201A0157 instruction manual

HIRAYAMA
HIRAYAMA HVA-85 Operation manual