manuals.online logo
Brands
  1. Home
  2. •
  3. Brands
  4. •
  5. Leviton
  6. •
  7. Dimmer
  8. •
  9. Leviton RZP15 User manual

Leviton RZP15 User manual

NOTES:
• If using a non-Leviton Programmer/Remote,
refer to the Programmer/Remote instruction
sheet for including a device.
A) If using a Leviton Z-WaveTM Programmer/
Remote, Cat. No. RZCPG, press the Menu
button and scroll down to System Setup.
Press the center button to select System
Setup Menu. Press the center button to select
Network.
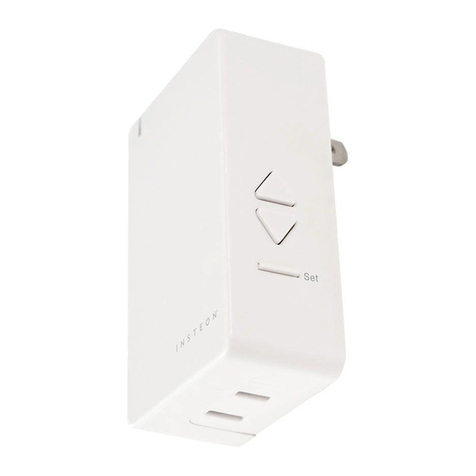
Scene Capable Plug-In Appliance Module
Cat. No. RZP
15
Incandescent: 1800W Fluorescent: 1800VA Resistive: 15A Motor: 1/2HP
Rated: 120VAC, 60Hz
INSTALLATION INSTRUCTIONS
DI-000-RZP15-00C
INTRODUCTION
Leviton’s ViziaTM RF components are designed
to communicate with each other via Radio
Frequency (RF) to provide remote control
of your lighting. Using RF technology allows
Leviton to provide the greatest signal integrity
possible. Each module in Leviton’s ViziaTM
RF component line is a Z-WaveTM enabled
device. In a Z-WaveTM network, each device is
designed to act as a router. These routers will
re-transmit the RF signal from one device to
another until the intended device is reached.
This ensures that the signal is received by its
intended device by routing the signal around
obstacles and radio dead spots. The Scene
Capable Plug-in Lamp Dimming Module
is compatible with any Z-Wave™ enabled
network, regardless of the manufacturer and
can also be used with other devices displaying
the Z-Wave™ logo.
CAUTION:
Remember to exercise good common sense
when using the Timer features of your remote,
especially when scheduling unattended
devices. There can be some unexpected
consequences if not used with care. For
example, an empty coffee pot can be remotely
turned on. If that should happen, your coffee
pot could be damaged from overheating. If an
electric heater is turned on by remote control
while clothing is draped over it, a fire could
result. DO NOT USE the remote for the control
of high power heating appliances such as
portable heaters. This device will not control
lighting that is used with electronic low-voltage
and high frequency power supply transformers,
nor high pressure discharge lamps (HID
lighting). This includes mercury-vapor, sodium
vapor and metal halide lamps. DO NOT change
location after unit is enrolled in Z-wave network.
Including Scene Capable
Plug-In Appliance Module
into Z-Wave
TM
Network:
Step 3
Attaching Scene Capable
Plug-In Appliance Module to
Wall Receptacle:
Step 2
• Plug the Scene Capable Plug-in Appliance
Module into wall receptacle. Verify that
receptacle is live. If controlled by a wall switch,
the switch must be kept ON at all times.
Attaching Load to Scene
Capable Plug-In Appliance
Module:
Step 1
NOTE: In order to use your ViziaTM Scene
Capable Plug-In Appliance Module in a Z-WaveTM
network, it must be included in the network using
a Primary Programmer/Remote, such as Leviton’s
Cat. No. RZCPG. Before including your module,
please refer to the Primary Programmer/Remote
instruction sheet for complete information. Refer
to Step 3 for further details.
• Locate load to be controlled by Scene Capable
Plug-In Appliance Module and ensure it is
fully operational. Attach load plug into module
receptacle noting proper polarity of blades.
NOTE: Use check boxes when Steps are
completed.
INSTALLING YOUR APPLIANCE MODULE
B) While standing close to the module
(approximately 2-5 ft.), press the center
button to <Include> device in the network.
NOTE: Only one device may be included
at a time. DO NOT put multiple devices into
the Inclusion mode at any time.
C) While the Programmer/Remote is in the
Inclusion mode and the LED is ON on
the Scene Capable Plug-In Appliance
Module, press the ON/OFF button on the
module. The Programmer/Remote will verify
inclusion and the LED will turn OFF on the
Scene Capable Plug-In Appliance Module.
If the Scene Capable Plug-In Appliance
Module is flashing Amber while in the
Inclusion mode, the Programmer/Remote is
still trying to communicate with the Scene
Capable Plug-In Appliance Module. Wait
until the device stops flashing, then press
ON/OFF button.
NOTE: If the LED on the Scene Capable
Plug-In Appliance Module turns solid
Red while including, there has been
a communication error. Refer to
Troubleshooting section.
D) The Primary Programmer/Remote will
assign a node ID number (Name) for this
module.
NOTE: This ID number (Name) will be
stored in the controller to be used for future
reference.
NOTE: You may name or edit the node of
this device at this time.
E) The module is now installed in the
network.
NOTE: If the module has been successfully
included in the network and the user tries to
include it again without first excluding it from
the network, the module
will retain the first node ID
it had received and ignore
the second.
• Soft fade ON/OFF
• Scene capable
• ON/OFF LED
• Two way communication
• RF reliability
• Ease of installation – No new wiring
• Compatible with other Z-Wave™ enabled
devices
FEATURES
Step 2 cont’d Step 3 cont’d
Programming and
ON/OFF Button
1 ON
2 ON
3 ON
4 ON
OFF
OFF
OFF
OFF
Programmer/Remote
Cat. No. RZCPG
Center Button
Menu Button
Compatible with enabled products!
TM
WARNINGS AND CAUTIONS:
• To be installed and/or used in accordance with appropriate electrical codes and regulations.
• If you are unsure about any part of these instructions, consult a qualified electrician.
WARNINGS AND CAUTIONS:
• Unplug unit when servicing fixture or changing bulbs.
• Save this instruction sheet. It contains important technical data along with testing and
troubleshooting information which will be useful after installation is complete.
LIMITED 5 YEAR WARRANTY AND EXCLUSIONS
Leviton warrants to the original consumer purchaser and not for the benefit of anyone else that this product at the time of its sale by Leviton is free of defects in materials and workmanship under normal and proper use for five years from the
purchase date. Leviton’s only obligation is to correct such defects by repair or replacement, at its option, if within such five year period the product is returned prepaid, with proof of purchase date, and a description of the problem to Leviton
Manufacturing Co., Inc., Att: Quality Assurance Department, 59-25 Little Neck Parkway, Little Neck, New York 11362-2591. This warranty excludes and there is disclaimed liability for labor for removal of this product or reinstallation.
This warranty is void if this product is installed improperly or in an improper environment, overloaded, misused, opened, abused, or altered in any manner, or is not used under normal operating conditions or not in accordance with any
labels or instructions. There are no other or implied warranties of any kind, including merchantability and fitness for a particular purpose, but if any implied warranty is required by the applicable jurisdiction, the duration of any such
implied warranty, including merchantability and fitness for a particular purpose, is limited to five years. Leviton is not liable for incidental, indirect, special, or consequential damages, including without limitation, damage to, or
loss of use of, any equipment, lost sales or profits or delay or failure to perform this warranty obligation. The remedies provided herein are the exclusive remedies under this warranty, whether based on contract, tort or otherwise.
OPERATION
TROUBLESHOOTING
DI-000-RZP15-00C
For additional information, contact Leviton’s
Techline at 1-800-824-3005 or visit Leviton’s
website at www.ViziaRF.com
Protected under U.S. Patent Number 6,388,399
and patents pending and licensed under U.S.
Patents Numbers 5,905,442, and 5,982,103
NOTE: It is very important to accurately
exclude devices from the network when
moving or removing a device from a Z-WaveTM
network. This ensures that all information has
been removed from your Primary Programmer/
Remote’s information table and is not counted
on to be a part of the mesh network.
A) If using a Leviton Z-WaveTM Programmer/
Remote, Cat. No. RZCPG, press the Menu
button and scroll down to System Setup.
Press the center button to select System
Setup Menu. Press the center button to
select Network.
B) While standing close to the module, press
the center button to <Exclude> device from
the network.
NOTE: Only one device may be excluded at
a time.
C) While the Programmer/Remote is in the
Exclusion mode and the LED is ON on
the Scene Capable Plug-In Appliance
Module, press the ON/OFF button on the
module. The Programmer/Remote will verify
Exclusion and the LED will turn OFF on the
Scene Capable Plug-In Appliance Module.
If the Scene Capable Plug-In Appliance
Module is flashing Amber while in the
Exclusion mode, the Programmer/Remote is
still trying to communicate with the module.
Wait until the device stops flashing, then
press the ON/OFF button.
Excluding Scene Capable
Plug-In Appliance Module
from Network:
Step 4
This equipment has been tested and found
to comply with the limits for a Class B Digital
Device, pursuant to Part 15 of the FCC
Rules. These limits are designed to provide
reasonable protection against harmful
interference in a residential installation.
This equipment generates, uses, and can
radiate radio frequency energy and, if not
installed and used in accordance with the
instructions, may cause harmful interference
to radio communications. However, there is
no guarantee that interference will not occur
in a particular installation. If this equipment
does cause harmful interference to radio or
television reception, which can be determined
by turning the equipment OFF and ON,
the user is encouraged to try to correct the
interference by one or more of the following
measures:
• Reorient or relocate the receiving Antenna.
• Increase the separation between the
equipment and the receiver.
• Connect the equipment into an outlet on
a circuit different from that to which the
receiver is connected.
• Consult the dealer or an experienced radio/
tv technician for help.
FCC COMPLIANCE STATEMENT
Factory Default:
If your module is not responding, or you are
unable to control it after you have tried to Include/
Exclude it multiple times, it may be necessary to
reset the module to its original factory settings. To
accomplish this, proceed as follows:
• Unplug the module and wait 5 seconds. Plug
the module back in and within 20 seconds
press and hold the programming button until
the LED flashes Amber and turns solid Red.
The module is now reset. Once the module is
reset, it will be necessary to Re-Include it to a
network before it can be used.
CAUTION: SETTING A DEVICE TO A
FACTORY DEFAULT DOES NOT EXCLUDE
THAT DEVICE FROM A NETWORK. THE
EXCLUSION PROCEDURE MUST STILL BE
FOLLOWED TO REMOVE THE DEVICE FROM
THE PRIMARY REMOTE’S INFORMATION
TABLE. FAILURE TO DO SO MAY RESULT IN
SYSTEM THAT IS SLOW TO RESPOND, OR
MAY FAIL TO RESPOND TO SOME DEVICES.
Including Scene
Capable Plug-In
Appliance Module
into Z-WaveTM
Network:
Step 3 cont’d Step 4 cont’d
Press ON/OFF Button
Wall
Receptacle
Load plug
Scene Capable Plug-In
Appliance Module
NOTE: Remote must be in close proximity to
Scene Capable Plug-In Appliance Module when
including in the network.
RZCPG
Programmer/Remote
NOTE: For complete details on operating the
Primary Programmer/Remote, refer to the
individual device’s instruction sheet.
ON: Press the ON/OFF button on the Scene
Capable Plug-In Appliance Module or
appropriate address “ON” button on the
applicable transmitter. The Load will turn
ON.
OFF: Press the button on the Scene Capable
Plug-In Appliance Module or appropriate
address “OFF” button on the applicable
transmitter. The Load will turn OFF.
If the Scene Capable Plug-In Appliance Module
appears to be functioning improperly, proceed
with the following steps:
1. Confirm that the device is being supplied
from a 120V, 60Hz AC source ONLY.
2. Confirm that the Load being controlled is in
proper working order. Local switch, ON
(check for burned-out bulbs).
3. Confirm that the Load being controlled does
not exceed the module limit.
4. Confirm that unit is programmed properly.
Repeat “TO INSTALL” section to verify that it
has been included in the Z-Wave™ network.
MANUAL ON/OFF PRIOR TO INCLUDING
IN NETWORK: The Scene Capable Plug-in
Appliance Module can control the Load before
being included in the Z-Wave™ network.
After powering up the Scene Capable Plug-In
Appliance Module, wait 10 seconds then use
ON/OFF button to turn the Load ON or OFF.
NOTE: If a power interruption should occur while
the module in ON, the light load will return to its
previous state when power is restored.
This manual suits for next models

1

Other Leviton Dimmer manuals

Leviton Topaz 12 Operating and safety instructions

Leviton

Leviton Topaz 12 Operating and safety instructions

Leviton Decora Smart DG6HD User manual

Leviton

Leviton Decora Smart DG6HD User manual

Leviton Decora Smart DWVAA User manual

Leviton

Leviton Decora Smart DWVAA User manual

Leviton DDS6000 Operating instructions

Leviton

Leviton DDS6000 Operating instructions

Leviton RZCZ1 User manual

Leviton

Leviton RZCZ1 User manual

Leviton ACM10-1L User manual

Leviton

Leviton ACM10-1L User manual

Leviton lumina 0-10VDC RF User manual

Leviton

Leviton lumina 0-10VDC RF User manual

Leviton HCM06-1D User manual

Leviton

Leviton HCM06-1D User manual

Leviton 600 Series Owner's manual

Leviton

Leviton 600 Series Owner's manual

Leviton MRIDC User manual

Leviton

Leviton MRIDC User manual

Leviton Decora HCM10-1DW Installation instructions

Leviton

Leviton Decora HCM10-1DW Installation instructions

Leviton ACM06-1L User manual

Leviton

Leviton ACM06-1L User manual

Leviton RZP03-1LW Installation instructions

Leviton

Leviton RZP03-1LW Installation instructions

Leviton LumaCan DRDDP User manual

Leviton

Leviton LumaCan DRDDP User manual

Leviton Decora True Touch TTI06-1 User manual

Leviton

Leviton Decora True Touch TTI06-1 User manual

Leviton Decora Illumatech IPI06-1L User manual

Leviton

Leviton Decora Illumatech IPI06-1L User manual

Leviton Toggle Touch TGM10-1L User manual

Leviton

Leviton Toggle Touch TGM10-1L User manual

Leviton Acenti ACH08 User manual

Leviton

Leviton Acenti ACH08 User manual

Leviton 6615-P User manual

Leviton

Leviton 6615-P User manual

Leviton Decora Smart D26HD User manual

Leviton

Leviton Decora Smart D26HD User manual

Leviton 06674 User manual

Leviton

Leviton 06674 User manual

Leviton Decora Mural MDI06-1 User manual

Leviton

Leviton Decora Mural MDI06-1 User manual

Leviton DMX-512 Installation guide

Leviton

Leviton DMX-512 Installation guide

Leviton Vizia RZI6-1L User manual

Leviton

Leviton Vizia RZI6-1L User manual

Popular Dimmer manuals by other brands

Plejd REL-02 installation manual

Plejd

Plejd REL-02 installation manual

Arlight V1-S user manual

Arlight

Arlight V1-S user manual

SkyLink SK7 installation instructions

SkyLink

SkyLink SK7 installation instructions

Zennio DIMinBOX DX1 Technical documentation

Zennio

Zennio DIMinBOX DX1 Technical documentation

ETC ES750 Programming guide

ETC

ETC ES750 Programming guide

Namron ZIGBEE LED DIMMER 2.0 instruction manual

Namron

Namron ZIGBEE LED DIMMER 2.0 instruction manual

LEGRAND radiant WNRL50 quick start guide

LEGRAND

LEGRAND radiant WNRL50 quick start guide

Trust START-LINE ACM-250-LD manual

Trust

Trust START-LINE ACM-250-LD manual

preussen DimME KNX product manual

preussen

preussen DimME KNX product manual

Electron DEM.214 user manual

Electron

Electron DEM.214 user manual

American DJ DP-20A User instructions

American DJ

American DJ DP-20A User instructions

Crestron CLW-DIM user guide

Crestron

Crestron CLW-DIM user guide

Lightronics AS-62D owner's manual

Lightronics

Lightronics AS-62D owner's manual

Crestron CNLDM-6 user guide

Crestron

Crestron CNLDM-6 user guide

YPHIX 50208670 installation manual

YPHIX

YPHIX 50208670 installation manual

Aeon Labs Aeotec Bypass user manual

Aeon Labs

Aeon Labs Aeotec Bypass user manual

Philips SBCSP275/00 Instructions for use

Philips

Philips SBCSP275/00 Instructions for use

RC4 Wireless RC4Magic 3 Series quick start guide

RC4 Wireless

RC4 Wireless RC4Magic 3 Series quick start guide

manuals.online logo
manuals.online logoBrands
  • About & Mission
  • Contact us
  • Privacy Policy
  • Terms and Conditions

Copyright 2025 Manuals.Online. All Rights Reserved.