DI-000-TS300-05A© 2016 Leviton Mfg. Co., Inc.
SET-UP INSTRUCTIONS FOR THE TS300 SERIES
SET FOR OTHER THAN FACTORY DEFAULT OPERATION
SET FOR 4 HOUR
SET A CUSTOM TIME (SOMETHING OTHER THAN 2 OR 4 HOURS)
OPERATIONS
SET A CUSTOM TIME AND ALLOW SCROLL UP TO 24 HOURS
ACTIVATE WARNING FEATURES
For Technical Assistance Call: 1-800-824-3005 (U.S.A. Only) www.leviton.com
LIMITED 5 YEAR WARRANTY AND EXCLUSIONS
Leviton warrants to the original consumer purchaser and not for the benefit of anyone else that this product at the time of its sale by Leviton is free of defects in materials and workmanship under normal and proper use for five years from
the purchase date. Leviton’s only obligation is to correct such defects by repair or replacement, at its option. For details visit www.leviton.com or call 1-800-824-3005. This warranty excludes and there is disclaimed liability for labor for
removal of this product or reinstallation. This warranty is void if this product is installed improperly or in an improper environment, overloaded, misused, opened, abused, or altered in any manner, or is not used under normal operating conditions or
not in accordance with any labels or instructions. There are no other or implied warranties of any kind, including merchantability and fitness for a particular purpose, but if any implied warranty is required by the applicable jurisdiction, the
duration of any such implied warranty, including merchantability and fitness for a particular purpose, is limited to five years. Leviton is not liable for incidental, indirect, special, or consequential damages, including without limitation, damage
to, or loss of use of, any equipment, lost sales or profits or delay or failure to perform this warranty obligation. The remedies provided herein are the exclusive remedies under this warranty, whether based on contract, tort or otherwise.
FOR CANADA ONLY
For warranty information and/or product returns, residents of Canada should contact Leviton in writing at Leviton Manufacturing of Canada Ltd to the attention of the Quality Assurance Department, 165 Hymus Blvd,
Pointe-Claire (Quebec), Canada H9R 1E9 or by telephone at 1 800 405-5320.
When powering up for the first lime, allow 1 minute for unit to show OFF on screen. If the screen in blank after 1 minute, press RESET button, see Figure 4.
Default Set 2 hours
The TS300 timers are factory preset to meet newer energy code override mandates. No adjustment is required. This setting will provide a two hour maximum operating time before shut
off. The scroll feature is active to allow the user to change the operating time with the maximum time setting at two hours.
DIP SWITCHES
1
4 Hour
2
2 Hour
3
Limit
4
Scroll
5
Beeper
6
Blink
OFF ON OFF ON OFF OFF Factory Default
Settings
ON OFF OFF ON OFF OFF
Set DIP
switches as
shown
DIP SWITCHES
1
4 Hour
2
2 Hour
3
Limit
4
Scroll
5
Beeper
6
Blink
OFF ON OFF ON OFF OFF Factory Default Settings
ON ON ON ON OFF OFF
1. Set DIP switches as shown
2a. Press and release TIMER
button
2b. Wait for screen to show
countdown
2c. Press and hold TIMER button
2d. Release button when desired
time shows
ON ON OFF OFF OFF OFF
3. Set LIMIT and SCROLL switch
to OFF
ON ON OFF ON OFF OFF
4. Set SCROLL switch to ON
DIP SWITCHES
1
4 Hour
2
2 Hour
3
Limit
4
Scroll
5
Beeper
6
Blink
OFF ON OFF ON OFF OFF Factory Default Settings
OFF OFF OFF ON OFF OFF
1. Set DIP switches as shown
2a. Press and release TIMER
button
2b. Wait for screen to show
countdown
2c. Press and hold TIMER button
2d. Release button when desired
time shows
OFF OFF OFF OFF OFF OFF
3. Set SCROLL switch
to OFF
OFF OFF OFF ON OFF OFF
4. Set SCROLL switch to ON
DIP SWITCHES
1
4 Hour
2
2 Hour
3
Limit
4
Scroll
5
Beeper
6
Blink
OFF ON OFF ON OFF OFF Factory Default
Settings
OFF ON OFF ON OFF ON
Set BLINK to ON
DIP SWITCHES
1
4 Hour
2
2 Hour
3
Limit
4
Scroll
5
Beeper
6
Blink
OFF ON OFF ON OFF OFF
Close the timer door and unit is ready. One press of the bottom cover turns the
load ON and load will stay ON until a countdown to the preset off time. Pressing
the bottom cover again will turn loud OFF.
1. 4HR: Set ON for preset 4 hour maximum countdown when 2HR is set to OFF.
Also used in custom time programming.
2. 2HR: Set ON for preset 2 hour maximum countdown when 4HR is set to OFF.
Also used in custom time programming.
3. LIMIT: Used with programming sequence. Switch from ON to OFF to limit scroll to
match custom time.
4. SCROLL: Set ON allows timer to scroll to a shorter run time. Set OFF to disable. Also
used in programming sequence. Switch from ON to OFF to set a custom time. The time
scrolls in steps:
5 minute steps from 5 minutes to 1 hour.
10 minute steps from 1 to 4 hours.
30 minute steps from 4 hours to 12 hours.
1 hour steps from 12 to 24 hours.
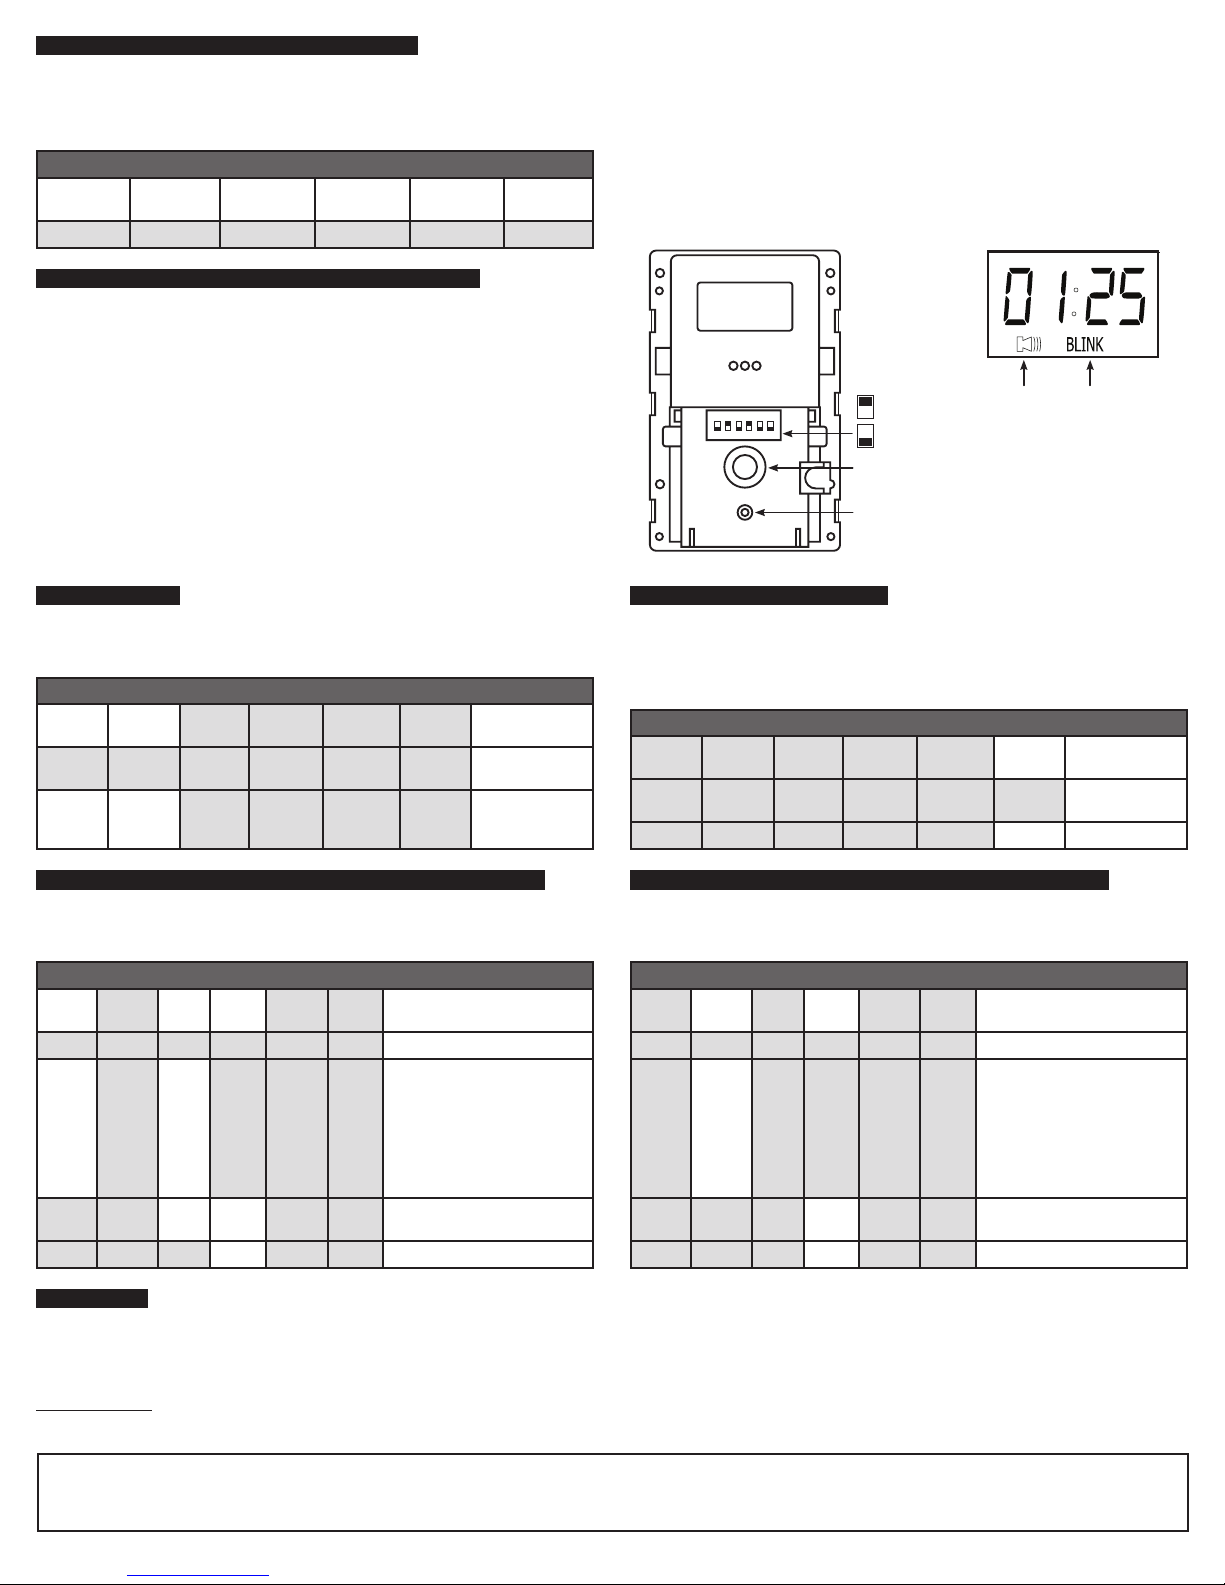
5. BEEPER: Set ON activates feature for beep warning every 15 seconds starting at
2 minutes before OFF. See Figure 5.
6. BLINK: Set ON activates feature for load flash 2 minutes before OFF. See Figure 5.
Figure 5
123456
ON
1 4HR
2 2HR
3 LIMIT
1 SCROLL
1 BEEPER
1 BLINK
Figure 4
Timer Button
Beeper Blink
Reset Button
ON - Switch UP
OFF - Switch DOWN
Change the dip switch settings, as shown below, to provide four hour maximum operating
time before shut off as allowed by some energy codes. The scroll feature is active to allow
the user to change the operating time with the maximum time setting at four hours.
The TS300 series provides for a warning 2 minutes before shutting load off. The optional
audible warning beeps every 15 seconds for the 2 minute warning period. The optional
blink warning will turn off the load for 1 second at 2 minutes before shut off. To activate
one or both, change the switch matching the feature to the ON position. An icon will
confirm these features are active. See Figure 5.
The TS300 series may be programed to a custom length of time for countdown. The time
can range between 5 minutes and 24 hours. The scroll feature is active to allow the user
to change the operating time up to the custom time setting.
The TS300 series may be programed to a custom length of time for countdown. The scroll
feature is active to allow the user to change the operating time up to the maximum time
setting of 24 hours.
Once set-up is complete, attach the supplied decorator-type wallplate to the unit. The bottom cover becomes the switch to control the timer operations. Press the bottom cover once.
Timer goes to preset time, turns load ON, and starts countdown interval to automatic OFF. Pressing the bottom cover again will turn load OFF. If the SCROLL feature is active, press and
hold the main bottom cover and timing will change. Release when the desired time is shown.
In the OFF mode, LCD screen scrolls timer interval message every 15 seconds (SEt -For - HH:MM - LOAD - OFF). Example of 3 hour default message: SEt - For -02:00 • LOAD -OFF.


