manuals.online logo
Brands
  1. Home
  2. •
  3. Brands
  4. •
  5. Linksys
  6. •
  7. IP Phone
  8. •
  9. Linksys WIP300 - iPhone Wireless VoIP Phone Original operating instructions

Linksys WIP300 - iPhone Wireless VoIP Phone Original operating instructions

Wireless-G
IP Phone
Quick Installation
Model WIP300
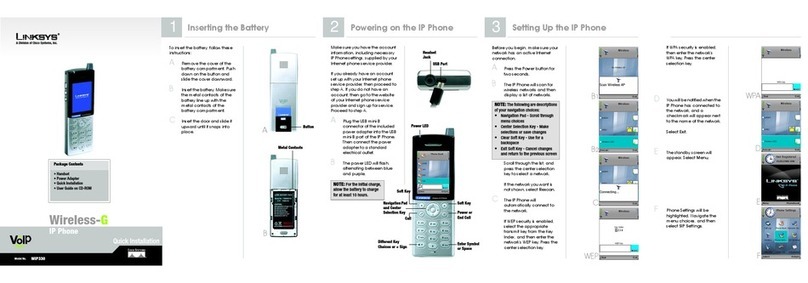
ARemove the battery compartment
cover by sliding it downwards.
BInsert the battery with the metal
contacts facing the contacts at the
bottom of the battery compartment.
CReplace the battery cover by sliding it
upwards until it clicks into place.
DConnect the small end of the included
power adapter to the USB mini-B port
on the bottom of the Phone.
EPlug the other end of the adapter
into a standard electrical outlet.
You see a charging indicator on the
LCD screen.
FWhen the battery charging indicator
remains solid blue, the battery is fully
charged and ready for use.
IMPORTANT:
Allow the battery to
charge for eight hours before initial use.
USB mini-B port
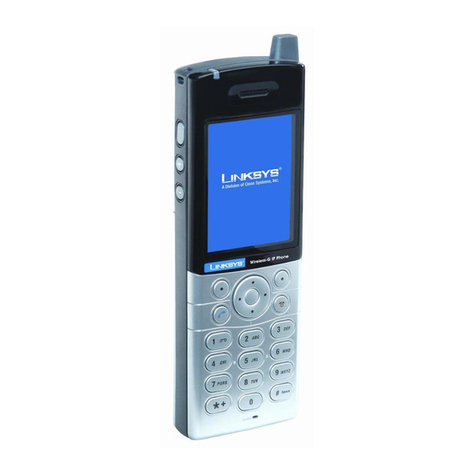
Navigation Button: Move the Navigation
button up or down to scroll through menus
and settings. You can also push the
Navigation button to select a highlighted
menu item or setting.
Power/End Call Button: If the Phone is
off, press the Power button once to turn
the Phone on. If the Phone is on, press and
hold the Power button to turn the Phone
off. If you’re on a phone call, press the End
Call button to disconnect the call.
Call Button: Press the Call button to make
or receive phone calls.
Clear Button: If you make a mistake while
entering information in the Phone, press
the Clear button until the incorrect
characters have been erased. If you need
to erase all of the characters, press the
Clear button until they are erased.
Soft Keys: Use the Soft Keys to select
menu items directly above the Soft Keys.
Numeric Keypad: Use the numeric key
pad to enter letters and numbers in the
Phone. Press the number keys until the
letter you want is displayed on the LCD
screen. To switch from entering letters to
numbers, press the left Soft Key. To enter
special characters, press the * (star), #, or
1 keys.
Navigation button
Power/End Call button
Call button
Clear button
Soft Keys
Numeric Keypad
Before you begin, make sure you have an
active Internet connection and the account
information provided by your Internet
phone service provider.
APress the Power button to turn on
the Phone.
BPress the Menu Soft Key.
CScroll to Profile, then press the
Navigation button to enter the
Profile menu.
DYou see a message asking you to
create a password. Press the
Navigation button, then use the
numeric keypad to enter a password.
When you are finished entering a
password, press the Navigation
button to save your password.
EScroll to SIP Account, then press
the Select Soft Key to enter the SIP
Account menu.
FPress the Option Soft Key, then press
the Select Soft Key to edit the default
SIP account.
NOTE: The Phone automatically dims
and turns off the LCD display when the
Phone is not in use. If this happens
while you are configuring the Phone,
press any key to turn the display back
on and continue configuring the Phone.
NOTE: After you have created a
password, you will need to enter
it to access the Profile menu.
13
Package Contents
•Handset
• Power Adapter
• Quick Installation
• User Guide on CD-ROM
• Registration Information Card
Install and Charge the Battery Configure the IP PhoneIdentify the IP Phone’s Buttons
2
GHighlight each setting your service
provider requires you to change, then
press the Select Soft Key to change
the setting.
When you are finished changing a
setting, press the Navigation button
to save your changes.
HIf you need to change a setting that
does not appear on the Edit screen,
scroll to Advanced, then press the
Select Soft Key to enter the
Advanced menu.
IHighlight each setting your service
provider requires you to change, then
press the Select Soft Key to change
the setting.
When you are finished changing the
setting, press the Navigation button
to save your changes.
JWhen you are finished making
changes in the advanced settings
menu, press the Back Soft Key until
you return to the Profile menu.
KHighlight Network Profile, then press
the Select Soft key to enter the
Network Profile menu.
LHighlight the network profile that
matches the type of security you’re
using for your wireless network. If you
don’t have security enabled on your
wireless network, highlight OPEN.
MPress the Option Soft Key to enter
the Profile Options menu, then
press the Select Soft Key to
edit the network profile.
NHighlight Wireless Settings, then
press the Select Soft Key to enter
the Wireless Settings menu.
OHighlight ESSID, then press the
Select Soft Key to enter the
ESSID menu.
PHighlight Site Survey, then press the
Navigation button to scan for your
wireless network.
You see a list of wireless networks in
range of the Phone. Highlight your
wireless network’s ESSID name in the
list, then press the Navigation button
to select it. Continue with step R.
QIf you don’t see your wireless
network’s ESSID name in the list,
your wireless network may not be
set to broadcast its ESSID name.
To enter the ESSID name manually,
press the Back Soft Key to return
to the ESSID menu, highlight New
ESSID, then press the Navigation
button to edit the ESSID name.
When you are finished entering
the ESSID name, press the
Navigation button to save it.
R
Press the
Back
Soft Key until you
return to the Wireless Settings menu.
SHighlight Security, then press the
Navigation button to enter the
Security menu.
THighlight the type of security you have
enabled on your wireless network and
press the Navigation button to
select it. Then change the settings
to match your wireless network.
If you don’t have security enabled on
your wireless network, select OPEN.
UWhen you are finished selecting
wireless security settings, press the
Back Soft Key until you return to the
Edit menu.
VHighlight Account Choice and press
the Navigation button to enter the
Account Choice menu. Press the
Navigation button again to assign the
default SIP account to the current
network profile, then highlight On and
press the Navigation button again to
activate it.
WPress the Back Soft Key until you
return to the Phone’s home screen.
Congratulations! Installation is
complete. For more information about
your IP Phone, see the on-screen
User Guide on the CD-ROM.
For additional information or troubleshooting
help, refer to the User Guide on the CD-ROM.
You can also e-mail for further support.
Website
http://www.linksys.com
Sales Information
800-546-5797 (800-LINKSYS)
Linksys is a registered trademark or trademark of
Cisco Systems, Inc. and/or its affiliates in the U.S.
and certain other countries. Copyright © 2006
Cisco Systems, Inc. All rights reserved.
WIP300-QI-60126NC CB
Other manuals for WIP300 - iPhone Wireless VoIP Phone

3

Other Linksys IP Phone manuals

Linksys SPA-941 Operation manual

Linksys

Linksys SPA-941 Operation manual

Linksys SPA962 User manual

Linksys

Linksys SPA962 User manual

Linksys SPA942 - Cisco - IP Phone User manual

Linksys

Linksys SPA942 - Cisco - IP Phone User manual

Linksys SPA901 User manual

Linksys

Linksys SPA901 User manual

Linksys SPA942 - Cisco - IP Phone User manual

Linksys

Linksys SPA942 - Cisco - IP Phone User manual

Linksys SPA-941 Instruction Manual

Linksys

Linksys SPA-941 Instruction Manual

Linksys SPA962 Operation manual

Linksys

Linksys SPA962 Operation manual

Linksys SPA921 - Cisco - IP Phone Operation manual

Linksys

Linksys SPA921 - Cisco - IP Phone Operation manual

Linksys PHB1100 - One Business Phone VoIP User manual

Linksys

Linksys PHB1100 - One Business Phone VoIP User manual

Linksys SPA-941 User manual

Linksys

Linksys SPA-941 User manual

Linksys SPA-941 Service manual

Linksys

Linksys SPA-941 Service manual

Linksys CIT300 Operation manual

Linksys

Linksys CIT300 Operation manual

Linksys SPA-941 User manual

Linksys

Linksys SPA-941 User manual

Linksys WIP330 - iPhone Wireless VoIP Phone User manual

Linksys

Linksys WIP330 - iPhone Wireless VoIP Phone User manual

Linksys SPA-941 User manual

Linksys

Linksys SPA-941 User manual

Linksys PHM1200 - One VoIP Phone User manual

Linksys

Linksys PHM1200 - One VoIP Phone User manual

Linksys WIP330 - iPhone Wireless VoIP Phone Operation manual

Linksys

Linksys WIP330 - iPhone Wireless VoIP Phone Operation manual

Linksys SPA942 - Cisco - IP Phone User manual

Linksys

Linksys SPA942 - Cisco - IP Phone User manual

Linksys SPA922 - IP Phone With Switch User manual

Linksys

Linksys SPA922 - IP Phone With Switch User manual

Linksys SPA922 - IP Phone With Switch Operation manual

Linksys

Linksys SPA922 - IP Phone With Switch Operation manual

Linksys SPA942 - Cisco - IP Phone User manual

Linksys

Linksys SPA942 - Cisco - IP Phone User manual

Linksys SPA942 - Cisco - IP Phone User manual

Linksys

Linksys SPA942 - Cisco - IP Phone User manual

Linksys Linksys SPA9000 Service manual

Linksys

Linksys Linksys SPA9000 Service manual

Linksys CIT200 - iPhone USB VoIP Wireless Phone User manual

Linksys

Linksys CIT200 - iPhone USB VoIP Wireless Phone User manual

Popular IP Phone manuals by other brands

Samsung SGH-P716 user manual

Samsung

Samsung SGH-P716 user manual

Grandstream Networks GRP2615 Quick installation guide

Grandstream Networks

Grandstream Networks GRP2615 Quick installation guide

Grandstream Networks GXP1610 quick reference

Grandstream Networks

Grandstream Networks GXP1610 quick reference

Avaya 4625SW user guide

Avaya

Avaya 4625SW user guide

Yealink SIP-T2XP Auto provisioning guide

Yealink

Yealink SIP-T2XP Auto provisioning guide

Vodavi Starplus Triad-S manual

Vodavi

Vodavi Starplus Triad-S manual

Cisco 7925G - Unified Wireless IP Phone VoIP Deployment guide

Cisco

Cisco 7925G - Unified Wireless IP Phone VoIP Deployment guide

Well Well SIP-T28 user manual

Well

Well Well SIP-T28 user manual

iPECS LIP-8040E user guide

iPECS

iPECS LIP-8040E user guide

Cisco Expansion Module 7914 quick start guide

Cisco

Cisco Expansion Module 7914 quick start guide

Grandstream Networks GXP2160 Basic instructions

Grandstream Networks

Grandstream Networks GXP2160 Basic instructions

Siemens Hicom 150 optiset E standard Operator's guide

Siemens

Siemens Hicom 150 optiset E standard Operator's guide

Telair T23P Administrator's guide

Telair

Telair T23P Administrator's guide

Mitel 5215 user guide

Mitel

Mitel 5215 user guide

Mocet IP3062 Administrator's guide

Mocet

Mocet IP3062 Administrator's guide

Mitel Mitel 5330 user guide

Mitel

Mitel Mitel 5330 user guide

Avaya 1616 brochure

Avaya

Avaya 1616 brochure

LiGo Doro PhoneEasy 331ph Setup & user guide

LiGo

LiGo Doro PhoneEasy 331ph Setup & user guide

manuals.online logo
manuals.online logoBrands
  • About & Mission
  • Contact us
  • Privacy Policy
  • Terms and Conditions

Copyright 2025 Manuals.Online. All Rights Reserved.