Lumatek Zeus 1000W Pro User manual

LVD
Plug & Play
CONTROL
TECHNOLOGY
YEAR
WARRANTY
PPF
2925
µmol/s
2925
EFFICACY
2.9
µmol/J
up to
2.9
MANUAL
- RUSSIAN

LUMATEK ZEUS 1000W
PRO LED MANUAL
ENGLISH
1. Introduction
3.1 General product information
3.2 Technical Specifications
3.4 Spectral Quantum Distribution Graph
3.5 Light distribution curve
3.6 Environment
3.7 Legal
6.1 Fixture assembly & installation
6.2 Connect the LED light bars
6.3 Changing and replacing light bars and modular use
6.4 Installing the fixture
6.5 Connecting the manual dimmer or external lighting controller
6.6 Connecting fixtures in series for external control
6.7 Connecting the LED fixture to the mains
2. Product Description
3. Product information and specifications
4. Safety recommendations and warnings
5. Contents
7. Precautions when using the LED fixture
8. Inspection, maintenance and repair
9. Storage and disposal
10. Warranty
6. Installation
TABLE OF CONTENTS
3.3 Fixture Dimensions

1. INTRODUCTION
Thank you for purchasing the Lumatek Zeus 1000W Pro linear multi-light bar LED fixture. This manual describes
how to install and use the Zeus Pro fixture; please read this manual thoroughly before attempting to install or
operate any Lumatek Zeus Series system. If you are not comfortable with the installation of high performance
lighting systems, you should seek the services of a qualified installation professional..
The Lumatek Zeus 1000W Pro LED is an electronic horticultural LED fixture using a wide-array design with two
integrated 500W Pro intelligent LED drivers making the fixture externally controllable & dimmable.
The ZUES 1000W Pro fixture is an ultra-high performance full-cycle top lighting solution for commercial
horticulture cultivation, with the power and flexibility to scale from propagation and cloning through
vegetative growth to higher light intensities in bloom.
In this manual the Lumatek Zeus 1000W Pro LED will be referred to as: “the LED fixture”.
2. PRODUCT DESCRIPTION
3. PRODUCT INFORMATION AND SPECIFICATIONS
3.1 General Product Information
PRODUCT NAME
MANUFACTURER
PRODUCT CODE
Zeus 1000W PRO LED
Lumatek EU
LUMLED009
5060560030720
UK/EU
EAN
PLUG TYPE
3.2 Technical Specifications
LIFE SPAN
PPF
WORKING TEMPERATURE
WORKING HUMIDITY
SPECTRUM
EFFICACY
LIGHT SOURCE
DIMENSIONS (LxWxH)
WEIGHT
BEAM ANGLE
MANUAL DIM/EXTERNAL
LIGHTING CONTROLLER
WATERPROOF / DUSTPROOF
FullspectrumF
2925 μmol/s
Up to 2.9 μmol/J
Higher spec LUMILED (W) & Osram (R) LED
1700 x 1099.6 x 48.2mm
17.5Kg
60000H
-20ºC -- +40ºC
20% - 90%
IP65
120º
0-10V analog protocol

3.3 Fixture Dimensions
1099.6mm
1700mm
48.2mm
Vmains=230V
50/60Hz AC
100%
DIMMING
RATIO
INPUT
VOLTAGE (V)
75%
50%
25%
1075
INPUT
POWER(W)
821
530
268
4.76
INPUT
CURRENT(A)
3.66
2.41
1.36
Vmains=240V
50/60Hz AC
100%
75%
50%
25%
1075
820
530
267
4.56
3.51
2.33
1.33
Vmains=277V
50/60Hz AC
100%
75%
50%
25%
1075
818
530
268
3.99
3.08
2.1
1.26

3.4 Spectral Quantum Distribution Graph
wavelength (nm)
3.5 Light distribution curve
3.6 Environment
The LED fixture is intended to be used in climate-controlled grow rooms and indoor farms.
The product may be used in damp environments but may not be used in wet environments or outdoors.
The product will operate in ambient temperatures from -10ºC to 40ºC but will function at optimal level
between 20ºC to 30ºC.
The product will operate in 20% – 90% humidity, non-condensing.
3.7 Legal
This product is CE certified compliant with LVD and EMC directive test standards.
Warning! Carefully read the warnings below before using or working with the product!
• Always adhere to the local rules and regulations when installing or using the LED fixture.
• Do not open or disassemble the LED fixture as it contains no serviceable parts inside. Opening or modifying
the LED fixture can be dangerous and will void the warranty.
• Do not use the LED fixture when either the LED fixture or its power cable are damaged. Replace the power
cable with correctly rated cable only.
• Modifications to the cables can lead to unwanted electromagnetic effects which may make the product
not comply with legal requirements.
4. SAFETY RECOMMENDATIONS AND WARNINGS
The Zeus Pro series use higher spec highly efficient top bin horticultural white & red LEDs to create
a balanced full spectrum of quality light ideal for photosynthesis.
-2.9349
-1.14674
300 500 600 700 800
Unit: cd
C0/180 , 114.9
C90/270 , 113.9

• Do not expose the LED fixture to:
Condensing humidity, heavy mist or direct spray;
Ambient temperatures outside the specified range;
Dust and contamination;
Direct sunlight during use or HID light that may heat up the driver.
• Always disconnect the LED fixture from mains before performing any maintenance.
• Always allow for a cool down period of at least 20-30 minutes before touching the LED light bars. Touching
the LED bars when the fixture is lit or immediately after may result in burns!
• Natural convection removes heat away from the heatsink. In order for the system too properly cool itself,
at least 5cm of space is required between the fixture and the roof of your grow area. Do not use abrasive
materials or aggressive cleaning agents to clean the LED fixture as this may damage
the secondary optics. Instead use a clean dry fabric/cloth.
• Do not use the LED fixture near flammable, explosive or reactive substances. The LED fixture can reach
temperatures of 40ºC.
• Do not use sulphur vaporizers or water misters.
• The installation and use of the LED fixture is the responsibility of the end user. Incorrect use or installation can
lead to failure and damage to the LED fixture. Damage to the LED fixture and electronic circuitry as a result
of incorrect installation and use revokes the warranty.
Warning! Mounting and installing the LED fixture must be in accordance with the applicable local laws and
regulations.
Warning! The installer is responsible for correct and safe installation.
Warning! Ensure the local cabling can support the voltage and current requirements of the LED fixture.
Warning! Avoid coiled cables and keep mains leads separated to help prevent electromagnetic interference.
Warning! Do not connect or disconnect the LED fixture under load.
5. CONTENTS
6. INSTALLATION
10x PRO LED LIGHT BAR
1x FOLDABLE FIXTURE FRAME
Containing two integrated
500W Pro Led drivers
1x DIMMING
CONTROLLER 0 -10V
Connects to ‘SIG IN’ connector.
1x USER MANUAL
4x METAL CABLE HANGERS
1x 240V POWER SUPPLY CABLE
2x HINGE-LOCK METAL PLATES

Install hook end first;
insert hook into square hole.
Then insert the other end; align the light bar’s
magnet connector with the round hole on Frame
connector and insert male pin into female socket.
Ensure magnetic connection is secure.
6.2 Connect the LED light bars
Assemble the rest of the light bars into the fixture frame.
Attach metal cable hangers to the mounting hooks inside of frame.
Warning! The light bars are shipped with protective plastic covers over the diodes.
Please ensure these protective covers are removed before use!
6.1 Fixture assembly & installation
The fixture frame uses a folding design for easier use and storage. After removing the components from the
packaging, open the frame fully.
There is a hinge-lock metal plate for each hinge to secure and balance the fixture. Align each plate correctly
with hinge and push onto outside of frame/hinge and click into place.
Fig. hinge-lock plates connect by pushing onto outside of frame over each hinge.

6.3
6.5 Connecting the manual dimmer or external lighting controller
The dimmer control or lighting controller is connected to the ‘SIG IN’ connector on the fixture frame.
This enables light intensity (PPF output) to be adjusted according to requirement. The LED fixture light
intensity can be adjusted without changing relative spectral power distribution or losing efficiency.
Remove dust cap and ensure male & female connectors are correctly aligned and then push together
until click-locked. To disconnect; turn twist-lock anti-clockwise and pull apart.
6.4 Installing the fixture
Warning! Mount the system to something that can hold the weight of the LED fixture.
Ensure all light bars are installed correctly and are secure.
Carefully turn the fixture over and attach the metal cable hangers to the mounting hooks.
Hang the fixture in required position and height.
For optimal performance; position fixture 50 -100cm above plant canopy for a 1.5 x 2m light spread.
Ensure the fixture is hung horizontally.
The LED fixture’s modular design uses intelligent LED drivers which can decrease or increase power to
match the amount of 100W light bars installed on the fixture automatically. If not all light bars are required,
the drivers will only draw power required for the amount of light bars connected eg if six light bars are
connected the drivers will only draw 600W to power them.
Warning! At least one light bar must be installed in the fixture before switching on.
Attach cable hangers
to mounting hooks.
Connect manual dimmer cable or lighting
controller cable to SIG IN port (left socket).
Changing and replacing light bars and modular use

6.7 Connecting the LED fixture to the mains
Warning! Make sure mains power is switched off.
Warning! Ensure the power supply cable is not coiled and does not touch any hot surfaces.
Warning! Connect the cables according to local rules, safety regulations and electrical code.
Warning! If not using an external lighting controller ensure external switching gear can cope
with theinrush current of the LED fixture. Always use a timer contactor suitable for switching
a capacitive load. Never use household timers to switch the LED fixture!
Ensure the LED fixture power supply cable twist-lock connector is correctly aligned to
the AC INPUT connector on the fixture frame and push together until click-locked.
Connect mains power plug to switching gear/power supply.
Switch on mains power.
To disconnect; turn twist-lock connector
anti-clockwise to unlock and pull
apart from fixture.
6.6 Connecting fixtures in series for external control
For detailed instructions please refer to the Lumatek Control Panel manual.
Position and hang each fixture appropriately. Zeus series fixtures use 0-10V signal protocol for control.
Connect controller output signal cable to fixture 1 SIG IN connector.
Connect daisy-chain control signal cable from fixture 1 SIG OUT connector to fixture 2 SIG IN connector.
Continue to connect fixtures in series for up to 100 fixtures per controller, see Fig.

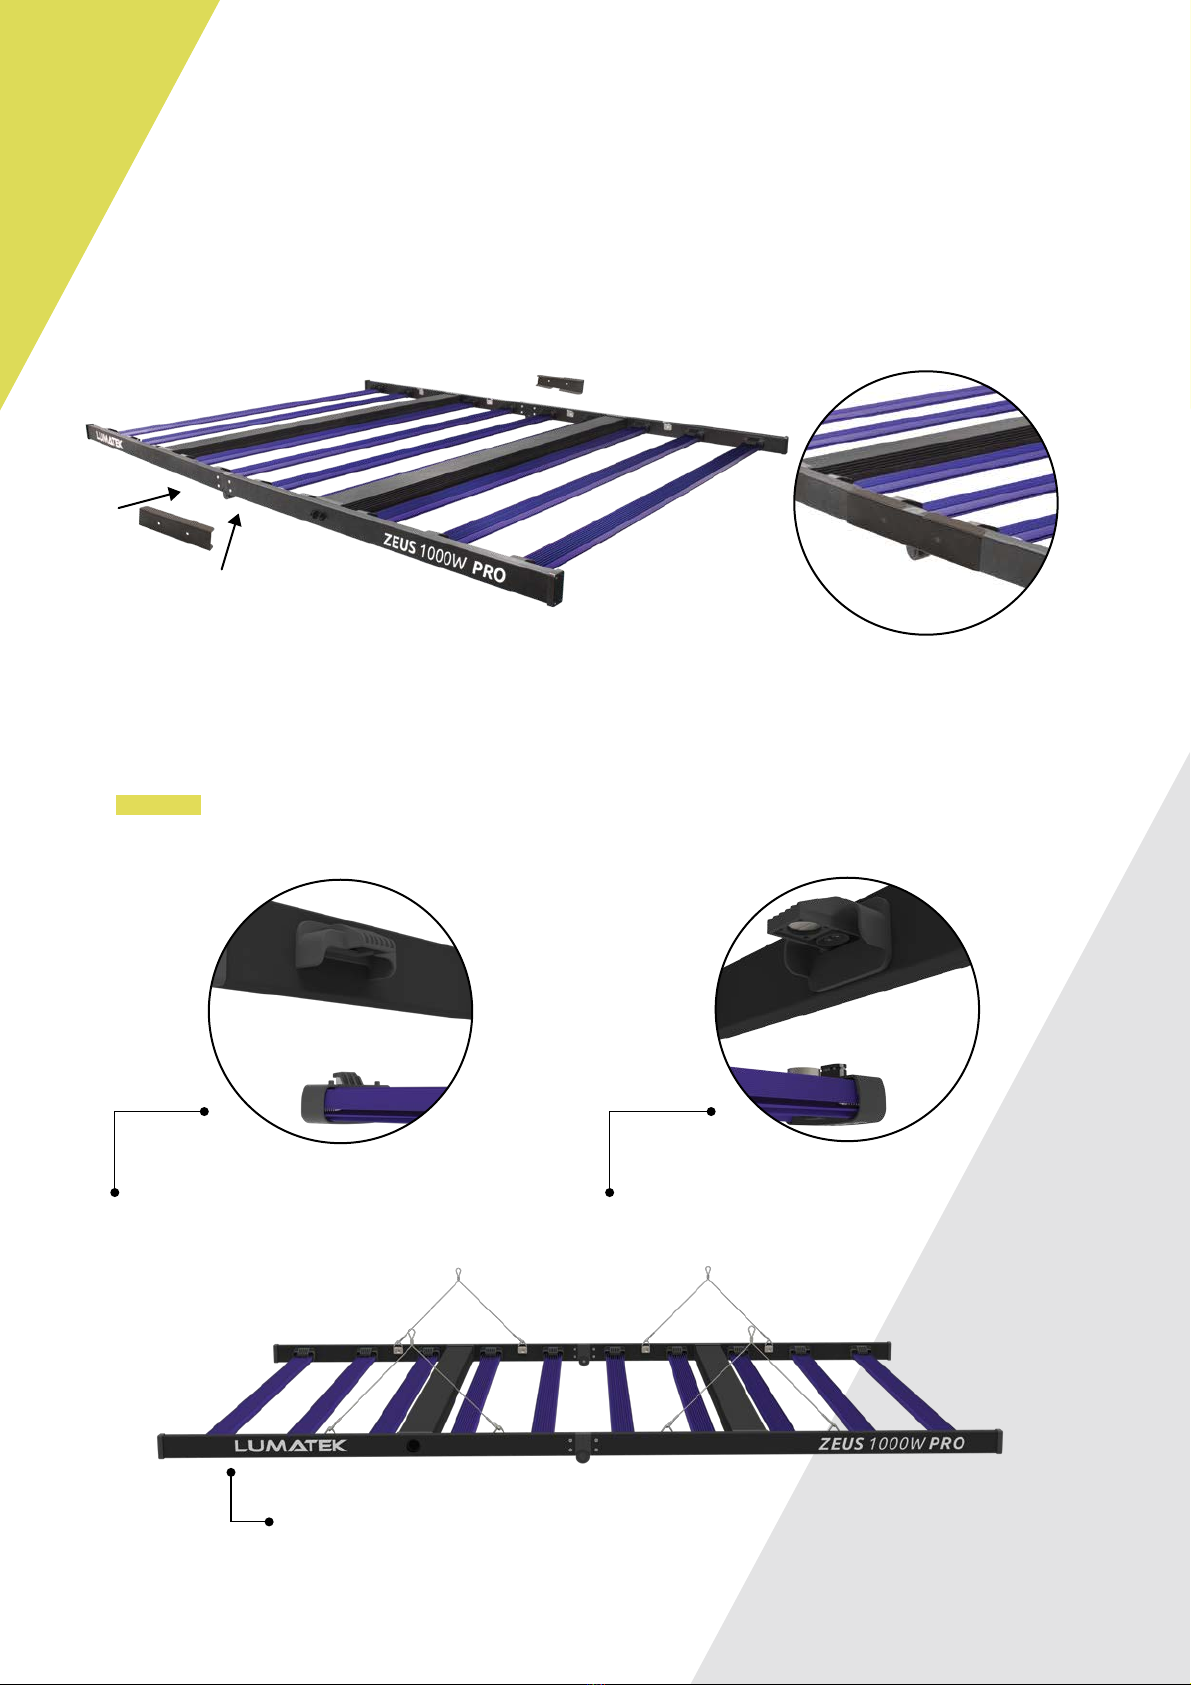
Warning! Always ensure at least one light bar is connected to the fixture before switching on.
The Zeus 1000W Pro fixture has two intelligent 500W Pro LED drivers which can increase or decrease
power to match the amount of light bars connected to the system automatically.
Warning! Always wait 20 – 30 minutes for the LED light bars to cool down.
Warning! Disconnect the LED fixture from mains before performing any maintenance or repairs.
Warning! Do not connect or disconnect the LED fixture under load.
Warning! Do not open or disassemble the LED fixture, it contains no serviceable parts inside. Opening the LED
fixture can be dangerous and will void the warranty.
Warning! Always wait 20 – 30 minutes for the LED light bars to cool down.
Caution! Do not clean the LED fixture with detergents, abrasives or other aggressive substances.
Regularly check the LED fixture for dust or dirt build up. Clean if necessary. Contamination may cause
overheating and decreased performance.
Clean the outside of the LED fixture using a dry or damp cloth.
Regularly check the cables of the LED fixture to ensure it is undamaged.
7. PRECAUTIONS WHEN USING THE LED FIXTURE
9. STORAGE AND DISPOSAL
8. INSPECTION, MAINTENANCE AND REPAIR
Store the LED fixture in a dry and clean environment, with an ambient temperature of -25ºC to 55ºC.
The product must not be discarded as unsorted municipal waste but must be collected separately for the
purpose of treatment, recovery and environmentally sound disposal.
10. WARRANTY
Lumatek Ltd warrants the mechanical and electronic components of their product to be free of defects in
material and workmanship if used under normal operating conditions for a period of five (5) years from the
original date of purchase. If the product shows any defects within this period and that defect is not due to user
error or improper use Lumatek Ltd shall, at its discretion, either replace or repair the product using suitable new
or reconditioned products or parts. In case Lumatek Ltd decides to replace the entire product, this limited
warranty shall apply to the replacement product for the remaining initial warranty period, i.e. five (5) years
from the date of purchase of the original product. For service; return the product to your shop with the original
sales receipt.
For more information on Lumatek products
visit www.lumatek-lighting.com

LUMATEK ZEUS 1000W
PRO LED MANUAL
ESPANÕL
1. Introducción
3.1 Información general del producto
3.2 Especificaciones técnicas
3.3 Dimensiones de la luminaria
3.4 Gráfico de distribución cuántica espectra
3.5 Curva de distribución luminosa
3.6 Medio Ambiente
3.7 Legal
6.1 Montaje e instalación de accesorios
6.2 Conectar las barras de luz LED
6.3 Cambio y sustitución de barras luminosas y uso modular
6.4 Instalación de la luminaria
6.5 Conexión del regulador manual o del controlador de
iluminación externo
6.6 Conexión de luminarias en serie para control externo
6.7 Conexión de la luminaria LED a la red eléctrica
2. Descripción del producto
3. Información del producto y especificaciones
4. Recomendaciones de seguridad y advertencias
5. Contenido
7. Precauciones al usar el dispositivo LED
8. Inspección, mantenimiento y reparación
9. Almacenamiento y eliminación
10. Garantía
6. Instalación
TABLA DE CONTENIDO

1. INTRODUCCIÓN
Muchas gracias por comprar la luminaria LED de barra multiluz lineal Lumatek Zeus 1000W Pro. El presente
manual describe cómo instalar y usar la luminaria Zeus Pro; por favor lea este manual detenidamente antes
de intentar u operar cualquier sistema de la serie Zeus de Lumatek. Si usted no se siente cómodo con la
instalación de sistemas de iluminación de alto rendimiento, por favor busque los servicios de un profesional de
instalación calificado.
El Lumatek Zeus 1000W Pro LED es una luminaaria LED hortícola electrónico que utiliza un diseño amplio con
dos controladores LED inteligentes Pro integrados de 500 W que hacen que el accesorio sea controlable y
regulable externamente. La luminaria ZUES 1000W Pro es una solución de iluminación superior de ciclo
completo de ultra alto rendimiento para el cultivo de horticultura comercial, con la potencia y la
flexibilidad para escalar desde la propagación y la clonación a través del crecimiento vegetativo
hasta mayores intensidades lumínicas en floración.
En este manual, el LED Lumatek Zeus 1000W Pro se denominará “la luminaria LED”.
2. DESCRIPCIÓN DEL PRODUCTO
3. INFORMACIÓN Y ESPECIFICACIONES DEL PRODUCTO
3.1 Información general del producto
NOMBRE DEL PRODUCTO
CÓDIGO DE PRODUCTO
FABRICANTE Lumatek EU
Reino Unido/EU
EAN
TIPO DE ENCHUFE
3.2 Especificaciones técnicas
ESPERANZA DE VIDA
PPF
TEMPERATURA DE FUNCIONAMIENTO
HUMEDAD DE TRABAJO
SPECTRO
EFICACIA
FUENTE DE LUZ
DIMENSIONES
PESO
ÁNGULO DE HAZ
ATENUADOR MANUAL /
CONTROLADOR DE ILUMINACIÓN EXTERNA
IMPERMEABLE / A PRUEBA DE POLVO
EspectrocompletoF
60000H
-20ºC -- +40ºC
20% - 90%
IP65
120º
Protocolo analógico 0-10V
LUMLED009
5060560030720
2925 μmol/s
Hasta 2.9 μmol/J
Especificaciones superiores LUMILED (W) & Osram (R) RED
1700 x 1099.6 x 48.2mm
17.5Kg
Zeus LED Pro 1000W

3.3 Dimensiones del accesorio
1099.6mm
1700mm
48.2mm
Vmains=230V
50/60Hz AC
100%
RELACIÓN DE
ATENUACIÓN
VOLTAJE DE
ENTRADA (V)
75%
50%
25%
1075
POTENCIA DE
ENTRADA(W)
821
530
268
4.76
CORRIENTE DE
ENTRADA (A)
3.66
2.41
1.36
Vmains=240V
50/60Hz AC
100%
75%
50%
25%
1075
820
530
267
4.56
3.51
2.33
1.33
Vmains=277V
50/60Hz AC
100%
75%
50%
25%
1075
818
530
268
3.99
3.08
2.1
1.26

3.5 Curva de distribución de luz
3.6 Medio ambiente
La luminaria LED está diseñado para ser utilizado en salas de cultivo con clima controlado, granjas interiores e
invernaderos. El producto puede usarse en ambientes húmedos, pero no en ambientes mojados o al aire libre.
El producto funcionará a temperaturas ambiente de -20ºC a 40ºC, pero funcionará a un nivel óptimo entre
20ºC y 30ºC.
El producto funcionará en 20% - 90% de humedad, sin condensación.
3.7 Legal
Este producto cuenta con la certificación CE y cumple con los estándares de prueba de directivas
LVD y EMC.
¡Advertencia! ¡Por favor lea atentamente las siguientes advertencias antes de usar o trabajar con el producto!
• Siempre siga las reglas y regulaciones locales al instalar o usar la luminaria LED.
• No abra ni desmonte la luminaria LED, ya que no contiene piezas reparables en su interior.
El abrir o modificar la luminaria LED puede ser peligroso y anulará la garantía.
• No utilice el la luminaria LED cuando la luminaria LED o su cable de alimentación estén dañados.
Reemplace el cable de alimentación solo con un cable con clasificación correcta.
• Las modificaciones en los cables puede dar lugar a efectos electromagnéticos no deseados, lo que hace
que el producto no cumpla con los requisitos legales.
4. RECOMENDACIONES DE SEGURIDAD Y ADVERTENCIAS
3.4 Gráfico de distribución cuántica espectral
longitud de onda (nm)
La serie Zeus Pro utiliza LEDs blancos y rojos hortícolas altamente eficientes de alta eficiencia
para crear un espectro completo equilibrado de luz de calidad ideal para la fotosíntesis.
-2.9349
-1.14674
300 500 600 700 800

• No exponga el dispositivo LED a:
Humedad condensada, neblina intensa, neblina o rociado directo;
Temperaturas ambiente fuera del rango especificado;
Polvo y contaminación;
Luz solar directa durante el uso o luz HID que podría calentar el balasto.
• Siempre desconecte el dispositivo de la red eléctrica antes de realizar cualquier mantenimiento.
• Siempre permita un período de enfriamiento de al menos 20-30 minutos antes de tocar las barras de luz LED.
¡El tocar las barras LED cuando el dispositivo está encendido o inmediatamente después puede provocar
quemaduras!
• La convección natural elimina el calor del disipador térmico. Para que el sistema pueda enfriarse bien, se
requiere al menos 5 cm de espacio entre la luminaria y el techo de su área de cultivo.
• Por favor no utilice materiales abrasivos o agentes de limpieza agresivos para limpiar la luminaria LED, ya
que esto puede dañar la óptica secundaria. En su lugar, use una tela limpia y seca.
• No utilice el dispositivo cerca de sustancias inflamables, explosivas o reactivas. La luminaria LED puede
alcanzar temperaturas de 40ºC.
• No use vaporizadores de azufre o agua pulverizada.
• La instalación y el uso del dispositivo son responsabilidad del usuario final. El uso o una instalación incorrecta
pueden provocar fallas y daños en la luminaria LED. El daño a la luminaria LED y a los circuitos electrónicos
como resultado de una instalación y uso incorrecto revocará la garantía.
¡Advertencia! El montaje e instalación de la luminaria LED debe realizarse de acuerdo con las leyes y
regulaciones locales aplicables.
¡Advertencia! El instalador tiene la responsabilidad de una instalación correcta y segura.
¡Advertencia! Por favor asegúrese que el cableado local pueda soportar los requisitos de voltaje y corriente
del dispositivo.
¡Advertencia! Evite los cables en espiral y mantenga los cables de alimentación separados para ayudar a
evitar interferencias electromagnéticas.
¡Advertencia! No conecte ni desconecte el dispositivo LED bajo carga.
5. CONTENIDO
6. INSTALACIÓN
10x BARRAS DE LUZ LED PRO
1x MARCO DE FIJACIÓN PLEGABLE
Que contiene dos controladores
LED Pro integrados de 500W
1x CONTROLADOR DE REGULACIÓN 0-10V
Connects to ‘SIG IN’ connector.
1x MANUAL DE USUARIO
4x PERCHAS METÁLICAS PARA CABLES
1x CABLE DE FUENTE DE ALIMENTACIÓN 240V
2x PLACAS DE METAL CON
CERRADURA DE BISAGRA

Instale primero el extremo del gancho;
inserte el gancho en el orificio cuadrado
Posteriormente, inserte el otro extremo; alinee el
conector magnético de la barra de luces con el
orificio redondo del conector del marco e inserte
el pasador macho en la toma hembra. Asegúrese
que la conexión magnética sea segura.
6.2 Conectar las barras de luz LED
Ensamble el resto de las barras de luz en el marco de la instalación.
Fije colgadores metálicos para cables a los ganchos de montaje dentro del marco.
¡Advertencia! Las barras de luz se envían con cubiertas protectoras de plástico sobre los diodos. Asegúrese de
quitar estas fundas protectoras antes de usar.
6.1 Montaje e instalación de accesorios
El marco del accesorio utiliza un diseño plegable para facilitar el uso y el almacenamiento.
Después de retirar los componentes del embalaje, abra el marco por completo.
Hay una placa metálica de bloqueo de bisagra para cada bisagra para asegurar y equilibrar el accesorio.
Alinee cada placa correctamente con la bisagra y empuje hacia fuera del marco / bisagra y haga clic
en su lugar.
Fig. Las placas de bloqueo de las bisagras se conectan empujando en el
exterior del marco sobre cada bisagra.

6.3
6.5 Conexión del regulador manual o del controlador de iluminación externo
El control del dimmer o el controlador de iluminación se conecta al conector 'SIG IN' en el marco de la
luminaria. Esto permite ajustar la intensidad de luz (salida PPF) de acuerdo con los requisitos.
La intensidad de la luz de la luminaria LED se puede ajustar sin cambiar la distribución de potencia
espectral relativa ni perder eficiencia.
Retire la tapa antipolvo y asegúrese que los conectores macho y hembra estén correctamente alineados y, a
continuación, empuje juntos hasta que se bloqueen por clic. Para desconectar, gire el cierre giratorio en sentido
antihorario y jálelo.
6.4 Instalación de la luminaria
¡Advertencia! Monte el sistema en algo que pueda soportar el peso de la luminaria LED.
Asegúrese que todas las barras de luz estén instaladas correctamente y sean seguras. Con cuidado, gire el
dispositivo y conecte los ganchos de cable de metal a los ganchos de montaje. Cuelgue el dispositivo en la
posición y altura requeridas. Para un rendimiento óptimo, coloque el aparato entre 50 y 100 cm por encima
de la copa de la planta para una distribución de la luz de 1,5 x 2 m. Asegúrese que la luminaria esté
colgada horizontalmente.
El diseño modular de la lámpara LED utiliza controladores LED inteligentes que pueden disminuir o
aumentar la potencia para que coincida con la cantidad de barras de luz de 100 W instaladas en el
dispositivo automáticamente. Si no se necesitan todas las barras de luz, los controladores sólo consumirán
la energía necesaria para la cantidad de barras de luz conectadas, por ejemplo, si se conectan seis
barras de luz, los controladores sólo consumirán 600 W para alimentarlas.
¡Advertencia! Se debe instalar al menos una barra de luz en el dispositivo antes de encenderlo.
Fije los colgadores de
cables a los ganchos
de montaje.
Conecte el cable de atenuación manual o
el cable del controlador de iluminación al
puerto SIG IN (zócalo izquierdo).
Cambio y sustitución de barras luminosas y uso modular

6.7 Conexión de la luminaria LED a la red eléctrica
¡Advertencia! Por favor asegúrese que la red eléctrica esté apagada.
¡Advertencia! Asegúrese que el cable de alimentación no esté enrollado y que no toque
ninguna superficie caliente.
¡Advertencia! Conecte los cables de acuerdo con las normas locales, las normas de seguridad
y el código eléctrico.
¡Advertencia! Si no utiliza un controlador de iluminación externo, asegúrese que el equipo de
conmutación externo pueda hacer frente a la corriente de entrada de la luminaria LED.
Utilice siempre un contactor temporizador adecuado para cambiar una carga capacitiva.
¡Nunca use temporizadores domésticos para cambiar la luminaria LED!
Asegúrese que el conector de bloqueo de giro del cable de la fuente de alimentación del
dispositivo LED esté correctamente alineado con el conector AC INPUT del bastidor de
la instalación y empuje hasta que se bloquee el clic.
Conecte el enchufe de alimentación de la red a cambio de engranaje/fuente de alimentación
Encienda la alimentación de red
To disconnect; turn twist-lock connector
anti-clockwise to unlock and pull
apart from fixture.
6.6 Conexión de luminarias en serie para control externo
Para obtener instrucciones detalladas, por favor consulte el manual del panel de control de Lumatek.
Coloque y cuelgue cada luminaria adecuadamente.
Las luminarias de la serie Zeus utilizan el protocolo de señal 0-10V para el control.
Conecte el cable de señal de salida del controlador al conector SIG IN del accesorio 1.
Conecte el cable de señal de control en cadena del conector SIG OUT de la luminaria 1 al conector
SIG IN de la luminaria 2.
Continúe conectando las luminarias en serie para un máximo de 100 dispositivos por controlador,
consulte la fig.

¡Advertencia! Asegúrese siempre que al menos una barra de luz esté conectada al dispositivo antes de
encenderla. El dispositivo Zeus 1000W Pro tiene dos controladores LED Pro inteligentes de 500 W que pueden
aumentar o disminuir la potencia para que coincida con la cantidad de barras de luz conectadas al sistema
automáticamente.
¡Advertencia! Espere siempre entre 20 y 30 minutos a que las barras de luces LED se enfríen
antes de manipular la lámpara.
¡Advertencia! Siempre desconecte el dispositivo de la red eléctrica antes de realizar cualquier mantenimiento.
¡Advertencia! No conecte ni desconecte el dispositivo LED bajo carga.
¡Advertencia! No abra ni desmonte la luminaria LED, ya que no contiene piezas reparables en su interior.
El abrir o modificar la luminaria LED puede ser peligroso y anulará la garantía.
¡Advertencia! Espere siempre entre 20 y 30 minutos a que las barras de luces LED se enfríen
antes de manipularlas.
¡Precaución! No limpie el dispositivo con detergentes, abrasivos u otras sustancias agresivas.
Revise regularmente el dispositivo para detectar la presencia de polvo o suciedad acumulada.
Límpielo de ser necesario. La contaminación puede causar sobrecalentamiento y disminución del rendimiento.
Limpie el exterior de la lámpara LED con un paño seco o húmedo.
Compruebe regularmente el cableado del producto para asegurarse que no esté dañado.
7. PRECAUCIONES AL USAR EL DISPOSITIVO LED
9. ALMACENAMIENTO Y ELIMINACIÓN
8. INSPECCIÓN, MANTENIMIENTO Y REPARACIÓN
Almacene la luminaria en un ambiente seco y limpio, con una temperatura ambiente de -25ºC a 55ºC.
No deseche el producto como residuo municipal sin antes clasificarlo, ya que debe recogerse por separado
con fines de tratamiento, recuperación y eliminación ambientalmente racional.
10. GARANTÍA
Lumatek garantiza que los componentes mecánicos y electrónicos de su producto estén libres de defectos
de material y mano de obra si se utilizan en condiciones normales de funcionamiento durante un período de
cinco (5) años a partir de la fecha original de compra. Si el producto muestra algún defecto dentro de este
período y ese defecto no se debe a un error del usuario o uso indebido, Lumatek deberá, a su discreción,
reemplazar o reparar el producto con productos o piezas nuevas o reacondicionadas. En caso de que
Lumatek decida sustituir todo el producto, esta garantía limitada se aplicará al producto de reemplazo
durante el período de garantía inicial restante, es decir, cinco (5) años a partir de la fecha de compra del
producto original. Para ser atendido, devuelva la luminaria a su tienda con el recibo de compra original.
Para más información sobre los productos Lumatek
visitar www.lumatek-lighting.com

LUMATEK ZEUS 1000W
PRO LED MANUAL
DEUTSCH
1. Einführung
3.1 Allgemeine Informationen zum Produkt
3.3 Abmessungen des Geräts
3.2 Technische Daten
3.4 Spektrale Quantenverteilungskurve
3.5 Lichtverteilungskurve
3.6 Rahmenbedingungen
3.7 Rechtliches
6.1 Montage und Installation der Leuchte
6.2 Anschließen der LED-Lichtleisten
6.3 Wechseln und Ersetzen der Lichtleisten
und modularer Einsatz
6.4 Montage der Leuchte
6.5 Anschluss des manuellen Dimmers oder
der externen Lichtsteuerung
6.6 Anschluss der Leuchten in Reihe für externe Steuerung
6.7 Anschluss der LED-Leuchte an das Stromnetz
2. Produktbeschreibung
3. Produktinformation und Spezifikationen
4. Sicherheitsempfehlungen und Warnhinweise
5. Inhalt
7. Vorsichtsmaßnahmen bei der Verwendung des LED-Gerätes
8. Inspektion, Wartung und Reparatur
9. Lagerung und Entsorgung
10. Garantie
6. Montage
INHALTSVERZEICHNIS
Table of contents
Languages:
Other Lumatek Lighting Equipment manuals

Lumatek
Lumatek LUMLED012 User manual

Lumatek
Lumatek ZEUS 465W PRO 2.9 User manual

Lumatek
Lumatek LEDL95211 User manual

Lumatek
Lumatek ZEUS 600W 2.6 User manual

Lumatek
Lumatek CONTROL PANEL PLUS 2.0 User manual

Lumatek
Lumatek ATS300W User manual

Lumatek
Lumatek LUMBC004 User manual

Lumatek
Lumatek Pro 600 EU/UK User manual

Lumatek
Lumatek ATS200W User manual

Lumatek
Lumatek VF650W User manual