Luxli ORC-TAIKO-2x1 User manual

QUICKSTART GUIDE
Firmware Version 1.0.0

2
Conduct an orchestra of lights.
The Luxli Orchestra series can produce a dazzling symphony of light. Synchronize LED light units of all
sizes, choose from millions of possible colors, apply lighting effects from four selectable modes, and
control them instantly with the powerful Composer mobile app.
For the latest version of the Composer mobile app,rmware updates,and a PDF of the full user manual,
as well as videos and ideas for creative uses for the Taiko, visit luxlilight.com.

3
Precautions
• Please read and follow these instructions, and keep this manual in a safe place.
• Keep this product away from water and ammable gases or liquids.
• Use only the correct, recommended voltage.
• Do not attempt to disassemble or repair this product.
• Clean this product with only a soft, dry cloth.
•
To avoid damage to this product, be careful not to overtighten or improperly thread any of the
threaded ttings.
• All images are for illustrative purposes only.

4
Back:
1. V-Mount battery plate
2. Power input
3. Micro-USB port for rmware updates
(visit luxlilight.com for details)
Overview
4. 5/8 in. receiver
5. Locking handle
6. 5-pin DMX In/Out
7. Tilt lock handle
2 4 53
1
6
7

5
Top:
14.Diffuser ap
15.Thumb tab
16.Barndoor slot
17.Diffuser slot
Control Panel:
8. Brightness dial
9. Power button
10.Mode selector
11.LCD screen
12.Function buttons
13.Adjustment dial
MODE
32%
3900K
+/- GREEN
0%
CCT
32%
8 9 10 11 13
1514 1716
12

6
Setting Up the Taiko
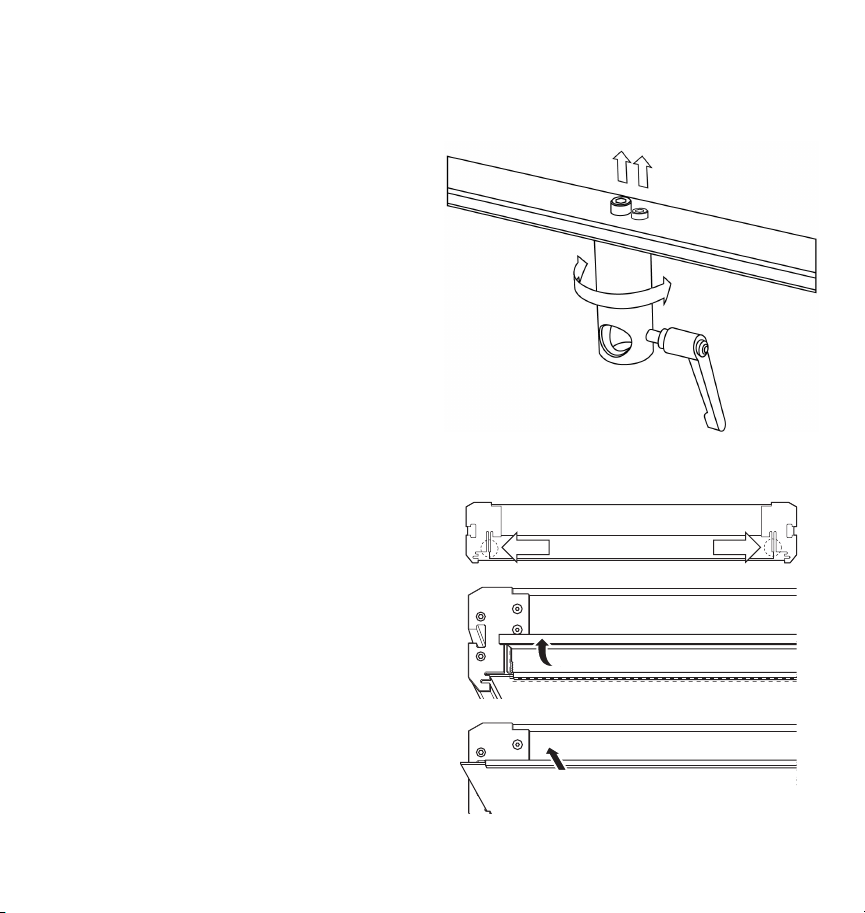
Attaching the Tilt Lock Handle
The tilt lock handle can be attached to either side of the Taiko.To attach the handle,follow these steps:
1.
Place the Taiko and yoke down on a at surface.
2.
Use the Hex key to remove one of the tilt
control screws, and replace with the tilt lock
handle.Screw in the handle so the threads are
engaged, but don’t tighten it.
3.
Use the Hex key to tighten the control screw on
the other side of the yoke.Tighten it enough
until there is some resistance while tilting the
Taiko in the Yoke.
4.
Tighten the handle until the yoke is locked and
secure.
Note: If the yoke seems too lose when the tilt lock handle is disengaged, use the Hex key to slightly
tighten the control screw opposite the handle.
Mounting the Taiko to a Light Stand
Loosen the mounting lock, and place the receiver over the light stand’s 5/8” pin.Tighten the handle
until secure.

7
Install/Remove the Diffuser
The Taiko includes a medium-density diffuser. Light- and heavy-density diffusers are also available
separately.
Reversing the Receiver’s Locking Handle
For mounting and handling convenience, you can change the side the locking handle is on:
1.
Press the thumb tabs, and lift up the diffuser ap.
2. Slide the diffuser in or out of the diffuser slot.
3.
Close the diffuser ap so it’s held in place by
the thumb tabs.
1.
Remove the Taiko from the light stand, and
place it down on a at surface.
2.
Use a hex key to unscrew the center and outer
mounting screws.
3.
Turn the receiver so the handle is on the
opposite side.
4.
Replace the center and outer mounting screws
and tighten until rm.

8
User Interface
Mode Selector
Press the mode selector to cycle through the four operating modes: CCT, RGB, Filter,and Special Effects.
Brightness Dial
In all operation modes, the Brightness dial adjusts the brightness from 100% to 0% in 1% increments.
In all operation modes, press the Brightness dial to toggle between the set brightness and 0%.
Function Buttons
The function buttons access the screen functions that are indicated next to the button.
In each mode, the Adjustment and Brightness dials can change settings.
Adjustment Dial
In all operation modes, the Adjustment dial changes the value of the highlighted function.

9
CCT Mode
CCT Adjustment screen
Use the Adjustment dial to set a color temperature
between 2800 and 10,000 K in 50 K increments.
Tint (+/− Green) Screen
Tap the Function button next to “+/− Green” to
access the Tint adjustment screen.
Use the adjustment dial to set the green/magenta
color shift between +100% (full plus green) to
−100% (full minus green) in 1% increments.
Press the CCT button to return to the CCT
Adjustment screen.
32%
3900K
+/- GREEN
0%
CCT
32%
17%
CCT
+/- GREEN
3900K
32%

10
RGB Mode
Hue Adjustment
Use the adjustment dial to set the hue from 0° to
360° on the color wheel.The crosshair icon moves
horizontally to represent the location of the hue on
the color wheel.
Saturation Adjustment
Tap the function button next to “SAT” to adjust
saturation levels.
Use the adjustment dial to set the saturation of
the hue from 100% to 0% in 1% increments. The
crosshair icon moves vertically to represent the
level of saturation.
Press the Hue button to return to the hue
adjustment screen.
HUE
100
SAT
169
32%
100
SAT
HUE
169
32%

11
Filter Mode
Filter Screen
Use the adjustment dial to scroll through the 150
digital gel lters.
Important! The selected lter is active only in Filter
mode.
CCT Adjustment
Adjusts the base color temperature without
leaving Filter mode.
Tap the CCT function button to adjust the base
color temperature using the adjustment dial.
Press the Gel function button to change the active
lter.
Medium Purple
Mauve
Bright Pink
FolliesPink
Rose Pink
Smokey Pink
Scarlet
S. Rose Pink
Bright Rose
54
CCT
54
GEL
3900
32%
Medium Purple
Mauve
Bright Pink
FolliesPink
Rose Pink
Smokey Pink
Scarlet
S. Rose Pink
Bright Rose
54
CCT
54
GEL
3900
32%

12
Special Effect Mode
Special Effect Screen
Use the adjustment dial to select one of ten
preprogrammed effects by scrolling down the list
and pressing the Play button . Pressing the Stop
button stops the effect.
Note:The LED panel turns off when Special Effects
mode is selected.The LED panel will remain off until
the effect is started.
The Taiko is loaded with 10 animated special effects. Each effect has multiple parameters that can be
adjusted in the edit menu.
Edit Menu
Pressing the button opens the Edit menu,where
the different programmable parameters of each
effect can be modied.Tap the conrm button to
apply the new setting, or tap the back button to
return to the previous menu.
Note: For descriptions of each special effect
and their programmable parameters, go to
luxlilight.com to download the full user manual.
32%
CCT chase
Color chase
Explosion
Fire
Fireworks
Lightning
Fire type
Candle
Campfire
Bonfire
CONFIRM
BACK

13
Main Menu
The Presets Menu
To save settings to a preset,do the following:
1. Scroll to the Presets menu with the Adjustment
dial, and press the Select button.
2.
Use the Adjustment dial to select a preset
number, and press Save.
3. At the prompt,press Conrm.
Press the function button for the main menu.
The main menu can be accessed in all operating
modes.
To recall a preset:
1. Select the preset number with the Adjustment dial, and press Load.
2. At the prompt,press Conrm.The Taiko will load the saved settings.
Press the Back button to return to the previous screen.
Presets
DMX
Bluetooth
About SELECT
BACK
Main menu
Save
Preset A
Preset B
Preset C
Preset D
Factory default
Load
BACK
Presets

14
The DMX Menu
The Taiko offers 512 addresses. To set the DMX
address:
1.
Scroll to the DMX Address menu with the
Adjustment dial, and press the Select button.
2.
Use the Adjustment dial to select an address
from 1 to 512, and press Save.
3. At the prompt,press Conrm.
To set the DMX mode, follow these steps:
1.
Scroll to the DMX Mode menu with the
Adjustment dial, and press the Select button.
2.
Use the Adjustment dial to select a DMX mode,
and press Conrm.
For a description of each DMX mode, go to
luxlilight.com to download the full user manual.
DMX Master
DMX Address
DMX Mode
Off
1
CCT 8 bit
SELECT
BACK
DMX settings
CCT 8 bit
CCT 16 bit
HSL 8 bit
HSL 16 bit
GEL 8 bit
GEL 16 bit
CONFIRM
BACK
DMX Mode

15
The Bluetooth Menu
Access the Bluetooth menu to turn Bluetooth on
or off.
The About Menu
The About menu displays the Taiko’s serial number
and rmware version.
Off
On
CONFIRM
BACK
Bluetooth state
Serial number
Firmware version
BACK
About
12FFB0006
1.0.0

16
Specications
Light panel RGBAW LED
Beam angle 76° (without diffuser)
Bluetooth version 4.2 LE
Battery mount V-mount (×2)
Battery requirements 14.4–14.8 V, 10 A minimum per battery
DC power input 4-pin XLR 24–36 V, 10 A
Max power consumption 250 W
Dimensions (W × H × D) 27 × 17.75 × 3 in. (68.6 × 45.1 × 7.6 cm)
Weight (with yoke) 16.2 lb. (7.3 kg)

17
Troubleshooting
• If you encounter any problems, rst try turning the device off and then on.
• If the problem persists, remove the batteries or power supply for 15 seconds, and then restart.
•
Go to luxlilight.com to make sure you have the most recent rmware update. If a new rmware
version is available, follow the instructions on how to download it to your light.

18
FCC Compliance Statement
This device complies with part 15 of the FCC rules.Operation is subject to the following two conditions:
1. This device may not cause harmful interference
2.
This device must accept any interference received,including interference that may cause undesired
operation.
Important: Changes or modications to this product not authorized by Gradus Group could void the
electromagnetic compatibility (EMC) and wireless compliance and negate your authority to operate
the product.This product has demonstrated EMC compliance under conditions that included the use
of compliant peripheral devices and shielded cables between system components.It is important that
you use compliant peripheral devices and shielded cables between system components to reduce
the possibility of causing interference to radios, televisions, and other electronic devices.

19
One-Year Limited Warranty
This LUXLI product is warranted to the original purchaser to be free from defects in materials and
workmanship under normal consumer use for a period of one (1) year from the original purchase
date or thirty (30) days after replacement, whichever occurs later.The warranty provider’s responsibility
with respect to this limited warranty shall be limited solely to repair or replacement, at the provider’s
discretion, of any product that fails during normal use of this product in its intended manner and in
its intended environment. Inoperability of the product or part(s) shall be determined by the warranty
provider. If the product has been discontinued, the warranty provider reserves the right to replace it
with a model of equivalent quality and function.
This warranty does not cover damage or defect caused by misuse, neglect,accident,alteration, abuse,
improper installation or maintenance. EXCEPT AS PROVIDED HEREIN,THE WARRANTY PROVIDER MAKES
NEITHER ANY EXPRESS WARRANTIES NOR ANY IMPLIED WARRANTIES,INCLUDING BUT NOT LIMITED TO ANY
IMPLIED WARRANTY OF MERCHANTABILITY OR FITNESS FOR A PARTICULAR PURPOSE.This warranty provides
you with specic legal rights, and you may also have additional rights that vary from state to state.
To obtain warranty coverage, contact the Luxli Customer Service Department to obtain a return
merchandise authorization (“RMA”) number, and return the defective product to Luxli along with the
RMA number and proof of purchase. Shipment of the defective product is at the purchaser’s own risk
and expense.
For more information or to arrange service, visit www.luxlilight.com or call Customer Service at
212-594-2353.
Product warranty provided by the Gradus Group.
www.gradusgroup.com
LUXLI is a registered trademark of the Gradus Group.
© 2019 Gradus Group LLC.All Rights Reserved.

luxlilight.com GG1
Table of contents
Other Luxli Lighting Equipment manuals

Luxli
Luxli CELLO 2 User manual

Luxli
Luxli TIMPANI2 User manual

Luxli
Luxli VIOLA 2 User manual

Luxli
Luxli SFT-50R User manual

Luxli
Luxli BICOLOR SFT-10B User manual

Luxli
Luxli ORC-CELLO-10-DK User manual

Luxli
Luxli ORCHESTRA Series User manual

Luxli
Luxli ORC-CELLO-M2 User manual

Luxli
Luxli TIMPANI2 User manual

Luxli
Luxli Timpan-1x1 User manual
Popular Lighting Equipment manuals by other brands

Larson Electronics
Larson Electronics XLE-UVC-XX-SGKT-2X instruction manual

Adam Hall
Adam Hall 87451SMART manual

Vision & Control
Vision & Control LDLF30x360-B470/24V/-a Instructions for use

Coopers of Stortford
Coopers of Stortford G591 Instructions for use

Robe
Robe DMX Control 1024 user manual

Elinchrom
Elinchrom Litemotiv Instructions for use