MACDEV XDR User manual

www.macdevpaintball.com
(c) Copyright 2021 Mac Developments Pty Ltd (MacDev).
MacDev - Proudly Australian
This paintball marker is covered by the following granted patents as well as internaonal pending patents:
U.S. Patent Nos. 5,228,427; 5,755,213; 5,957,119; 6,260,821; 6,349,711; 6,494,195; 6,644,295; 6,644,296; 6,823,857;
6,694,963; 6,810,871; 7,017,497; 7,044,119.
XDRTM
Owners Manual
XDR
TM

XDR Owners Manual
V1.00
Copyright Mac Developments Pty. Ltd. 2021
All rights reserved
No part of this document may be copied or reproduced in any form or by any means without the prior wrien
consent of Mac Developments Pty. Ltd.
Noce is hereby given that this manual is part of the arcle owned in whole by Mac Developments Pty. Ltd., known
as indicated in this manual and drawings. All rights of manufacture and reproducon of such arcles or any part
thereof are reserved by Mac Developments Pty Ltd. Neither said arcle nor any part thereof may be manufactured
or reproduced without the wrien authorizaon from Mac Developments Pty. Ltd. All proprietary rights and
informaon are the sole property of Mac Developments Pty. Ltd.
MacDev, XDR, Prime, Conquest, Gladiator, MatchSck, Cyborg, Shi and Drone are all trademarks of Mac
Developments Pty Ltd.
Statement of Liability
Mac Developments Pty. Ltd. makes no warranes with respect to this documentaon and disclaims any implied
warranes of merchantability or tness for a parcular purpose. The informaon in this document is subject to
change without noce. Mac Developments Pty. Ltd. assumes no responsibility for its resale or safe handling. Mac
Developments Pty. Ltd. assumes no responsibility for physical injury or property damage resulng from its use.
MacDev Warranty
MacDev oers a 12 month limited warranty period on your MacDev manufactured electro-pneumac marker. The
MacDev electro-pneumac marker is warranted to be free from all manufacturing and producon defects for a
period of 12 months from the date of original purchase. If requested by MacDev, an original proof of purchase must
be provided. Warranty excepons include, but are not limited to, accidental damage, misadventure, reasonable
wear and tear and consumable components such as O-rings, detents, baeries and eyes. Warranty work must be
undertaken by an authorized MacDev Tech Centre or at a MacDev sanconed Tech Support booth.
For assistance with your warranty, please visit www.macdevpaintball.com/warranty or contact customer service on
our website (www.macdevpaintball.com)
Warning!
This is not a toy. Misuse may cause serious injury or death. Eye protecon designed specically
for paintball must be worn by user and persons within range. Recommend 18 years or older
to purchase. Persons under 18 must have adult supervision. Do not use muzzle velocies
over 300fps. Do not use within 5m of target. READ OWNER’S MANUAL BEFORE USING. 2

CONTENTS
Know your Marker (Page 5)
All users should read this secon to learn the parts of your marker and their names.
Quick Setup (page 7)
Learn how to set your marker up for use the rst me.
Install an air system
Fit your loader
Turning on your marker
Understanding the OLED
Adjusng your velocity
Adjusng your trigger
Using a mech frame accessory
Charging your baery
Advanced Setup (Page 12)
Essenal reading on how to use your marker.
Tourney Lock
Entering program mode
Finding and changing sengs
Sengs in detail
Maintenance (Page 16)
Maintaining your purchase is essenal to long term product sasfacon.
Basic cleaning
Maintaining the drivetrain
Maintaining the inline regulator
Troubleshoong (Page 19)
Solving common dicules.
Common problems and soluons
Technical assistance
Specicaons (Page 22)
4

KNOW YOUR XDRTM
2
1
3
4
5
7
8
10
6
11
9
Congratulaons on your purchase of a new MacDev XDR. Your marker uses a highly ecient spool valve drive for a
at, constant and accurate shot. The drive is powered by a high precision, low power solenoid valve, manufactured
in house by MacDev. The enre system is controlled by a new generaon, robust microprocessor running a
proprietary operang system.
The latest features have been added around this powerful base core to bring you a marker with unrivalled usability,
quality and reliability.
Please take the me to learn the parts of your XDR, it will help you when reading this manual.
Numbered basic parts as shown in the gure on the le:
1. Two piece XDR barrel
2. Feed clamp lever (used to ax your loader)
3. Drive cover (pull up and back to remove)
4. Velocity regulator adjustment (an clockwise to increase velocity)
5. Eye covers (access detents here)
6. OLED display used to view gun status/sengs
7. Trigger with screw adjustments
8. Power and programming buons
9. Venng ASA, screw your air system in here
10. Venng ASA on/o cap (used to turn the air on or o)
11. Front grip assembly
12. USB charge point
Please note, the features and included accessories are subject to change, and may vary from those show in this manual.
6
12

QUICK SETUP Install an air system
Your marker can accept any standard screw in air
system. A pressure of 450psi is preferred, however
300-800psi is acceptable.
1. Unscrew the ASA cap by 3 turns
2. Screw in an air system
3. Screw the cap back in to engage the air.
WHEN SCREWING YOUR
AIR SYSTEM INTO THE ASA,
THE THREADS SHOULD BE
LOOSE. IF AT ANY POINT
THEY BECOME TIGHT, DO
NOT FORCE THE THREADS,
THIS MAY CAUSE DAMAGE
TO YOUR AIR SYSTEM OR
YOUR MARKER!
1
3
8
2
Fit your loader
1. Open the lever
2. Push in your loader
3. Close the lever
4. Make ne adjustments to the clamp force using a
hex key tool.
Use any loader you like with the elec frame version, your mark-
er will use the beam sensor to wait for a ball before ring. If
you would like to re at a faster rate, use a faster loader. When
using the mech frame accessory, use a fast leader, because the
beam sensor is not used.
1
3
2
4

Turning on your marker
Tap the power buon to turn on. Long press the
power buon to turn o.
Long press the scroll buon to toggle the eyes on
and o.
Understanding the OLED display
Your OLED display indicates the baery level, eye
status, re mode and recent rate of re.
Ball loaded
No ball loaded
Bolt is not seen*
Eye system disabled
* Your marker looks for the bolt to move back and
forth during ring. If this is not seen, your display
will show a queson mark. This is common if the
marker does not have any air. 10
power buon
scroll buon
SEMI
10.1
0.00
Tourney lock
Eye indicator
Baery meter
Fire mode and cap
Rate of re meter
Adjusng velocity
Use a 1/8” allen key to adjust velocity as shown.
The arrow on the diagram is an clockwise, which
is increasing velocity. Always use a chronograph,
and use small adjustments.
Adjusng the trigger
Your trigger has four adjustment screws, they are located in the front face
of the trigger and also on the upper face. In order of top to boom, they
are the trigger rest point, spring tension, actuaon point and stop point.
You can easily adjust these screws to personalise the feel of your trigger.
DO NOT ADJUST YOUR VELOCITY
ABOVE 300FPS, AND ALWAYS OBEY
LOCAL LAWS AND REQUIREMENTS.
CAUTION! WHEN ADJUSTING THE SWITCH ACTUATION SCREW, MAKE
CERTAIN THAT YOU DO NOT ADJUST THE SCREW IN TOO FAR, AS THIS
MAY RESULT IN DAMAGE TO YOUR MICROSWITCH.

12
Using a mech frame accessory
If you have the mech frame accessory, youcan change it the frame
using the two frame mounng screws shown. This must be done
without air in your marker.
The mech frame has a push safety (le hand side of the marker).
Push for safety
Charging your baery
Your marker has a LiPO batery buit in. Your marker is shipped with
the baery charged, so you do not need to charge it before rst use
(usually).
When the baery meter begins to fall, you can charge your baery.
To access the baery charge point, gently swing aside the USB cover
on the back of your gun, and use the included cable to charge your
gun. A full charge will typically take approximately and hour.
Your OLED display will show a baery charging icon in place of the
baery meter.
USB cover
THE USB COVER IS JUST A PRESS IN COVER. IF YOU PULL IT TOO
HARD IT MAY COME OUT. THE USB COVER WILL JUST SNAP BACK
INTO PLACE .
The included USB cable can be used with any wall adaptor, comput-
er USB port or power bank for convenient charging.
USB (C)
Cable

Once you have found a seng you would like to change, press and hold the trigger unl the seng ashes.
The seng can now be changed by tapping the scroll buon to increase its value (or change to a dierent opon), or
tapping the power buon to decrease its value.
Once you have adjusted the seng to a value you would like, press and hold the trigger again unl the seng stops
ashing, it has now been saved.
If your tourney lock is on, sengs that can change the tournament legality of your marker will be locked. Their seng
can be viewed, but not changed. You will know if the tournament lock is blocking eding, because a lock symbol will
show in the upper le hand corner of the screen, and the seng will not ash as usual. If you would like to change a
locked seng, you must open the wrap around grip and hold in the tourney lock buon. This may be done inside pro-
gram or normal running mode.
Sengs in detail
Mode - The type of ring system used, semi auto, Millenium and PSP are common tournament modes. Ramp mode
allows the programming of custom ramping behaviour.
ROF - This is the maximum rate of re allowed by the marker. This seng is only observed if the next seng, rate of
re cap is set on.
ROF cap - If the cap is enabled, the marker will be limited to the ROF seng. Otherwise, it will re as fast as the laws
of physics (and paint supply) will allow.
Dwell - the amount of me your solenoid is given power - the Prime should be set to a maximum of 12ms. If the
weather is very cold, or your marker requires it, you may set this a lile higher.
Debounce - the amount of bounce ltering applied by the soware. This seng may be increased to remove unwanted
trigger bounce.
Ball delay - this is a parameter used to give a paintball me to sele in the breach of the gun. If you have
unexplained ball breakage, then you may need to increase this seng. 14
ADVANCED SETUP
Tourney lock
The marker board is equipped with a tourney lock system. When the
tourney lock system is acvated, the marker cannot be reprogrammed
on the eld - making it tournament legal.
If your board is in locked mode, you can view your sengs, but a
lock indicator will be shown on the right hand side of the screen,
indicang that your board will need to be unlocked before sengs
may be changed.
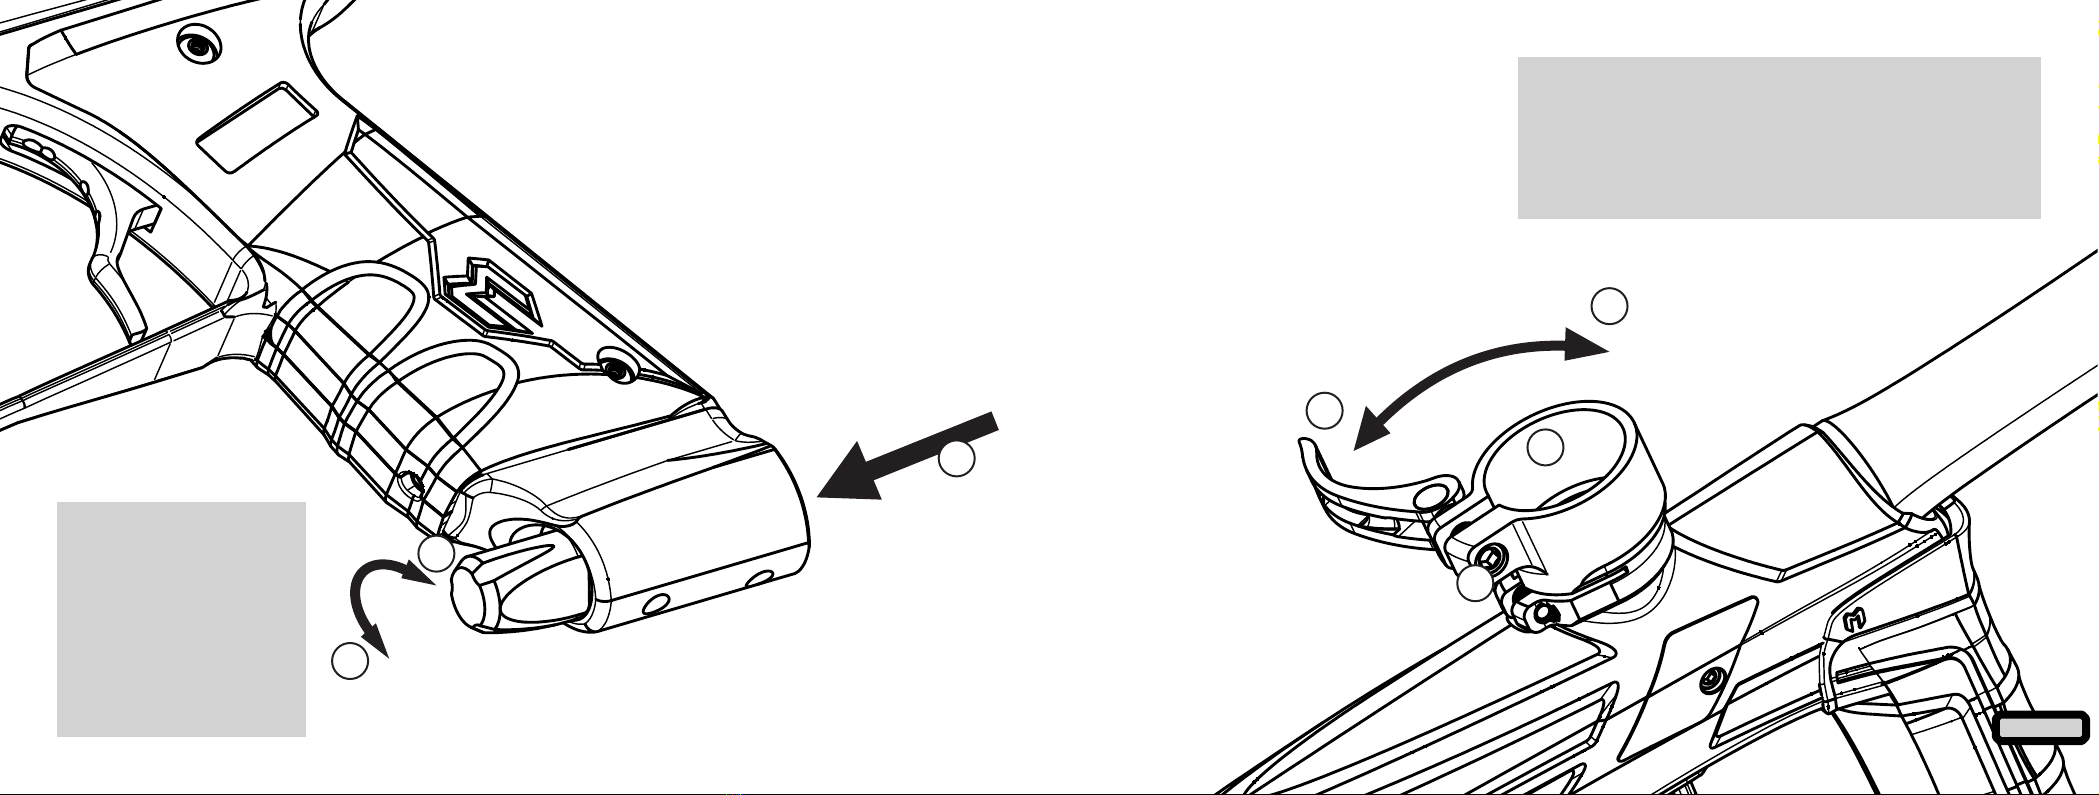
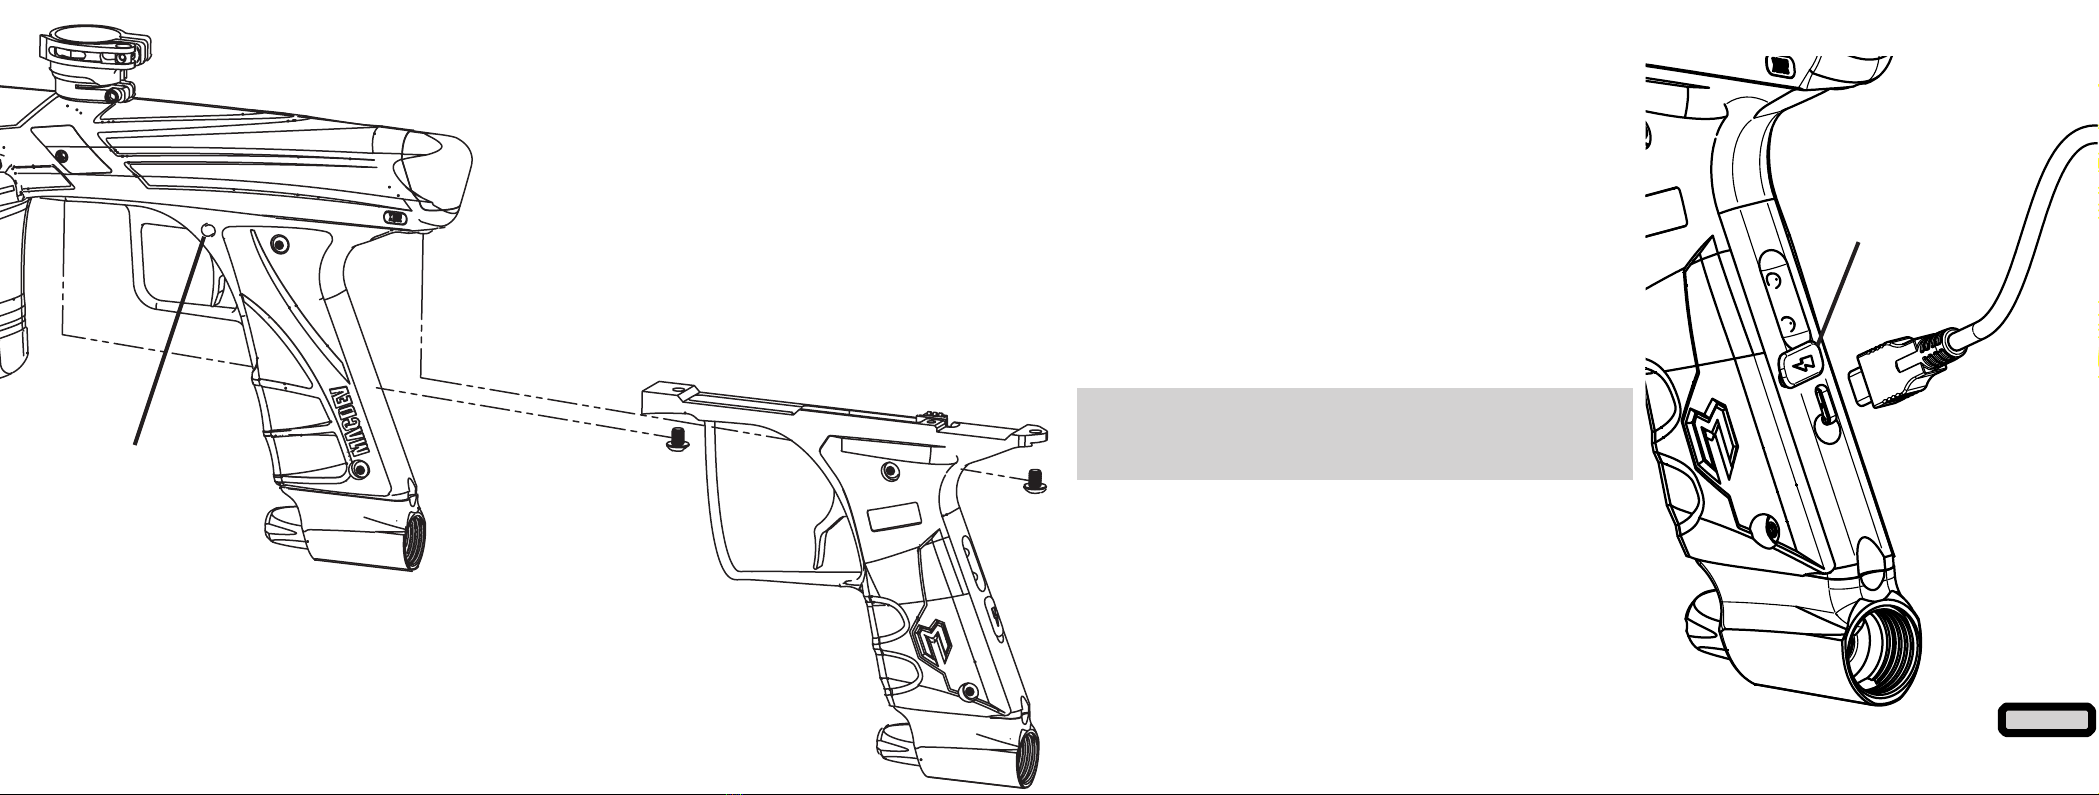
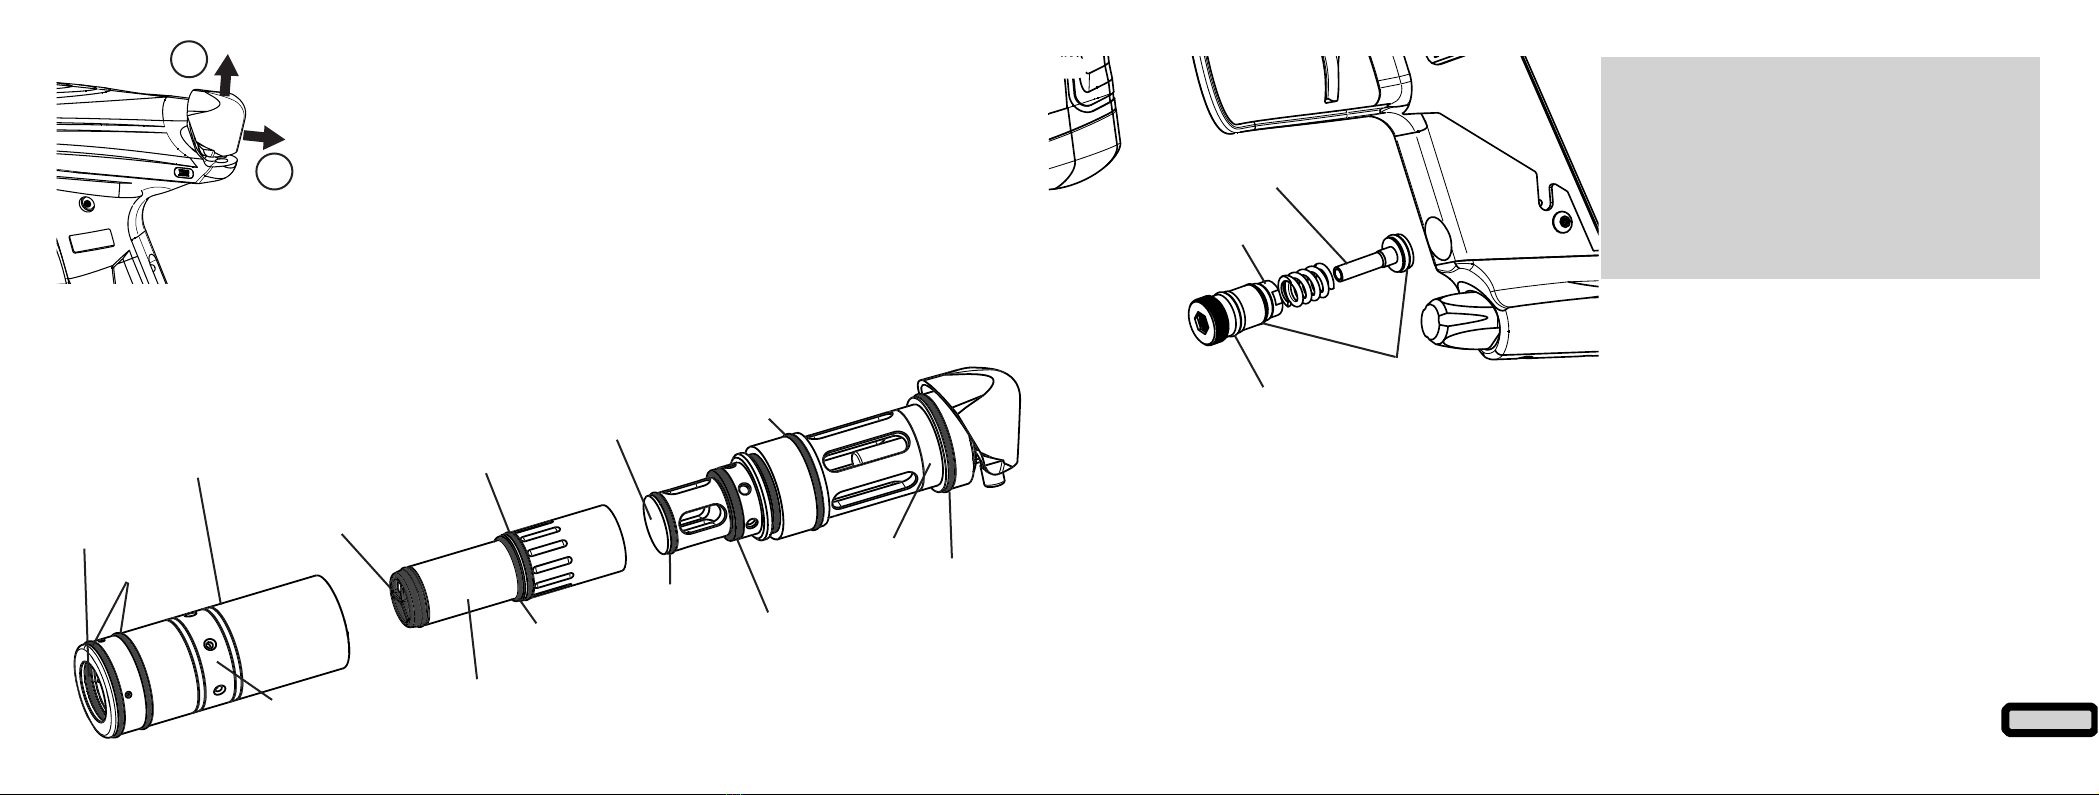
The lock status can be changed by opening the le hand side of the
marker wrap around grip to gain access to the circuit board. The
tournament lock is a black buon. Press and hold the tourney lock
buon unl an on screen indicaon of tourney lock status is shown.
Entering program mode
To program the board, hold down the trigger whilst turning the marker on. When done correctly, you will see a message
on your display screen indicang that programming mode is loading. You must connue to hold the trigger unl the
program mode is loaded, then release the trigger.
Finding and changing sengs
Once in program mode, the OLED display will show a current seng. You can advance to the next seng by tapping
the scroll buon. You can go back to the previous seng by tapping the power buon.
lock buon

MAINTENANCE
If you take 10 minutes aer every day of play to maintain your marker, you will be rewarded with consistent reliable
performance.
You should perform basic cleaning aer every day of play, and you should perform drivetrain maintenance every
5 cases. You should perform inline regulator maintenance every 20 cases. You can clean and maintain your marker
more oen, it is up to you.
When maintaining your marker, use only MacDev accessories. Your marker is packaged with a small tube of MacDev
Milia Lube, only use Milia Lube for lubricaon.
Basic cleaning
Aer using your marker, always clean old paint from the outside. Always clean your barrel using a barrel swab to
remove traces of dirt and paint. Use your barrel swab to clean the breech and feed tube in a similar way.
Your marker internal parts are quite well protected and sealed. However, when not in use, dirt can get into the
marker and cause problems - so storage of your marker is just as important as cleaning. When storing your marker,
ensure that it is stored a bag that is free of dirt, otherwise dirt may get into the venng ASA or breech.
16
Eye sensivity - the sensivity of the soware to changes in your eyes. Please do not change this parameter unless
directed (default 10).
Forced shot - when enabled, this will allow the user to force a shot by holding the trigger in - even if the eyes cannot
detect a ball. Set this to o, if you would not like to use this funcon.
FSDO me - FSDO stands for First Shot Drop O. If you leave your gun for some me, and the rst shot is lower than
it should be, then you can use this parameter to correct it. This parameter is the me that the soware waits before
correcng for FSDO.
FSDO dwell - this is the amount of extra dwell given to the solenoid to overcome FSDO - if directed to do so by the
above parameter.
Ramp semishots - this seng (and the other three below) is only used if you are using the Ramp remode. This is the
number of semi auto shots which must be red before ramping is allowed.
Ramp rate - this is the number of shots per trigger pull when in ramp mode.
Ramp ROF - this is the rate of re which must be achieved and maintained to stay in ramp mode.
Ramp meout - the amount of me the user can spend below the ramp ROF before ramping is exited.
Auto power o - save power by automacally turning the marker o aer 30 minutes.
Load/Save proles - Your marker has two prole save slots. Once you have your marker set up as you like it, go to
save prole and select one of the proles. Hold the trigger in on the prole number you would like, and the current
sengs will be save to that prole slot. You can reload them at any me using the load prole opon.
There is an opon under load prole, to load factory defaults.
Version informaon and shot counter is shown on the nal seng screen.

Maintaining the drivetrain (every 10,000 shots)
To maintain your drive, ensure your marker is fully degassed and pull the drive cover up to
release the drive. Slide the drive out of your marker. Unscrew the drive parts to access the
components shown in the diagram below.
Clean the old grease and dirt from the keg, bolt and valve. Apply fresh Milia Lube to the keg
inner o-rings (#17 and #19). Apply fresh lube to the #M16-2 o-ring on the bolt, as well as the
inside of the larger end of the bolt. Slide the bolt back into the keg. Apply fresh lube to the
#14 o-ring on the valve and slide it into the bolt, then screw the valve into place. Complete
the drive assembly by screwing the valve cap back onto the valve. Lightly regrease the outside of the drive and slide it
back into your marker.
More detailed drawings of the sub assemblies are available from macdevpaintball.com/support.
18
#20 o-ring
#14 o-ring
Valve
#M16-2 o-ring
Bolt p
#14 o-ring
#19 o-ring
(Internal)
#20 o-ring
#17 o-ring
Keg
Bolt
Drive cap
Bumper
#20 o-ring
Maintaining the inline regulator
(40,000 shots)
Before working on your inline reg, make certain that
the air supply is turned o (via the venng ASA), and
safely re any gas out of the gun to ensure it does not have any residual pressure.
To access the regulator, remove the le hand side of your wrap around grip. This will allow you to unscrew the body of
the regulator.
Clean the inside of the frame bore with a q-p, and remove old grease from the regulator piston. Apply new grease to
the piston sha, and the #11 o-ring on the piston, as well as the #8 o-ring.
Apply new grease to the inside of the frame bore before re-installing your regulator.
More detailed drawings of the sub assemblies are available from macdevpaintball.com/support.
#11 o-ring
Piston stem
(Lubricate here)
#12 o-ring
Unscrew regulator from frame
(degass marker rst)
The piston may not come out with the regulator
body. Never use pliers or any tool to grab the piston,
this can damage it. Use a 1/8” allen key pushed into
the centre hole of the allen key to help remove the
piston if it is lodged in the frame bore.
#8 o-ring
(inside)
1
2

20
20
TROUBLESHOOTING
If you are experiencing dicules with your marker, please check this table rst to see if there is an easy soluon
listed. If at any me you are unsure about how to work on your marker, please contact a cered MacDev technician
or service centre.
Symptom Possible Cause Soluon
Marker will not turn on Baery is at Ensure your baery is charged. Use dierent
cables or power outlets to be sure they are
operaonal.
Your marker leaks from
the solenoid
Leaking bolt #M16-2 o-ring Clean and re lubricate the drivetrain with
parcular aenon to the bolt o-ring #M16-
2. Replace if necessary.
Solenoid installaon or operaonal
fault
Check the solenoid is mounted correctly. If
mounng is correct and the seal is in place,
contact your local tech.
Pressure too high Reduce the pressure seng on your inline
regulator
Your marker uses
excessive air
Keg internal number 19 o-ring leaks Re lube and check the keg o-ring. Replace as
necessary.
General leak Make certain that there are no leaks from
your gun or air system wasng your air
supply.
Symptom Possible Cause Soluon
The beam sensor is not
reading correctly
Bolt is not moving Trying to cycle your marker without air can
lead to sensor fault signals, ignore them un-
less your bolt is moving back and forth.
Eyes are dirty Check that the eyes are clean and not
blocked. Clean with water and a swab inside
the breech.
Eyes are faulty Replace the eye pair.
Your marker is
chopping paintballs
Beam sensor is turned o Always play with the beam sensor
enabled.
Beam sensor is dirty or blocked Clean the breach with water and a swab, and
wipe o the bolt p.
Loader is set on a force seng too
high for your paintballs
Some force fed loaders can apply enough
force to break a fragile paintball. If this is the
case, consult your loader manual to reduce
the force seng.
Detents are missing or incorrectly
installed
Replace or re-install your detents.
Your marker will not re The trigger is set up incorrectly Ensure that the trigger actuates the micro-
switch by adjusng the actuator screw.
The beam sensor is on, and there are
no paintballs loaded
Load some paintballs.
The solenoid is not plugged in Plug the solenoid into the board.

22
XDR SPECIFICATIONS
(Specs are a guide only and may change without noce)
Physical
Length 225mm (538mm with barrel)
Width 34mm
Height 205mm
Weight 890g with barrel and baery
Barrel Threads Autococker
Performance
Operang pressure 100psi
Maximum Rate of Fire 25 BPS (only allowed with eyes on, and paint)
Electronics
Soware Miliaso V1.xx
Hardware XDR V1.2 (Lead Free)
Display Single colour OLED, low power usage 128x32px
Power LiPO 3.7V baery
Fire modes Semi, NXL, PSP, Custom ramp, Full Auto
Connecvity Mini USB
Solenoid 3V .5W
MACDEV TECHNICAL
ASSISTANCE
If you require technical assistance,
please contact your local MacDev
service centre. You can also nd
assistance on the MacDev support
website :
macdevpaintball.com/support
Symptom Possible Cause Soluon
Your marker res high on
the rst shot or
inconsistently.
Creeping regulator Clean and lubricate the reglulator, ensure that
the seat and piston are in good condion.
Your marker res low on
the rst shot
Scking drivetrain Clean and relubricate the drivetrain. If you
connue to have problems:
-increase the dwell by 1-2 ms.
-increase the ABS parameter on your board.
Table of contents
Other MACDEV Paintball Equipment manuals