manuals.online logo
Brands
  1. Home
  2. •
  3. Brands
  4. •
  5. MADDALENA
  6. •
  7. Measuring Instrument
  8. •
  9. MADDALENA ElecTo Bulk User manual

MADDALENA ElecTo Bulk User manual

1
Installation instructions
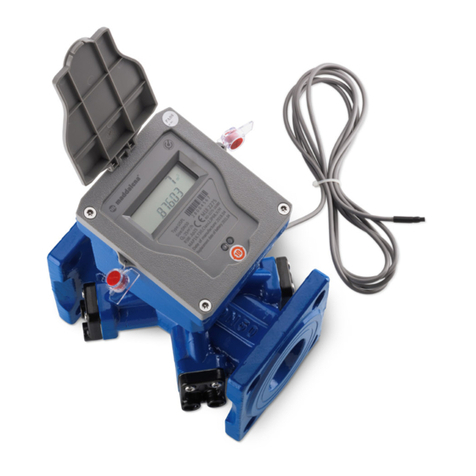
Ultrasonic water meter
ElecTo Bulk
Important
Before installing the meter, please read this manual carefully.
This instruction sheet is for qualified technicians and does not contain the basic installation instructions.
The design and specifications of the meter may change and may not correspond to the description contained in these
instructions. In this event refer to the meter. These changes do not affect meter operation. For information contact the
manufacturer.
ElecTo Bulk is a precision instrument. Before leaving the factory it undergoes strict tests and is intended to be used by
qualified personnel.
If the meter fails to operate properly or requires repair, contact the manufacturer or an authorised dealer.
Do not shorten or lengthen the cable. This might affect meter performance.
The meters undergo strict tests before leaving the factory. Maintenance, replacement of components and calibration
must be carried out only by qualified personnel.
Contact the manufacturer for technical support.
In the event of loss of measuring data due to malfunction or other causes, the manufacturer commits to recover the
data. The manufacturer undertakes no responsibility if the loss of measuring data is caused by the user or by failure to
back up data.
The meter may be provided with a built-in pressure sensor for pipe pressure monitoring (optional).
Choice of the water meter
Before installing the meter ensure that the nominal diameter, nominal flow rate, working temperature and pressure are
compatible with the operating conditions.
Transport and storage
Water meters are precision instruments: handle with care and protect from shocks and vibration.
Store the meters in a frost-free place. Defrosting of the meter is a delicate operation.
Store the meters in a dry place, at a temperature between 0 °C and +50 °C. Do not expose to direct sunlight.
Recommendations for the installation
Before installing the meter check that the two pipe sections are aligned in order to avoid mechanical stress. Clean the
two pipe sections carefully (especially if the system is empty) and allow water to flow in the pipe for some time using a
pipe section instead of the meter.
If there is no water in the system, open the upstream valve before installing the meter. This is necessary to avoid
negative pressure from building when opening the valve at the end of the installation procedure because it might
damage the meter.
If the meter is installed in vertical or inclined position, the pipe must always be full of water.
Install the meter where it will be safe from frost (if necessary protect the meter with insulating material) and possibly in
the lowest part of the system to prevent air from building up.
Install the meter in a place where it will be protected from tampering and impact, and where it can be read easily.
Install the meter ensuring that the flow direction arrow on the body points in the same direction as the flow.
It is advisable to install a valve upstream and downstream of the meter in order to enable maintenance and verification
of the meter and monitoring of the system.
Operating conditions
Temperature class: T30/T50
Admissible pressure (MAP): 16 bar
Straight pipes and flow straighteners
For the usage of upstream and/or downstream straight pipes refer to the letters U and D marked on the dial. If the
letters U and/or D are followed by the letter S, a flow straightener must be installed.
Battery
The battery has a service life of 13 years. It is recommended to replace the battery before it is completely discharged in
order to avoid malfunction.
2
1
2
3
4
The battery must be replaced by qualified personnel.
Installation procedure
1. Counter flange
2. Bolts
3. Meter body
4. Flange
Position a gasket on each flange.
Connect the meter (2) to the pipe. Ensure that the flow direction is
correct.
Position the meter's flange (4) on the counter flange (1) and tighten it with the bolts provided (3). Ensure that the
gasket is in the right position and in line with the flange.
Tighten the bolts.
Before positioning the gasket ensure that it is not damaged. Ensure that the gasket is not damaged during the
installation. Ensure that the gasket is in the right position and in line with the flange.
Ensure that the gaskets are tight to prevent leaks.
Ensure that the gasket do not protrude from the pipe.
Ensure that the flange surface is clean and is not damaged.
Ensure that the bolt holes of flanges and counter flanges are aligned.
Liquid crystal display
The meter has two menus: a primary menu (standard) and a secondary menu (with details)
To move from the primary menu to the secondary menu use the reading software.
The primary menu has a standard mode and a single screen view mode.
To move from one menu item to another press the magnetically operated button using a magnetic pen.
The magnetically operated button is indicated by this pictogram:
Primary menu
Secondary menu
Faults
Primary menu - Standard mode
Volume flowed
If several faults occur simultaneously, the
error codes are displayed in order.
Volume flowed (default view)
Water temperature (°C)
Instantaneous flow
Pipe empty
Backflow (not displayed by default; the
backflow can be displayed by changing the
settings with the reading software and
selecting the relevant mode).
Primary address
Battery voltage
E1-11: measuring channel no 1 –circuit
fault
E1-22: measuring channel no 1 –
transducer fault or air in the measuring
channel or short width signal
E2-11: measuring channel no 2 –circuit
fault
E2-22: measuring channel no 2 –
transducer fault or air in the measuring
channel or short width signal
Water temperature
Instantaneous flow
Secondary address
Water temperature low (the error
message is displayed if the temperature is
lower than 4 °C)
3
Primary menu
Secondary menu
Faults
Volume flowed: m3
Pipe pressure (kPa, version with pressure
sensor only)
Current date: month-day
Current date: year
Battery low
Display test
Current time: hours-minutes
Current time: seconds
Primary menu - Single screen view mode
First line: always displays the volume
flowed in m3.
Second line: displays the volume flowing
(or instantaneous flow rate) in litres.
To view further data use the magnetically
operated button.
Total operating time
Total non-operating time
Version of main firmware
Version of metrological firmware
Default display
With no flow: volume flowed in
submultiples
With flow: instantaneous flow
Time difference between signal
transmission
Instantaneous flow
Calibration parameters
Transducer signal voltage
Water temperature (in °C)
Display test
Pipe pressure (kPa, version with pressure
sensor only)
Seals
The meter is sealed. It cannot be opened without breaking the seal. Meters must be serviced only by an authorized
centre.
Do not alter or remove the meter's seal. If the seal has been altered or removed the warranty is void.
4
Hazardous substances contained in the water meter
Component
Toxic or hazardous substances or chemicals
Lead
Pb
Mercury
Hg
Cadmium
Cd
Hexavalent
chromium
Polybrominated
biphenyl
Polybrominated
diphenyl
Cr (VI)
PBB
PBDE
Water meter
○
○
○
○
○
○
○: Indicates that the maximum concentration of toxic or hazardous substances in all homogeneous materials does not
exceed the limit established in SJ/T11363-2006.
x: Indicates that the maximum concentration of toxic or hazardous contained in at least one of the homogeneous
materials used for this part is above the limit requirement in SJ/T11363-2006.
Remarks
1. The table indicates that the manufacturer's instruments may contain the above substances. However
information may change with evolving technology.
2. The above information is exclusive property of the manufacturer.
3. Directive 2012/19/EU on waste electrical and electronic equipment (WEEE) prescribes that the manufacturer or
authorized dealer must take back waste electrical and electronic equipment (WEEE).
The water meter must not be disposed of with household waste.
Packing list
Ultrasonic water meter model E Bulk
Installation instructions and declaration of conformity
Declaration of conformity
This is a shorter version of the declaration of conformity. The full version is available on the website www.maddalena.it.
Maddalena S.p.A. hereby declares that the ultrasonic water meter model ElecTo Bulk complies with Directive
2014/32/EU and Standard ISO 4064.
Sales and warranty terms
The sales and warranty terms are available at www.maddalena.it.
Manufacturer
Maddalena S.p.A.
Via G.B. Maddalena, 2/4
33040 Povoletto (UD), Italy
Tel. +39 0432 634811
www.maddalena.it
2 03/19 | Subject to technical change

Other manuals for ElecTo Bulk

1

Other MADDALENA Measuring Instrument manuals

MADDALENA microCLIMA User manual

MADDALENA

MADDALENA microCLIMA User manual

MADDALENA microCLIMA U User manual

MADDALENA

MADDALENA microCLIMA U User manual

MADDALENA ArrowEVO Parts list manual

MADDALENA

MADDALENA ArrowEVO Parts list manual

MADDALENA E-Bulk Parts list manual

MADDALENA

MADDALENA E-Bulk Parts list manual

MADDALENA microCLIMA/SENSOSTAR 2+ MSH User manual

MADDALENA

MADDALENA microCLIMA/SENSOSTAR 2+ MSH User manual

MADDALENA ElecTo SJ Parts list manual

MADDALENA

MADDALENA ElecTo SJ Parts list manual

MADDALENA ElecTo SONIC Parts list manual

MADDALENA

MADDALENA ElecTo SONIC Parts list manual

MADDALENA SensoStar C User manual

MADDALENA

MADDALENA SensoStar C User manual

MADDALENA ElecTo SJ Parts list manual

MADDALENA

MADDALENA ElecTo SJ Parts list manual

MADDALENA ElecTo SJ Parts list manual

MADDALENA

MADDALENA ElecTo SJ Parts list manual

MADDALENA QuadraPlus User manual

MADDALENA

MADDALENA QuadraPlus User manual

MADDALENA microCLIMA U User manual

MADDALENA

MADDALENA microCLIMA U User manual

MADDALENA Arrow Mobile Android User manual

MADDALENA

MADDALENA Arrow Mobile Android User manual

MADDALENA ElecTo Bulk Parts list manual

MADDALENA

MADDALENA ElecTo Bulk Parts list manual

MADDALENA SJ PLUS User manual

MADDALENA

MADDALENA SJ PLUS User manual

MADDALENA microCLIMA ULTRA User manual

MADDALENA

MADDALENA microCLIMA ULTRA User manual

Popular Measuring Instrument manuals by other brands

ORTEC 935 Operating and service manual

ORTEC

ORTEC 935 Operating and service manual

Hanna Instruments HI 96761C instruction manual

Hanna Instruments

Hanna Instruments HI 96761C instruction manual

Mastech MS2030 user manual

Mastech

Mastech MS2030 user manual

Canberra UltraRadiac user manual

Canberra

Canberra UltraRadiac user manual

Weston BV01 user manual

Weston

Weston BV01 user manual

Burster DIGIFORCE 9307 Operation manual

Burster

Burster DIGIFORCE 9307 Operation manual

ABB LevelMaster 7100 quick start

ABB

ABB LevelMaster 7100 quick start

Newport PScout2 Series user manual

Newport

Newport PScout2 Series user manual

Lincoln 946 quick start guide

Lincoln

Lincoln 946 quick start guide

Cameron Scanner 3100 manual

Cameron

Cameron Scanner 3100 manual

PowerTek PA2553 user guide

PowerTek

PowerTek PA2553 user guide

Fluke CableAnalyzer DSP-4000 Series user manual

Fluke

Fluke CableAnalyzer DSP-4000 Series user manual

Hobo MX series manual

Hobo

Hobo MX series manual

Calscan Falcon user manual

Calscan

Calscan Falcon user manual

MFJ MFJ-842 instruction manual

MFJ

MFJ MFJ-842 instruction manual

WACON AquaInform Sycon 2500 operating manual

WACON

WACON AquaInform Sycon 2500 operating manual

JENCO VisionPlus 6377B Operation manual

JENCO

JENCO VisionPlus 6377B Operation manual

Apera Instruments SX716 user manual

Apera Instruments

Apera Instruments SX716 user manual

manuals.online logo
manuals.online logoBrands
  • About & Mission
  • Contact us
  • Privacy Policy
  • Terms and Conditions

Copyright 2025 Manuals.Online. All Rights Reserved.