10 ENGLISH
For UT002G
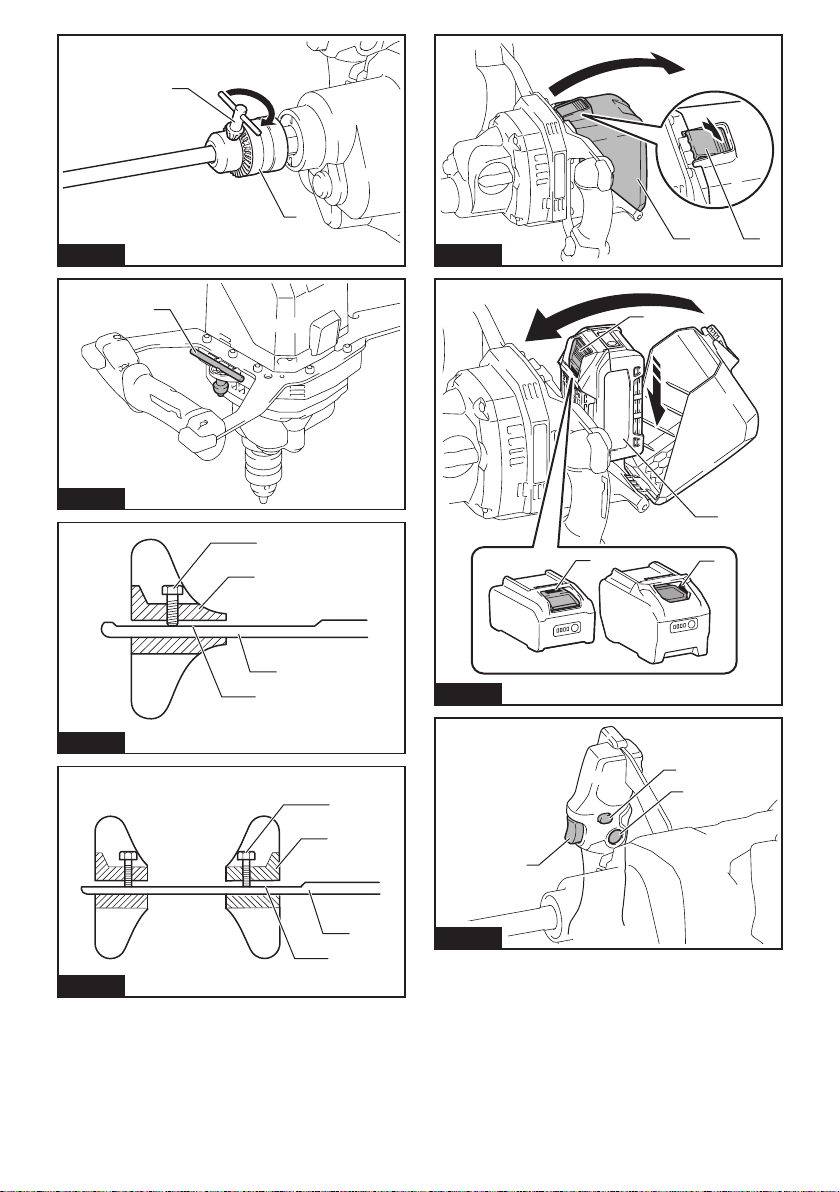
1. Insert the shaft into the chuck as far as it will go.
►Fig.8: 1. Shaft 2. Chuck
2.
Tighten the chuck by hand, and then place the
chuck key in each of three holes and tighten it clockwise.
Be sure to tighten the chuck key at all three holes evenly.
►Fig.9: 1. Chuck key 2. Chuck
3.
To remove the shaft, turn the chuck key counterclock-
wise at one of the holes, and then loosen the chuck by hand.
4. When not in use, store the chuck key as shown in
theguretokeepitfrombeinglost.
►Fig.10: 1. Chuck key
Installing the mixing blade
Optional accessory
Insert the mixing blade into the shaft and secure it with
the hex bolt. At this time, position it so that the top end
ofthehexboltalwayststotheatsurfaceontheshaft
and tighten the hex bolt with the provided wrench.
►Fig.11:
1. Hex bolt 2. Shaft 3. Flat surface 4. Mixing blade
Wheninstallingthemixingbladesattwodierentpositions,
mountandsecurethetwomixingbladesontheatpartof
the shaft with the hex bolts so that the same surface of the
mixingbladesfaceseachotherasshowninthegure.
►Fig.12:
1. Hex bolt 2. Shaft 3. Flat surface 4. Mixing blade
NOTE: Ask your local Makita Service Center about
which is mixing blades are allowed.
Installing or removing battery cartridge
CAUTION: Always switch o the tool before
installing or removing of the battery cartridge.
CAUTION:
Hold the tool and the battery cartridge
rmly when installing or removing battery cartridge.
Failuretoholdthetoolandthebatterycartridgermlymay
causethemtoslipoyourhandsandresultindamageto
thetoolandbatterycartridgeandapersonalinjury.
CAUTION:
Do not use this tool with the bat-
tery adapter. If you connect the battery adapter to the
tool, the battery cover cannot be closed, and using the
toolwithbatterycoveropenedmaycauseaninjury.
CAUTION: Be careful not to pinch your n-
gers when opening or closing the battery cover.
NOTICE: Install a battery cover that matches the
size of the battery.
Open the battery cover while pressing the button on the
battery cover.
►Fig.13: 1. Button 2. Battery cover
To remove the battery cartridge, slide it from the tool
while sliding the button on the front of the cartridge.
►Fig.14:
1. Red indicator 2. Button 3. Battery cartridge
To install the battery cartridge, align the tongue on the battery car-
tridge with the groove in the housing and slip it into place. Insert it
all the way until it locks in place with a little click. If you can see the
redindicatorasshowninthegure,itisnotlockedcompletely.
After installing the battery cartridge, close the battery
cover securely.
CAUTION: Always install the battery cartridge
fully until the red indicator cannot be seen. If not,
itmayaccidentallyfalloutofthetool,causinginjuryto
you or someone around you.
CAUTION: Do not install the battery cartridge
forcibly. If the cartridge does not slide in easily, it is
not being inserted correctly.
Switch action
WARNING:
Before installing the battery car-
tridge into the tool, always make sure that the
switch trigger actuates properly and returns to the
"OFF" position by fully pulling and releasing it.
WARNING: NEVER defeat the lock-o button
by taping down or some other means. A switch with
anegatedlock-obuttonmayresultinunintentional
operationandseriouspersonalinjury.
WARNING: NEVER use the tool if it runs when
you simply pull the switch trigger without press-
ing the lock-o button. A switch in need of repair
may result in unintentional operation and serious
personalinjury.ReturntooltoaMakitaservicecenter
for proper repairs BEFORE further usage.
WARNING: Do not install the battery cartridge
with the lock button engaged.
To prevent the switch trigger from being accidentally
pulled,alock-obuttonisprovided.Tostartthetool,
depressthelock-obuttonandpulltheswitchtrigger.
Tool speed is increased by increasing pressure on the
switch trigger. Release the switch trigger to stop.
For continuous operation, depress the lock button while
pulling the switch trigger, and then release the switch
trigger. To stop the tool, pull the switch trigger fully, then
release it.
►Fig.15:
1. Switch trigger 2.Lock-obutton3. Lock button
Operation of speed change knob
NOTICE: Use the speed change knob only after
the tool comes to a complete stop. Changing the
tool speed mode before the tool stops may damage
the tool.
NOTICE: Always set the speed change knob
carefully into the correct position. If you operate
the tool with the speed change knob positioned half-
way between the position 1 and the position 2, the
tool may be damaged.
NOTICE: If the rotation speed signicantly
decreases during operation in the high speed
mode, stop the tool and change the mode to the
low speed mode. Otherwise, the motor may get
overloadedandcauseamalfunctionorre.
Two speed ranges can be preselected with the speed
change knob.
Select the proper speed mode for the material to be mixed.
To change the speed mode, turn the speed change
knob so that the pointer points to the dot at position
1 for low speed mode or the dot at position 2 for high
speed mode.
►Fig.16: 1. Pointer 2. Speed change knob 3. Dot