Makita HR2650 User manual

HR2650
HR2651
HR2651T
HR2661
EN Combination Hammer with
Self Dust Collection INSTRUCTION MANUAL 7
FR
Perforateur Burineur Avec
Système d’Aspiration De
Poussières
MANUEL D’INSTRUCTIONS 14
DE Kombihammer mit
Staubabsaugung BETRIEBSANLEITUNG 22
IT Tassellatore combinato con
raccolta polveri automatica ISTRUZIONI PER L’USO 30
NL Combinatiehamer met
stofopvang GEBRUIKSAANWIJZING 37
ES
Martillo Combinado con
Recolección Automática de Polvo
MANUAL DE
INSTRUCCIONES 44
PT Martelete Combinado com
Coleta Automática de Pó MANUAL DE INSTRUÇÕES 52
DA Kombinationshammer med
automatisk støvopsamling BRUGSANVISNING 59
EL 66
TR Otomatik Toz Toplayan
Kombine Darbeli Matkap KULLANMA KILAVUZU 74

Fig.1
Fig.2
Fig.3
Fig.4
Fig.5
Fig.6
Fig.7
Fig.8
2

Fig.9
Fig.10
Fig.11
Fig.12
Fig.13
Fig.14
Fig.15
Fig.16
3

Fig.17
Fig.18
Fig.19
Fig.20
Fig.21
Fig.22
Fig.23
Fig.24
4

Fig.25
Fig.26
Fig.27
Fig.28
Fig.29
Fig.30
Fig.31
Fig.32
5

Fig.33
Fig.34
Fig.35
Fig.36
Fig.37
Fig.38
Fig.39
6

7 ENGLISH
ENGLISH (Original instructions)
SPECIFICATIONS
Model: HR2650 HR2651 HR2651T HR2661
Capacities Concrete 26 mm
Core bit 68 mm
Diamond core bit (dry type) 80 mm
Steel 13 mm
Wood 32 mm
No load speed 0 - 1,200 min-1 0 - 1,100 min-1
Blows per minute 0 - 4,600 min-1 0 - 4,500 min-1
Overall length 604 mm 630 mm 666 mm
Net weight 3.0 - 4.1 kg 3.1 - 4.2 kg 3.2 - 4.4 kg 3.3 - 4.4 kg
Safety class /II
without notice.
Intended use
brick, concrete and stone.
It is also suitable for drilling without impact in wood,
metal, ceramic and plastic.
Power supply
the same voltage as indicated on the nameplate, and
are double-insulated and can, therefore, also be used
from sockets without earth wire.
Noise
-
ing to EN60745:
Model HR2650
Sound pressure level (L
Sound power level (L
Model HR2651
Sound pressure level (L
Sound power level (L
Model HR2651T
Sound pressure level (L
Sound power level (L
Model HR2661
Sound pressure level (L
Sound power level (L
WARNING: Wear ear protection.
Vibration
-
mined according to EN60745:
Model HR2650
Work mode: hammer drilling into concrete
Vibration emission (ah, HD): 12.5 m/s2
Uncertainty (K) : 1.5 m/s2
Work mode: chiselling function with side grip
Vibration emission (ah, Cheq): 9.5 m/s2
Uncertainty (K) : 1.5 m/s2
Work mode: drilling into metal
Vibration emission (ah,D) : 2.5 m/s2
Uncertainty (K) : 1.5 m/s2
Model HR2651
Work mode: hammer drilling into concrete
Vibration emission (ah, HD): 11.5 m/s2
Uncertainty (K) : 1.5 m/s2
Work mode: chiselling function with side grip
Vibration emission (ah, Cheq): 9.0 m/s2
Uncertainty (K) : 1.5 m/s2
Work mode: drilling into metal
Vibration emission (ah,D) : 2.5 m/s2
Uncertainty (K) : 1.5 m/s2
Model HR2651T
Work mode: hammer drilling into concrete
Vibration emission (ah, HD): 11.5 m/s2
Uncertainty (K) : 1.5 m/s2
Work mode: chiselling function with side grip
Vibration emission (ah, Cheq): 9.0 m/s2
Uncertainty (K) : 1.5 m/s2
Work mode: drilling into metal
Vibration emission (ah,D) : 2.5 m/s2
Uncertainty (K) : 1.5 m/s2
Model HR2661
Work mode: hammer drilling into concrete
Vibration emission (ah, HD): 9.5 m/s2
Uncertainty (K) : 1.5 m/s2

8 ENGLISH
Work mode: chiselling function with side grip
Vibration emission (ah, Cheq): 6.0 m/s2
Uncertainty (K) : 1.5 m/s2
Work mode: drilling into metal
Vibration emission (ah,D) : 2.5 m/s2 or less
Uncertainty (K) : 1.5 m/s2
NOTE:
been measured in accordance with the standard test
method and may be used for comparing one tool with
another.
NOTE:
WARNING:
use of the power tool can differ from the declared
emission value depending on the ways in which the
tool is used.
WARNING: Be sure to identify safety measures
to protect the operator that are based on an estima-
account of all parts of the operating cycle such as
the times when the tool is switched off and when it is
running idle in addition to the trigger time).
EC Declaration of Conformity
For European countries only
to this instruction manual.
SAFETY WARNINGS
General power tool safety warnings
WARNING: Read all safety warnings, instruc-
with this power tool. Failure to follow all instructions
Save all warnings and instruc-
tions for future reference.
mains-operated (corded) power tool or battery-operated
(cordless) power tool.
ROTARY HAMMER SAFETY
WARNINGS
1. Wear ear protectors.
cause hearing loss.
2. Use auxiliary handle(s), if supplied with the
tool.
3. Hold power tool by insulated gripping sur-
faces, when performing an operation where
the cutting accessory may contact hidden wir-
ing or its own cord. Cutting accessory contacting
electric shock.
4. Wear a hard hat (safety helmet), safety glasses
and/or face shield. Ordinary eye or sun glasses
are NOT safety glasses. It is also highly recom-
mended that you wear a dust mask and thickly
padded gloves.
5. Be sure the bit is secured in place before
operation.
6. Under normal operation, the tool is designed
to produce vibration. The screws can come
loose easily, causing a breakdown or accident.
Check tightness of screws carefully before
operation.
7. In cold weather or when the tool has not been
used for a long time, let the tool warm up for
a while by operating it under no load. This
will loosen up the lubrication. Without proper
8.
sure no one is below when using the tool in
high locations.
9.
10. Keep hands away from moving parts.
11. Do not leave the tool running. Operate the tool
only when hand-held.
12. Do not point the tool at any one in the area
injure someone seriously.
13. Do not touch the bit, parts close to the bit, or
workpiece immediately after operation; they
may be extremely hot and could burn your
skin.
14. Some material contains chemicals which may
be toxic. Take caution to prevent dust inhala-
tion and skin contact. Follow material supplier
safety data.
15. Do not touch the power plug with wet hands.
SAVE THESE INSTRUCTIONS.
WARNING: DO NOT let comfort or familiarity
with product (gained from repeated use) replace
strict adherence to safety rules for the subject
product. MISUSE or failure to follow the safety
rules stated in this instruction manual may cause
serious personal injury.

9 ENGLISH
FUNCTIONAL
DESCRIPTION
CAUTION: Always be sure that the tool is
switched off and unplugged before adjusting or
checking function on the tool.
Switch action
CAUTION:
Before plugging in the tool, always
check to see that the switch trigger actuates properly
and returns to the "OFF" position when released.
CAUTION: Switch can be locked in “ON” posi-
tion for ease of operator comfort during extended
use. Apply caution when locking tool in “ON”
Fig.1: 1. Switch trigger 2. Lock button
Fig.2: 1. Switch trigger 2. Lock button
speed is increased by increasing pressure on the switch
trigger. Release the switch trigger to stop.
For continuous operation, pull the switch trigger, push
in the lock button and then release the switch trigger.
trigger fully, then release it.
Reversing switch action
CAUTION: Always check the direction of
rotation before operation.
NOTICE:
Use the reversing switch only after the
tool comes to a complete stop.
Changing the direction
of rotation before the tool stops may damage the tool.
NOTICE: If the switch trigger cannot be
depressed, check to see that the reversing switch
is fully set to position / (A side) or / (B
side).
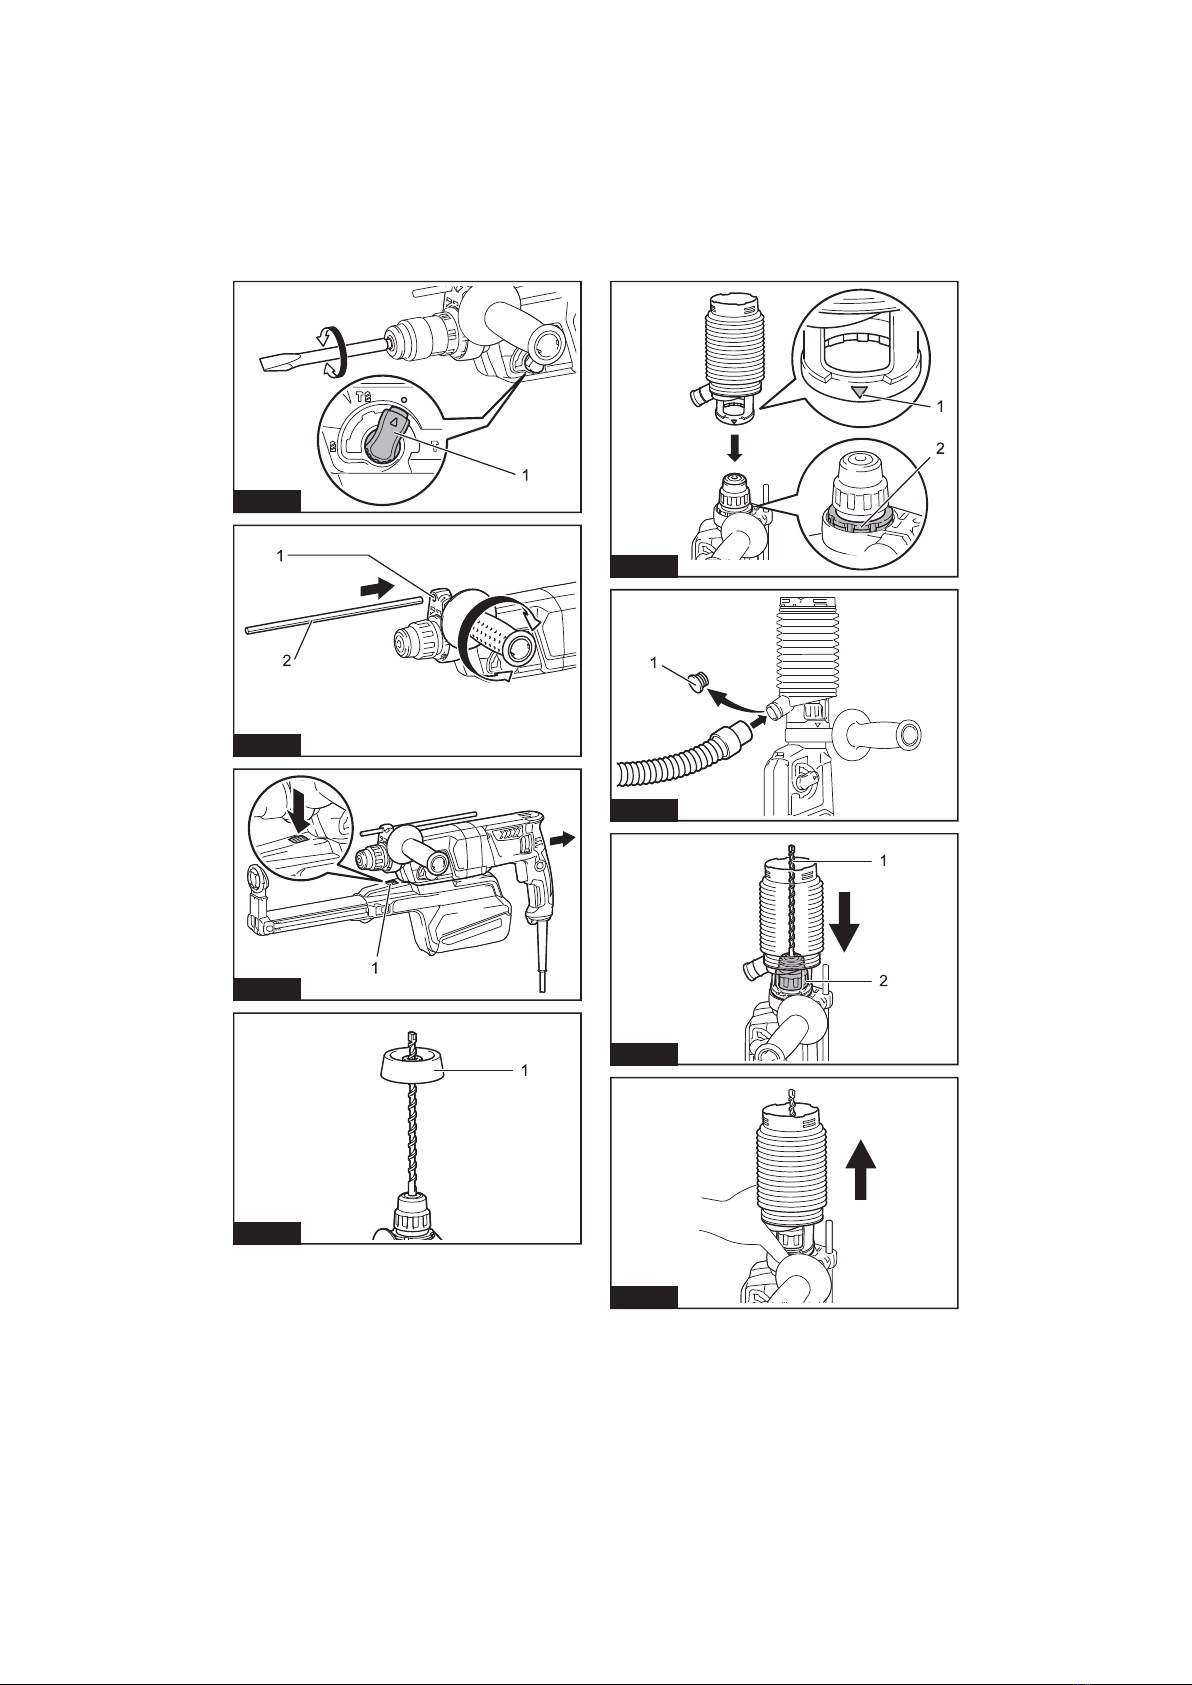
For HR2650/HR2651/HR2651T
-
tion of rotation. Move the reversing switch lever to the
position -
tion (B side) for counterclockwise rotation.
Fig.3: 1. Reversing switch lever
For HR2661
-
tion of rotation. Move the reversing switch lever to
the
the position (B side) for counterclockwise rotation.
Fig.4: 1. Reversing switch lever
NOTE: When you operate the tool in counterclock-
wise rotation, the switch trigger is pulled only halfway
and the tool runs at half speed. For counterclockwise
rotation, you cannot push in the lock button.
Changing the quick change chuck
for SDS-plus
For HR2651T
Removing the quick change chuck
for SDS-plus
CAUTION: Before removing the quick change
chuck for SDS-plus, be sure to remove the bit.
Grasp the change cover of the quick change chuck
for SDS-plus and turn in the direction of the arrow
until the change cover line moves from the symbol
to the symbol. Pull forcefully in the direction of the
arrow.
Fig.5: 1. Quick change chuck for SDS-plus
2. Change cover 3. Change cover line
Installing the quick change drill
chuck
Check the line of the quick change drill chuck shows
the symbol. Grasp the change cover of the quick
change drill chuck and set the line to the symbol.
Place the quick change drill chuck on the spindle of the
tool. Grasp the change cover of the quick change drill
chuck and turn the change cover line to the symbol
until a click can clearly be heard.
Fig.6: 1. Quick change drill chuck 2. Spindle
3. Change cover line 4. Change cover
Selecting the action mode
NOTICE: Do not rotate the action mode chang-
ing knob when the tool is running.
damaged.
NOTICE: To avoid rapid wear on the mode
change mechanism, be sure that the action mode
changing knob is always positively located in one
of the three action mode positions.
Rotation with hammering
For drilling in concrete, masonry, etc., rotate the action
mode changing knob to the symbol. Use a tungsten-
carbide tipped bit (optional accessory).
Fig.7: 1. Rotation with hammering 2.
changing knob
Rotation only
For drilling in wood, metal or plastic materials, rotate
the action mode changing knob to the symbol. Use a
twist drill bit or wood drill bit.
Fig.8: 1. Rotation only

10 ENGLISH
Hammering only
For chipping, scaling or demolition operations, rotate
the action mode changing knob to the symbol. Use a
bull point, cold chisel, scaling chisel, etc.
Fig.9: 1. Hammering only
Adjusting the nozzle position
button, and then release the button at the desired
position.
Fig.10: 1. Guide 2.
NOTE:
Adjusting the drilling depth
-
depth.
Fig.11: 1.
Torque limiter
NOTICE: As soon as the torque limiter actuates,
switch off the tool immediately. -
vent premature wear of the tool.
NOTICE: Drill bits such as hole saw, which tend
to pinch or catch easily in the hole, are not appro-
priate for this tool.
the torque limiter to actuate too frequently.
output shaft. When this happens, the drill bit will stop
turning.
Hook
CAUTION: Never hook the tool at high loca-
tion or on potentially unstable surface.
For HR2661
Fig.12: 1. Hook
the open position. When not in use, always lower hook
until it snaps into the closed position.
ASSEMBLY
CAUTION: Always be sure that the tool is
switched off and unplugged before carrying out
any work on the tool.
Side grip (auxiliary handle)
CAUTION: Always use the side grip to ensure
safe operation.
CAUTION: After installing or adjusting the
secured.
-
Fig.13: 1. Side grip
Grease
Coat the shank end of the drill bit beforehand with a
small amount of grease (about 0.5 - 1 g).
-
ger service life.
Installing or removing drill bit
Clean the shank end of the drill bit and apply grease
before installing the drill bit.
Fig.14: 1. Shank end 2. Grease
it in until it engages.
drill bit is securely held in place by trying to pull it out.
Fig.15: 1. Drill bit
way and pull the drill bit out.
Fig.16: 1. Drill bit 2. Chuck cover
Chisel angle (when chipping,
scaling or demolishing)
change the chisel angle, rotate the action mode chang-
angle.
Fig.17: 1.
Rotate the action mode changing knob to the sym-
place by turning it slightly.
Depth gauge
uniform depth. Loosen the side grip and insert the depth
gauge to the desired depth and tighten the side grip
Fig.18: 1. Hole 2. Depth gauge
NOTE: Make sure that the depth gauge does not
touch the main body of the tool when attaching it.

11 ENGLISH
Installing or removing dust
collection system
into the dust collection system all the way until it locks in
place with a little click.
Fig.19: 1. Lock-off button
Dust cup
Optional accessory
Use the dust cup to prevent dust from falling over the
tool and on yourself when performing overhead drilling
attached to is as follows.
Model Bit diameter
Dust cup 5 6 mm - 14.5 mm
Dust cup 9 12 mm - 16 mm
Fig.20: 1. Dust cup
Dust cup set
Optional accessory
Before installing the dust cup set, remove the bit from
the tool if installed.
Install the dust cup set on the tool so that the sym-
bol on the dust cup is aligned with the groove in the tool.
Fig.21: 1. symbol 2. Groove
NOTE: If you connect a vacuum cleaner to the dust
cup set, remove the dust cap before connecting it.
Fig.22: 1. Dust cap
the chuck cover in the direction of the arrow.
Fig.23: 1. Bit 2. Chuck cover
Hold the root of dust cup and pull it out.
Fig.24
NOTE: If the cap comes off from the dust cup, attach
it with its printed side facing up so that groove on the
Fig.25
OPERATION
CAUTION: Always use the side grip (auxiliary
and switch handle during operations.
CAUTION: Always make sure that the work-
piece is secured before operation.
CAUTION: The dust collection system is
intended for drilling in concrete only. Do not use
the dust collection system for drilling in metal or
wood.
CAUTION: When using the tool with the dust
to the dust collection system to prevent dust
inhalation.
CAUTION: Before using the dust collection
Failure to do so may cause dust inhalation.
CAUTION: The dust collection system col-
lects the generated dust at a considerable rate,
but not all dust can be collected.
NOTICE: Do not use the dust collection system
for core drilling or chiseling.
NOTICE: Do not use the dust collection system
for drilling in wet concrete or use this system
in wet environment. Failure to do so may cause
malfunction.
Fig.26
Hammer drilling operation
CAUTION:
hole break-through, when the hole becomes clogged
with chips and particles, or when striking reinforcing
rods embedded in the concrete. Always use the side
both side grip and switch handle during opera-
tions. Failure to do so may result in the loss of control
Set the action mode changing knob to the symbol.
Position the drill bit at the desired location for the hole,
then pull the switch trigger. Do not force the tool. Light
pressure gives best results. Keep the tool in position
and prevent it from slipping away from the hole.
Do not apply more pressure when the hole becomes
clogged with chips or particles. Instead, run the tool at
an idle, then remove the drill bit partially from the hole.
By repeating this several times, the hole will be cleaned
out and normal drilling may be resumed.
NOTE: Eccentricity in the drill bit rotation may occur
-
affect the drilling precision.
Chipping/Scaling/Demolition
Set the action mode changing knob to the symbol.
and apply slight pressure on the tool so that the tool will
not bounce around, uncontrolled.
Pressing very hard on the tool will not increase the
Fig.27

12 ENGLISH
Drilling in wood or metal
CAUTION:
when the drill bit begins to break through the
workpiece.
the tool/drill bit at the time of hole break through.
CAUTION: A stuck drill bit can be removed
simply by setting the reversing switch to reverse
rotation in order to back out. However, the tool
CAUTION: Always secure workpieces in a
vise or similar hold-down device.
NOTICE: Never use “rotation with hammering”
when the drill chuck is installed on the tool.
drill chuck may be damaged.
tool.
NOTICE: Pressing excessively on the tool will
not speed up the drilling.
pressure will only serve to damage the tip of your drill
bit, decrease the tool performance and shorten the
service life of the tool.
Set the action mode changing knob to the symbol.
For HR2650/HR2651/HR2661
Optional accessory
install them to the tool. When installing it, refer to the
section “Installing or removing drill bit”.
Fig.28: 1. Keyless drill chuck 2. Chuck adapter
For HR2651T
Use the quick change drill chuck as standard equip-
Hold the ring and turn the sleeve counterclockwise to
-
wise to tighten the chuck.
Fig.29: 1. Sleeve 2. Ring
counterclockwise.
Diamond core drilling
NOTICE: If performing diamond core drilling
operations using “rotation with hammering”
action, the diamond core bit may be damaged.
When performing diamond core drilling operations,
always set the change lever to the position to use
Disposing of dust
CAUTION: Always be sure that the tool is
switched off and unplugged before carrying out
any work on the tool.
CAUTION: Be sure to wear dust mask when
disposing of dust.
CAUTION: Empty the dust case regularly
before the dust case becomes full. Failure to do so
may decrease the dust collection performance and
cause dust inhalation.
CAUTION: The performance of dust collection
guide. Failure to do so may cause dust inhalation.
1. Remove the dust case while pressing down the
lever of the dust case.
Fig.30: 1. Lever
2. Open the cover of the dust case.
Fig.31: 1. Cover
3.
Fig.32
NOTICE:
-
Blow-out bulb
Optional accessory
dust out of the hole.
Fig.33
Using dust cup set
Optional accessory
Fit the dust cup set against the ceiling when operating the tool.
Fig.34
NOTICE: Do not use the dust cup set when drill-
ing in metal or similar. It may damage the dust
cup set due to the heat produced by small metal
dust or similar.
NOTICE: Do not install or remove the dust cup
set with the drill bit installed in the tool. It may
damage the dust cup set and cause dust leak.
MAINTENANCE
CAUTION: Always be sure that the tool is
switched off and unplugged before attempting to
perform inspection or maintenance.
NOTICE: Never use gasoline, benzine, thinner,
alcohol or the like. Discoloration, deformation or
cracks may result.
Centers, always using Makita replacement parts.

13 ENGLISH
1. Remove the dust case while pressing down the
lever of the dust case.
Fig.35: 1. Lever
2.
Fig.36: 1. Flat-blade screwdriver 2. Filter case
3.
Fig.37: 1. Filter 2. Filter case
4.
attach them to the dust case aligning the protrusion on
Fig.38: 1. Protrusion 2. Groove
5. Close the cover of the dust case, and then attach
it to the tool.
Replacing sealing cap
If the sealing cap is worn out, the performance of the
dust collection decreases. Replace it if it's worn out.
Remove the sealing cap, and then attach a new one
with its protrusion facing upward.
Fig.39: 1. Protrusion 2. Sealing cap
OPTIONAL
ACCESSORIES
CAUTION:
These accessories or attachments
are recommended for use with your Makita tool spec-
Only use accessory or attachment for its stated purpose.
If you need any assistance for more details regarding
these accessories, ask your local Makita Service Center.
bits)
NOTE: Some items in the list may be included in the
differ from country to country.

14 FRANÇAIS
FRANÇAIS (Instructions originales)
SPÉCIFICATIONS
Modèle : HR2650 HR2651 HR2651T HR2661
Capacités Béton 26 mm
68 mm
80 mm
13 mm
Bois 32 mm
Vitesse à vide 0 à 1 200 min-1 0 à 1 100 min-1
Frappes par minute 0 à 4 600 min-1 0 à 4 500 min-1
Longueur totale 604 mm 630 mm 666 mm
Poids net 3,0 à 4,1 kg 3,1 - 4,2 kg 3,2 - 4,4 kg 3,3 - 4,4 kg
Catégorie de sécurité /II
-
Utilisation prévue
bois, le métal, la céramique et le plastique.
Alimentation
-
tique, et il ne pourra fonctionner que sur un courant secteur
monophasé. Réalisé avec une double isolation, il peut de
Bruit
EN60745 :
Modèle HR2650
Niveau de pression sonore (L
Niveau de puissance sonore (L
Modèle HR2651
Niveau de pression sonore (L
Niveau de puissance sonore (L
Modèle HR2651T
Niveau de pression sonore (L
Niveau de puissance sonore (L
Modèle HR2661
Niveau de pression sonore (L
Niveau de puissance sonore (L
AVERTISSEMENT : Portez un serre-tête
antibruit.
Vibrations
déterminée selon EN60745 :
Modèle HR2650
h, HD) : 12,5 m/s2
Incertitude (K) : 1,5 m/s2
Mode de travail : fonction de ciselage avec poignée
latérale
h, Cheq) : 9,5 m/s2
Incertitude (K) : 1,5 m/s2
h,D) : 2,5 m/s2
Incertitude (K) : 1,5 m/s2
Modèle HR2651
h, HD) : 11,5 m/s2
Incertitude (K) : 1,5 m/s2
Mode de travail : fonction de ciselage avec poignée
latérale
h, Cheq) : 9,0 m/s2
Incertitude (K) : 1,5 m/s2
h,D) : 2,5 m/s2
Incertitude (K) : 1,5 m/s2
Modèle HR2651T
h, HD) : 11,5 m/s2
Incertitude (K) : 1,5 m/s2
Mode de travail : fonction de ciselage avec poignée
latérale
h, Cheq) : 9,0 m/s2
Incertitude (K) : 1,5 m/s2
h,D) : 2,5 m/s2
Incertitude (K) : 1,5 m/s2

15 FRANÇAIS
Modèle HR2661
h, HD) : 9,5 m/s2
Incertitude (K) : 1,5 m/s2
Mode de travail : fonction de ciselage avec poignée
latérale
h, Cheq) : 6,0 m/s2
Incertitude (K) : 1,5 m/s2
h,D) : 2,5 m/s2 ou moins
Incertitude (K) : 1,5 m/s2
NOTE :
a été mesurée conformément à la méthode de test
NOTE :
AVERTISSEMENT :
AVERTISSEMENT : Les mesures de sécurité à
-
tourne à vide et le moment de son déclenchement).
Déclaration de conformité CE
Pour les pays européens uniquement
CONSIGNES DE
SÉCURITÉ
Consignes de sécurité générales
pour outils électriques
AVERTISSEMENT : Veuillez lire les
consignes de sécurité, instructions, illustrations
électrique. Le non-respect de toutes les instructions
indiquées ci-dessous peut entraîner une électrocu-
tion, un incendie et/ou de graves blessures.
Conservez toutes les mises en
garde et instructions pour réfé-
rence ultérieure.
Le terme « outil électrique » dans les avertissements
-
CONSIGNES DE SÉCURITÉ POUR
LE MARTEAU PERFORATEUR
1. Portez des protecteurs d’oreilles.
au bruit peut entraîner la surdité.
2. Utilisez la ou les poignées auxiliaires, si l’outil
en possède.
comporte un risque de blessure.
3.
Tenez l’outil électrique par une surface de prise
isolée, lorsque vous effectuez une tâche où l’acces-
soire de coupe pourrait toucher un câblage caché
ou son propre cordon d’alimentation.
Le contact
4.
Portez un casque de sécurité (casque de chan-
tier), des lunettes de sécurité et/ou un écran
facial. Les lunettes de vue ou les lunettes de
soleil NE sont PAS des lunettes de sécurité. Il est
également vivement recommandé de porter un
masque anti-poussière et des gants matelassés.
5. Avant utilisation, assurez-vous que le foret est
6.
Dans des conditions normales de fonctionnement,
l’outil est conçu pour émettre des vibrations. Les
vis peuvent se desserrer facilement et provoquer
une panne ou un accident. Avant utilisation, véri-
7.
Par temps froid ou si l’outil n’a pas été utilisé
pendant longtemps, laissez-le chauffer un instant
en le faisant fonctionner à vide. Cela ramollira le
8.
Assurez-vous toujours de travailler en position
stable. Veillez à ce que personne ne se trouve en des-
sous de vous quand vous utilisez l’outil en hauteur.
9. Tenez l’outil fermement à deux mains.
10. Éloignez les mains des pièces en mouvement.
11.
Ne vous éloignez pas en laissant l’outil tourner. Ne le
faites fonctionner que lorsque vous l’avez bien en main.
12. Ne pointez l’outil vers personne dans la zone
d’utilisation. Le foret peut être projeté et bles-
ser gravement quelqu’un.
13.
Ne touchez pas le foret, les pièces situées près du foret
ou la pièce immédiatement après utilisation ; ils peuvent
être extrêmement chauds et vous brûler la peau.
14.
Certains matériaux contiennent des produits chimiques
qui peuvent être toxiques. Prenez garde de ne pas avaler
la poussière et évitez tout contact avec la peau. Suivez
les données de sécurité du fournisseur du matériau.
15. Ne touchez pas la prise d’alimentation avec
des mains humides.
CONSERVEZ CES INSTRUCTIONS.
AVERTISSEMENT : NE vous laissez PAS
sentiment d’aisance et de familiarité avec le
produit, en négligeant le respect rigoureux des
consignes de sécurité qui accompagnent le pro-
duit en question. La MAUVAISE UTILISATION de
l’outil ou l’ignorance des consignes de sécurité
indiquées dans ce mode d’emploi peut entraîner
de graves blessures.

16 FRANÇAIS
DESCRIPTION DU
FONCTIONNEMENT
ATTENTION : Assurez-vous toujours que
l’outil est hors tension et débranché avant de
Fonctionnement de la gâchette
ATTENTION : Avant de brancher l’outil,
assurez-vous toujours que la gâchette fonctionne
correctement et revient en position d’arrêt une
fois relâchée.
ATTENTION : L’interrupteur peut être ver-
rouillé sur la position « Marche » pour améliorer
le confort de l’utilisateur pendant une utilisation
prolongée. Soyez prudent lorsque vous verrouil-
lez l’outil sur la position « Marche » et tenez-le
fermement.
Fig.1: 1. Gâchette 2. Bouton de sécurité
Fig.2: 1. Gâchette 2. Bouton de verrouillage
-
Fonctionnement de l’inverseur
ATTENTION :
rotation avant d’utiliser l’outil.
REMARQUE : N’utilisez l’inverseur qu’une fois
que l’outil est complètement arrêté. Si vous chan-
REMARQUE : Si la gâchette ne peut pas être
-
tement placé sur la position / (côté A)
ou / (côté B).
Pour HR2650/HR2651/HR2651T
-
la position
(côté
B) pour une rotation dans le sens inverse des aiguilles
Fig.3: 1. Levier inverseur
Pour HR2661
-
la position
(côté
B) pour une rotation dans le sens inverse des aiguilles
Fig.4: 1. Levier inverseur
NOTE :
enfoncer le bouton de verrouillage.
Remplacement du mandrin de
remplacement rapide pour SDS-plus
Pour HR2651T
Il est facile de remplacer le mandrin de remplacement
rapide pour SDS-plus par le mandrin à foret de rempla-
cement rapide.
Retrait du mandrin de remplacement
rapide pour SDS-plus
ATTENTION :
le foret.
de remplacement passe du symbole au symbole .
Fig.5: 1. Mandrin de remplacement rapide pour
SDS-plus 2. Couvercle de remplacement
3. Ligne du couvercle de remplacement
Installation du mandrin à foret de
remplacement rapide
-
ment rapide présente le symbole -
vercle de remplacement du mandrin à foret de rem-
.
du mandrin à foret de remplacement rapide et faites
tourner la ligne du couvercle de remplacement sur le
symbole
entendre.
Fig.6: 1. Mandrin à foret de remplacement rapide
2. 3. Ligne du couvercle de remplace-
ment 4. Couvercle de remplacement

17 FRANÇAIS
Sélection du mode de
fonctionnement
REMARQUE : Ne tournez pas le bouton de
changement de mode pendant que l’outil fonc-
tionne.
REMARQUE : Pour éviter que le mécanisme
de changement de mode ne s’use rapidement,
vous devez toujours vous assurer que le bouton
de changement de mode est placé avec exac-
titude sur l’une des trois positions du mode de
fonctionnement.
Rotation avec martelage
symbole
Fig.7: 1. Rotation avec martelage 2. Bouton de
changement de mode
Rotation uniquement
bois.
Fig.8: 1. Rotation uniquement
Martelage uniquement
.
etc.
Fig.9: 1. Martelage uniquement
Réglage de la position de la buse
souhaitée.
Fig.10: 1. Guide 2. Bouton de réglage du guide
NOTE : -
le bouton de réglage du guide.
Réglage de la profondeur de
perçage
Faites coulisser le bouton de réglage de la profondeur
Fig.11: 1. Bouton de réglage de la profondeur
Limiteur de couple
REMARQUE : Si le limiteur de couple se
déclenche, éteignez immédiatement l’outil. Ceci
REMARQUE : Les forets, comme les scies clo-
ches qui ont tendance à se coincer ou se prendre
facilement dans le trou, ne sont pas appropriés
pour cet outil. Ils déclenchent trop fréquemment le
limiteur de couple.
niveau de couple est atteint. Le moteur se dégage de
Crochet
ATTENTION : N’accrochez jamais l’outil dans
un emplacement élevé ou sur une surface poten-
tiellement instable.
Pour HR2661
Fig.12: 1. Crochet
Le crochet est pratique pour suspendre momentané-
-
passe en position fermée.
ASSEMBLAGE
ATTENTION : Avant d’effectuer toute inter-
vention sur l’outil, assurez-vous toujours qu’il est
hors tension et débranché.
Poignée latérale (poignée auxiliaire)
ATTENTION : Utilisez toujours la poignée
latérale pour garantir votre sécurité.
ATTENTION : Après avoir mis en place ou
réglé la poignée latérale, assurez-vous qu’elle est
-
Fig.13: 1. Poignée latérale
Graisse
avec une petite quantité de graisse (environ 0,5 à 1 g).

18 FRANÇAIS
Pose ou retrait du foret
la graisse avant de poser le foret.
Fig.14: 1. 2. Graisse
-
est solidement maintenu en place en essayant de le
sortir.
Fig.15: 1. Foret
Fig.16: 1. Foret 2. Carter du mandrin
Angle du burin (lors du burinage, de
l’écaillage ou de la démolition)
souhaité.
Fig.17: 1. Bouton de changement de mode
symbole
est solidement maintenu en place en le tournant
Jauge de profondeur
latérale.
Fig.18: 1. 2. Jauge de profondeur
NOTE :
Installation ou retrait du système de
collecte des poussières
-
Fig.19: 1. Bouton de déverrouillage
Collecteur de poussières
Accessoire en option
tailles suivantes.
6 mm à 14,5 mm
12 mm à 16 mm
Fig.20: 1.
Ensemble du collecteur de
poussières
Accessoire en option
-
sur le collecteur de
Fig.21: 1. symbole 2. Rainure
NOTE :
Fig.22: 1.
-
Fig.23: 1. Foret 2. Carter du mandrin
Fig.24
NOTE : Si le bouchon se détache du collecteur de
Fig.25
UTILISATION
ATTENTION : Utilisez toujours la poignée
latérale (poignée auxiliaire) et saisissez l’outil
fermement par la poignée latérale et la poignée
pistolet pendant l’utilisation.
ATTENTION : Avant l’utilisation, assu-

19 FRANÇAIS
ATTENTION : Le système de collecte des
poussières est exclusivement conçu pour le
perçage du béton. N’utilisez pas le système de
collecte des poussières pour le perçage du métal
ou du bois.
ATTENTION : Lorsque vous utilisez l’outil
avec le système de collecte des poussières,
poussières.
ATTENTION : Avant d’utiliser le système de
pas endommagé.
ATTENTION : Bien que le système de collecte
des poussières collecte en grande partie les
poussières générées, toute la poussière ne peut
pas être collectée.
REMARQUE : N’utilisez pas le système de
collecte des poussières pour le perçage avec un
trépan ou le burinage.
REMARQUE : N’utilisez pas le système de
collecte des poussières pour le perçage dans du
béton humide ou dans un environnement humide.
Le non-respect de cette règle peut entraîner un
dysfonctionnement.
Fig.26
Perçage avec percussion
ATTENTION :
émerge sur la face opposée, lorsque le trou est bou-
avec des armatures dans le béton. Utilisez toujours
la poignée latérale (poignée auxiliaire) et saisis-
sez l’outil fermement par la poignée latérale et la
poignée pistolet pendant l’utilisation. Si vous ne
-
bole .
glisser hors du trou.
du trou. En répétant cette opération plusieurs fois, le
-
NOTE :
-
pas affectée.
Burinage/Écaillage/Démolition
-
bole .
-
Fig.27
Perçage dans le bois ou le métal
ATTENTION
:
Tenez l’outil fermement et redoublez
d’attention lorsque le foret commence à sortir par la face
opposée de la pièce.
ATTENTION :
Un foret coincé peut être retiré en
réglant simplement l’inverseur sur la rotation inverse pour
faire marche arrière. L’outil peut toutefois faire brusque-
ment marche arrière si vous ne le tenez pas fermement.
ATTENTION :
Immobilisez toujours les pièces à tra-
vailler dans un étau ou un dispositif de retenue similaire.
REMARQUE :
N’utilisez jamais la « rotation avec
martelage » lorsque le mandrin à foret est installé sur
l’outil.
De plus, le mandrin à foret se détacherait lors de
REMARQUE :
Une pression excessive sur l’outil
n’accélèrera pas le perçage.
-
sive abîmera la pointe du foret, provoquera une baisse
.
Pour HR2650/HR2651/HR2661
Accessoire en option
-
Fig.28: 1. Mandrin à foret sans clé 2.
de mandrin
Pour HR2651T
-
-
ment rapide pour SDS-plus ».
faites tourner le manchon dans le sens des aiguilles
Fig.29: 1. Manchon 2. Bague
montre.

20 FRANÇAIS
Perçage avec trépan diamant
REMARQUE : Percer avec un trépan diamant en
mode « Rotation avec martelage » peut endomma-
ger le trépan diamant.
levier de changement sur la position
mode « Rotation uniquement ».
Élimination des poussières
ATTENTION : Avant d’effectuer toute inter-
vention sur l’outil, assurez-vous toujours qu’il est
hors tension et débranché.
ATTENTION : Veillez à porter un masque anti-
poussière lorsque vous éliminez les poussières.
ATTENTION : Videz régulièrement le loge-
ment à poussières avant qu’il soit plein. Le
-
ATTENTION : Les performances de la col-
dans le logement à poussières est obstrué. Pour
après environ 200 remplissages. Le non-respect
1.
son levier.
Fig.30: 1. Levier
2.
Fig.31: 1. Couvercle
3.
Fig.32
REMARQUE :
Accessoire en option
Fig.33
Utilisation de l’ensemble du
collecteur de poussières
Accessoire en option
Fig.34
REMARQUE : N’utilisez pas l’ensemble du col-
lecteur de poussières pour le perçage du métal ou
d’une matière similaire. Cela pourrait détériorer
l’ensemble du collecteur de poussières en raison
de la chaleur générée par les petites poussières
métalliques ou similaires.
REMARQUE : N’installez pas ou ne retirez pas
l’ensemble du collecteur de poussières avec le
foret installé dans l’outil. Cela pourrait détériorer
l’ensemble du collecteur de poussières et entraî-
ner une fuite des poussières.
ENTRETIEN
ATTENTION : Assurez-vous toujours que
l’outil est hors tension et débranché avant d’y
effectuer tout travail d’inspection ou d’entretien.
REMARQUE : N’utilisez jamais d’essence, ben-
zine, diluant, alcool ou autre produit similaire.
Cela risquerait de provoquer la décoloration, la
à poussières
1.
son levier.
Fig.35: 1. Levier
2.
son logement.
Fig.36: 1. 2. Logement du
3.
Fig.37: 1. Filtre 2.
4.
Fig.38: 1. Saillie 2. Rainure
5.
Remplacement du bouchon
hermétique
Si le bouchon hermétique a subi une usure, les perfor-
-
veau en positionnant la saillie vers le haut.
Fig.39: 1. Saillie 2. Bouchon hermétique
Other manuals for HR2650
7
This manual suits for next models
3
Table of contents
Languages:
Other Makita Power Tools manuals

Makita
Makita XKH01 Series User manual

Makita
Makita TW140D User manual

Makita
Makita RT0700C User manual

Makita
Makita JN3201 User manual

Makita
Makita 4322 User manual

Makita
Makita DSC121 User manual

Makita
Makita 4326 User manual

Makita
Makita HM1202 User manual

Makita
Makita DHR263 User manual

Makita
Makita HS301D User manual

Makita
Makita HM1140C Quick start guide

Makita
Makita VR001C User manual

Makita
Makita 3601B User manual

Makita
Makita DTM40 User manual

Makita
Makita 4351T User manual

Makita
Makita JS1300 User manual

Makita
Makita HR3540C User manual

Makita
Makita DCO140 User manual

Makita
Makita 4340CT User manual

Makita
Makita DHG181RT User manual