manuals.online logo
Brands
  1. Home
  2. •
  3. Brands
  4. •
  5. Manfrotto
  6. •
  7. Camera Accessories
  8. •
  9. Manfrotto 338 User manual

Manfrotto 338 User manual

GB
INTRODUCTION
The 338 Levelling Base is designed to support cameras or instruments and make fine,
finger tip level adjustments of +-5 degrees.
KEY FEATURES
●Spirit level with sensitivity of 0.5 degrees.
●Three thumb rings to find level adjustment.
●3/8” screw mounting for camera/instrument.
SET UP INSTRUCTIONS
Mount on tripod via 3/8” female thread “A” on the bottom of the levelling base.
The mounting plate on Manfrotto tripods are equipped with 3 set screws “B”
which clamp up against the head to ensure effective and secure locking.
Mount camera/instrument onto the levelling base via the 3/8” male screw “C”.
In the event of the equipment that is to be mounted on the base covering the spirit
level “F”, carry out the levelling procedure prior to mounting the equipment.
USE
Using the spirit level, rotate the 3 thumb rings “G” until the bubble in the spirit level is
within the black circle.
When the level is set, lock in position by rotating thumb rings “J” up against base disk
“E”.
I
INTRODUZIONE
La testa è stata progettata per livellare e supportare attrezzature fotografiche o di
altro tipo, su treppiedi dotati di attacco maschio da 3/8”W.
L’art. 338 (USA 3416) consente all’operatore di effettuare precisi e sensibili
livellamenti dentro un campo di +/- 5 gradi rispetto al piano di attacco al treppiede.
CARATTERISTICHE PRINCIPALI
●Bolla di livellamento con sensibilità di 0,5 gradi
●Tre ghiere per precise regolazioni del livellamento
PREPARAZIONE
Montare la testa sul treppiede utilizzando l’attacco femmina “A” da 3/8” (fig. 1).
I treppiedi Manfrotto sono dotati di tre grani “B” da avvitare contro la base della
testa per un bloccaggio efficace e sicuro.
Avvitare l’attrezzatura sulla vite “C” da 3/8”.
Nel caso che l’attrezzatura adoperata sia così ingombrante da coprire la bolla “F”,
effettuare prima il livellamento (vedi paragrafo successivo) e quindi effettuare il
montaggio.
USO
La testa è provvista di livella a bolla “F”.
Quando la bolla d’aria rimane all’interno del circoletto nero (vedi dettaglio fig. 1) si
raggiunge un livellamento sul piano orizzontale con una precisione di circa 0,5 gradi. Il
livellamento si ottiene mediante la rotazione delle tre ghiere “G”.
Ruotare in senso antiorario la ghiera (o le ghiere)e che si trova sul lato più basso del
disco superiore “H”(fig.2), oppure ruotare in senso antiorario la ghiera (le ghiere)
opposta. Una volta raggiunto il livellamento, ruotare i tre nottolini “J” contro il disco di
base “E” ottenendo un bloccaggio più solido della posizione raggiunta.
Cod. 338,12 - 09/04 Copyright © 2004 Manfrotto Bassano Italy
INSTRUCTIONS
338 - USA 3416
4 cm 0,53 kg 15 kg
1 1/2” 1.16 lbs 33 lbs
1
2
1
2
D
F
INTRODUCTION
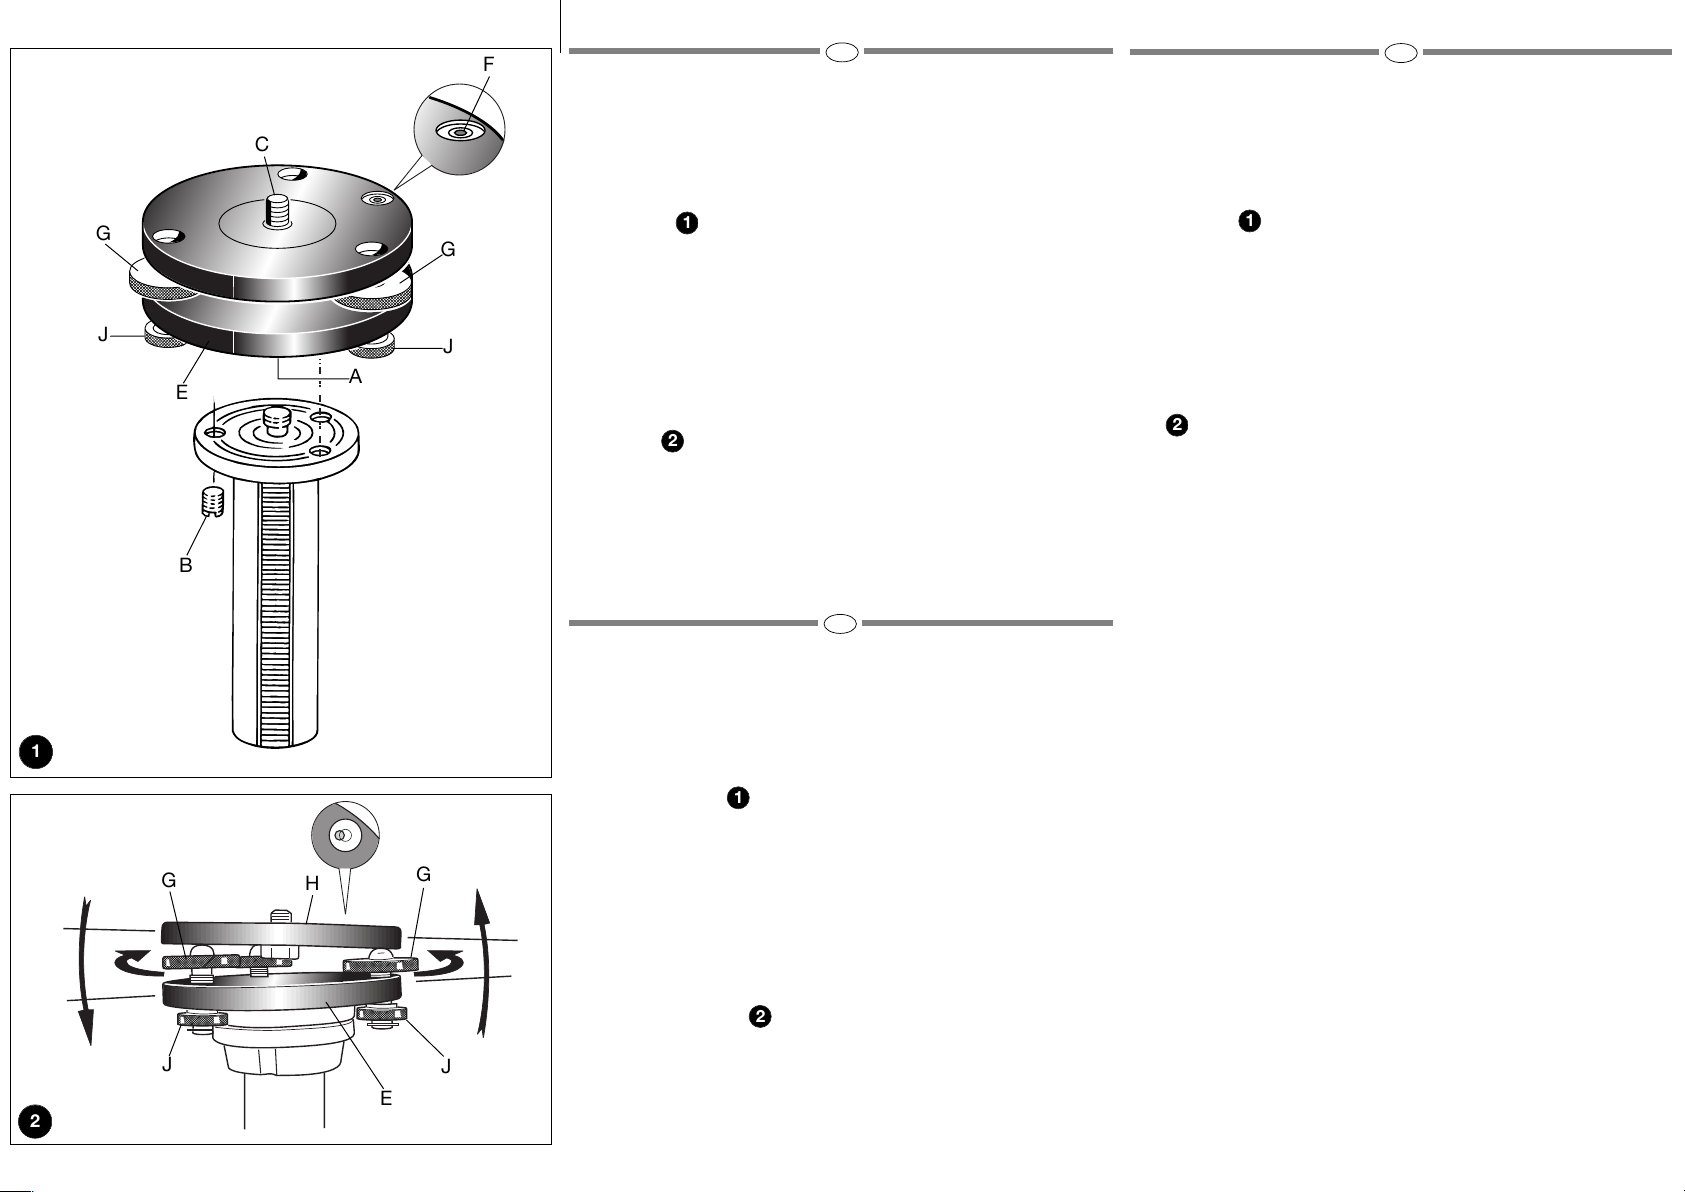
La base de mise à niveau 338 permet de mettre à niveau tout appareil ou instrument
avec une précision de +/- 5°.
CARACTERISTIQUES
●Niveau à bulle avec sensibilité de 0.5 degrés
●Trois molettes pour un réglage très précis du niveau
●Vis de fixation de l'appareil/instrument 3/8"
PREPARATION
Pour fixer la base à niveau sur le trépied, vissez la par le filetage femelle 3/8" situé en
essous.
Le socle de fixation des trépieds Manfrotto est équipé de trois vis sans tête "B"
qui viennent en butée sur la base de la rotule, en assurant ainsi la fixation et
évitant tout risque de desserrage
Pour monter l'appareil/ instrument sur la base de mise à niveau, vissez le sur la vis
mâle 3/8" "C".
Dans le cas où le matériel cache sur le niveau à bulle, effectuez la mise à niveau avant
de le monter.
UTILISATION
Tournez les 3 molettes "G" pour faire la mise à niveau jusqu'à ce que la bulle soit
placée dans le cercle noir.
Une fois le niveau fait, bloquez la position en tournant les molettes "J" jusqu'à ce
qu'elles soient en butée contre le socle de la base "E"
EINFÜHRUNG
Die Nivelliervorrichtung 338 ermöglicht es, Kameras oder Instrumente in einem
Bereich von +-5° präzise auszunivellieren.
AUSSTATTUNGSMERKMALE:
●Nivellierlibelle mit einer Sensibilität von 0.5°
●Drei Verstellschrauben, welche mit dem Daumen verstellt werden können.
●3/8" (m) Schraube für Kamera oder Instrumente
MONTAGEANLEITUNG
Befestigen Sie die Vorrichtung mit dem auf der Unterseite angebrachten 3/8" Gewinde
"A" auf einem Stativ.
Die Kopfauflageplatte von Manfrotto Stativen ist mit drei Blockierschrauben “B“
ausgerüstet, welche ein unerwünschtes Losdrehen der Nivelliervorrichtung
verhindern, wenn sie korrekt angezogen sind.
Schrauben Sie die Kamera oder das Instrument auf die 3/8" Schraube "C", welche
sich auf der Oberseite der Nivelliervorrichtung befindet.
Sollte das aufgesetzte Gerät so gross sein, dass die Nivellierlibelle abgedeckt wird, so
führen Sie den Nivellierprozess aus, bevor Sie das Gerät aufsetzen.
BEDIENUNGSANLEITUNG
Drehen Sie die Verstellschrauben "G" solange, bis sich die Nivellierlibelle in der Mitte
des schwarzen Kreises befindet.
Ist die korrekte Position erreicht, so ziehen Sie die Blockierschrauben "J" gegen die
Basis "E" an, damit Ihre Einstellung gesichert ist.
INTRODUCCION
La base niveladora 338 ha sido diseñada para sostener cámaras o instrumentos y
para realizar finos ajustes con suaves toques de +/- 5 grados.
CARACTERISTICAS DESTACADS
●Burbuja de nivel con sensibilidad de 0,5 grados
●Tres arandelas para hallar el ajuste del nivelado
●Acoplamiento de rosca 3/8" para cámara/instrumento
PREPARATION
Montar sobre un trípode por medio de la rosca hembra 3/8" "A" en la plataforma
inferior de la base niveladora.
Las plataformas de los trípodes Manfrotto estan equipadas con 3 tornillos "B"
que se aprietan contra la rótula para asegurar un bloqueo eficaz
Coloque la cámara/instrumento sobre la base niveladora por medio del tornillo macho
3/8" "C".
En caso de que el equipo ha de montarse sobre la base tapando la burbuja de nivel
"F", lleve a cabo el proceso del nivelado anteriormente.
USO
Utilizando la burbuja de nivel girar las tres arandelas "G" hasta que la burbuja quede
dentro del círculo negro.
Una vez alcanzado el nivel correcto bloquee la posición girando las arandelas "J"
contra el disco base "E".
E
;;
;;
;;
;;
;
;;;
;;
;;;
;;
;
;;;
;;
;
B
G
JJ
E
G
H
G
J
EA
J
G
F
C
1
2
1
2
1
2
1
2

This manual suits for next models

1

Other Manfrotto Camera Accessories manuals

Manfrotto MT190GOA4 User manual

Manfrotto

Manfrotto MT190GOA4 User manual

Manfrotto Imagine More MKC3-H01 User manual

Manfrotto

Manfrotto Imagine More MKC3-H01 User manual

Manfrotto 454 User manual

Manfrotto

Manfrotto 454 User manual

Manfrotto 554 User manual

Manfrotto

Manfrotto 554 User manual

Manfrotto Lastolite Ezybalance User manual

Manfrotto

Manfrotto Lastolite Ezybalance User manual

Manfrotto 685B Quick start guide

Manfrotto

Manfrotto 685B Quick start guide

Manfrotto 357 User manual

Manfrotto

Manfrotto 357 User manual

Manfrotto 501HDV User manual

Manfrotto

Manfrotto 501HDV User manual

Manfrotto 056 User manual

Manfrotto

Manfrotto 056 User manual

Manfrotto 361 User manual

Manfrotto

Manfrotto 361 User manual

Manfrotto 701RC2 User manual

Manfrotto

Manfrotto 701RC2 User manual

Manfrotto 523 PRO User manual

Manfrotto

Manfrotto 523 PRO User manual

Manfrotto 351MV User manual

Manfrotto

Manfrotto 351MV User manual

Manfrotto 330B User manual

Manfrotto

Manfrotto 330B User manual

Manfrotto 504 User manual

Manfrotto

Manfrotto 504 User manual

Manfrotto 131D User manual

Manfrotto

Manfrotto 131D User manual

Manfrotto MDOLLYVR User manual

Manfrotto

Manfrotto MDOLLYVR User manual

Manfrotto 745XB User manual

Manfrotto

Manfrotto 745XB User manual

Manfrotto 322RSM User manual

Manfrotto

Manfrotto 322RSM User manual

Manfrotto MVH502A User manual

Manfrotto

Manfrotto MVH502A User manual

Manfrotto 384 User manual

Manfrotto

Manfrotto 384 User manual

Manfrotto C350N User manual

Manfrotto

Manfrotto C350N User manual

Manfrotto 524AX User manual

Manfrotto

Manfrotto 524AX User manual

Manfrotto 595B User manual

Manfrotto

Manfrotto 595B User manual

Popular Camera Accessories manuals by other brands

Panasonic AW-AD700BS instructions

Panasonic

Panasonic AW-AD700BS instructions

Philips 389 Specifications

Philips

Philips 389 Specifications

Nikon SB-300 user manual

Nikon

Nikon SB-300 user manual

AL-KO B50 Li manual

AL-KO

AL-KO B50 Li manual

Sanyo Twicell HR-AUC Specifications

Sanyo

Sanyo Twicell HR-AUC Specifications

Solight FP06 quick start guide

Solight

Solight FP06 quick start guide

Ikelite Olympus E-3 instruction manual

Ikelite

Ikelite Olympus E-3 instruction manual

Tarot T-2D user manual

Tarot

Tarot T-2D user manual

AUTOCUE Heavy Tripod Medium Guide

AUTOCUE

AUTOCUE Heavy Tripod Medium Guide

Philips R14-P2 Specifications

Philips

Philips R14-P2 Specifications

Axis F8201 installation guide

Axis

Axis F8201 installation guide

Moog RHW75C2N Installation and operation instructions

Moog

Moog RHW75C2N Installation and operation instructions

Sony SPK-CXB Sports Pack Preparation Guide

Sony

Sony SPK-CXB Sports Pack Preparation Guide

for_q FQ-BLT40 manual

for_q

for_q FQ-BLT40 manual

Panasonic LJ-SK84A user manual

Panasonic

Panasonic LJ-SK84A user manual

Karma GRIP user manual

Karma

Karma GRIP user manual

NATURE & DECOUVERTES 53159630 manual

NATURE & DECOUVERTES

NATURE & DECOUVERTES 53159630 manual

Active Silicon AS-CIB-3GSDI-002-EVAL-B quick start guide

Active Silicon

Active Silicon AS-CIB-3GSDI-002-EVAL-B quick start guide

manuals.online logo
manuals.online logoBrands
  • About & Mission
  • Contact us
  • Privacy Policy
  • Terms and Conditions

Copyright 2025 Manuals.Online. All Rights Reserved.