Martinelli CARRELLO BOOK 51 S User manual

CARRELLO
BOOK 51 S

3
2
1
click
OPTION A

1
2
4OPTION B
5
6

click
7
9
8
OPTION A

10 OPTION A
12
11 OPTION B
OPTION B

1 1
2
2
1
13
14
15

16
IT_Italiano
Grazie per aver acquistato un prodotto Martinelli.
ATTENZIONE!
IMPORTANTE: leggere
attentamente e conservare per
futuro riferimento. La sicurezza
del bambino potrebbe essere
messa a rischio se non si
eseguono queste istruzioni.
_ Questo articolo è stato progettato
per il trasporto di 1 bambino nella
seduta.
_ Non utilizzare questo articolo per
un numero di occupanti superiori a
quanto previsto dal costruttore.
_ Il Carrello Book 51 S e' stato
progettato per essere usato in
combinazione con i prodotti
Ganciomatic:
- Carrello Book 51 S + Seat Pop-Up:
questo prodotto è omologato per
bambini dalla nascita sino a 4 anni
di età o peso massimo di 22 kg, a
seconda della condizione che si
presenta prima.
Per bambini superiori a 15 Kg di
peso, orientare ed utilizzare la
seduta esclusivamente in direzione
del senso di marcia.
- Carrello Book 51 S + seggiolino auto
Primo Viaggio : è omologato per
bambini dalla nascita, fino a 13 kg di
peso.
Usato in combinazione con il
seggiolino auto, questo articolo non
sostituisce la carrozzina o lettino.
Se il bambino necessita di dormire,
dovrebbe essere posto sdraiato in
una carrozzina, culla o lettino.
- Carrello Book 51 + Navicelle:
è omologato per bambini dalla
nascita, fino a 9 kg di peso.
Usato in combinazione con la
carrozzina : questo prodotto è
omologato per bambini che non
sono in grado di sedersi da soli,
girarsi e sostenersi sulle mani o sulle
ginocchia per un peso massimo
consentito di 9 kg.
Durante l' uso della carrozzina, tutte
le manigle di trasporto (se presenti)
devono essere posizionate all'
esterno della carrozzina al di fuori
della portata del bambino.
_ ATTENZIONE! Prima dell'uso
assicurarsi che tutti i meccanismi
di bloccaggio siano correttamente
agganciati.
_ ATTENZIONE! Prima dell'uso
controllare che i meccanismi
di aggancio della seduta, della
navicella o del seggiolino auto siano
correttamente agganciati.
_ ATTENZIONE! Per evitare lesioni o

- 8 -
ferimenti assicurarsi che il bambino
sia a debita distanza durante le
operazioni di apertura e chiusura del
prodotto
_ ATTENZIONE! Non lasciare che
il bambino giochi con questo
prodotto. Questo articolo non è un
gioco.
_ ATTENZIONE! Le operazioni di
assemblaggio e di preparazione
dell’articolo devono essere
effettuate solo da adulti.
_ Non utilizzate questo articolo se
presenta parti mancanti o rotture.
_ ATTENZIONE! Non lasciare mai il
bambino incustodito.
_ Azionare sempre il freno quando si
è fermi e durante le operazioni di
carico e scarico del bambino.
_ Non inserire le dita nei meccanismi.
_ Prestare attenzione alla presenza
del bambino quando si effettuano
operazioni di regolazione dei
meccanismi (maniglione, schienale).
_ Qualsiasi carico applicato
all’impugnatura e/o allo schienale
e/o lateralmente al prodotto può
compromettere la stabilità del
prodotto.
_ Non introdurre nel cestello carichi
per un peso superiore a 7 kg. Non
inserire nei portabibite (se presente)
pesi superiori a quanto specificato
nel portabibite stesso e mai
bevande calde. Non inserire nelle
tasche delle capotte (se presenti)
pesi superiori a 0.2 Kg.
_Non utilizzare l'articolo in vicinanza
di scale o gradini; non utilizzare
vicino a fonti di calore, fiamme libere
o oggetti pericolosi a portata delle
braccia del bambino.
_ Utilizzare unicamente le parti di
ricambio fornite o consigliate dal
produttore/distributore.
_ ATTENZIONE! Questo prodotto non
è adatto per correre o pattinare.
_ ATTENZIONE! Non aggiungere alcun
materassino non approvato dal
costruttore.
_ Non utilizzare accessori non
approvati dal costruttore.
Le immagini riferite ai dettagli tessili potrebbero
differire dalla collezione acquistata.
Per maggiori informazioni consultare il nostro sito
internet: www.martinellimilano.com
ISTRUZIONI D'USO
1 APERTURA: Prima di aprire il telaio, se presenti, rimuovere
(senza utilizzare lame) tutti i fustellati in cartone.
ATTENZIONE:
_ NON TIRARE O FORZARE IL GANCIO DI CHIUSURA
OLTRE I FINE CORSA.
_ NON UTILIZZARE IL GANCIO DI CHIUSURA COME
UNA MANIGLIA DI TRASPORTO O PER AGGANCIARE
PESI.
NON APPENDERE BORSE O ALTRI ACCESSORI A
QUESTO PARTICOLARE.
Premere verso il basso il gancio di chiusura laterale,
impugnare le estremità superiori del maniglione e
ruotarle verso di sè sino alla completa apertura del
carrello (fig_a). Carrello aperto (fig_b). La corretta
apertura è data dal click, corrispondente all'aggangio
della base, vedere figura. ATTENZIONE: quando il
seggiolino è applicato, premere sullo stesso per
garantire il corretto aggancio della base.
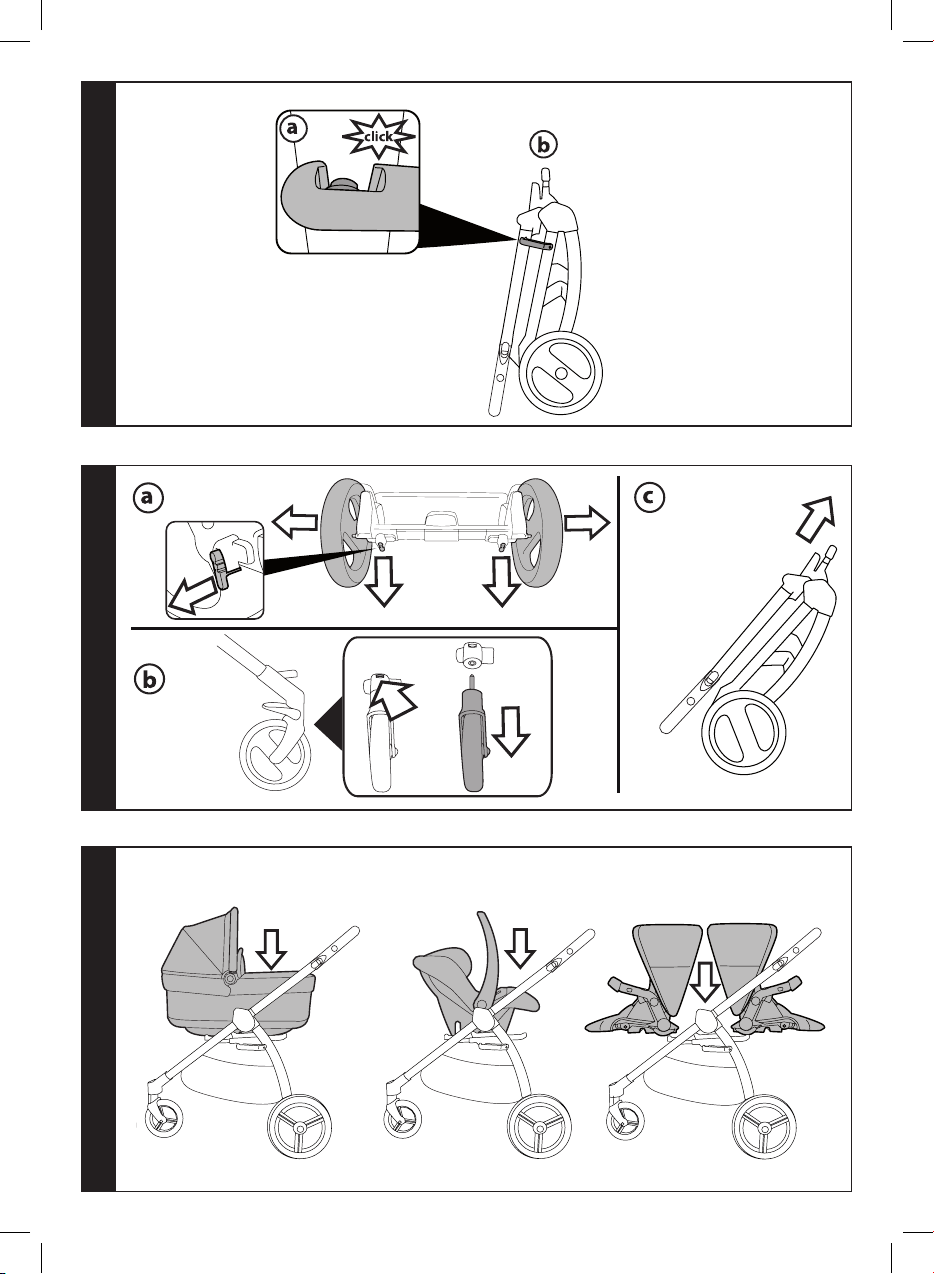
2 MONTAGGIO RUOTE: infilare la barra ruote posteriori
sui montanti (fig_a) prestando attenzione al verso
corretto, infine agganciare le ruote posteriori (fig_b)
fino al click. Per montare le ruote anteriori, infilarle nei
montanti fino al click (fig_c).
MANIGLIONE
In base al maniglione acquistato (OPTION A
oppure OPTION B) il montaggio e le caratteristiche
sono differenti.
3 MONTAGGIO MANIGLIONE OPTION A
infilare il maniglione nelle apposite sedi (fig_a) come
in figura.
Per completare l'aggancio è necessario premere i due
bottoncini laterali sul maniglione (fig_b) e spingere il
maniglione fino al click (fig_c).
4 MONTAGGIO MANIGLIONE OPTION B
Agganciarlo al telaio come in figura (Fig_a).
Per completare l'aggancio è necessario premere i due
bottoncini laterali sul maniglione (Fig_b) per portare
il maniglione fino in fondo, fino al click (Fig_c).
5 MONTAGGIO CESTELLO: se abbassato, sollevare il tubo
cestello in posizione orizzontale. Premere i pulsanti
argento sotto il tubo metallico del cestello posto
sul retro del passeggino (fig_a) e rimuovere il tubo
metallico (fig_b). Inserire il tubo nel passante in tessuto
sul retro del cestello, con i due pulsanti argento rivolti
verso il basso (fig_c). Fissare nuovamente il tubo nelle
sedi (fig_d).
6 Fissare i due occhielli superiori del cestello ai due
bottoni grigi fissati ai lati dei supporti del tubo cestello.
Si osservi che gli occhielli si aprono (fig_e).
Rimuovere il cartoncino dalla barra posteriore.
IMPORTANTE! Fissare i due occhielli inferiori del
cestello ai due bottoni grigi posto sopra la barra
posteriore. Si osservi che gli occhielli si aprono (fig_f).
ATTENZIONE! se questa operazione non è effettuata
correttamente, il cestello non può sorreggere il
contenuto.
Fissare le alette anteriori del cestello sui bottoni grigi
del telaio (fig_g).
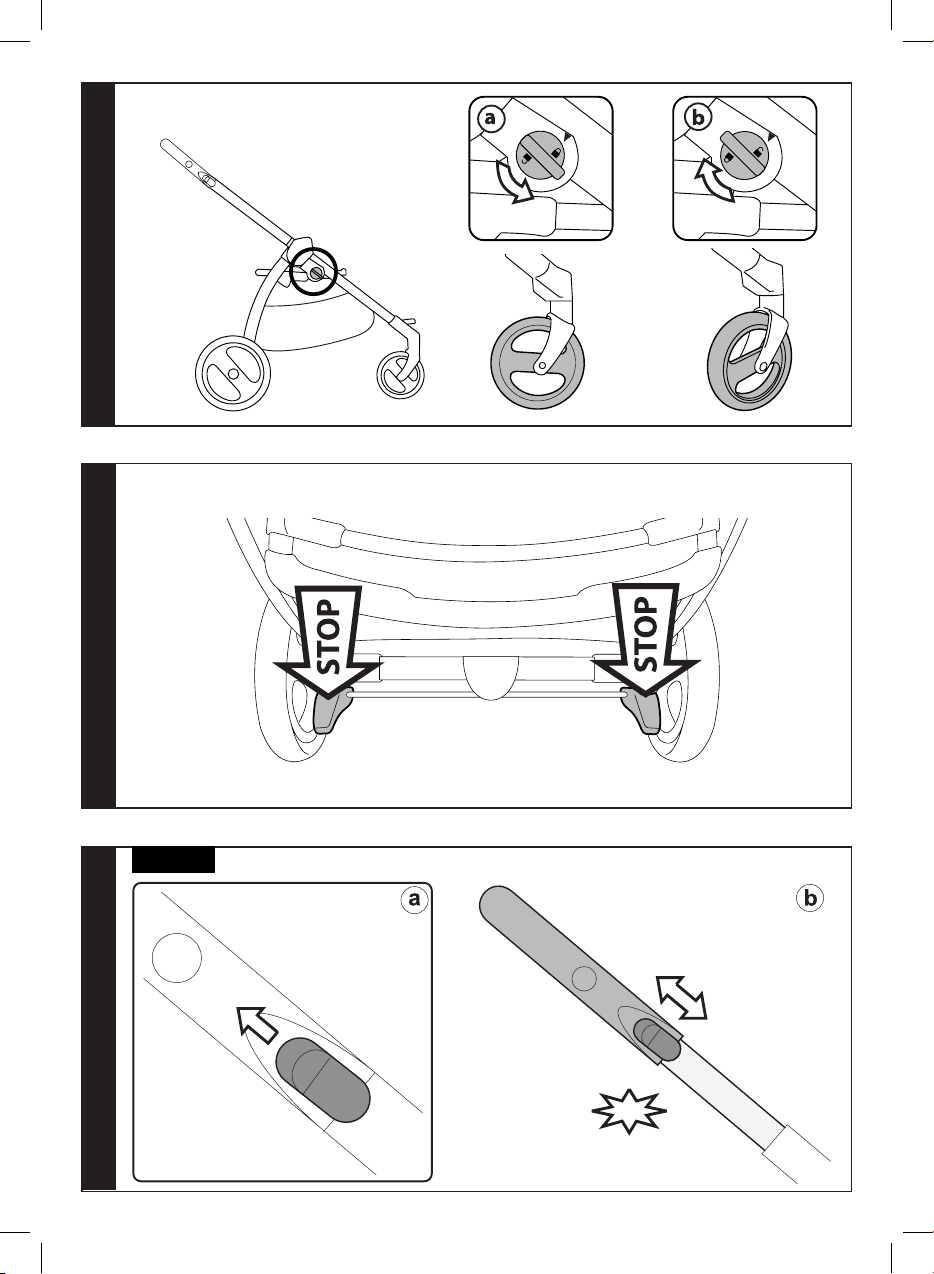
7 RUOTE ANTERIORI FISSE O PIROETTANTI Book 51 S:
per rendere le ruote anteriori fisse, ruotare la levetta
in senso antiorario sul lucchetto chiuso (fig_a), per
sbloccare le ruote, ruotare la levetta in senso orario
sul lucchetto aperto (fig_b). Su terreni difficili si
consiglia l'utilizzo delle ruote fisse.
8 FRENO: premere la leva freno per bloccare il telaio. Per
sbloccare il telaio, agire in senso contrario.

- 9 -
9 MANIGLIONE ESTENSIBILE OPTION A
per regolare l’estensione del maniglione, tirare le
levette verso di sè (fig_a) e far scorrere il maniglione
fino al click (fig_b). Il maniglione può essere regolato
in più posizioni
10 CHIUSURA OPTION A
la chiusura può essere effettuata senza seggiolino, con
seggiolino rivolto verso la mamma (reclinando, prima
di chiudere, lo schienale) o verso la strada.
Per chiudere il carrello è preferibile rendere le ruote
anteriori fisse e chiudere la capottina se applicata.
Ridurre completamente l’estensione del maniglione
(fig a). Tirare la maniglia interna posta sulla base
(fig_b) e, mantenendo la stessa in presa, sollevarla
(fig_c) e lasciare cadere in avanti il maniglione fino
alla chiusura.
11 MANIGLIONE TELESCOPICO OPTION B
per allungare il maniglione tirare verso l'alto i pulsanti
laterali (fig_a) e allungare (fig_b).
12
CHIUSURA OPTION B
la chiusura può essere effettuata senza seggiolino, con
seggiolino rivolto verso la mamma (reclinando, prima
di chiudere, lo schienale) o verso la strada.
Per chiudere il carrello è preferibile rendere le ruote
anteriori fisse e chiudere la capottina se applicata.
Posizionare il maniglione come in figura (fig_a)
Tirare la maniglia interna posta sulla base (fig_b)
e, mantenendo la stessa in presa, sollevarla (fig_c)
e lasciare cadere in avanti il maniglione fino alla
chiusura.
13 Per una corretta chiusura, verificare che il gancio
laterale sia innestato (fig_a). Il carrello chiuso rimane
in piedi da solo (fig_b).
14 E' possibile, per una maggiore compattezza, estrarre
tutte le ruote.
Per estrarre le ruote posteriori: tirare verso l'esterno
la leva posta sotto la barra posteriore ed estrarre la
ruota come in figura (fig_a).
Per estrarre le ruote anteriori: premere la linguetta
come in figura, ed estrare la ruota (fig_b).
TRASPORTO: si può trasportare comodamente,
tenendo le ruote anteriori fisse,impugnando la
maniglia centrale (fig_c).
GANCIOMATIC SYSTEM
15 Ganciomatic System é il sistema pratico e veloce
che ti permette di agganciare la navicella Navetta, il
seggiolino auto Primo Viaggio e il Seggiolino Pop-Up
alla Base Ganciomatic del carrello con un solo gesto.
Appoggiarli alla Base Ganciomatic e premere sul
prodotto con entrambi le mani fino al click.
Azionare sempre il freno del telaio o passeggino prima
di agganciare e sganciare i prodotti (consultare i
rispettivi manuali istruzioni).
Verificare che l'elemento di trasporto del bambino sia
correttamente agganciato.
NUMERI DI SERIE
16 Carrello Book 51 S, riporta informazioni relative alla
data di produzione dello stesso.
_ Nome del prodotto, data di produzione e numerazione
del carrello.
Queste informazioni sono indispensabili in caso di
reclamo.
PULIZIA E MANUTENZIONE
MANUTENZIONE DELL'ARTICOLO: proteggere da
agenti atmosferici: acqua, pioggia o neve; l’esposizione
continua e prolungata al sole potrebbe causare
cambiamenti di colore in molti materiali; conservare
questo articolo in un posto asciutto.
PULIZIA DEL TELAIO: periodicamente pulire le parti in
plastica con un panno umido senza utilizzare solventi
o altri prodotti simili; mantenere asciutte tutte le parti
in metallo per prevenire la ruggine; mantenere pulite
tutte le parti in movimento (meccanismi di regolazione,
meccanismi di aggancio, ruote...) da polvere o sabbia e
se occorre, lubrificarle con olio leggero.
THE ORIGINAL ACCESSORY
Gli accessori Martinelli sono stati concepiti come utile
e pratico supporto per semplificare la vita dei genitori.
Scopri tutti gli accessori dedicati al tuo prodotto
Martinelli su www.martinellimilano.com
MARTINELLI È UN MARCHIO
PEGPEREGO
PegPerego SpA è un' azienda con sistema di gestione
qualità certificato da TÜV Italia Srl, in accordo alla
norma ISO 9001.
PegPerego potrà apportare in qualunque momento
modifiche ai modelli descritti in questa pubblicazione,
per ragioni di natura tecnica o commerciale.
SERVIZIO ASSISTENZA
Se fortuitamente parti del modello vengono perse o
danneggiate, usare solo pezzi di ricambio originali.
Per eventuali riparazioni, sostituzioni, informazioni
sui prodotti, la vendita di ricambi originali e accessori,
contatta il Servizio Assistenza:
Tel. 0039/039/60.88.610
Email [email protected]

- 10 -
engaged before use.
_ WARNING! To avoid injury ensure
that the child is kept away when
unfolding and folding this product.
_ WARNING! Do not let the child play
with this product. This product is
not a toy.
_ WARNING! The assembly and
preparation of the product must be
carried out by an adult.
_ Do not use this product if there are
parts missing or signs of breakage.
_ WARNING! Never leave the child
unattended.
_ Always apply the brake when
stationary and when loading or
unloading children.
_ Do not insert fingers into the
mechanisms.
_ Be careful not to hurt the child
when adjusting the mechanisms
(handlebar, backrest … ).
_ Any load applied to the handle and/
or the backrest and/or laterally to
the product can compromise the
stability of the product.
_ Do not load the baskets over 7
Kg. Do not put weight in the cup
holder (if present) in excess of
those indicated on the cup holders
themselves and never hot drinks. Do
not put loads of more than 0.2 Kg in
the hood pockets (if present).
_ Do not use the product near to
stairs or steps, heat sources, naked
flames or dangerous objects within
reach of the child.
_ Only replacement parts supplied or
recommended by the manufacturer/
distributor shall be used.
_ WARNING! This product is not
suitable for running or skating.
_ WARNING! Do not add any
mattress are not approved by the
manufacturer.
_ Do not use accessories which are
not approved by the manufacturer.
The images referring to the textile details may
differ from the collection purchased.
For more information, consult our website:
www.martinellimilano.com
EN_English
Thank you for choosing a Martinelli product.
WARNING!
_ IMPORTANT: Read the
instructions carefully before use
and keep for future reference.
The child’s safety could be at
risk if these instructions are not
followed.
_ This product was designed for the
transport of 1 child in the seat.
_ Do not use this product for a
number of occupants greater than
that intended by the manufacturer.
_ This product was designed for use
in combination with Ganciomatic
products :
- Book 51 Chassis + Seat Pop-Up:
This product is suitable from birth
up to 22 kg or 4 years, whichever
comes firts.
For babies weighing more than 15
kg, direct and use the seat exclusively
following the direction of travel.
- Book 51 Chassis + Primo Viaggio Car
Seat:
is approved for children from birth
up to 13 kg of weight ;
When used in combination with car
seat, this vehicle does not replace a
cot or a bed.
Should your child need to sleep,
then it should be placed in a
suitable pram body, cot or bed.
_ Book 51 Chassis + Bassinet Elite ,
Bassinet Pop-up:
is approved for children from birth
up to 9 kg of weight.
When used in combination with
pram body : this product is suitable
for a child who cannot sit up by
itself, roll over and a cannot push
itself up on it's hands and knees.
Maximum weight of the child : 9 kg.
_ WARNING! Ensure that all the locking
devices are engaged before use.
_ WARNING! Check that the pram
body or seat unit or car seat
attachment devices are correctly

- 11 -
INSTRUCTIONS
1 OPENING: Before opening the frame, remove (without
using blades) any die-cut cardboard.
WARNING:
_ DO NOT PULL OR FORCE THE FASTENER BEYOND
ITS LIMIT.
_ DO NOT USE THE FASTENER AS A CARRY HANDLE
OR TO CARRY WEIGHTS.
DO NOT HANG BAGS OR OTHER ACCESSORIES TO
THIS FEATURE.
Press down the side fastener, hold the upper section
of the handle and rotate it towards you until the
frame is fully opened (fig_a). Open frame (fig_b).
The frame is properly opened when the attachment on
the base clicks into place, as shown. CAUTION: When
placing the seat on the frame, press the seat downwards
to ensure it engages securely onto the base.
2 FITTING THE WHEELS: Slot the uprights into the rear
wheel crosspiece (fig_a), ensuring that it is facing the
right way, then push the rear wheels on and make
sure that they click into place (fig_b). To mount the
front wheels, fit them into the uprights until they lock
into place (fig_c).
THE HANDLE BAR
Assembly and characteristics are different
according to handlebar purchased (OPTION A or
OPTION B)
3 FITTING THE HANDLE BAR OPTION A
insert the handlebar into the frame (fig_a) as shown
in the picture. For the attachment to be complete,
press the two buttons on the side of the handle bar
(fig_b) and press the handle bar until you hear it click
(fig_c).
4 FITTING THE HANDLE BAR OPTION B
Fasten the handle to the frame as shown in the figure
(Fig_a). To complete the operation, press the two side
buttons on the handle (Fig_b) to ensure the handle
pushes in all the way, until it clicks into place (Fig_c).
5 FITTING THE BASKET: if lowered, lift the basket tube
to the horizontal position. Press the silver buttons
under the metal basket tube located at the back of
the stroller (fig_a) and remove the metal tube (fig_b).
Thread the tube through the fabric loop on the back
of the basket, making sure that the two silver buttons
are facing downward (fig_c). Re-attach the tube to the
housings (fig_d).
6 Secure the two upper basket vinyl eyelets to the two
grey buttons on either side of the metal tube housing.
Please note that the eyelets open (fig_e). Remove the
cardboard from the lower rear bar.
IMPORTANT! Secure the two lower basket vinyl
eyelets to the two grey buttons on the top of the
lower rear bar. Please note that the eyelets open
(fig_f).
WARNING! If this operation is not performed
correctly, the basket will not properly hold the
weight.
Attach the basket tabs to the grey buttons on the
front of the frame (figure).
7 FIXED OR SWIVEL FRONT WHEELS Book 51 S: to fix the
front wheels, rotate the lever counter clockwise to the
locked padlock (fig_a); to release the wheels, turn the
lever clockwise to the unlocked padlock (fig_b). On
difficult terrain, we recommend using fixed wheels.
8 BRAKE: Press the lever down to apply the brake on the
chassis and lift it to release the brake.
9 ADJUSTABLE HANDLE BAR OPTION A
to adjust the height of the handlebar, pull the levers
towards you (fig_a) and move the handle bar until
it clicks (fig_b). The handle bar can be adjusted in
several positions.
10 FOLDING UP OPTION A
The chassis can be folded up without the seat, with
the seat facing the person pushing (recline the
backrest before folding it) or with the seat facing
forward. To fold the stroller, it is best to set the front
wheels to their fixed position and close the hood
(if fitted). Put the handle bar to its lowest position
(fig_a). Pull the inside handle on the base (fig_b) and
lift it (fig_c); the handle will drop forward until the
frame is closed.
11 TELESCOPIC HANDLEBAR OPTION B
to lengthen the handlebar, pull the sde buttons
upwards (fig_ a) and legthen (fig_b).
12 FOLDING UP OPTION B
The chassis can be folded up without the seat, with
the seat facing the person pushing (recline the
backrest before folding it) or with the seat facing
forward. To fold the stroller, it is best to set the front
wheels to their fixed position and close the hood (if
fitted). Place the handle as shown in the figure (fig_a).
Pull the inside handle on the base (fig_b) and lift it (fig_c);
the handle will drop forward until the frame is closed.
13 To ensure the frame is closed properly, check that
the side fastener is enabled (fig_a). When closed, the
frame remains in the upright position (fig_b).
14 For greater compactness, it is possible to remove the
wheels.
To remove the rear wheels: pull outwards on the lever
located under the rear bar and remove the wheels as
shown in figure (fig_a).
To remove the front wheels: press the tab as shown,
and remove the wheel (fig_b).
TRANSPORT: the stroller can be carried comfortably
locking the front wheels and grasping the main handle
(fig_c).
GANCIOMATIC SYSTEM
15 Ganciomatic is a fast and practical system that allows
you to attach the Navetta bassinet unit, the Primo
Viaggio car seat or the Seggiolino Pop Up seat to the
Ganciomatic Base of the chassis in one quick step.
Place the item on the Ganciomatic Base and press
down with both hands until it clicks into place.
Always apply the chassis or stroller brake before
attaching and removing products (refer to the
respective instruction manuals).
Check that the child transport unit is properly attached.
SERIAL NUMBERS
16Information about the production date can be found
on the Carrello Book 51 S.
_ The product name, production date and serial number
of the chassis.
This information is required for any complaints.
CLEANING AND MAINTENANCE
PRODUCT MAINTENANCE: protect from the weather:
water, rain, or snow; prolonged and continuous
exposure to bright sunlight may give rise to colour
changes of various different materials; store this
product in a dry place.
CLEANING THE CHASSIS: periodically clean all plastic
parts with a damp cloth. Do not use solvent or
similar cleaning products; keep all metal parts dry to
prevent rusting; keep moving parts clean (adjustment
mechanisms, locking mechanisms, wheels, ...) and free
of dust and sand and, if necessary, lubricate with light
machine oil.
THE ORIGINAL ACCESSORY PEGPEREGO
Martinelli accessories are designed as a useful, practical
means of simplifying the lives of parents. Discover all
your product’s accessories on
www.martinellimilano.com.
MARTINELLI IS A
PEGPEREGO
TRADEMARK
PegPerego SpA adopts a quality management system
certified by TÜV Italia Srl in accordance with the ISO

- 12 -
9001 standard. PegPerego can make changes at any
time to the models described in this publication for
technical or commercial reasons.
CUSTOMER SERVICE
If any parts of the item get lost or damaged, only use
original spare parts. For any repairs, replacements,
product information, original spare parts and
accessories, contact our Customer Service:
Tel. 0039/039/60.88.610
Email [email protected]
FR_Français
Merci d’avoir choisi un produit Martinelli.
AVERTISSEMENTS !
_ IMPORTANT : Lire les instructions
suivantes attentivement avant
utilisation et les conserver
pour les besoins ultérieurs de
référence. La sécurité de l’enfant
pourrait être menacée si ces
instructions ne sont pas suivies.
_ Cet article a été conçu pour
transporter 1 enfant sur le siège.
_ Ne pas utiliser lorsque le nombre
d’occupants est supérieur aux
prescriptions du fabricant.
_ Carrello Book 51 S a été conçu pour
être utilisé en combinaison avec les
articles Ganciomatic:
_ Carrello Book 51 S + Seat Pop-Up :
Ce produit est homologué pour les
enfants de la naissance jusqu'à 4 ans
ou pesant au maximum 22 kg.
Pour des enfants pesant plus de
15 kg, orienter et utiliser le siège
exclusivement dans le sens de
marche.
_ Carrello Book 51 S + Primo Viaggio
siège-auto : est homologué pour les
enfants de la naissance jusqu’à un
poids de 13 kg.
Utilisé en combinaison avec le
siège-auto, cet article ne remplace
pas la poussette ou le lit.
Si l'enfant a besoin de dormir,
il devrait être étendu dans une
poussette, un berceau ou un lit.
_ Carrello Book 51 S + le landau : est
homologué pour les enfants de la
naissance jusqu’à un poids de 9 kg.
Utilisé en combinaison avec
la poussette : ce produit est
homologué pour des enfants
qui ne peuvent pas s'asseoir, se
tourner et s’appuyer sur les mains
et les genoux seuls, ayant un poids
maximum autorisé de 9 kg.
Durant l'utilisation de la poussette,
toutes les poignées de transport (le

- 13 -
cas échéant) doivent être placées à
l'extérieur de la poussette, hors de la
portée de l'enfant.
_ AVERTISSEMENT ! S’assurer que tous
les dispositifs de verrouillage sont
enclenchés avant utilisation
_ AVERTISSEMENT ! Vérifier que les
dispositifs de fixation de la nacelle,
du siège ou du siège-auto sont
correctement enclenchés avant
utilisation.
_ AVERTISSEMENT ! Pour éviter toute
blessure, maintenir l’enfant à l’écart
lors du dépliage et du pliage du
produit
_ AVERTISSEMENT ! Ne pas laisser un
enfant jouer avec ce produit. Ce
produit n'est pas un jouet.
_ AVERTISSEMENT ! Les opérations
d’assemblage et de préparation de
l’article doivent être effectuées par
des adultes.
_ Ne pas utiliser cet article si des
pièces sont manquantes ou cassées.
_ AVERTISSEMENT ! Ne jamais laisser
un enfant sans surveillance.
_ Toujours actionner le frein à l'arrêt
et lorsque l’enfant est installé dans
l’article ou qu’il en est retiré.
_ Ne pas mettre les doigts dans les
mécanismes.
_ Prêter attention à la position de
l’enfant lors des opérations de
réglage des éléments mobiles (anse,
dossier).
_ Toute charge pendue aux poignées
peut rendre l’article instable; se
conformer aux indications du
fabricant relatives aux charges
maximales admises.
_ Ne pas utiliser le panier pour
transporter des charges supérieures
à 7 kg. Ne pas introduire dans le
porte-boissons (le cas échéant)
des charges supérieures à celles
indiquées sur le porte-boissons lui-
même; ne jamais y introduire de
boissons chaudes. Ne pas introduire
dans les poches de la capote (le cas
échéant) des objets dont le poids
excède 0,2 kg.
_ Ne pas utiliser l’article à proximité
d’escaliers ou de marches; ne pas
l’utiliser à proximité de sources de
chaleur, de flammes directes ou
d’objets dangereux se trouvant à la
portée de l’enfant.
_ N’utiliser que les pièces de rechange
fournies ou conseillées par le
fabricant/distributeur.
_ AVERTISSEMENT ! Ce produit ne
convient pas pour faire du jogging
ou des promenades en rollers.
_ AVERTISSEMENT ! Ne pas ajouter de
matelas qui ne soit pas approuvé
par le fabricant.
_ Ne pas utiliser d'accessoires non
approuvés par le fabricant.
Les images relatives aux détails textiles
pourraient différer de la collection achetée.
Pour plus d'informations, consulter notre site
internet : www.martinellimilano.com
INSTRUCTIONS D’UTILISATION
1 OUVERTURE : Avant d'ouvrir le châssis, le cas échéant,
retirer (sans utiliser de lames) tous les éléments en
carton.
AVERTISSEMENT :
_ NE PAS TIRER OU FORCER LE CROCHET DE
FERMETURE AU-DELÀ DE LA FIN DE COURSE.
_ NE PAS UTILISER LE CROCHET DE FERMETURE
COMME POIGNÉE DE TRANSPORT OU POUR Y
SUSPENDRE DES POIDS.
NE PAS SUSPENDRE SACS OU AUTRES
ACCESSOIRES À CETTE PIÈCE.
Appuyer vers le bas sur le crochet de fermeture
latéral, saisir les extrémités supérieures de l'anse
et les tourner vers soi jusqu'à ce que le châssis soit
complètement ouvert (fig_a). Châssis ouvert (fig_b).
L’ouverture correcte est confirmée par le déclic, qui
correspond à l’accrochage de la base, voir figure.
AVERTISSEMENT lorsque le siège est monté, appuyer
dessus pour être sûr qu'il soit bien accroché à la base.
2 MONTAGE ROUES : insérer la barre des roues
arrière dans les montants (fig_a) en veillant au sens
d’introduction correct, puis accrocher les roues arrière
(fig_b) jusqu’au déclic. Pour monter les roues avant,
les enfiler sur les montants jusqu'au déclic (fig_c).
DE L'ANSE
L'assemblage et les caractéristiques sont
différents selon l'anse acheté
(OPTION A ou OPTION B)
3 MONTAGE DE L'ANSE OPTION A
enfiler l'anse dans les emplacements prévus à cet
effet (fig_a) comme sur la figure.
Pour compléter le montage, il faut appuyer sur les
deux boutons se trouvant sur les côtés de l'anse
(fig_b) pour presser l'anse jusqu'au déclic (fig_c).
4 FIXATION DE L'ANSE OPTION B
Le fixer au châssis comme sur la figure (Fig_a).
Pour compléter le montage, il faut appuyer sur les
deux boutons se trouvant sur les côtés de l'anse
(Fig_b) pour amener l'anse jusqu'au fond, jusqu'au
déclic (Fig_c).
5 MONTAGE PANIER : si abaissé, soulever le tube du

- 14 -
panier en position horizontale. Appuyez sur les
boutons argentés sous le montant en métal du panier
situé au dos de la poussette (fig_a) et enlevez le
montant (fig_b) Introduisez le montant dans la boucle
en tissu au dos du panier, avec les deux boutons
argentés tournés vers le bas (fig_c).Remettez le
montant dans ses logements (fig_d).
6 Fixez les deux œillets supérieurs du panier aux deux
boutons gris fixés de chaque côté des supports
du montant du panier À noter que les œillets
s’ouvrent (fig_e).Enlevez le carton de la barre arrière.
AVERTISSEMENT Fixez les deux œillets inférieurs du
panier aux deux boutons gris situés au-dessus de la
barre arrière. À noter que les œillets s’ouvrent (fig_f).
AVERTISSEMENT Si cette opération n’est pas
effectuée correctement, le panier ne peut pas
soutenir le contenu.Fixez les languettes antérieures
du panier aux boutons gris du châssis (fig_g).
7 ROUES AVANT FIXES OU PIVOTANTES Book 51 S: pour
rendre les roues avant fixes, tourner le petit levier
dans le sens antihoraire vers le verrou fermé (fig_a),
pour débloquer les roues, tourner le petit levier dans
le sens horaire vers le verrou ouvert (fig_b). En cas
de sols difficiles, il est conseillé d’utiliser les roues en
mode fixe.
8 FREIN : appuyer sur le levier de frein pour bloquer
le châssis. Pour débloquer le châssis, procéder à
l’opération inverse.
9 ANSE EXTENSIBLE OPTION A
pour régler l'extension de l'anse, tirer les leviers vers
soi (fig_a) et faire glisser l'anse jusqu'au déclic (fig_b).
L'anse peut être réglée sur plusieurs positions
10 FERMETURE OPTION A
il est possible de procéder à la fermeture sans siège,
avec siège tourné vers maman (en inclinant le dossier
avant la fermeture) ou tourné vers la route. Pour
fermer le châssis, il est préférable de rendre les roues
avant fixes et de fermer la capote si elle est installée.
Réduire complètement l'extension de l'anse (fig.
a). Tirer sur la poignée intérieure située sur la base
(fig_b) et, en continuant de la tenir, la soulever (fig_c)
et laisser retomber l'anse vers l'avant jusqu'à la
fermeture.
11 TELESCOPIC HANDLEBAR OPTION B
to lengthen the handlebar, pull the sde buttons
upwards (fig_ a) and legthen (fig_b).
12 FOLDING UP OPTION B
The chassis can be folded up without the seat, with
the seat facing the person pushing (recline the
backrest before folding it) or with the seat facing
forward. To fold the stroller, it is best to set the front
wheels to their fixed position and close the hood (if
fitted). Place the handle as shown in the figure (fig_a).
Pull the inside handle on the base (fig_b) and lift it (fig_c);
the handle will drop forward until the frame is closed.
13 Pour une bonne fermeture, vérifier que le crochet
latéral soit correctement enclenché (fig_a). Le châssis
fermé tient debout tout seul (fig_b).
14 Pour qu’elle soit plus compacte, il est possible
d’extraire toutes les roues.
Pour extraire les roues arrière : tirer le levier situé sous
la barre arrière vers l’extérieur et extraire les roues
comme cela est montré sur la figure (fig_a).
Pour extraire les roues avant : appuyez sur la languette
comme le montre la figure, et extraire la roue (fig_b).
TRANSPORT : la poussette peut être facilement
transportée, avec les roues avant fixes, par sa poignée
centrale (fig_c).
SYSTÈME GANCIOMATIC
15 Le Système Ganciomatic, pratique et rapide, permet
d’accrocher en un seul geste la nacelle Navetta, le
siège-auto Primo Viaggio et le siège Seggiolino Pop Up
au châssis: les positionner sur le châssis et appuyer des
deux mains jusqu’au déclic. Châssis non utilisable avec
la nacelle Primo Nido en France.
Toujours actionner le frein du châssis ou de la poussette
avant d’accrocher ou de décrocher les produits
(consulter le manuel d’instructions de chaque produit).
Vérifier que le produit est bien positionné sur le châssis.
NUMÉROS DE SÉRIE
16 Des informations relatives à la date de production
figurent sur Carrello Book 51 S:
_ Nom du produit, date de production et numéro de
châssis.
Ces informations sont indispensables en cas de
réclamation.
NETTOYAGE ET ENTRETIEN
ENTRETIEN DE L’ARTICLE: protéger l’article des agents
atmosphériques (eau, pluie ou neige); une exposition
continue et prolongée au soleil pourrait entraîner
un changement de couleur de nombreux matériaux;
ranger cet article dans un lieu sec.
NETTOYAGE DU CHÂSSIS: nettoyer régulièrement
les pièces en plastique à l’aide d’un linge humide; ne
pas utiliser de solvants ou autres produits similaires.
Veiller à ce que toutes les pièces métalliques restent
sèches pour prévenir la formation de rouille. Maintenir
le bon état de propreté de toutes les pièces mobiles
(mécanismes de réglage, mécanismes de fixation,
roues, etc.) en enlevant poussière ou sable; graisser
avec une huile légère si nécessaire.
THE ORIGINAL ACCESSORY
Les accessoires Martinelli ont été conçus en tant que
support utile et pratique pour simplifier la vie des
parents. Découvrez tous les accessoires consacrés à
votre produit Martinelli sur le site
www.martinellimilano.com
MARTINELLI EST UNE MARQUE
PEGPEREGO
PegPerego SpA adopte un système de gestion de la
qualité certifié par TÜV Italia Srl conformément à la
norme ISO 9001.
PegPerego se réserve le droit de procéder à tout
moment à des modifications sur les modèles décrits
dans cet ouvrage, pour des raisons de nature
technique ou commerciale.
SERVICE APRÈS-VENTE
En cas de perte de pièces ou de rupture de l'une
d'elles, utiliser exclusivement des pièces de rechange
originales. Pour toute réparation, remplacement,
information sur les produits, vente de pièces détachées
d’origine et d'accessoires, veuillez contacter le Service
Après-vente :
Tel. 0039/039/60.88.610
Email [email protected]

- 15 -
Dichiarazione di conformità
- Denominazione del prodotto: CARRELLO BOOK 51S
- Codice identicativo del prodotto: ICBO09*
- Normative di riferimento (origine): EN 1888:2012
EN 71-3 Regolamento (CE) N. 1907/2006 - All
. XVII pt. 43,51,52
(REACH) SOR/85-379
- Dichiarazione di conformità: La PegPerego S.p
.A. dichiara
sotto la propria responsabilità che l’ar
ticolo in oggetto è stato
sottoposto a test di collaudo interni e omologato secondo le
normative vigenti pr
esso laboratori esterni ed indipendenti.
- Data e luogo di rilascio: Arcore, Febbraio 2014
PegPerego S.p.A. Via De Gasperi, 50 20862 Arcore (MB), IT
ALY
Declaration of conformity
- Product name: CARRELLO BOOK 51S
- Product reference number: ICBO09*
- Reference Standards (origin): EN 1888:2012
EN 71-3 Regolamento (CE) N. 1907/2006 - All
. XVII pt. 43,51,52
(REACH) SOR/85-379
- Declaration of conformity La PegPerego S.p.A. dichiara
sotto la propria responsabilità che l’ar
ticolo in oggetto è stato
sottoposto a test di collaudo interni e omologato secondo le
normative vigenti pr
esso laboratori esterni ed indipendenti.
- Date and place of issue: Arcore, Febbraio 2014
PegPerego S.p.A. Via De Gasperi, 50 20862 Arcore (MB), IT
ALY
Declaration du conformitè
- Denomination du produit: CARRELLO BOOK 51S
- Identication du produit: ICBO09*
- Standard du referiment (origin): EN 1888:2012
EN 71-3 Regolamento (CE) N. 1907/2006 - All
. XVII pt. 43,51,52
(REACH) SOR/85-379
- Declaration du conformitè: La PegPerego S.p
.A. dichiara
sotto la propria responsabilità che l’ar
ticolo in oggetto è stato
sottoposto a test di collaudo interni e omologato secondo le
normative vigenti pr
esso laboratori esterni ed indipendenti.
- Date et lieu du publication: Arcore, Febbraio 2014
PegPerego S.p.A. Via De Gasperi, 50 20862 Arcor
e (MB), ITALY
IT_Italiano
EN_English
FR_Français

CARRELLO
BOOK 51 S
FIMA2001I217
Other manuals for CARRELLO BOOK 51 S
1
Table of contents
Languages:
Other Martinelli Stroller manuals

Martinelli
Martinelli Pliko Mini User manual

Martinelli
Martinelli Navicella User manual

Martinelli
Martinelli CULLA PRIMONIDO User manual

Martinelli
Martinelli SEGGIOLINO POP-UP User manual

Martinelli
Martinelli PRIMONIDO ELITE User manual

Martinelli
Martinelli CARRELLO BOOK ST User manual

Martinelli
Martinelli CARRELLO BOOK ST User manual

Martinelli
Martinelli Navicella User manual

Martinelli
Martinelli CARRELLO CLASSICO User manual

Martinelli
Martinelli VIAGGIO FF105 User manual