Master DH 732 P Manual

Edition 20 - Rev. 8
en
it
de
es
fr
nl
da
pl
ru
cs
hu
lt
lv
ro
uk
zh
USER AND MAINTENANCE BOOK
LIBRETTO USO E MANUTENZIONE
BEDIENUNGS- UND WARTUNGSANLEITUNG
MANUAL DE INSTRUCCIONES PARA EL USO Y MANTENIMIENTO
MANUEL D’UTILISATION ET DE MAINTENANCE
HANDLEIDING VOOR GEBRUIK EN ONDERHOUD
MANUAL DE USO E MANUTENÇÃO
VEJLEDNING OM BRUG OG VEDLIGEHOLDELSE
KÄYTTÖ- JA HUOLTO-OHJE
HEFTE FOR BRUK OG VEDLIKEHOLD
ANVÄNDAR- OCH UNDERHÅLLSHANDBOK
INSTRUKCJA OBSŁUGI I KONSERWACJI
РУКОВОДСТВО ПО ЭКСПЛУАТАЦИИ И ТЕХНИЧЕСКОМУ ОБСЛУЖИВАНИЮ
PŘÍRUČKA PRO POUŽITÍ A ÚDRŽBU
HASZNÁLATI ÉS KARBANTARTÁSI KÉZIKÖNYV
PRIROČNIK Z NAVODILI ZA UPORABO IN VZDRŽEVANJE
KNJIŽICA O UPORABI I ODRŽAVANJU
NAUDOJIMO IR PRIEŽIŪROS KNYGELE
LIETOŠANAS UN TEHNISKĀS APKOPES GRĀMATINA
KASUTUS- JA HOOLDUSJUHEND
LIVRET DE UTILIZARE SI ÎNTREŢINERE
PRÍRUČKA PRE POUŽITIE A ÚDRŽBU
НАРЪЧНИК ЗА ИЗПОЛЗВАНЕ И ПОДДРЪЖКА
ІНСТРУКЦІЯ З ОБСЛУГОВУВАННЯ
使用和维护手册
Dantherm S.p.A.
Via Gardesana 11, -37010-
Pastrengo (VR), Italy
Dantherm S.p.A.
Виа Гардесана 11, 37010
Пастренго (Верона), Италия
Dantherm Sp. z o.o.
ul. Magazynowa 5A,
62-023 Gądki, Poland
Dantherm Sp. z o.o.
ул. Магазинова, 5A,
62-023 Гадки, Польша
Dantherm LLC
ul. Transportnaya 22/2,
142802, STUPINO, Moscow region, Russia
ООО «Дантерм»
Ул. Транспортная, 22/2,
142802, г. Ступино, Московская обл., РФ
Dantherm China LTD
Unit 2B, 512 Yunchuan Rd.,
Shanghai, 201906, China
Dantherm China LTD
Юньчуань роад, 512, строение 2В,
Шанхай, 201906, Китай
Dantherm SP S.A.
C/Calabozos, 6 Polígono Industrial, 28108
Alcobendas (Madrid) Spain
Dantherm SP S.A.
Ц/Калабозос, 6 Полигоно Индустриал,
28108 Алкобендас (Мадрит) Испания
DH 732 P

en
it
de
es
fr
nl
pt
da
no
sv
pl
ru
cs
hu
sl
hr
lt
lv
et
ro
sk
bg
uk
zh
SE
SE
SE
SI
ТЕХНИЧЕСКИ ДАНИ - TECHNICKÉ ÚDAJE - TECHNISCHE DATEN - TEKNISK DATA -
TEHNILISED ANDMED - ESPECIFICACIONES TÉCNICAS - TEKNISET TIEDOT -
DONNÉES TECHNIQUES - TECHNICAL DATA - TEHNIČKI PODACI - MŐSZAKI ADATOK -
DATI TECNICI - TECHNINIAI DUOMENYS - TEHNISKIE DATI - TECHNISCHE GEGEVENS -
TEKNISKE DATA - DANE TECHNICZNE - DADOS TÉCNICOS - DADOS TÉCNICOS - INFORMAłII
TEHNICE - ТЕХНИЧЕСКИЕ ДАННЫЕ - TEKNISKA DATA - TEHNIČNI PODATKI -
TECHNICKÉ PARAMETRE - ТЕХНІЧНІ ДАНІ - 技术参数
MODEL DH 732 P
~220V-240V-B / 50Hz - Гц
500W - Вт / 2,2A
30 l/day - л / 24ч
Rotary
R-290 0,12kg - кг
200 m3/h - м3/ч
5 ~ 35oC
35 ~ 95%
6,5 L - л
358 x 338 x 550 mm - мм
18,5 kg - кг
CO2Eq 0,0004
GWP 3
Power supply
Power /Ampere consumption *
Moisture removal capacity
Compressor
Refrigerant
Working range
Water tank capacity
Size (WxDxH)
N.W.
230 V
HFC
H2O
WL
H
RT 30ºC
RH 80%
( )
Power supply
Power /Ampere consumption *
Moisture removal capacity
Compressor
Refrigerant
Working range
Water tank capacity
Size (WxDxH)
N.W.
230 V
HFC
H2O
WL
H
RT 30ºC
RH 80%
( )
Power supply
Power /Ampere consumption *
Moisture removal capacity
Compressor
Refrigerant
Working range
Water tank capacity
Size (WxDxH)
N.W.
230 V
HFC
H
2
O
WL
H
RT 30ºC
RH 80%
( )
HC
Power supply
Power /Ampere consumption *
Moisture removal capacity
Compressor
Refrigerant
Working range
Water tank capacity
Size (WxDxH)
N.W.
230 V
HFC
H
2
O
WL
H
RT 30ºC
RH 80%
( )
Power supply
Power /Ampere consumption *
Moisture removal capacity
Compressor
Refrigerant
Working range
Water tank capacity
Size (WxDxH)
N.W.
230 V
HFC
H
2
O
WL
H
RT 30ºC
RH 80%
( )
Power supply
Power /Ampere consumption *
Moisture removal capacity
Compressor
Refrigerant
Working range
Water tank capacity
Size (WxDxH)
N.W.
230 V
HFC
H
2
O
WL
H
RT 30ºC
RH 80%
( )
Power supply
Power /Ampere consumption *
Moisture removal capacity
Compressor
Refrigerant
Working range
Water tank capacity
Size (WxDxH)
N.W.
230 V
HFC
H2O
W
L
H
RT 30ºC
RH 80%
( )
Power supply
Power /Ampere consumption *
Moisture removal capacity
Compressor
Refrigerant
Working range
Water tank capacity
Size (WxDxH)
N.W.
230 V
HFC
H
2
O
WL
H
RT 30ºC
RH 80%
( )

en
it
de
es
fr
nl
pt
da
no
sv
pl
ru
cs
hu
sl
hr
lt
lv
et
ro
sk
bg
uk
zh
SE
SE
SE
SI
Fig. 3
Fig. 1
1
2
3
4
5
6
7
8
9
Fig. 4
1 2 3 4 5
6 7 8 9
Fig. 2
1
2
3
4
5
6
7
8
9

en
it
de
es
fr
nl
pt
da
no
sv
pl
ru
cs
hu
sl
hr
lt
lv
et
ro
sk
bg
uk
zh
SE
SE
SE
SI
Fig. 6Fig. 5
Fig. 8
Fig. 7

en
CZ
DE
DK
EE
ES
FI
FR
GB
HR
HU
IT
LT
LV
NL
NO
PL
RO
RU
SE
SI
SK
UA
SE
SI
SK
TR
UA
CONTENTS
1... HOW IT WORKS
2... WHERE TO POSITION
3... BEFORE USE
4... PARTS
5... OPERATION
6... DRAINAGE
7... MAINTENANCE
8... TROUBLE SHOOTING
PLEASE TAKE TIME TO READ THIS MANUAL
CAREFULLY BEFORE USE AND SAVE IT FOR
FUTURE REFERENCE.
►1. HOW IT WORKS
This product is the dehumidier. It controls relative humi-
dity by passing the air through the unit, forcing the excess
moisture to condense over the cooling elements. Contact
with this cold surface makes the moisture in the air to con-
dense. This condensed water then drains safely into the
water tank. The dried air then passes through the conden-
ser where it is slightly warmed and re-enters the room at a
slightly higher temperature.
► FIG. 1
1. dry warmer air,
2. condenser (warmed coil),
3. evaporator (cold refrigerated coil),
4. moist saturated air,
5. lter,
6. water tank,
7. motor,
8. fan,
9. compressor.
►2. WHERE TO POSITION
Excess moisture will travel throughout your home, just like
the cooking smells waft to every room in the house. For
this reason, the dehumidier should be positioned in a way
that allows it to draw this moist air towards it from all over
the home.
Alternatively, if you have a serious problem in one area
you can begin with positioning the dehumidier close to
this area and later moving gradually closer to the central
point. When positioning the dehumidier, ensure that it
is placed on a level surface and that there is a minimum
of 10 cm (4”) of space on either side of the unit to allow an
efcient airow.
This dehumidier is equipped with castors for extra mobi-
lity, if you move the unit, it should rst be switched off and
the water tank emptied. The use of an extension lead is
not recommended, so please ensure that the unit is close
enough to a xed mains socket. If it is necessary to use an
extension lead, please ensure the diameter of the wires of
the cable is at least 1 mm2.
When the dehumidier is in operation, outside doors and
windows should be closed, when necessary, for more ef-
cient use .
►3. BEFORE USE
CAUTION!
These symbols on your device mean:
► This appliance is lled with Propane gas R290. Follow
strictly the manufacturer’s instruction concerning use and
repairs!
► Before using the machine, read carefully the entire in-
struction manual.
► Do not install, operate or store the device in a room
smaller than 4m2.
GENERAL CAUTIONS
► FOR INDOOR USE ONLY.
► Do not use in cabinet, closet, boats, caravans or similar
locations.
► Do not use the unit in swimming pools, washrooms or
similar wet areas.
► Leave the unit to stand for 12hours before connecting to
the mains supply after transport or when it has been titled
(ex. During cleaning).
► Only use the unit in the upright position on a at level
surface (even during transport!) and at least 50cm from
any objects.
► Do not use the unit in a potentially explosive environ-
ment containing combustible liquids, gases or dusts.
► Do not use the appliance in the vicinity of ammable or
explosive substances or fuels. Never use any paint, clea-
ning sprays, anti-insect sprays or similar near the unit; this
could deform the plastic or cause electrical damage.
► Ensure that there is at least 50cm between the sides of
the appliance and any ammable, heating materials.
► Do not place objects on the unit or restrict air inlet/out-
let.
► Avoid the unit from splash.
► Closely supervise any children and pets when the unit
is in use.
► CHILDREN SHALL NOT PLAY WITH APPLIANCE.
► Cleaning and user maintenance shall not be made by
children without supervision.
► Switch off and unplug the unit when not in use.
► Never leave a functioning device unsupervised.
► Do not pull the unit along by the cord.
100*40 mm

en
CZ
DE
DK
EE
ES
FI
FR
GB
HR
HU
IT
LT
LV
NL
NO
PL
RO
RU
SE
SI
SK
UA
SE
SI
SK
TR
UA
► Avoid over-twisting, -coiling, -pulling the power cord,
never use nylon or iron wire to tide the power cord.
► Make sure that the plug and socket remain visible and
accessible at all the time.
► Do not use extension cords.
► Never reach to retrieve the unit if it has fallen in wa-
ter. In such case, immediately pull the plug. Have the unit
checked before using it again.
► The appliance shall be installed in accordance with na-
tional wiring regulations.
► Do not exceed the recommended room size for max.
efciency.
► Close the doors and windows.
► Keep curtains or blinds closed during the sunniest
hours of the day.
► Keep lters clean.
► Once room has reached the desired conditions, reduce
the setting for temperature and ventilation.
► Do not turn on the appliance if you have discovered da-
mage to the appliance, cord or plug, if the appliance is mal-
functioning or if there are signs of any other defect. Return
the complete product to the vendor or to a certied elec-
trician for inspection and/or repair. Always ask for original
parts. The appliance (incl. cord and plug) may only be ope-
ned and/or repaired by properly authorized and qualied
persons.
► Suggest to send the unit for professional maintenance
periodically.
► ONLY A LICENSED PROFESSIONAL IS ALLOWED
TO DISMANTLE OR MODIFY THE APPLIANCE.
► THE MACHINE IS TO BE USED ONLY FOR ITS PRES-
CRIBED PURPOSE. ANY OTHER USE IS DEEMED TO
BE A CASE OF MISUSE. THE USER/OPERATOR, NOT
THE MANUFACTUER WILL BE LIABLE FOR ANY DAMA-
GE OR INJURIES OF ANY KIND CAUSED AS A RESULT
OF THIS.
► Always keep the unit in vertical position.
► Keep all foreign objects away from the air intake or out-
put openings.
► The mains supply must conform to the specication
shown on the rating plate at the back of the unit.
► If the supply cord is damaged, it must be replaced by
an approved service representative or a similar qualied
person in order to avoid a hazard.
► Never use the plug to start and stop the unit. Always
use switch on the control panel.
► Before moving the unit, rst switch off, then unplug and
empty the water tank.
► Don’t use bug sprays or other ammable cleaners on
the unit.
► Never pour or spray water over the unit.
► THIS APPLIANCE IS NOT INTENDED FOR USE BY
PERSONS (INCLUDING CHILDREN) WITH REDUCED
PHYSICAL , SENSORY OR MENTAL CAPABILITIES, OR
LACK OF EXPERIENCE AND KNOWLEDGE , UNLESS
THEY HAVE BEEN GIVEN SUPERVISION OR INSTRUC-
TION CONCERNING USE OF THE APPLIANCE BY A
PERSON RESPONSIBLE FOR THEIR SAFETY. CHILD-
REN SHOULD BE SUPERVISED TO ENSURE THAT
THEY DO NOT PLAY WITH APPLIANCE.
►SAFETY RELATING TO REFRIGERANT
R290:
► Read these warnings carefully.
► This appliance contains the refrigerant R290. R290
is a refrigerant that complies with the relevant European
Directives. Never perforate the refrigerant circuit. R290 is
ammable (GWP3)!
► Do not use means to accelerate the defrosting process
or to clean, other than those recommended by the manu-
facturer.
► The appliance shall be stored in a room without continu-
ously operating ignition sources (for example: open ames,
an operating gas appliance or an operating electric heater).
► Do not pierce or burn any of the components of the coo-
ling circuit of the unit. Do not set light to the unit.
► The appliance shall be stored so as to prevent mecha-
nical damage from occurring.
► Appliance should be installed, operated and stored in a
room with a oor area larger than 4m2.
► Be aware that the refrigerants may not contain an
odour, which means you cannot smell leaks.
► Compliance with national gas regulations shall be ob-
served.
► Keep ventilation openings clear of obstruction.
► A warning that the appliance shall be stored in a well-
ventilated area where the room size corresponds to the
room area as specied for operation.
► Any person who is involved with working on or breaking
into a refrigerant circuit should hold a current valid certi-
cate from an industry-accredited assessment authority,
which authorizes their competence to handle refrigerants
safely in accordance with an industry recognized assess-
ment specication.
► Servicing shall only be performed on the grounds as re-
commended by the equipment manufacturer. Maintenance
and repair requiring the assistance of other skilled person-
nel shall be carried out under the supervision of the person
competent in the use of ammable refrigerants.
IMPORTANT!
Do not use this unit at ambient temperatures below
5oC, to prevent the evaporating coils from freezing up.
►4. PARTS
► FIG. 2
1. Metal housing
2. Handle
3. Control panel
4. Hour counter
5. Left panel
6. Caster
7. Filter
8. Water tank
9. Right panel
► FIG. 3
Position of the handle can be adjusted by pressing the but-
ton at the two ends of the handle.
►5. OPERATION
► Control panel FIG. 4
1. Humidity display
2. Operation indicator
3. Defrost indicator
4. Memory indicator
5. Water tank full indicator
6. Memory button
7. Humidity up button

en
CZ
DE
DK
EE
ES
FI
FR
GB
HR
HU
IT
LT
LV
NL
NO
PL
RO
RU
SE
SI
SK
UA
SE
SI
SK
TR
UA
8. Humidity down button
9. ON/OFF (power) button
► OPERATION
1. Plug the unit into a suitable mains socket (please refer
to the rating label on the backside of the unit to check the
appropriate voltage/frequency).
2. Press ON/OFF button to turn on the unit. When turning
on the unit for the rst time, if press only ON/FF button but
not set the Memory, the compressor will start (provided the
room humidity is higher than 50%).
3. Press the buttons Humidity up and Humidity down to set
the required humidity. The setting range is 40%~80%, 1%
will be added or reduced for each press. The set humidity
will show on the LED display for 8 seconds, after that the
display will return to show the room humidity. Once the set
humidity is achieved, the compressor stops working auto-
matically.
Humidity range is 35%~95%, when the room humidity is
less than 35%, the LED display shows “LO”, when the
room humidity is higher than 95%, it shows “ HI”.
4. Press ON/OFF button again to turn off the unit.
5. When unit is turned on for the rst time or immediately
after shutoff, there is 3 minute delay protection for com-
pressor.
► DEFROST
Unit is equipped with the Hot Gas Defrost function. After
running for 30 minutes, the coil sensor detects the coil tem-
perature. If the coil temperature is ≤-1°C, the unit switches
to the hot gas defrost mode, and the Defrost indicator is
on. During the defrost process, the compressor and the
fan keep running. It takes 5 minutes to defrost (if the coil
temperature raises up to 10°C, the unit drops out of the
defrost mode automatically).
► MEMORY
By pressing Memory button, the memory indicator is on,
and the unit remembers the last settings.
► HOUR COUNTER FIG. 5
1. A special hour counter serves to count the operation time
of the machine.
2. 7-digit display counts off the operation time, it goes on
continuously, never gets back to “zero”.
►6. DRAINAGE
Please note that in case the water tank is not positioned
appropriately, the water full indicator turns red. When the
water tank is full, the compressor stops, as a protective
measure, the “Water Tank Full” indicator turns red and
buzz.
To remove the water tank, pull it out carefully from the unit,
make sure it does not tilt over.
After empting the water tank, place the water tank into the
dedicated space. Make sure it is positioned properly, only
then the ’water full’ indicator is off and your dehumidier
can start working. (FIG. 6)
►CONTINUOUS DRAINAGE
When the dehumidier works in extremely high humidity
levels, the water tank requires more frequent drainage. In
this situation, it may be more convenient to set the unit up
for continuous drainage, according to the following proce-
dures:
► Remove the drain knob and rubber plug and retain for
future use.
► Connect the drain tube to the water outlet (FIG. 7) and
put the other end into a drain.
►7. MAINTENANCE
Always unplug the unit from the mains supply before car-
rying out any maintenance or cleaning of the unit.
CASING CLEANING
Use soft cloth to clean the unit.
Don’t ever use volatile chemicals, gasoline, detergents,
chemically treated clothes, or other cleansing solutions as
they may damage the casing.
FILTER CLEANING (FIG. 8)
► Extract the lter from the unit.
► Use a vacuum cleaner or tap the lter lightly for easy
cleaning. If the lter is excessively dirty, use warm wa-
ter with a small amount of medium strength detergent.
► Make sure the lter is completely dry before installing
it back.
► Do not expose the lter to sunlight.
STORAGE
If the unit is not used for an extended period of time, please:
► Turn off the unit, unplug it and take away the AC cord.
► Empty the water tank completely and dry it.
► Cover the unit and store it in a place not exposed to the
direct sunlight.
►8. TROUBLE SHOOTING
THE UNIT DOES NOT OPERATE:
► Is the unit plugged in?
► Is the house electricity on?
► Is the room temperature below 5OC or above 32OC? If
so, then it is out of the working range of the unit.
► Make sure the ON/OFF switch is turned on.
► Check if the water tank is positioned properly inside the
unit and if it is not full.
► Make sure the air inlet and outlet are not obstructed.
THE UNIT SEEMS TO DO NOTHING:
► Is the lter dusty, contaminated ?
► Is the air intake or outlet blocked?
► Is the room humidity already quite low?
THE UNIT SEEMS TO DO LITTLE:
► Are too many windows or doors open?
► Is there something in the room producing a lot of hu-
midity?
THE UNIT IS TOO NOISY:
► Check whether the unit is positioned on a level surface.
THE UNIT IS LEAKING:
► Make sure the unit is in appropriate condition.
► If you are not using continuous drainage, make sure
the rubber plug (on the bottom of the unit) is in its position.

en
CZ
DE
DK
EE
ES
FI
FR
GB
HR
HU
IT
LT
LV
NL
NO
PL
RO
RU
SE
SI
SK
UA
SE
SI
SK
TR
UA
Error codes on display
Code Cause Solution
E1 The room temperature sen-
sor (with resin head) is open
or short circuit fault
Checking if the room tem-
perature sensor is plugged
in properly on the PCB.
Replace the room tem-
perature sensor of room
temp.
Replace main PC board.
The humidity level is be-
low RH40%
E2 The system sensor (with
copper head) is open or
short circuit fault
Checking if the system
sensor is plugged in pro-
perly on the PCB.
Replace the system sen-
sor
Replace main PC board.
E3 The Temperature Control
(TC) sensor wire is loosen or
breaks down.
The machine will beep for
3 sounds, the E3 code will
ash on every one second.
The compressor and fan mo-
tor will stop.
Pls check and replace it.
E5 When the TC sensor wire
senses the temperature is >
or = 130oC more than 5 se-
conds, the E5 code will ash
on every second, the machi-
ne will beep for 3 sounds.
The compressor and fan mo-
tor stop.
When it happens, pls
press ON/OFF button on
and off again to check if
E5 signal still exists, if yes,
that means the compres-
sor system is abnormal.
Pls check it and get rid of
the mal-function.

INDICE
1... FUNZIONAMENTO
2... UBICAZIONE
3... CONSIGLI PRIMA DELL’USO DELL’IMPIANTO
4... PARTI
5... SERVIZIO
6... USCITA DELL’ACQUA
7... MANUTENZIONE E CONSERVAZIONE
8... RIVELAZIONE DEI DIFETTI
PRIMA DI USARE L’IMPIANTO BISOGNA LEG-
GERE ATTENTEMENTE L’ISTRUZIONE DI USO
E CONSERVARLA PER POTER CONSULTARLA
IN FUTURO.
►1. FUNZIONAMENTO
L’impianto serve alla deumidicazione dell’aria. Controlla
l’umidità relativa lasciando passare l’aria per l’impianto,
conducendo alla condensazione dell eccesso diumidità
sugli elementi refrigeranti. Il contatto con la supercie
fredda provoca la condensazione dell’umidità nell’aria. Poi
l’acqua condensata è tras messa al. contenitore dell’acqua.
Poi, l’aria secca passa per condensatore dove viene un po
riscaldata, e poi introdotta di nuovo nel locale, ma la sua
temperatura è adesso un po aumentata.
► FIG. 1
1. uscita l’aria secca,
2. condensatore,
3. evaporatore,
4. entrata l’aria umida,
5. microcommutatore,
6. contenitore acqua,
7. motore,
8. ventilatore,
9. compressore
►2. UBICAZIONE
l’eccesso di umidità andrà in tutta la casa, nello stesso
modo che si diffonde l’odore durante la cottura. per questo,
il deumidicatore deve avere il posto giusto per poter rac-
cogliere l’aria umida di tutta la casa.
Eventualmente se in un posto scopriamo il problema pos-
siamo mettere il deumidicatore nella sua vicinanza, e poi
spostarlo nel punto centrale.
Posizionando il deumidicatore, bis ogna assicurarsi che
Si trovi sul posto piatto e che da ogni parte dell’impianto ci
sono 10 cm (4”) di spazio libero per garantire usso libero
dell’aria.
il deumidicatore è dotato In ruote autoallineantesi per
garantira la mobilità migliore. Durante lo spostamento,
l’impianto deve esser spento, e il contenitore dell’acqua
svuotato.
Non consigliamo di usare la prolunga, quindi bisogna as-
sicurarsi che l’impianto si trovi abbastanza vicio alla presa
di corrente. quando l’uso della prolunga è inevitabile, biso-
gna assicurarsi che il dimatro dei li del cavo è di almeno
1 mm2.
Durante la deumidicazione, tutte le nestre e le porte de-
vono essere chiuse, per garantire il massimo rendimento
dell’impianto.
►3. CONSIGLI PRIMA DELL’USO
DELL’IMPIANTO
ATTENZIONE:
I simboli collocati sull’apparecchiatura hanno il seguente
signicato:
► Dispositivo riempito con propano R290. Rispettare
sempre le indicazioni del fabbricante in merito all’uso e alle
riparazioni dell’apparecchiatura!
► Prima di avviare l’apparecchiatura, leggere attentamen-
te le istruzioni per l’uso.
► Non installare, utilizzare né conservare l’apparecchiatura
in un locale caratterizzato da una supercie inferiore a 4m2.
PRINCIPI DI SICUREZZA GENERALI
► SOLTANTO PER USO IN AMBIENTI CHIUSI.
► Non utilizzare il dispositivo in cucine a incasso, armadi,
su imbarcazioni, a bordo di camper o in altri spazi chiusi
analoghi.
► Non usare il dispositivo in prossimità di piscine, bagni o
altri locali umidi.
► Attendere 12 ore prima di collegare il dispositivo
all’alimentazione dopo il trasporto o in caso di inclinazione
(ad es. durante le operazioni di pulizia).
► Collocare il dispositivo in posizione verticale, su una su-
percie piana (anche durante il trasporto!), a una distanza
di almento 50 cm dagli altri oggetti.
► Non usare il dispositivo in atmosfere potenzialmente
esplosive, contenenti liquidi inammabili, gas o polveri.
► Non usare il dispositivo in prossimità di sostanze ina-
mmabili o esplosive, né in prossimità di combustibili. Non
nebulizzare, nelle vicinanze del dispositivo, vernici, prodot-
ti detergenti, insetticidi né altri prodotti analoghi, poiché ciò
potrà comportare la deformazione degli elementi in plasti-
ca o il danneggiamento dell’impianto elettrico.
► Lasciare almeno 50 cm di spazio libero tra i lati
dell’apparecchiatura e i materiali inammabili, soggetti a
riscaldamento.
► Non collocare oggetti sull’apparecchiatura né ostruire
l’ingresso e l’uscita dell’aria.
BG
it
DE
DK
EE
ES
FI
FR
GB
HR
HU
IT
LT
LV
NL
NO
PL
RO
RU
SE
SI
SK
UA
SE
SI
SK
TR
UA
100*40 mm

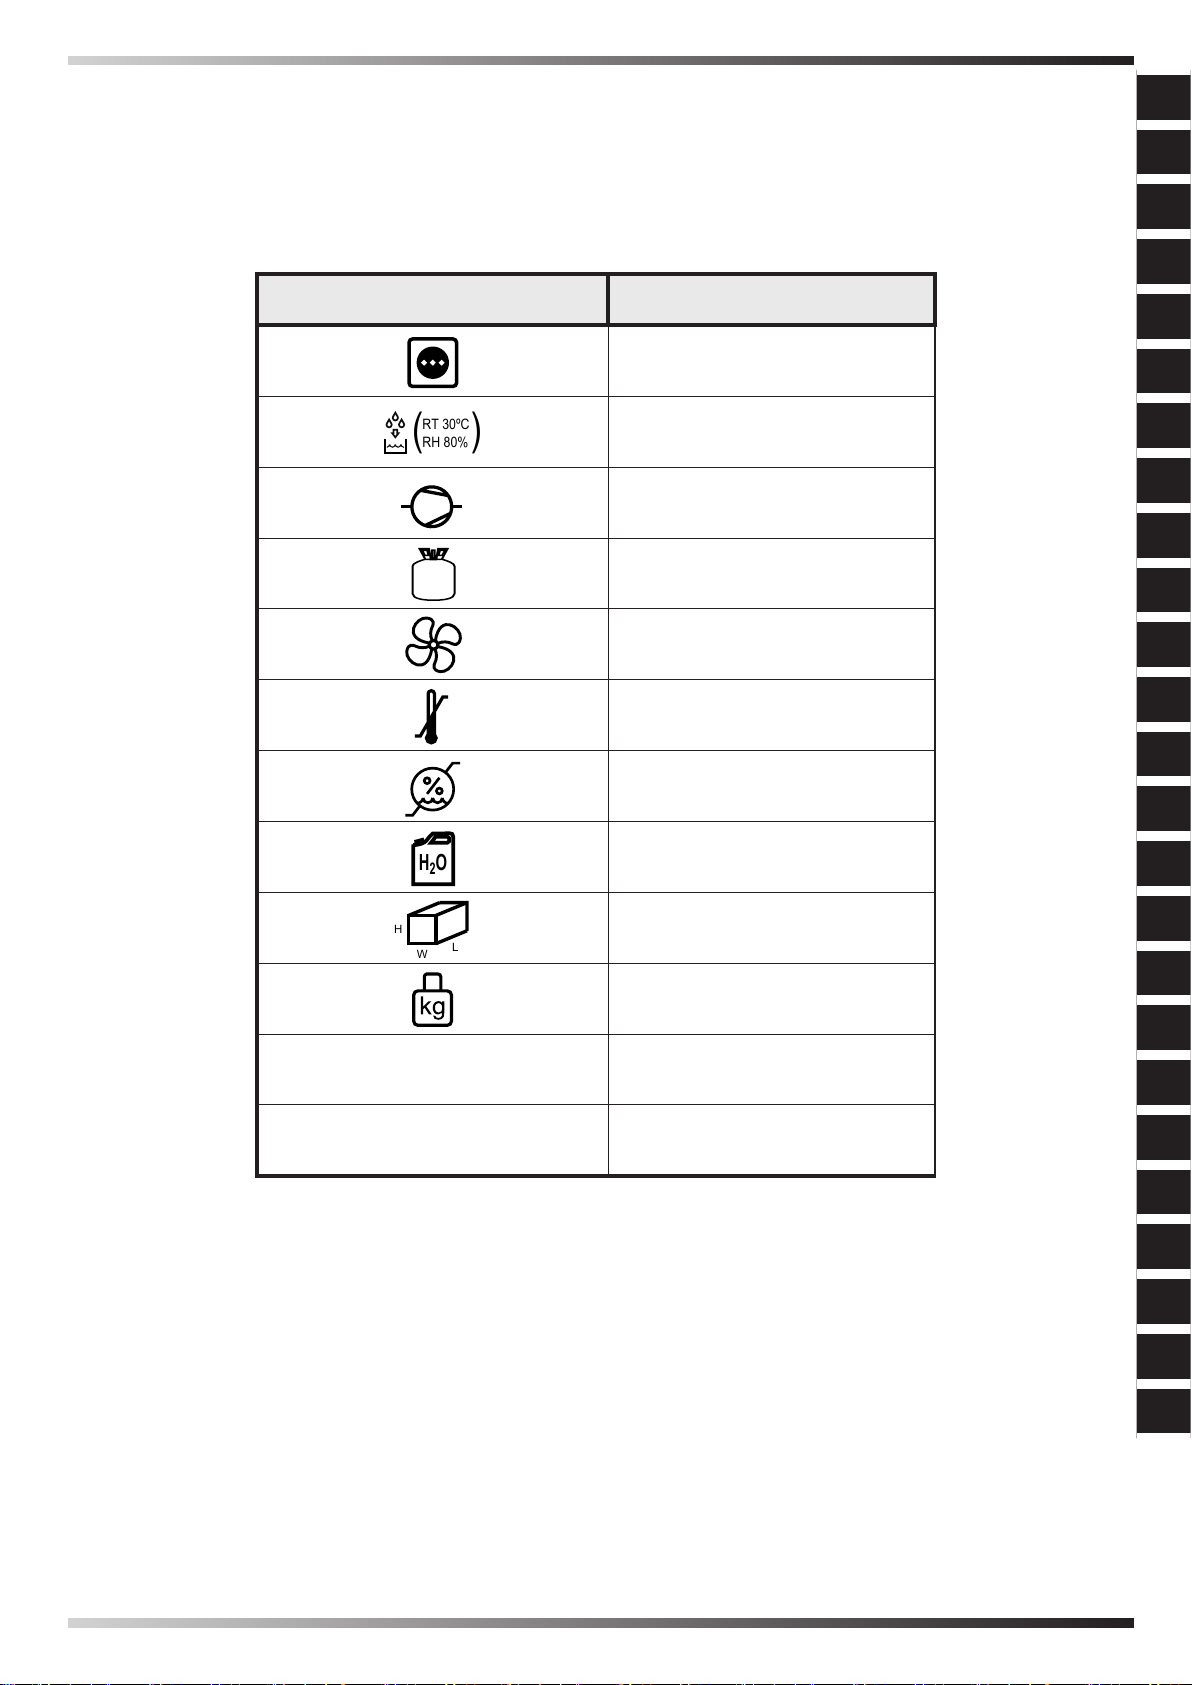
► Proteggere il dispositivo dagli schizzi.
► Sorvegliare i bambini e gli animali domestici qualora si
trovino nei pressi del dispositivo in funzione.
► NON PERMETTERE AI BAMBINI DI GIOCARE CON
IL DISPOSITIVO.
► I bambini non potranno occuparsi della pulizia né della
manutenzione del dispositivo senza la supervisione di un
adulto.
► Spegnere il dispositivo e staccarlo dall’alimentazione
quando non viene utilizzato.
► Non lasciare il dispositivo in funzione senza supervi-
sione.
► Non tirare il dispositivo per mezzo del cavo di alimen-
tazione.
► Evitare la torsione eccessiva, l’avvolgimento e la tra-
zione del cavo di alimentaizone. Non legare il cavo con lo
di nylon o di acciaio.
► Fare attenzione afnché la spina e la presa si trovino in
un luogo visibile e facilmente accessibile.
► Non usare prolunghe.
► Non toccare l’apparecchiatura qualora sia caduta in ac-
qua. In questo caso, per prima cosa, occorrerà staccare
il cavo di alimentazione. Prima di riutilizzare il dispositivo,
controllare il suo stato.
► L’apparecchiatura dovrà essere collegata in conformità
con le leggi nazionali e con le norme elettriche.
► Non superare le dimensioni massime indicate del locale
per il massimo rendimento del dispositivo.
► Chiudere porte e nestre.
► In caso di forte insolazione, tirare le tende o abbassare
gli avvolgibili.
► Fare attenzione alla pulizia dei ltri.
► Quando le condizioni del locale raggiungeranno il li-
vello nale, ridurre le impostazioni della temperatura e
dell’intensità della ventilazione.
► Non avviare il dispositivo qualora il dispositivo stesso, il
cavo di alimentazione o la presa siano danneggiati, il dis-
positivo funzioni in modo non conforme o vi siano sintomi
di altri problemi. Trasmettere il dispositivo completo al ri-
venditore o a un elettricista in possesso di qualiche ade-
guate ai ni del controllo e/o della riparazione. Usare solo
i pezzi di ricambio originali. L’apparecchiatura (compresi il
cavo di alimentazione e la spina) potranno essere smon-
tati e/o riparati esclusivamente da personale autorizzato e
adeguatamente qualicato.
► Si consiglia l’esecuzione periodica della revisione di
controllo del dispositivo.
► L’APPARECCHIATURA POTRÀ ESSERE SMONTATA
O MODIFICATA UNICAMENTE DA UN MANUTENTORE
QUALIFICATO.
► L’APPARECCHIATURA PUÒ ESSERE UTILIZZATA
SOLO IN MODO CONFORME ALLA DESTINAZIONE.
L’USO CON ALTRE FINALITÀ SARÀ TRATTATO COME
UN USO NON CONFORME. IN CASO DI DANNI O
LESIONI DOVUTE A TALE PROCEDIMENTO, IL SOG-
GETTO RITENUTO RESPONSABILE SARÀ L’UTENTE E
NON IL FABBRICANTE DEL DISPOSITIVO.
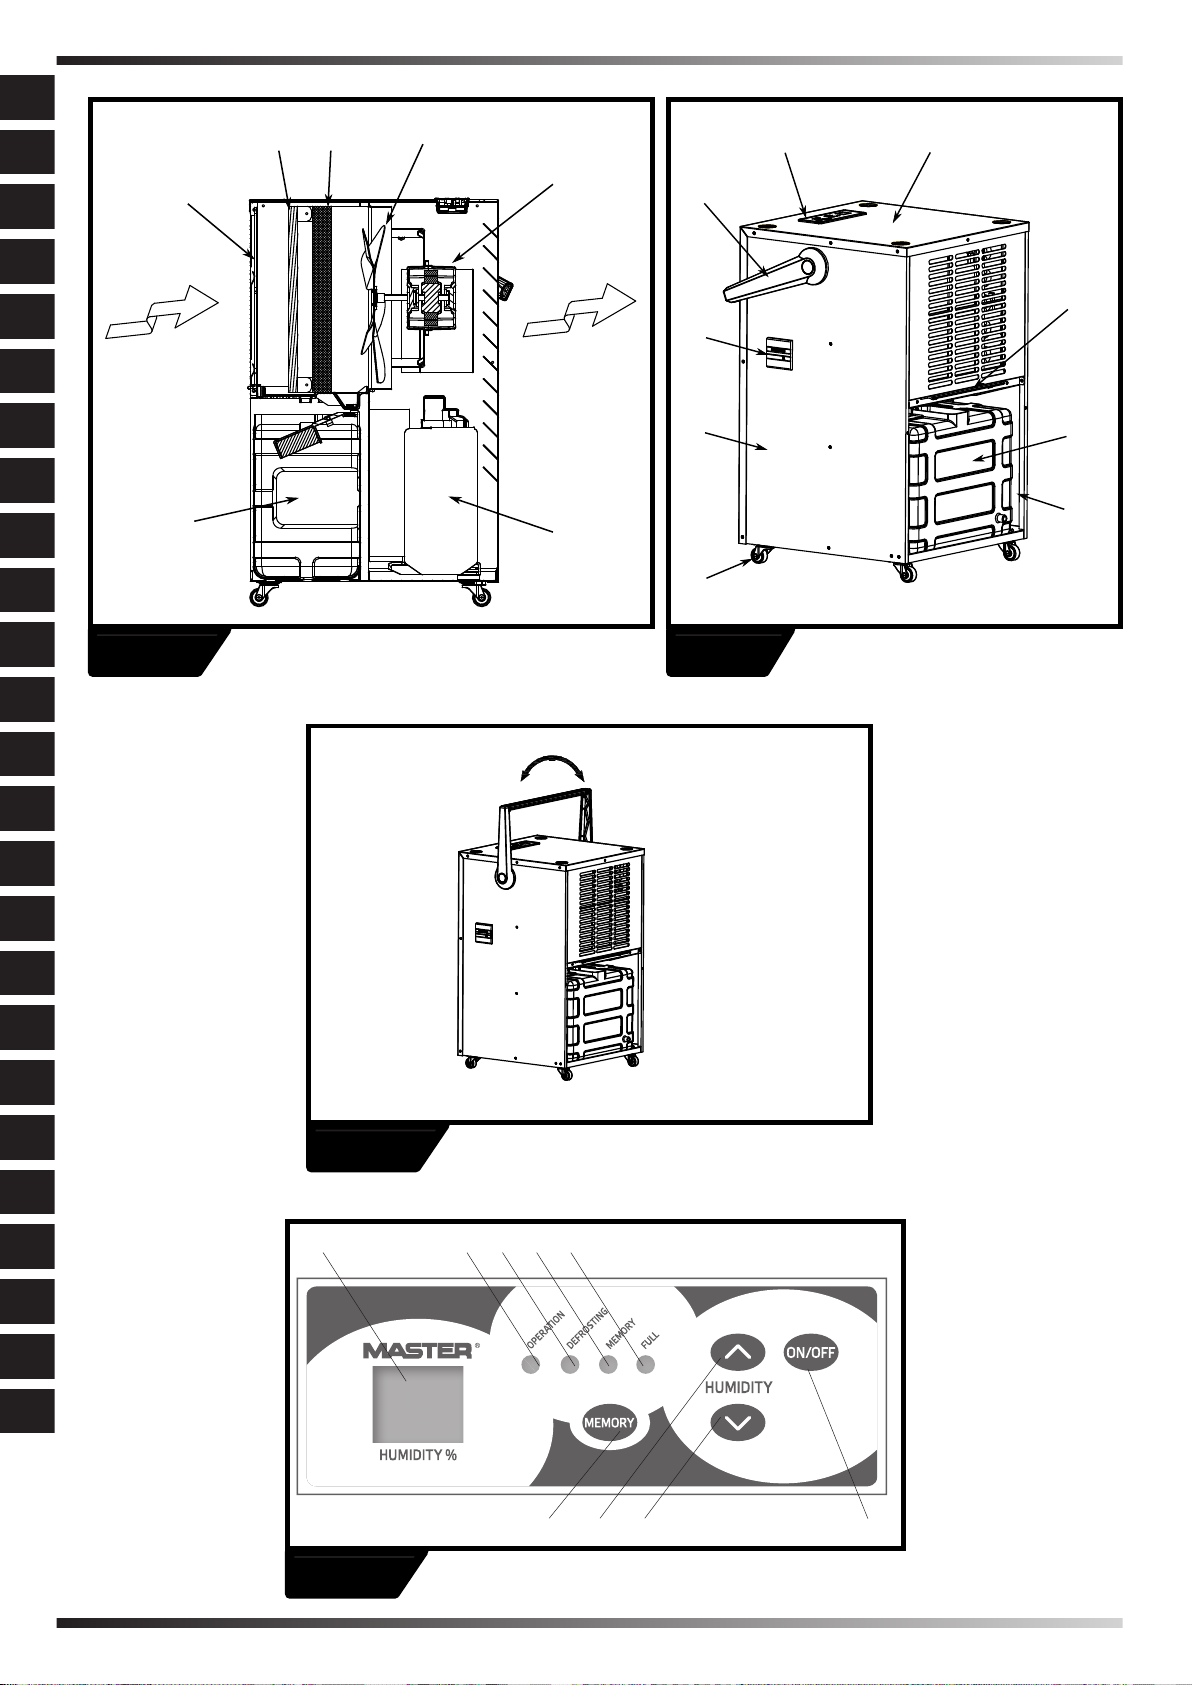
► Impianto deve trovarsi in posizione verticale.
► Tenere lontano da tutti i fori di entrata ed uscita dell’aria,
ogni corpo estraneo.
► Alimentazione elettrica deve essere conforme alla spe-
cicazione dal targhetto dati dell’impianto.
► Se il cavo di alimentazione è rotto, deve esser subito
sostituito dal personale autorizzato, per evitare il pericolo.
► Non si deve usare la spina elettrica per accendere o
spegnere l’impianto. Bisogna sempre usare il pulsante sul
pannello commando.
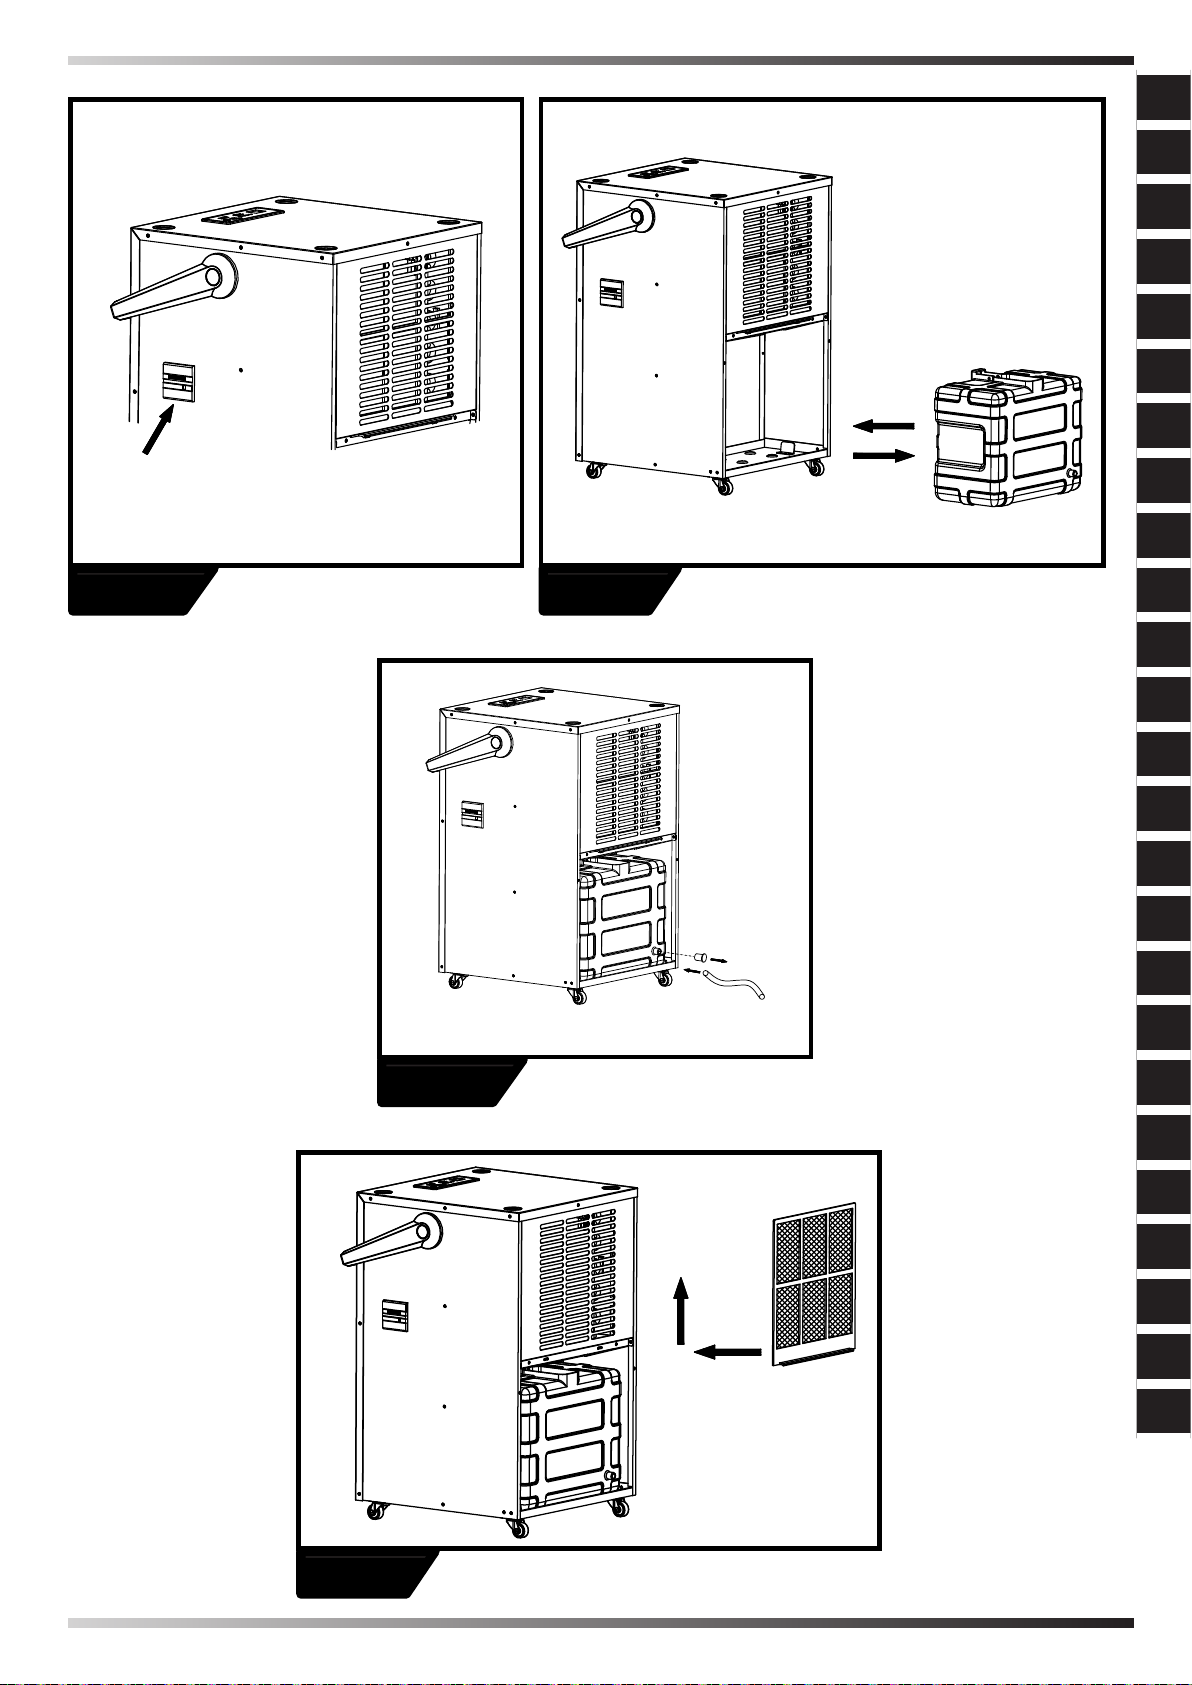
► Prima di spostare l’impianto si deve spegnerlo, e poi
svuotare il contenitore dell’acqua.
► Non usare l’aerosolo insetticida oppure altri detergenti
inammabili.
► E vietato di spruzzare o bagnare l’impianto
► IL PRESENTE DISPOSITIVO NON È DESTINATO
ALL’UTILIZZO DA PARTE DELLE PERSONE (COMPRE-
SI BAMBINI), CON CAPACITÀ FISICHE, SENSORIALI O
MENTALI LIMITATE, OPPURE DA PERSONE INESPER-
TE, SENZA UN CORSO DI FORMAZIONE DA PARTE
DI UNA PERSONA RESPONSABILE DELLA LORO SI-
CUREZZA. SI PREGA DI FARE ATTENZIONE A NON FAR
GIOCARE I BAMBINI CON IL DISPOSITIVO.
►NORME DI SICUREZZA RELATIVE
ALL’AGENTE REFRIGERANTE R290:
► Leggere attentamente le seguenti avvertenze.
► L’apparecchiatura contiene l’agente refrigerante R290.
L’agente refrigerante R290 è conforme alle Direttive vigenti
dell’Unione Europea. Non forare l’impianto di raffredda-
mento. L’agente refrigerante R290 è una sostanza facil-
mente inammabile (GWP3)!
► Non usare dispositivi né agenti per l’accelerazione dello
sbrinamento o per la pulizia diversi da quelli consigliati dal
fabbricante.
► Conservare il dispositivo in un ambiente chiuso, privo
di fonti di ignizione sse (ad es. amme libere, dispositivi a
gas in funzione, resistenze elettriche in funzione).
► Non forare né scaldare gli elementi dell’impianto refri-
gerante dell’apparecchiatura. Non dirigere la luce diret-
tamente sul dispositivo.
► Conservare il dispositivo in modo tale che non subisca
danneggiamenti meccanici.
► L’apparecchiatura dovrà essere installata, utilizzata e
conservata in un locale caratterizzato da una supercie del
pavimento superiore a 4m2.
► L’agente refrigerante può essere inodore. Ciò rende più
difcile l’individuazione di eventuali perdite.
► Rispettare le norme e le leggi nazionali relative ai com-
bustibili gassosi.
► Non ostruire i fori di ventilazione.
► Conservare il dispositivo in un locale ben ventilato, ca-
ratterizzato da dimensioni adeguate alla specica tecnica
del prodotto.
► Ogni soggetto impegnato nell’uso o nella riparazione
dell’impianto refrigerante dovrà essere in possesso di un
valido certicato rilasciato da un’entità tecnica competente,
a conferma delle competenze di tale soggetto nel campo
dell’uso sicuro degli agenti refrigeranti, nel rispetto delle
norme e delle leggi vigenti.
► Le operazioni di servizio andranno eseguite uni-
camente nel rispetto delle indicazioni del fabbricante
dell’apparecchiatura. Le attività di uso e riparazioni che
richiedono la presenza di personale di servizio qualicato
andranno eseguite sotto al supervisione di un soggetto con
competenze adeguate nel’ambito dell’uso degli agenti re-
frigeranti inammabili.
AVVERTENZE !
Non usare l’impianto nella temperatura ambientale in-
feriore a 50C, per evitare il gelo dell’evaporatore.
BG
it
DE
DK
EE
ES
FI
FR
GB
HR
HU
IT
LT
LV
NL
NO
PL
RO
RU
SE
SI
SK
UA
SE
SI
SK
TR
UA

►4. PARTI
► FIG. 2
1. involucro di metallo,
2. impugnatura,
3. quadro di comando,
4. contatore di ore di esercizio,
5. quadro sinistro,
6. ruota,
7. ltro,
8. serbatoio dell’acqua,
9. quadro destro.
► FIG. 3
La posizione dell’impugnatura può essere regolata tramite
dei pulsanti su entrambi lati.
►5. SERVIZIO
► Pannello di commando FIG. 4
1. indicatore umidità
2. Indicatore lavoro
3. Indicatore scongellazione
4. indicatore contenitore pieno
5. Indicatore memoria
6. memoria
7. umidità crescita
8. umidità diminuzione
9. pulsante ON/OFF
► FUNZIONAMENTO
1. Collegare Il dispositivo ad una apposita presa di alimen-
tazione. (Si prega di fare riferimento alla targhetta dati si-
tuata nella parte posteriore del dispositivo con riferimento
alla corretta alimentazione, tensione/frequenza).
2. Per attivare il dispositivo premere il pulsante “ON/OFF”,
. Al primo avvio, dopo aver premuto solo il pulsante “ON/
OFF” senza impostare la memoria, il compressore si avvia
(purché il livello di umidità del locale superi il 50%).
3. Premere il pulsante dell’aumento o della diminuzione
dell’umidità voluta.
L’intervallo di umidità disponibile è tra 40%~80%, ogni
pressione dell’apposito pulsante riduce o aumenta l’umidità
dell’1%. L’umidità impostata sarà visualizzata per 8 secon-
di sul visualizzatore, dopodiché sul visualizzatore apparirà
l’informazione sul livello reale dell’umidità nel locale. Una
volta raggiunto il livello di umidità voluto, il compressore si
disattiva automaticamente.
***Il visualizzatore mostra l’umidità nell’intervallo
35%~95%, se il livello di umidità del locale è inferiore al
35%, il visualizzatore mostra ”LO”, se il livello di umidità
supera il 95%, sul display apparirà ”HI”.
4. Per disattivare il dispositivo, premere nuovamente il
pulsante “ON/OFF”,
5. Al primo avvio del dispositivo o al riavvio dopo lo spegni-
mento automatico, il compressore si attiva dopo 3 secondi
per motivi di sicurezza.
► SBRINAMENTO
Il dispositivo è dotato della funzione di sbrinamento a gas
caldo. Dopo 30 minuti di funzionamento il dispositivo con-
trolla automaticamente la temperatura del sistema per ve-
ricare se necessita lo sbrinamento. Se la temperatura è
≤-1°C, il dispositivo passa alla modalità di sbrinamento a
gas caldo, si illumina l’indicatore di sbrinamento. Durante
BG
it
DE
DK
EE
ES
FI
FR
GB
HR
HU
IT
LT
LV
NL
NO
PL
RO
RU
SE
SI
SK
UA
SE
SI
SK
TR
UA
lo sbrinamento il compressore e il ventilatore sono in fun-
zione. Il processo dura 5 minuti (se la temperatura del
sistema raggiunge 10°C, il dispositivo termina automatica-
mente la funzione di sbrinamento).
► MEMORIA
Dopo aver premuto il pulsante della Memoria, viene atti-
vato automaticamente il visualizzatore di memoria, mentre
il dispositivo memorizza l’ultima impostazione.
► CONTATORE DI ORE DI ESERCIZIO (FIG. 5)
1. Un contatore speciale serve e calcolare il tempo di eser-
cizio del dispositivo.
2. Il visualizzatore a 7-cifre conta il tempo di lavoro sempre
in progressione senza mai azzerarlo.
►6. USCITA DELL’ACQUA
Se il dispositivo è posizionato in modo scorretto, l’indicatore
rosso del serbatoio si accende. Nel momento in cui il
serbatoio raggiunge il pieno, il compressore si ferma, e
l’indicatore del pieno si illumina in rosso, mentre il dispo-
sitivo stesso comincia a vibrare e entra in funzione un ci-
calino.
Nel togliere il serbatoio dell’acqua, rimuoverlo con atten-
zione dal dispositivo, evitando che si ribalti. Dopo lo svuo-
tamento, inserire il serbatoio nel suo alloggiamento. Accer-
tarsi che sia posizionato correttamente. L’indicatore del
serbatoio pieno si disattiva, e il dispositivo può rimanere
acceso. (FIG. 6)
SCOLLO CONTINUO
In caso di funzionamento con umidità eccessiva, il serba-
toio richiede uno scarico più frequente. In tale situazione è
possibile dotare il dispositivo di un sistema di scarico con-
tinuo, seguendo le indicazioni sottostanti:
► Rimuovere il tappo e conservarlo per un futuro utilizzo.
► Fissare una estremità del tubo all’attacco dello scarico
dell’acqua (FIG. 7), l’altra estremità del tubo inserirla nello
scarico della vasca.
►7. MANUTENZIONE E CONSERVAZIONE
Prima di comminciare la manutenzione o la pulizia bisogna
scollegare l’impianto dalla rete elettrica.
PULIZIA DELLA CARCASSA
Per pulire l’impianto bis ogna usare il tessuto morbido.
Vietato di usare delle sostanze chimiche voltatili, detergen-
ti, benzina, vestiti trattati chimicamente, pure altrie soluzio-
ni di pulizia. Ogni sostanza sopra citata puó danneggiare la
carcassa dell’impianto.
PULIZIA DEL FILTRO (FIG. 8)
► Rimuovere il ltro Pulirlo delicatamente con
l’aspirapolvere. Utilizzare dell’acqua tiepida con poca
quantità detergente nel caso il ltro sia molto sporco.
► Prima di inserire il ltro, accertarsi che sia perfettamen-
te asciutto.
► Non esporre il ltro alla luce del sole.
CONSERVAZIONE:
Se l’impianto non è usato per lungo tempo bisogna speg-
nerlo. Filo di allimentazione deve esser scollegato e pulito:
► Svuotare completamente il contenitore acqua ed asci-
ugarlo con cura.

BG
it
DE
DK
EE
ES
FI
FR
GB
HR
HU
IT
LT
LV
NL
NO
PL
RO
RU
SE
SI
SK
UA
SE
SI
SK
TR
UA
► Coprire l’impianto per protteggerlo contro i raggi del
sole.
►8. RIVELAZIONE DEI DIFETTI
IMPIANTO NON FUNZIONA:
► Impianto non collegato alla rete elettrica?
► Rete elettrica a casa è accesa?
► Temperatura ambientale è di 50C oppure piu di 350C?
Rispondendo si alle domande, sappiamo che la tempera-
tura è fuori il regime di lavoro dell’impianto.
► Bisogna assicurarsi se umidostato (oppure commuta-
tore ON/OFF) sià acceso.
► Controlare se il contenitore acqua sia posizionato cor-
rettamente nell’impianto e se non sia pieno.
► Assicurarsi che l’entrata e l’uscita dell’aria non siano
bloccate.
IMPIANTO SEMBRA NON LAVORARE:
► Filtro è sporco ?
► Entrata ed uscita sono bloccate?
► Umidita nel locale non è troppo bassa?
LAVORO DELL’IMPIANTO SEMBRA ESSER IN-
EFFICIENTE:
► Troppe porte e nestre aperte?
► Nel locale funziona l’impianto che genera troppa umi-
dita?
IMPIANTO E TROPPO RUMOROSO:
► Controlare se l’impianto sia stabile sulla supercie pi-
atta.
IMPIANTO PERDE:
► Assicurarsi che stato tecnico dell’impianto sia buono
► Se lo scollo continuo dell’acqua non è usato, biso-
gna assicurarsi che il tappo di gomma (parte inferiore
dell’impianto) sia ben posizionato
Codici di errore sul display
Codice Causa Soluzione
E1 Il sensore di temperatura
dell’ambiente (con un ripa-
ro di resina) è aperto o fun-
ziona male per cortocircuito
Controllare che il sensore di
temperatura dell’ambiente
sia correttamente collegato
alla piastra PCB
Sostituire il sensore di tem-
peratura dell’ambiente.
Sostituire la piastra PCB
principale.
Il livello di umidità dell’aria
è inferiore al 40% di umidità
relativa.
E2 Il sensore del sistema di
refrigerazione (con riparo di
rame) è aperto o funziona
male per cortocircuito
Controllare che il sensore
sia correttamente collegato
alla piastra PCB
Sostituire il sensore
Sostituire la piastra PCB
principale.
E3 Il cavo del sensore di co-
mando della temperatura
(TC) è allentato o danneg-
giato.
Il dispositivo emetterà un
segnale sonoro per 3 se-
condi, mentre il messag-
gio E3 lampeggerà ogni
secondo.
Il compressore e il motore
del ventilatore smetteranno
di funzionare.
La sonda dovrà essere
controllata e sostituita.
E5 Qualora la temperatura
letta dal sensore TC sia
pari ad almeno 1300C per
più di 5 secondi, il dispo-
sitivo emetterà un segnale
sonoro per 3 secondi, e il
messaggio E5 lampeggerà
una volta al secondo.
Il compressore e il motore
del ventilatore smetteranno
di funzionare.
In questa situazione sarà
necessario spegnere e
accendere nuovamente il
dispositivo con il tasto ON/
OFF per vericare se il
messaggio E5 continua a
essere visualizzato. Qualo-
ra l’errore non sparisca, ciò
signica che l’impianto del
compressore non funziona
correttamente.
Tale impianto dovrà essere
controllato al ne di elimi-
nare il malfunzionamento.

BEDIENUNGSANLEITUNG
1... FUNKTIONSWEISE
2... PLATZIERUNG
3... EMPFEHLUNGEN VOR DEM ERSTBETRIEB
4... TEILE
5... BEDIENUNG
6... WASSERABLEITUNG
7... WARTUNG UND INSTANDHALTUNG
8... MÄNGELERKENNUNG
VOR DER ANWENDUNG DIESES GERÄTES
SOLL MAN SICH AUSFÜHRLICH MIT DER AN-
LEITUNG BEFASSEN UND SIE DANN AUFBE-
WAHREN UM SPÄTER NUTZEN ZU KÖNNEN.
►1. FUNKTIONSWEISE
Das vorliegende Produkt dient zum Trockenen von Luft.
Es überwacht die relative Feuchtigkeit indem es die Luft
durch das Gerät verarbeitet und zur Kondensierung des
Übermaßes an Feuchtigkeit an den Kälteteilen führt. Die
Berührung mit kalter Oberache bewirkt, dass sich die
Feuchtigkeit in der Luft verüssigt. Danach wird das Kon-
denswasser sicher in den Wasserbehälter abgeleitet. Die
getrocknete Luft geht durch den Kondensator, in dem sie
leicht erwärmt wird und dann wieder in den Raum eing-
espeist wird, wobei ihre Temperatur ist gering erhöht.
► FIG. 1
1. TROCKNE WÄRMERE LUFT,
2. KONDENSATOR,
3. VERDAMPFER – kalte Rohren,
4. MIT FEUCHTIGKEIT GESÄTTIGTE LUFT,
5. MIKROSCHALTER,
6. WASSERBE-HÄLTER,
7. MOTOR,
8. VENTILATOR,
9. KOMPRESSOR,
►2. PLATZIERUNG
Das Übermaß an Feuchtigkeit wird sich im ganzen Haus
verteilen auf die selbe Art und Weise wie sich Gerüche wäh-
rend des Kochens im ganzen Raum ausbreiten. Deswegen
sollte die Trocknungsanlage so platziert werden, dass er
feuchte Luft aus dem ganzen Haus aufnehmen kann.
Es besteht auch die Möglichkeit, dass, wenn an einer Stel-
le im Haus es zu einem ernsthaften Problem kommt, man
die Trocknungsanlage in der Nähe dieser Stelle stellt und
danach sie in einen mehr zentralen Punkt verschiebt.
Während die Trocknungsanlage aufgestellt wird, soll man
sich vergewissern, dass sie sich auf ebener Fläche ben-
det und, ob an jeder Seite 10 cm (4“) Freiraum vorhanden
sind, um einen leistungsfähigen Luftuss zu ermöglichen.
Diese Trocknungsanlage ist mit Rädern ausgestattet, um
ihm bessere Bewegungsfreiheit zu garantieren. Wenn
das Gerät verschoben werden soll, muss man es vorher
ausschalten und den Wasserbehälter entleeren.
Es wird nicht empfohlen einen Verlängerungskabel zu
benutzen, im Zusammenhang damit soll man sich ver-
gewissern, ob das Gerät sich ausreichend Nah an einer
Steckdose bendet. Wenn die Verwendung eines Verläng-
erungskabels notwendig sein wird, muss man sich ver-
gewissern, ob der Kabeldurchmesser mindestens 1 mm2
beträgt.
Während das Gerät arbeitet, sollten bei Notwendigkeit die
Außentüren und Fenster geschlossen bleiben, und die
maximale Leistungsfähigkeit des Gerätes zu sichern.
►3. EMPFEHLUNGEN VOR DEM ERSTBE-
TRIEB
ACHTUNG!
► Die auf dem Gerät angegebenen Zeichen haben fol-
gende Bedeutung:
► Das Gerät ist mit R290-Propan gefüllt. Beachten Sie
unbedingt die Betriebs- und Reparaturanleitung des
Herstellers!
► Lesen Sie die Bedienungsanleitung sorgfältig durch,
bevor Sie das Gerät in Betrieb nehmen.
► Installieren, verwenden oder lagern Sie das Gerät nicht
in einem Raum, der kleiner als 4 qm ist.
ALLGEMEINE SICHERHEITSREGELN
► NUR ZUR VERWENDUNG IN INNENRÄUMEN.
► Es ist verboten, das Gerät in Kücheneinbaumöbeln, in
einem Schrank, auf Booten, in Wohnwagen oder in ähnli-
chen geschlossenen Räumen zu verwenden.
► Es ist verboten, das Gerät in der Nähe von Schwimm-
becken, in Waschräumen sowie anderen feuchten Räu-
men zu verwenden.
► Bevor das Gerät nach dem Transport oder nachdem es
(z.B. bei der Reinigung) gekippt wurde an die Stromver-
sorgung angeschlossen wird, muss man 12 Stunden ab-
warten.
► Das Gerät ist auf einer ebenen Fläche (auch beim
Transport!) aufrecht und mindestens 50 cm von anderen
Gegenständen entfernt aufzustellen.
► Das Gerät darf nicht in einer explosionsgefährdeten At-
mosphäre mit brennbaren Flüssigkeiten, Gasen oder Stäu-
ben verwendet werden.
► Das Gerät darf nicht in der Nähe von brennbaren oder
explosiven Substanzen oder Brennstoffen verwendet wer-
BG
CZ
de
DK
EE
ES
FI
FR
GB
HR
HU
IT
LT
LV
NL
NO
PL
RO
RU
SE
SI
SK
UA
SE
SI
SK
TR
UA
100*40 mm

BG
CZ
de
DK
EE
ES
FI
FR
GB
HR
HU
IT
LT
LV
NL
NO
PL
RO
RU
SE
SI
SK
UA
SE
SI
SK
TR
UA
den. Keine Farben, Reinigungsmittel, Insektizide oder ähn-
liche Produkte in der Nähe des Gerätes versprühen, da
dies zu einer Verformung der Kunststoffteile oder zu Schä-
den an der elektrischen Installation führen kann.
► Zwischen den Geräteseiten und brennbaren, erwär-
menden Materialien mindestens 50 cm Freiraum lassen.
► Keine Gegenstände auf das Gerät legen sowie den Luf-
tein- und -auslass nicht abdecken.
► Das Gerät vor Spritzern schützen.
► Kinder und Haustiere, die sich in der Nähe des in Be-
trieb bendlichen Geräts aufhalten, müssen beaufsichtigt
werden.
► KINDERN IST ES NICHT ERLAUBT, MIT DEM GERÄT
ZU SPIELEN.
► Kinder dürfen das Gerät ohne Aufsicht von Erwach-
senen weder reinigen noch warten.
► Das Gerät ausschalten und den Netzstecker herauszie-
hen, wenn es nicht benutzt wird.
► Das Gerät darf nicht unbeaufsichtigt betrieben werden.
► Das Gerät nicht am Versorgungskabel ziehen.
► Übermäßiges Verdrehen, Aufwickeln und Ziehen des
Netzkabels sowie das Zusammenbinden mit Nylon- oder
Stahldraht vermeiden.
► Sicherstellen, dass Stecker und Steckdose an einer gut
sichtbaren und leicht zugänglichen Stelle platziert sind.
► Keine Verlängerungskabel verwenden.
► Nach dem Gerät nicht greifen, wenn es ins Wasser ge-
fallen ist. In einem solchen Fall muss das Netzkabel sofort
herausgezogen werden. Den Zustand des Geräts vor er-
neuter Verwendung überprüfen.
► Das Gerät ist in Übereinstimmung mit den nationalen
elektrischen Vorschriften und Normen anzuschließen.
► Die empfohlene Raumgröße überschreiten, um maxi-
male Leistung zu gewährleisten.
► Fenster und Türen schließen.
► Bei übermäßiger Sonneneinstrahlung die Vorhänge zu-
ziehen oder Jalousien herunterlassen.
► Filter sauber halten.
► Wenn die Raumbedingungen das Zielniveau erreichen,
die Temperatur und Luftgebläseeinstellung reduzieren.
► Es ist verboten, das Gerät in Betrieb zu nehmen, wenn
es sowie das Netzkabel oder der Stecker beschädigt sind,
das Gerät nicht richtig funktioniert oder es Anzeichen für
eine andere Fehlfunktion gibt. Das komplette Gerät zur In-
spektion und/oder Reparatur an einen qualizierten Händ-
ler oder Elektriker übergeben. Ausschließlich originale Er-
satzteile verwenden. Das Gerät (einschließlich Netzkabel
und Stecker) darf nur von autorisierten und entsprechend
qualizierten Personen demontiert und/oder repariert wer-
den.
► Es wird empfohlen, das Gerät in regelmäßigen Abstän-
den zu warten.
► DAS GERÄT DARF NUR VON EINEM ZERTIFIZIER-
TEN SERVICETECHNIKER DEMONTIERT ODER MODI-
FIZIERT WERDEN.
► DAS GERÄT DARF NUR BESTIMMUNGSGEMÄSS
VERWENDET WERDEN. DIE VERWENDUNG ZU EINEN
ANDEREN ZWECK GILT ALS NICHT BESTIMMUNGSGE-
MÄSS. JEGLICHE SCHÄDEN ODER VERLETZUNGEN,
DIE SICH AUS EINEM SOLCHEN VERHALTEN ERGE-
BEN, LIEGEN IN DER VERANTWORTUNG DES BENUT-
ZERS, NICHT DES GERÄTEHERSTELLERS.
► Das Gerät muss immer in vertikaler Stellung aufgestellt
sein.
► Alle Fremdkörper solle weit von den Ein- und Ausgang-
söffnungen aufbewahrt werden.
► Die Stromversorgung muss mit der Nenntafel übereins-
timmen, die sich auf der Rückseite des Gerätes bendet.
► Wenn der Versorgungskabel beschädigt ist, muss er
vom autorisierten Fachhändler unserer Serviceabteilung
oder einer Person, die über entsprechende Befugnisse
verfügt, ausgetauscht werden, damit es zu keine Gefahr
kommt.
► Zum Ein- und Ausschalten darf man in keinem Fall den
Stecker benutzten. Man muss immer den Schalter auf dem
Bedienungsfeld benutzten.
► Bevor das Gerät verstellt oder verschoben wird, muss
man es erst ausschalten und den Wasserbehälter entle-
eren.
► Man darf keine Sprühsubstanzen gegen Insekten oder
andere leichtbrennbare Reinigungsmittel verwenden.
► In keinem Fall darf man das Gerät mit Wasser be-
sprühen oder begießen.
► DAS GERÄT SOLL NICHT DURCH PERSONEN
(EINSCHLIESSLICH DER KINDER) MIT BEGRENZTEN
KÖRPERLICHEN, SENSORISCHEN ODER MENTALEN
FÄHIGKEITEN ODER DURCH PERSONEN, DIE KEINE
ERFAHRUNG BESITZEN UND NICHT DURCH EINE
FÜR IHRE SICHERHEIT VERANTWORTLICHE PERSON
GESCHULT WURDEN, BEDIENT WERDEN. ES IST SI-
CHERZUSTELLEN, DASS KINDER MIT DEM GERÄT
NICHT SPIELEN.
►SICHERHEITSREGELN IM BEREICH DES
KÄLTEMITTELS R290:
► Machen Sie sich mit den folgenden Warnhinweisen
sorgfältig vertraut.
► Das Gerät enthält das Kältemittel R290. Das Kältemit-
tel R290 entspricht den relevanten Richtlinien der Europäi-
schen Union. Das Kühlsystem darf nicht durchstochen
werden. Das Kältemittel R290 ist eine brennbare Substanz
(GWP3)!
► Keine anderen als die vom Hersteller empfohlenen Ge-
räte oder Mittel zur Beschleunigung der Enteisung oder
Gerätereinigung verwenden.
► Das Gerät in einem Raum ohne feste Zündquellen (z.B.
offene Flamme, laufendes Gasgerät oder laufender Elek-
troerhitzer) lagern.
► Die Komponenten des Gerätekühlsystems dürfen nicht
durchstochen sowie erhitzt werden. Kein direktes Licht auf
das Gerät richten.
► Das Gerät so aufbewahren, dass es nicht mechanisch
beschädigt wird.
► Das Gerät muss in einem Raum mit einer Bodenäche
von mehr als 4 qm installiert, betrieben und aufbewahrt
werden.
► Das Kältemittel kann geruchlos sein, wodurch die Er-
mittlung von Leckagen schwieriger sein kann.
► Einzuhalten sind nationale Normen und Vorschriften für
Gasbrennstoffe.
► Keine Lüftungsöffnungen verdecken.
► Das Gerät in einem gut belüfteten Raum von einer
Größe, die den technischen Spezikationen des Geräts
entspricht, lagern.
► Jede Person, die das Kühlsystem wartet oder repariert,
muss im Besitz eines gültigen Zertikats sein, das von
der entsprechenden technischen Organisation ausgestellt
wurde und bescheinigt, dass diese Person für den siche-

ren Umgang mit Kältemitteln in Übereinstimmung mit aner-
kannten Normen und Vorschriften zugelassen ist.
► Servicearbeiten sollten nur in Übereinstimmung mit den
Empfehlungen des Geräteherstellers durchgeführt wer-
den. Bedienung und Reparaturarbeiten, die die Anwesen-
heit von qualiziertem Servicepersonal erfordern, müssen
unter der Aufsicht einer Person durchgeführt werden, die
zu der Verwendung von brennbaren Kältemitteln zugelas-
sen ist.
WICHTIG!
Das Gerät darf man nicht einsetzen, wenn die Raum-
temperatur unter 5°C fällt, damit es nicht zum Vereisen
des Verdampferschlauches kommt.
►4. TEILE
► FIG. 2
1. Metallgehäuse,
2. Griff,
3. Bedienfeld,
4. Betriebsstundenzähler,
5. linke Seitenwand,
6. Lenkrolle,
7. Filter,
8. Wassertank,
9. rechte Seitenwand.
► FIG. 3
Durch Drücken der Knöpfe an der Griffbefestigung kann
die Griffposition eingestellt werden.
►5. BEDIENUNG
► Bedienpult FIG. 4
1. Anzeige Feuchtigkeit
2. Anzeige Betrieb
3. Anzeige Entfrosten
4. Anzeige Speicher
5. Anzeige Behaelter voll
6. Speicher
7. Feuchtigkeit hoch
8. Feuchtigkeit unter
9. Taste ON/OFF
► BETRIEB
1. Schließen Sie das Gerät an geeignete Steckdose an.
(Anschluss nur an die auf dem Typenschild angegebene
Spannung/Frequenz.)
2. Um das Gerät zu starten, drücken Sie die “ON/OFF”,
-Taste. Bei der ersten Inbetriebnahme, wenn keine Einstell-
ungen gespeichert wurden, wird nach dem Drücken der
“ON/OFF” -Taste der Kompressor gestartet (vorausge-
setzt, dass die Raumfeuchtigkeit mehr als 50% beträgt).
3. Drücken Sie die Luftfeuchte-Tasten, um die gewünschte
Luftfeuchte einzustellen.
Der Entfeuchtungsbereich beträgt 40%~80% Luftfeuch-
tigkeit, nach Betätigung der entsprechenden Taste wird
die Feuchtigkeit durch jedes Drücken um 1 % erhöht oder
gesenkt. Während der Einstellung wird die eingestellte
Luftfeuchtigkeit 8 Sekunden lang angezeigt, danach wird
wieder die aktuelle Raumfeuchte angezeigt. Wenn die
gewünschte Luftfeuchtigkeit erreicht wird, schaltet der
Kompressor automatisch ab.
***Die Feuchteanzeige umfasst den Bereich von 35% bis
95%. Wenn die Raumfeuchte niedriger als 35% ist, wird
”LO”, und wenn sie höher als 95 % ist, wird ”HI”. ang-
ezeigt.
4. Drücken Sie wieder die “ON/OFF”, -Taste, um das Gerät
abzuschalten.
5. Bei der ersten Inbetriebnahme oder einem Neustart
nach abruptem Abschalten wird der Kompressor aus Si-
cherheitsgründen nach 3 Sekunden angeschaltet.
► ABTAUEN
Das Gerät ist mit einer Heißgasabtauautomatik ausgestat-
tet. Nach 30 Minuten Betrieb prüft das Gerät mit einem
Sensor automatisch die Innentemperatur. Wenn die Tem-
peratur ≤-1°C beträgt, geht das Gerät in den Heißgas-Ab-
taumodus, und die Abtauanzeige leuchtet. Der Kompres-
sor und der Ventilator arbeiten während des Abtauens. Der
ganze Vorgang dauert 5 Minuten (wenn die Temperatur im
System 10°C erreicht, kommt das Gerät aus dem Abtau-
modus heraus).
► MEMORY
Nach dem Drücken der MEMORY-Taste wird die Speiche-
ranzeige angezeigt und das Gerät speichert die letzten
Einstellungen.
► BETRIEBSSTUNDENZÄHLER (FIG. 5)
1. Der Betriebsstundenzähler misst die Betriebszeit des
Gerätes.
2. Die 7-stellige Anzeige zeigt die Betriebszeit an und zählt
kontinuierlich weiter, sie kann nicht auf Null gesetzt wer-
den.
Wenn der Wassertank falsch montiert ist, leuchtet die An-
zeige des überfüllten Wassertanks rot auf. Beim vollen
Wassertank wird der Kompressor anhalten, die Anzeige
des überfüllten Wassertanks leuchtet rot auf und ein Ge-
räuschsignal ertönt.
►6. WASSERABLEITUNG
Wenn der Wassertank falsch montiert ist, leuchtet die An-
zeige des überfüllten Wassertanks rot auf. Beim vollen
Wassertank wird der Kompressor anhalten, die Anzeige
des überfüllten Wassertanks leuchtet rot auf und ein Ge-
räuschsignal ertönt.
Um den Wassertank rauszunehmen, muss er vorsichtig
aus dem Gerät herausgezogen werden. Achten Sie dabei
darauf, dass er nicht zur Seite kippt. Nach dem Entleeren
schieben Sie den Wassertank zurück. Stellen Sie sicher,
dass er korrekt sitzt. Die Anzeige des überfüllten Wass-
ertanks schaltet dann aus und das Gerät kann in Betrieb
genommen werden (FIG. 6).
STÄNDIGE ABLEITUNG
Wenn der Entfeuchter bei einer zu hohen Luftfeuchtigkeit
eingesetzt wird, muss der Wassertank häuger entleert
werden. In dem Fall ist es bequemer, das Gerät für konti-
nuierliche Wasserentleerung anzupassen. Um dies durch-
zuführen, gehen Sie wie folgt vor:
► Den Stöpsel entfernen und für die Zukunft aufbewah-
ren.
► Den Ablaufschlauch am Wasserablauf (FIG. 7) be-
festigen, und am anderen Ende an den Abuss ansch-
ließen.
►7. WARTUNG UND INSTANDHALTUNG
Bevor Wartungs- oder Reinigungsarbeiten am Gerät vor-
genommen werden, soll man es immer von der Stromver-
sorgung trennen.
BG
CZ
de
DK
EE
ES
FI
FR
GB
HR
HU
IT
LT
LV
NL
NO
PL
RO
RU
SE
SI
SK
UA
SE
SI
SK
TR
UA

BG
CZ
de
DK
EE
ES
FI
FR
GB
HR
HU
IT
LT
LV
NL
NO
PL
RO
RU
SE
SI
SK
UA
SE
SI
SK
TR
UA
GEHÄUSEREINIGUNG
Um das Gerät zu reinigen, soll man einen weichen Lappen
verwenden.
In keinem Fall darf man chemische Sprühsubstanzen,
Detergentien, Benzin, Kleidung, die chemisch verarbeitet
wurde, oder andere Reinigungslösungen verwenden. Jede
dieser Substanzen kann das Gehäuse beschädigen.
FILTERREINIGUNG (FIG. 8)
► Das Filter entnehmen. Das Filter mit Staubsauger vor-
sichtig reinigen. Bei einem sehr stark verschmutztem Filter
warmes Wasser mit mildem Reinigungsmittel verwenden.
► Vergewissern Sie sich, dass das Filter vollständig trock-
en ist, bevor Sie es wieder einsetzen.
► Das Filter darf keiner Sonneneinstrahlung ausgesetzt
werden.
AUFBEWAHRUNG
Wenn das Gerät eine länger Zeitlang nicht benutzt wird,
soll man es ausschalten. Den Stromversorgungskabel soll
man abschalten und reinigen:
► Man soll vollständig den Wasserbehälter entleeren und
ihn abwischen.
► Das Gerät soll man abdecken und an einem Ort auf-
bewahren, wo es keinen Sonnenstrahlen ausgesetzt wird.
►8. MÄNGELERKENNUNG
DAS GERÄT FUNKTIONIERT NICHT:
► Ist das Gerät an das Stromnetz angeschlossen?
► Ist die Elektrizität im Haus eingeschaltet?
► Beträgt die Raumtemperatur 5°C oder mehr als 35°C?
Wenn ja, dann liegt sie außerhalb des Arbeitsbereichs des
Gerätes.
► Man soll sich vergewissern, ob das Humidostat (oder
die ON/OFF-Taste) eingeschaltet ist.
► Man soll überprüfen, ob der Wasserbehälter ordnungs-
gemäß im Gerät eingebaut ist und ob er nicht voll ist.
► Man soll sich vergewissern, ob die Luftein- und Luftaus-
lassöffnungen nicht gesperrt sind.
ES SCHEINT, DASS DAS GERÄT NICHT ARBEI-
TET:
► Ist der Filter verunreinigt oder verstaubt?
► Ist die Lufteinlass- oder Luftauslassöffnung blockiert?
► Ist die Umgebungsluftfeuchtigkeit nicht schon zu
niedrig?
ES SIEHT SO AUS ALSOB DAS GERÄT UNPRO-
DUKTIV ARBEITEN WÜRDE:
► Sind zu viele Fenster oder Türen geöffnet?
► Bendet sich im Raum irgendetwas, was hohe Feuch-
tigkeit verursacht?
DAS GERÄT IST ZU LAUT:
► Man muss überprüfen ob das Gerät auf gerader Fläche
steht.
DAS GERÄT HAT EINEN LECK:
► Man soll sich vergewissern, ob das Gerät im guten
technischen Zustand ist.
► Wenn der Modus der ständigen Wasserableitung nicht
genutzt wird, soll man sich vergewissern ob die Gummi-
blende (unten am Gerät) in ihrem Platz ist.
Fehlercode-Anzeigen auf dem Bildschirm
Code Verursacher Lösung
E1 Der Temperatursensor
(mit Harzummantelung) ist
offen oder aufgrund des
Kurzschlusses nicht funk-
tionsfähig.
Überprüfen, ob der Tempe-
ratursensor an die Leiter-
platte richtig angeschlossen
ist.
Den Temperatursensor aus-
tauschen.
Die Hauptleiterplatte aus-
tauschen.
Die Luftfeuchtigkeit liegt
unter 40 % der relativen
Feuchte.
E2 Der Kühlsensor (mit Kupfe-
rummantelung) ist offen oder
aufgrund des Kurzschlusses
nicht funktionsfähig.
Überprüfen, ob der Sensor
an die Leiterplatte richtig
angeschlossen ist.
Den Sensor austauschen.
Die Hauptleiterplatte aus-
tauschen.
E3 Das Kabel des Temperatur-
kontrollsensors (TC) ist lose
oder beschädigt.
Das Gerät gibt 3 Sekunden
lang einen Ton von sich und
die E3-Meldung wird im Se-
kundentakt blinken.
Der Kompressor und der
Lüftermotor stellen den Be-
trieb ein.
Der Sensor muss überprüft
und ersetzt werden.
E5 Wenn die vom TC-Sensor
gemessene Temperatur
mehr als 5 Sekunden lang
mindestens 130°C beträgt,
gibt das Gerät 3 Sekunden
lang einen Ton von sich und
die E5-Meldung wird im Se-
kundentakt blinken.
Der Kompressor und Lüf-
termotor stellen den Betrieb
ein.
In dieser Situation muss das
Gerät aus- und wieder eing-
eschaltet werden, indem
man die EIN/AUS-Taste
drückt, um zu prüfen, ob die
E5-Meldung noch angezeigt
wird. Wenn der Fehler nicht
behoben wird, bedeutet
dies, dass die Kompressor-
anlage nicht richtig funktio-
niert.
Die Kompressoranlage
muss überprüft und der
Fehler behoben werden.

INDICE
1... FUNCIONAMIENTO
2... UBICACIÓN
3... RECOMENDACIONES ANTES DE LA UTILIZACIÓN
4... COMPONENTES
5... COMO MANEJARLO
6... ELIMINACIÓN DEL AGUA ALMACENADA
7... LIMPIEZA Y MANTENIMIENTO
8... DIAGNOSTICAR LOS PROBLEMAS
ANTES DE UTILIZAR ESTE APARATO HAY QUE
LEER DETENIDAMENTE EL MANUAL DE IN-
STRUCCIONES Y GUARDARLA PARA SUS FU-
TURAS CONSULTAS.
►1. FUNCIONAMIENTO
Este producto está destinado a deshumidicar el aire. Con-
trola la humedad relativa al pasar el aire por el aparato,
provoca la condensación del exceso de la humedad en los
elementos refrigeradores. El contacto con una supercie
fría provoca la condensación de la humedad en el aire.
Seguidamente el agua condensada se conduce de forma
segura hacia el depósito de agua. El aire deshumidicado
pasa por el condensador donde se calienta ligeramente y
seguidamente queda expulsado y la temperatura del am-
biente sube ligeramente.
► FIG. 1
1. salida del aire seco,
2. condensador,
3. evaporador, 4. entrada del aire húmedo,
5. micro interruptor,
6. depósito de agua,
7. motor,
8. ventilador,
9. compresor
►2. UBICACIÓN
El exceso de humedad va a extenderse por toda la casa
del mismo modo que lo hace el olor cuando estamos co-
cinando. Por este motivo el deshumidicador debería ser
ubicado de manera que pueda absorber el aire húmedo de
toda la casa. Como excepción, si en un lugar determinado
aparece un problema grave, podemos acercar el deshumi-
dicador al dicho lugar y más tarde desplazarlo a un punto
más central de la casa.
Cuando estemos ubicando el deshumidicador tenemos
que asegurarnos de que este se encuentra en una super-
cie plana y tenga alrededor un espacio de 10 cm (4”) libres
para facilitar un ujo ecaz de aire. Este deshumidicador
tiene unas ruedas auto ajustables que le dan una mejor
movilidad. Antes de desplazar el aparato hay que apagarlo
y vaciar el depósito de agua.
No se aconseja el uso de un alargador. Por eso hay que
asegurarse de que el aparato se encuentra suciente-
mente cerca de un enchufe. En el caso de que el uso del
un alargador fuera necesario hay que asegurarse de que
el diámetro de los cables es de 1 mm2 como mínimo. A
medida de lo posible, mientras el deshumidicador esté
funcionando es aconsejable mantener las puertas y las
ventanas cerradas para asegurar de esta manera la mayor
ecacia del aparato.
►3. RECOMENDACIONES ANTES DE LA UT-
ILIZACIÓN
¡ATENCIÓN!
100*40 mm
Los símbolos en el dispositivo tienen los siguientes signi-
cados:
► El dispositivo está lleno de propano R290. ¡Deben ob-
servarse estrictamente las instrucciones del fabricante
para operar y reparar el dispositivo!
► Lea las instrucciones de funcionamiento detenidamen-
te antes de iniciar el dispositivo.
► No instale, use ni almacene el dispositivo en una habi-
tación inferior a 4m2.
REGLAS GENERALES DE SEGURIDAD
► SOLAMENTE PARA USO EN INTERIORES.
► No utilice el dispositivo en armarios de cocina empotra-
dos, armarios, botes, caravanas o espacios cerrados si-
milares.
► No utilice el dispositivo cerca de piscinas, en baños u
otras habitaciones húmedas.
► Espere 12 horas antes de conectar el dispositivo a la
fuente de alimentación después del transporte o cuando
se haya inclinado (por ejemplo, durante la limpieza).
► Coloque el dispositivo en posición vertical sobre una
supercie nivelada (¡también durante el transporte!) Y a
una distancia de al menos 50 cm de otros objetos.
► No utilice el dispositivo en atmósferas potencialmente
explosivas que contengan líquidos, gases o polvo inama-
bles.
► No utilice el dispositivo cerca de sustancias o combus-
tibles inamables o explosivos. No rocíe pinturas, agentes
de limpieza, insecticidas o agentes similares cerca del dis-
positivo, ya que esto puede deformar las piezas de plástico
o dañar el sistema eléctrico.
► Deje al menos 50 cm de espacio libre entre los lados
del dispositivo y materiales de calentamiento inamables.
► No coloque ningún objeto sobre el dispositivo ni cubra
BG
CZ
DE
es
EE
ES
FI
FR
GB
HR
HU
IT
LT
LV
NL
NO
PL
RO
RU
SE
SI
SK
UA
SE
SI
SK
TR
UA

la entrada y salida de aire.
► Proteja el dispositivo contra salpicaduras.
► Supervisar a los niños y los animales domésticos cerca
del dispositivo en marcha.
► NO PERMITA QUE LOS NIÑOS JUEGUEN CON EL
DISPOSITIVO.
► Los niños no deben limpiar ni mantener el dispositivo
sin la supervisión de un adulto.
► Apague el dispositivo y desenchúfelo cuando no esté
en uso.
► No deje el dispositivo en funcionamiento sin vigilancia.
► No tire del dispositivo por el cable de alimentación.
► Evite torcer, enrollar o tirar del cable de alimentación en
exceso, o atarlo con nylon o alambre de acero.
► Asegúrese de que el enchufe y el enchufe estén en un
lugar visible y de fácil acceso.
► No use cables de extensión.
► No intente alcanzar el dispositivo si se ha caído al agua.
En este caso, desenchufe el cable de alimentación inme-
diatamente. Verique la condición del dispositivo antes de
usarlo nuevamente.
► El dispositivo debe conectarse de acuerdo con las nor-
mativas nacionales y las normas eléctricas.
► No exceda el tamaño de habitación recomendado para
obtener el máximo rendimiento del dispositivo.
► Cerrar puertas y ventanas.
► En caso de luz solar signicativa, cierre las cortinas o
baje las persianas.
► Mantenga los ltros limpios.
► Cuando las condiciones de la habitación alcancen el
nivel objetivo, reduzca la temperatura y la conguración
del ujo de aire.
► No opere el dispositivo si el dispositivo, el cable de
alimentación o el enchufe están dañados, el dispositivo
no funciona correctamente o si hay signos de otra falla.
Entregue el dispositivo completo a un vendedor o electri-
cista calicado para su inspección y / o reparación. Use
solo repuestos originales. El dispositivo (incluido el cable
de alimentación y el enchufe) puede ser desmontado y /
o reparado solo por personas autorizadas y debidamente
calicadas.
► Se recomienda la inspección periódica del dispositivo.
► LA MÁQUINA PUEDE SER DESMONTADA O MODIFI-
CADA SOLAMENTE POR UN SERVICIO CERTIFICADO.
► EL DISPOSITIVO PUEDE SER UTILIZADO SOLA-
MENTE DE ACUERDO CON SU PROPÓSITO.
► USARLO PARA OTRO PROPÓSITO SERÁ CONSI-
DERADO COMO UN USO INADECUADO. EL USUARIO
ES RESPONSABLE DE CUALQUIER DAÑO O LESIÓN
DERIVADO DE DICHO PROCEDIMIENTO, NO EL FABRI-
CANTE DEL DISPOSITIVO.
► El aparato tiene que estar en la posición vertical.
► No introduzca los dedos u objetos en la entrada y salida
del aire.
► La fuente alimentadora tiene que coincidir con la espe-
cicación indicada en la placa nominal de la parte trasera
del aparato.
► Si el cable o la clavija están dañados hay que sustitu-
irlos por una persona autorizada del servicio técnico (una
persona debidamente cualicada) para evitar situaciones
de riesgo.
► Para encender y apagar el aparato no se debe utilizar
la clavija. Siempre hay que utilizar el interruptor del panel
de control.
► Antes de desplazar el aparato hay que apagarlo y va-
ciar el depósito de agua.
► No utilice insecticidas ni otros detergentes limpiadores
inamables.
► Bajo ningún concepto eche agua encima del aparato.
► EL PRESENTE APARATO NO DEBE SER MANEJA-
DO POR PERSONAS (LOS NIÑOS INCLUIDOS) CON LI-
MITACIONES FISICAS, SENSORIALES O MENTALES, O
PERSONAS SIN EXPERIENCIA, QUE NO HAYAN SIDO
INSTRUIDAS POR LOS RESPONSABLES DE SU SEGU-
RIDAD.
►REGLAS DE SEGURIDAD PARA EL REFRI-
GERANTE R290:
► Lea atentamente las siguientes advertencias.
► El dispositivo contiene refrigerante R290. El refrigeran-
te R290 cumple con las directivas relevantes de la Unión
Europea.
► No perforar el sistema de refrigeración. ¡El refrigerante
R290 es inamable (GWP3)!
► No utilice equipos o agentes para acelerar la descong-
elación o limpieza del dispositivo que no sean los reco-
mendados por el fabricante.
► Almacene el dispositivo en una habitación sin fuentes
permanentes de ignición (por ejemplo, llama abierta, dis-
positivo de gas en funcionamiento o calentador eléctrico
en funcionamiento).
► No perfore ni dispare los componentes de refrigeración
del sistema. No apunte la luz directamente al dispositivo.
► Almacene el dispositivo de tal manera que no se dañe
mecánicamente.
► El dispositivo debe instalarse, usarse y almacenarse en
una habitación superior a 4m2.
► El refrigerante puede ser inodoro lo que diculta la de-
tección de fugas.
► Cumplir con las normas y regulaciones nacionales para
combustibles gaseosos.
► No bloquee los oricios de ventilación.
► Almacene el dispositivo en una habitación bien ven-
tilada que coincida con las especicaciones técnicas del
dispositivo.
► Cada persona involucrada en la operación o reparación
del sistema de refrigeración debe tener un certicado vá-
lido emitido por la institución técnica pertinente que certi-
que la competencia de esa persona en el manejo seguro
de refrigerantes de acuerdo con las normas y reglamentos
aceptados.
► El servicio solo debe llevarse a cabo de acuerdo con
las instrucciones del fabricante del dispositivo. Los traba-
jos de mantenimiento y reparación que requieran la pre-
sencia de personal de servicio calicado deben realizarse
bajo la supervisión de una persona calicada para usar
refrigerantes inamables.
IMPORTANTE!
No se debe utilizar el aparato en la temperatura del am-
biente más baja que 5OC, para evitar el del evaporador
se cubra de escarcha.
►4. COMPONENTES
► FIG. 2
1. carcasa metálica
2. asa
3. panel de control
BG
CZ
DE
es
EE
ES
FI
FR
GB
HR
HU
IT
LT
LV
NL
NO
PL
RO
RU
SE
SI
SK
UA
SE
SI
SK
TR
UA

4. contador de motohoras
5. panel izquierdo
6. rueda
7. ltro
8. depósito de agua
9. panel derecho
► FIG. 3
La posición del asa se puede regular con los botones si-
tuados en ambos lados.
►5. COMO MANEJARLO
► Panel de control FIG. 4
1. visualizador de la humedad
2. idicador del trabajo
3. indicador del desescarche
4. indicador del depósito lleno
5. indicador de la memoria
6. memoria
7. subir la humedad
8. bajar la humedad
9. interruptor ON/OFF
► TRABAJO
1. Conectar el aparato en un enchufe de alimentación ade-
cuado. (Se ruega consultar la placa nominal situada en la
parte posterior del aparato para saber la tensión/frecuen-
cia correcta.)
2. Pulsar el botón “ON/OFF”, para encender el aparato.
Tras el primer encendido, habiendo pulsado sólo el botón
“ON/OFF”, sin programar la memoria, el compresor se
pondrá en marcha (a condición de que el nivel de la hu-
medad en el edicio sea mayor del 50%).
3. Pulsar el botón de reducción o incremento de la hu-
medad, con el n de elegir el nivel deseado.
El campo de la humedad disponible es del 40%~80%,
cada pulsación de un botón adecuado reduce o incremen-
ta la humedad en 1%. La humedad elegida se visualizará
en la pantalla durante 8 segundos y seguidamente se verá
la información sobre el nivel real de humedad en el edicio.
Una vez alcanzado el nivel de humedad deseado, el com-
presor se apaga automáticamente.
***El lector indica la humedad en el campo de entre el
35%~95%, si el nivel de humedad en la habitación es in-
ferior al 35%, la pantalla muestra ”LO”, si el nivel de hu-
medad es mayor, del 95%, la pantalla indica ”HI”.
4. Pulsar nuevamente el botón “ON/OFF”, para encender
el aparato.
5. Si enciende el aparato por primera vez, o lo enciende
tras un apagado brusco e inesperado, el compresor se
pone en marcha, por el tema de la seguridad, una vez pa-
sados 3 segundos.
► DESCONGELACIÓN
El aparato tiene la función de descongelación con un gas
caliente. Tras 30 minutos de funcionamiento del aparato
éste verica automáticamente la temperatura del circuito
por el tema de la descongelación. Si la temperatura es
≤-1°C, el aparato pasa al modo de descongelación con un
gas caliente, en este caso se enciende el indicador de de-
scongelación. Durante el proceso de la descongelación el
compresor y el ventilador funcionan. Dicho proceso dura
5 minutos (cuando la temperatura en el circuito alcanza
10°C, el aparato apaga automáticamente el modo de de-
scongelación).
BG
CZ
DE
es
EE
ES
FI
FR
GB
HR
HU
IT
LT
LV
NL
NO
PL
RO
RU
SE
SI
SK
UA
SE
SI
SK
TR
UA
► MEMORIA
Una vez pulsado el botón Memoria se enciende la pantalla
de la memoria y el aparato memoriza las últimas program-
aciones.
► CONTADOR DE HORAS DE TRABAJO (FIG. 5)
1. Un contador especíco sirve para calcular el tiempo de
trabajo del aparato.
2. Un display de 7 dígitos hace el recuento hacia delante,
nunca realiza la cuenta hacia atrás.
►6. ELIMINACIÓN DEL AGUA ALMACENA-
DA
Cuando el aparato está colocado de forma incorrecta el
indicador del depósito lleno se enciende en rojo. En el mo-
mento del llenado del depósito de agua el compresor se
para y el indicador de llenado se enciende con la luz roja a
la vez que el aparato empieza a emitir un zumbido.
Para sacar el depósito de agua hay que levantarlo con cui-
dado hacia arriba evitando su inclinación. Una vez vaciado
hay que colocarlo en su sitio. Asegúrese de que el depósito
está colocado correctamente. En ese caso el indicador de
depósito lleno se apagará y podremos encender el aparato
(FIG. 6).
VACIADO CONTINUO
Durante el funcionamiento del dispositivo con el nivel de
humedad demasiado alto es necesario vaciar el agua más
a menudo. En ese caso es más cómodo adaptar el aparato
al vaciado continuo siguiendo estas pautas:
► Sacar el tapón y guardarlo para futuros usos.
► Fijar uno de los extremos del conducto de evacuación
del agua en el oricio de salida (FIG. 7), el otro extremo
hay que colocarlo en el conducto de evacuación.
►7. LIMPIEZA Y MANTENIMIENTO
Antes de empezar las labores de limpieza o mantenimien-
to hay que desconectar el aparato de la red eléctrica.
LIMPIEZA EXTERIOR
Usar un paño suave para limpiar el aparato.
Bajo ningún concepto use sprays, detergentes, gasolina,
ropa tratada con productos químicos u otras sustancias
limpiadoras. Cualquiera de las sustancias mencionadas
puede dañar la caja del aparato.
LIMPIEZA DEL FILTRO (FIG. 8)
► Sacar el ltro. Limpiarlo con cuidado utilizando la aspi-
radora. En el caso de que el ltro esté muy sucio utilizar el
agua caliente con poca cantidad de un detergente suave.
► Antes de volver a colocar el ltro hay que asegurarse
de que éste está completamente seco.
► No exponer el ltro a los rayos del sol.
ALMACENAMIENTO
Si el aparato no se utiliza durante una temporada se re-
comienda apagarlo. Se debe desenchufar el cable y lim-
piarlo:
► Es necesario vaciar completamente el depósito de
agua y secarlo.
► A continuación tapamos el aparato y lo guardamos en
un lugar donde no esté expuesto a rayos de sol.

BG
CZ
DE
es
EE
ES
FI
FR
GB
HR
HU
IT
LT
LV
NL
NO
PL
RO
RU
SE
SI
SK
UA
SE
SI
SK
TR
UA
►8. DIAGNOSTICAR LOS PROBLEMAS
EL APARATO NO ARRANCA:
► ¿El cable de alimentación está desenchufado?
► ¿La corriente eléctrica en casa está cortada?
► ¿La temperatura de la habitación es más baja que 5OC
o más alta que 35OC? Si es así la temperatura está fuera
de la temperatura de servicio.
► Asegurarse de que el humidostato (o el interruptor ON/
OFF) está encendido.
► Vericar si el depósito de agua está colocado correcta-
mente en el aparato y si está lleno.
► Asegurarse de que la salida y la entrada de aire no
están bloqueadas.
EL APARATO PARECE QUE NO FUNCIONA:
► ¿El ltro está sucio o con polvo?
► ¿La salida y la entrada de aire están bloqueadas?
► ¿La humedad del ambiente está ya demasiado baja?
EL APARATO PARECE QUE NO FUNCIONA
EFICAZMENTE:
► ¿Hay demasiadas puertas y ventanas abiertas?
► ¿Hay algo en la habitación que sube el nivel de hu-
medad?
EL APARATO ES DEMASIADO RUIDOSO:
► Vericar si el aparato está apoyado en una supercie
lisa.
EL APARATO PIERDE AGUA:
► Asegurarse de que el aparato está en buena condición
técnica.
► Si la opción de la salida continua de agua no está en
uso, hay que asegurarse de que el tapón de goma (que se
encuentra en la parte inferior del aparato) está en su sitio.
Códigos de errores en la pantalla
Código Causa Solución
E1 El sensor de temperatura
del ambiente (con la protec-
ción de resina) está abierto
o no funciona correctamen-
te debido a un cortocircuito.
Vericar si el sensor de
temperatura del ambiente
está conectado al circuito
impreso de forma correcta.
Cambiar el sensor de tem-
peratura del ambiente.
Cambiar el circuito impreso
principal.
El nivel de humedad del aire
está por debajo del 40% de
la humedad relativa.
E2 El sensor del circuito de
refrigeración (con la protec-
ción de cobre) está abierto
o no funciona correctamen-
te debido a un cortocircuito
Vericar si el sensor está
conectado al circuito imp-
reso de forma correcta.
Cambiar el sensor.
Cambiar el circuito impreso
principal.
E3 El cable del sensor de con-
trol de temperatura (TC)
está suelto o dañado.
El dispositivo emitirá un pi-
tido durante 3 segundos y
el mensaje E3 parpadeará
cada segundo.
El compresor y el motor del
ventilador dejarán de fun-
cionar
El sensor debe ser revisado
y reemplazado.
E5 Si la temperatura leída por
el sensor TC es de al me-
nos 130° C durante más de
5 segundos, el dispositivo
emitirá un pitido durante 3
segundos y el mensaje E5
parpadeará cada segundo.
El compresor y el motor del
ventilador dejan de funcio-
nar.
En esta situación, apague
el dispositivo y vuelva a
encenderlo con el botón
ON / OFF para vericar
si el mensaje E5 aún se
mostrará. Si el error persis-
te, signica que el sistema
del compresor no funciona
correctamente.
El sistema del compresor
debe ser vericado y la falla
recticada.
This manual suits for next models
1
Table of contents
Languages:
Other Master Dehumidifier manuals