Mesto FERROX PLUS Series Instruction Manual

TECH DATA SHEET 60143
10/03/17
Compression Sprayers
2
Ersatzteile Spare Parts Pièces de Rechange
Reserve-onderdelen Piezas de repuesto Pezzi di ricambio
FERROX PLUS 3565P
INOX PLUS 3595P
FERROX PLUS 3585P
INOX PLUS 3615P

2
3
11
22
33
44
55
6
6
6
66
6
6
4
4
10
10 11
4
7
7
9
7
FERROX PLUS 3565P
INOX PLUS 3595P
FERROX PLUS 3585P
INOX PLUS 3615P
1a 1b
2a 2b
3

3
4
15
12
12
99
14
2
8
2
11
13
17
1
1
8
16 16
18
16
16
13
2
4567
8 9 10
11 12 13 14

4
3
1a
1b
2
3
4
5
6
7
7
6
5
3
3
9
1
3
2
7
5
6
4
10
2
11
1
1 3
2
7
5
6
4
8
3
3
1a
1b
2
3
4
5
6
7
7
6
5
3
3
9
1
3
2
7
5
6
4
10
2
11
1
1 3
2
7
5
6
4
8
3
5
21
22
21
22
19
12
20
23
25
24 16 16
16
26
27
27
27
28
27
2
20
19
9
15 16 17 18
19 20 21 22
23 24
a
b
25

5
4
8
9
10
11
12
13
14
15
16
2
10
8
6
2
5
1
2
13
13
14
14
12b
12a
6
6
5
4
13
GB IRL AUS USA NZ CDN IND
Welcome and congratulations
for purchasing your new MESTO spraying device. Thank you for the trust you have shown
in our brand. Your satisfaction with MESTO products and services is very important for us.
Please contact us if your expectations are not met.
<RXZLOO¿QGRXUDGGUHVVRQWKHWLWOHSDJHRIWKHVHLQVWUXFWLRQVIRUXVH
Usage
Spraying devices FERROX PLUS 3565P, 3580P and INOX PLUS 3595P, 3615P are desig-
ned for the spraying of forming oils and low-viscosity mineral oils, slightly alkaline construc-
WLRQFKHPLFDOVS+ DVZHOODVSODQWSURWHFWLRQSURGXFWVLQFOXGLQJZHHGNLOOHUVLQWKH
stipulated concentrations. INOX PLUS 3595P, 3615P can also be used for solvent-free and
chloride-free, neutral cleaning agents as well as low-viscosity, solvent-free emulsion paints
and paints.
Observe the manufacturer’s instructions for using the product before each application. The
spraying devices must only be used outdoors or in well ventilated rooms only.
At the time of manufacture, there are no known harmful effects to the device caused by
SODQWSURWHFWLRQSURGXFWVDSSURYHGE\WKH%9/)HGHUDO2I¿FH
You should only use other products if harmful effects on the device and endangerment of
people and the environment can be excluded. Upon request, we will provide you with a list
of active ingredients used in the spraying device.
Not suitable for
• Combustible liquids
• Hydrogen peroxide and similar substances that give off oxygen
&RUURVLYHVXEVWDQFHVFHUWDLQGLVLQIHFWLQJDQGLPSUHJQDWLQJDJHQWVDFLGVDQGEDVHV
• Liquids containing ammonia
• Solvents and liquids containing solvents
9LVFRXVRUVWLFN\OLTXLGVRUOLTXLGVWKDWIRUPUHVLGXHVG\HVJUHDVHV
• Use in applications for foodstuffs.
Under no circumstances should you use
• external pressure sources without a MESTO compressed air valve
IRUÀDPLQJ
• for storing and holding liquids
• as an eyewash.
Safety
Make certain to read the instructions for use before using the device!
Keep the instructions for use in a safe place where they can be easily found.
Improper use may result in dangerous injuries and environmental damage.
Children and adolescents who have not been properly instructed must not use the
device.
Keep the spraying devices safe from access to children.
Take precautions to prevent hazardous substances from being misused.
Never spray on people, animals, electrical devices and lines, into the wind, or into
bodies of water.

6
14
5HSDLUVDQGPRGL¿FDWLRQVWRWKHWDQNDUHQRWSHUPLWWHG
The effect of the safety valve must not be bypassed or made inoperative.
Contact between spraying device materials and hydrogen peroxide or other agents
that give off oxygen may result in increased pressure similar in nature to an explo-
sion. Never place such agents in the device.
Have damaged parts or parts that do not work properly repaired immediately by our
customer service department or by service partners authorized by us.
Avoid ignition sources in the environment if you spray combustible liquids.
Do not allow the device to remain under pressure and/or exposed directly to
sunlight. Make certain the device is not heated beyond the maximum operating
temperature ĺ7DEOHEHORZ.
Never blow through the nozzles or valves with your mouth.
Use only MESTO spare and accessory parts.
We cannot assume any liability resulting from the use of third-party parts.
Wear suitable protective equipment when working with hazardous substances.
When pumping, always observe the pressure gauge to ensure the maximum spray-
ing pressure is not exceeded ĺ7DEOHEHORZ.
%HIRUH¿OOLQJDIWHUXVHDQGEHIRUHPDLQWHQDQFHZRUNDOORZWKHUHVLGXDOSUHVVXUHLQ
the tank to dissipate completelyĺ6HFWLRQ³$IWHU8VH³6HFWLRQ
Scope of delivery
Tank [1], with pump [2] and spare parts pouch [3], spray line [4], instructions for use [5],
FDUU\LQJVWUDS>@VSUD\ODQFH>@)LJXUHVDDQGE
<RXZLOO¿QGWKHLOOXVWUDWLRQVUHIHUUHGWRDERYHLQWKHIURQWIROGRXWSDJHV±RI
WKHVH,QVWUXFWLRQVIRU8VH
Technical data
Device family FERROX PLUS INOX PLUS
Type 3565P 3585P 3595P 3615P
0D[¿OOLQJDPRXQW 6 l 10 l 6 l 10 l
Total contents 9 l 13 l 9 l 13 l
Max. spraying pressure EDUSVL
Max. operating temperature &)
Weight when empty 4.7 kg 5.2 kg 4.2 kg 4.7 kg
Material of tank Steel with polyester coating Stainless steel
Where device is carried Shoulder Back Shoulder Back
Technical residual quantity 0.03 l
0D[YROXPHÀRZ 0.78 l/min
Recoil force < 5 N
Table 1
GB IRL AUS USA NZ CDN IND

7
15
GB IRL AUS USA NZ CDN IND
Assembly
)DVWHQWKHFDUU\LQJVWUDSV>@RQWKHWDQN>@)LJVDE
2. Screw the spray line [4] tightly into the outlet port [10]. )LJ.
Note the location of the spigot in order to be able to insert the lock.
3. Insert the lock [11]. )LJ.
Ź 7KHORFNFORVHVDQGWKHVSUD\OLQHLVVHFXUHGIURPXQVFUHZLQJRXWRIWKHWDQN
4. Screw the spray lance [7] onto the shut-off valve [9] )LJ.
Checks
Visual inspection:
Are the tank [1], pump [2], spray line [4] with shut-off valve [9], pressure gage [16] and
spray lance [7] undamaged? )LJV
3D\VSHFLDODWWHQWLRQWRWKHFRQQHFWLRQVEHWZHHQWKHWDQN±VSUD\OLQHDQGWKHVSUD\OLQH
±VKXWRIIYDOYHDQGWRWKHFRQGLWLRQRIWKHSXPSWKUHDGLQJDQGVSUD\OLQH
No leaks: Pump up the empty device to 2 bar.
Ź 7KHSUHVVXUHPXVWQRWGHFUHDVHPRUHWKDQEDUZLWKLQPLQXWHV
Function: Pull the red button on the safety valve [12]. )LJ.
Ź 7KHSUHVVXUHPXVWGLVVLSDWH
Activate the shut-off valve [9] )LJ
Ź 7KHVKXWRIIYDOYHPXVWRSHQDQGFORVH
Making preparations
Observe the instructions in the section entitled “Safety”.
All excess pressure must be released from the device.
1. Pull up the red button on the safety valve [12] until all excess pressure is released from
the tank. )LJ.
2. Press the pump handle [13] down and turn it counterclockwise.
Ź 7KHSXPSKDQGOHLVORFNHGLQSODFH)LJ.
3. Unscrew the pump [2] from the tank [1]. )LJ.
7RHQVXUHWKHSXPSUHPDLQVFOHDQGXULQJVWRUDJHZHUHFRPPHQG\RXDWWDFKWKH
SXPSWRWKHSXPSKROGHU>@)LJ
:HUHFRPPHQG\RXPL[WKHVSUD\LQJOLTXLGLQWKHGHYLFHRUSUHPL[LWLQDQH[WHUQDO
WDQN)LOOWRZLWKZDWHUSRXULQWKHVSUD\LQJDJHQWDQGWKHQDGGPRUHZDWHU
XQWLOIXOO
4. Add the spraying liquid to the tank [1] )LJ.
&KHFNWKH¿OOLQJKHLJKWWKURXJKWKHYLHZLQJJODVV>@RIWKHVKXWRIIYDOYH>@)LJ.
0RYHWKHVKXWRIIYDOYH>@RQWKHWDQN>@IURPWRSWRERWWRPVHYHUDOWLPHVZKLOH
SUHVVLQJWKHOHYHUWKHOHYHORIOLTXLGLQWKHKRVHOLQHDQGWDQNLVHTXDOL]HG7KH
OHYHORIOLTXLGYLVLEOHLQWKHYLHZLQJJODVV>@WKHQFRUUHVSRQGVWRWKH¿OOLQJKHLJKW
RIWKHWDQNZKLFKFDQEHUHDGRQWKHVFDOH>@)LJ
6. Screw the pump [2] into the tank [1]. )LJ.
7. Swivel in the pump holder [8]. )LJ.

8
16
GB IRL AUS USA NZ CDN IND
Ensure that the initial pressure is not higher than 15 bar.
Observe the instructions in the section entitled “Safety”.
Operate the device only while it is vertical or suspended upright and nearly vertical.
Avoid allowing drops of spray to drift onto areas that are not being treated.
Observe the instructions of the spray product manufacturer!
:LWKRXWFRPSUHVVHGDLU¿OOLQJYDOYH
8. Press the pump handle [13] down and turn it clockwise.
Ź 7KHSXPSKDQGOHLVXQORFNHG)LJ.
9. Generate the required pressure ĺ7DEOH in the tank [1] )LJ.
�7KHPD[LPXPSUHVVXUHVKRXOGQRWH[FHHGEDUUHGOLQHRQWKHSUHVVXUHJDXJH>@
)LJ,IWKHPD[LPXPSUHVVXUHLVH[FHHGHGWKHVDIHW\YDOYHZLOOHQJDJHDQG
UHOHDVHWKHH[FHVVSUHVVXUH
10.Press the pump handle [13] down and turn it counterclockwise.
Ź 7KHSXPSKDQGOHLVORFNHGLQSODFH)LJ.
:LWKFRPSUHVVHGDLU¿OOLQJYDOYHRSWLRQ
&RQQHFWWKHFRPSUHVVHGDLUKRVH>@WRWKHFRPSUHVVHGDLU¿OOLQJYDOYH>@)LJ.
Ź 3UHVVXUHLVEXLOWXSPD[EDUSVL
9. When the required pressure has built up ĺ7DEOH, remove the compressed-air hose
[17].
Spraying
1. Suspend the device from your shoulder or place it on your back. )LJDQGRU
� 7RSUHYHQWGULSSLQJKROGWKHVSUD\ODQFHXSZKHQ¿UVWVSUD\LQJDQGDFWLYDWHWKH
VKXWRIIYDOYHXQWLOQRPRUHOLTXLGPL[HGZLWKDLULVHPHUJLQJ
2. Activate the shut-off valve [9] )LJ.
Ź 6SUD\LQJPD\QRZEHJLQ
3. Make certain the optimum spraying pressure is set ĺ7DEOHon the pressure gauge
[16].
Spraying pressure Spraying rate with fan jet nozzle
EDUSVL 0.56 l/min
EDUSVL 0.64 l/min
EDUSVL 0.78 l/min
Table 2. Dependence: spraying rate and spraying pressure
,IWKHVSUD\LQJSUHVVXUHGHFUHDVHVPRUHWKDQEDUSVLIURPWKHRSWLPXPOHYHO
pump some more.
�
,IOLTXLGPL[HGZLWKDLUHPHUJHVIURPWKHQR]]OHWKHWDQNLVHPSW\

9
17
GB IRL AUS USA NZ CDN IND
After usage
Observe the instructions in the section entitled “Safety”.
8VHRQO\0(672VSDUHDQGDFFHVVRU\SDUWV\RXZLOO¿QGVRPHLQWKHVSDUHSDUWV
pouch [3], )LJDDQGE
Observe the legal requirements of your country for accident prevention and check
the device in regular intervals. If there are no special rules, we recommend you
have the device examined externally by a competent professional every 2 years
and subject it to an internal inspection every 5 years. We would be happy to provi-
de you with an inspection schedule in German or English.
Collect and dispose of the residual liquid according to all applicable laws, requirements
and regulations. Observe the instructions of the spray product manufacturer!
Clean the protective equipment and yourself every time after usage.
1. Pull up the red button on the safety valve [12] until all excess pressure is released from
the tank. ()LJ.
2. Lock the pump handle in place [13]. )LJ.
3. Unscrew the pump [2] from the tank [1]. )LJ.
4. In the case of plant protection products dilute the remaining quantity twice in a row with
1/2 liter of water each time and spray the resulting liquid onto the treated area.
5. Empty and rinse the device with clear water.
6. Wipe off the device with a moist cloth.
7. For drying and storing the device, keep the tank and pump separate in a dry place pro-
tected from sunlight and freezing temperatures.
Care and maintenance
After using the device 50 times or at least once a year:
• Disassemble the pump [2] and grease the diaphragm [20]. )LJ.
• Clean the nozzle [21] under running water. If required use a needle. )LJ
5HPRYHWKH¿OWHU>@IURPEHWZHHQWKHVKXWRIIYDOYH>@DQGVSUD\OLQH>@DQGFOHDQLW
under running water. )LJ.
• Grease the O-rings [19] and [24] )LJDQGRU
Faults
Fault Cause Remedy
No pressure builds up
in the device
The pump is not screwed on
tightly.
Screw the pump on tightly.
O-ring [19] on the pump is
faulty.
Replace the O-ring. )LJ.
Diaphragm [20] is defective. Replace the diaphragm. )LJ.

10
18
GB IRL AUS USA NZ CDN IND
&RQWDFWDGGUHVVIRUDGGLWLRQDOLQIRUPDWLRQĺVHHWLWOHSDJH.
Warranty
:HJXDUDQWHHWKDWIURPWKHWLPHLWLV¿UVWSXUFKDVHGIRUDSHULRGRIWKHOHJDOO\YDOLGUHTXLUHGZDUUDQW\
SHULRGPD[LPXP\HDUVWKLVGHYLFHZLOOQRWH[KLELWDQ\PDWHULDORUSURFHVVLQJHUURUV,IGHIHFWVDUH
discovered during the warranty period, MESTO or the distributor in your country will repair the device
ZLWKRXWFKDUJLQJIRUWKHODERURUPDWHULDORUDWWKHGLVFUHWLRQRI0(672UHSODFHWKHGHYLFHLWVHOIRULWV
defective parts.
If such defects are discovered, please contact us immediately. We require the invoice or cash register
receipt for purchase of the device.
7KHZDUUDQW\GRHVQRWLQFOXGHZHDULQJSDUWVVHDOV2ULQJVGLDSKUDJPHWFRUGHIHFWVZKLFKKDYH
occurred due to improper use or unforeseeable circumstances.
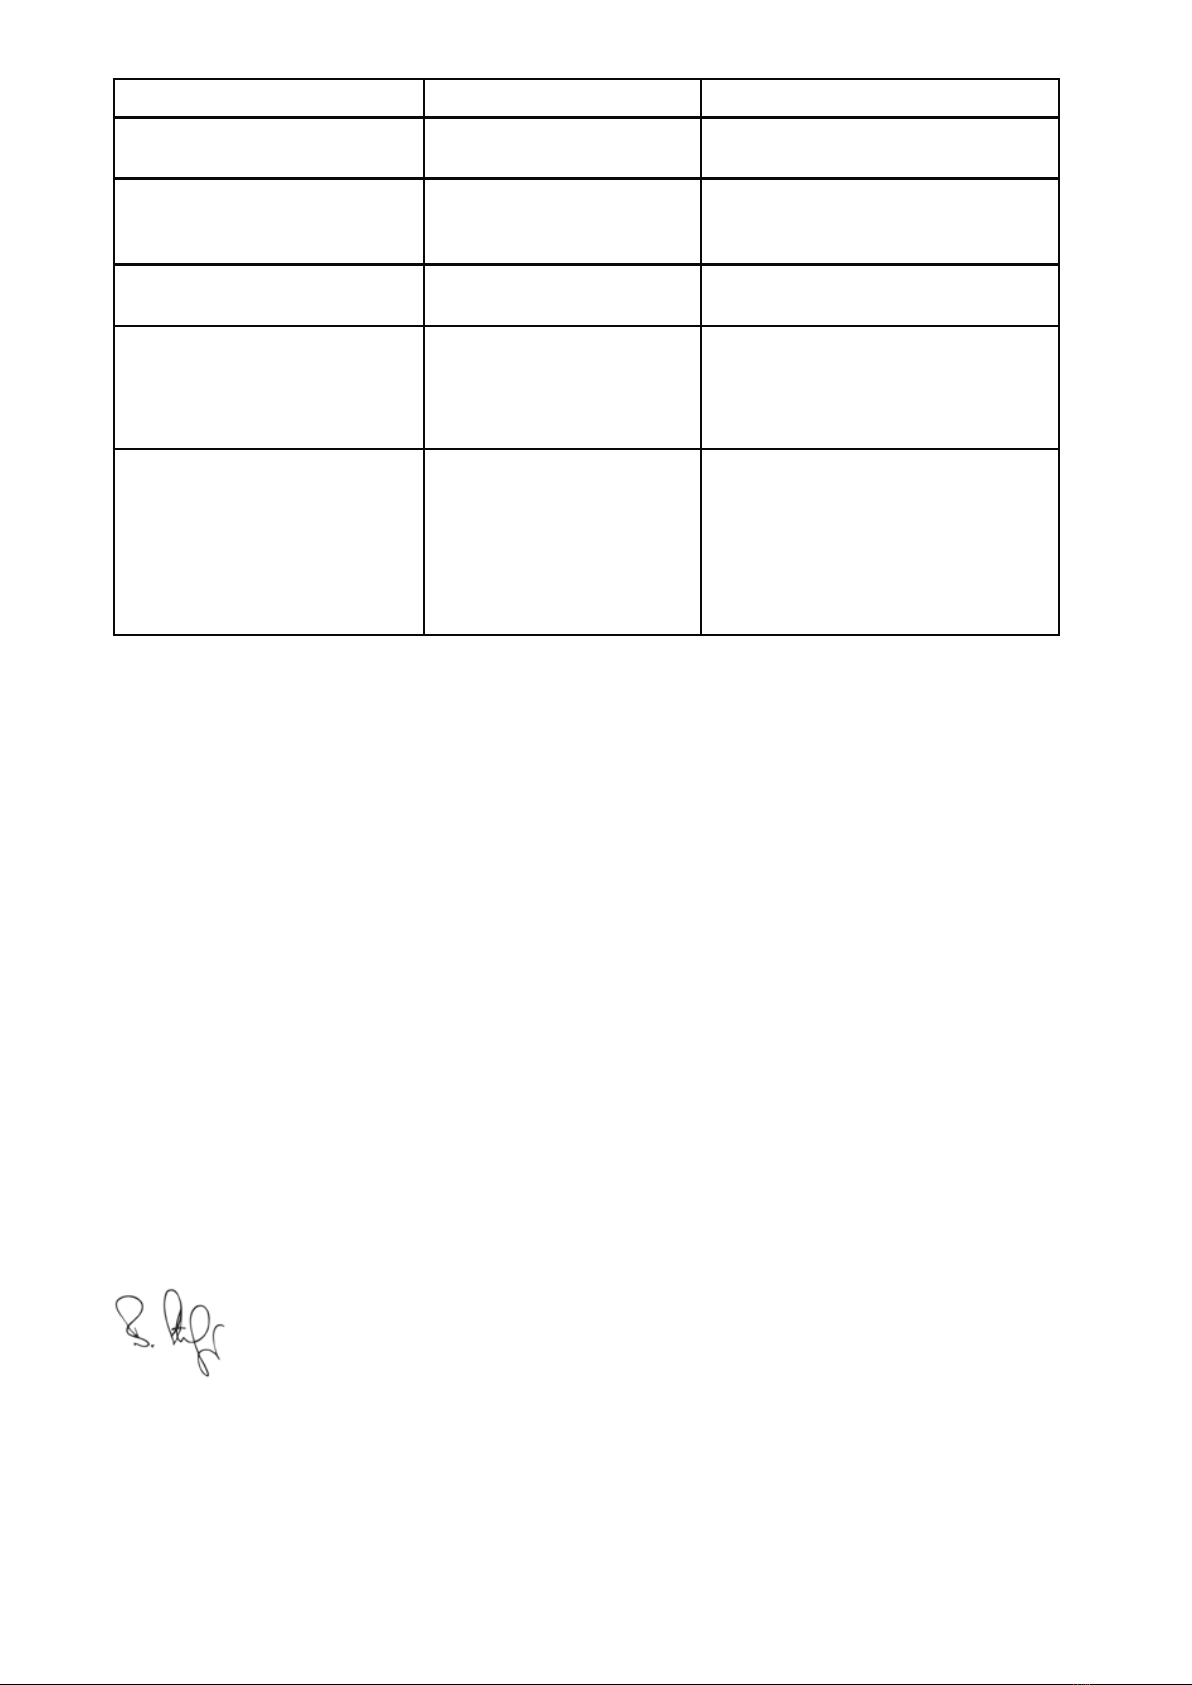
Fault Cause Remedy
/LTXLGÀRZVRXWRIWKHSXPS Valve disk [23] dirty of
defective.
Clean or replace the valve disk.
)LJ.
The nozzle does not spray
even though pressure is
present.
Filter [22] and / or nozzle
[21] blocked.
&OHDQWKH¿OWHURUDQGQR]]OH)LJ
.
Safety valves blows off too
early.
Safety valve [12] is defec-
tive.
5HSODFHVDIHW\YDOYH)LJ
The shut-off valve does not
close.
Liquid emerges without the
lever being activated.
O-ring [24] on the pressure
bolt not greased.
Defective pressure bolt [25]
or O-ring [24].
Grease the O-ring of the pressure
EROW)LJ5HSODFHWKHSUHVVXUH
bolt or O-ring. )LJ.
Pressure gage is not indicating
any tank pressure.
Pressure gage [16] defec-
tive.
Sever attachments (at top, at bottom,
RQULJKW>@)LJ Open panel
[27], unscrew pressure gage [16] with
wrench and replace. )LJ
,QVHUW¿[LQJNQRE>@IURPWKHVSDUH
SDUWVSRXFK>@SXVKWRWKHULJKWDQG
insert panel [27]. )LJ.
CE Declaration of Conformity
according to EC Machinery Directive 2006/42/EC, Appendix II, No. 1A.
We,
MESTO Spritzenfabrik Ernst Stockburger GmbH
Ludwigsburger Straße 71
D-71691 Freiberg
declare under our sole responsibility that the products high-pressure spraying devices of the series
3565, 3585, 3595, 3615 from factory number 1289536 in the version supplied comply with all relevant
provisions of the Directive 2006/42/EC. Furthermore, the device complies with the Directive 97/23/EC
for pressure equipment.
Rolf Rehkugler, Ludwigsburger Str. 71, D- 71691 Freiberg, is authorized to compile the technical
documentation.
Freiberg, 15.12.2011
Bernd Stockburger - Managing Director –
This manual suits for next models
5
Table of contents
Other Mesto Paint Sprayer manuals

Mesto
Mesto RS 120 User manual

Mesto
Mesto RESISTENT PLUS 3594 User manual

Mesto
Mesto RS 120 User manual

Mesto
Mesto PRIMER 3237P User manual

Mesto
Mesto FOAMER 3270FO User manual

Mesto
Mesto 3132GM User manual

Mesto
Mesto 3552A User manual

Mesto
Mesto FERROX PLUS 3565P User manual

Mesto
Mesto 3132GT User manual

Mesto
Mesto PROFI 3275 User manual

Mesto
Mesto REKORD 3533S User manual

Mesto
Mesto 3558 User manual

Mesto
Mesto CLEANER 3275PP User manual

Mesto
Mesto STABILUS 3541G User manual

Mesto
Mesto Herbi 3232 User manual

Mesto
Mesto 3555B User manual

Mesto
Mesto PRIMER 3237P User manual

Mesto
Mesto HERBI 3232U User manual

Mesto
Mesto 3270 Series User manual

Mesto
Mesto 3131 Instruction manual