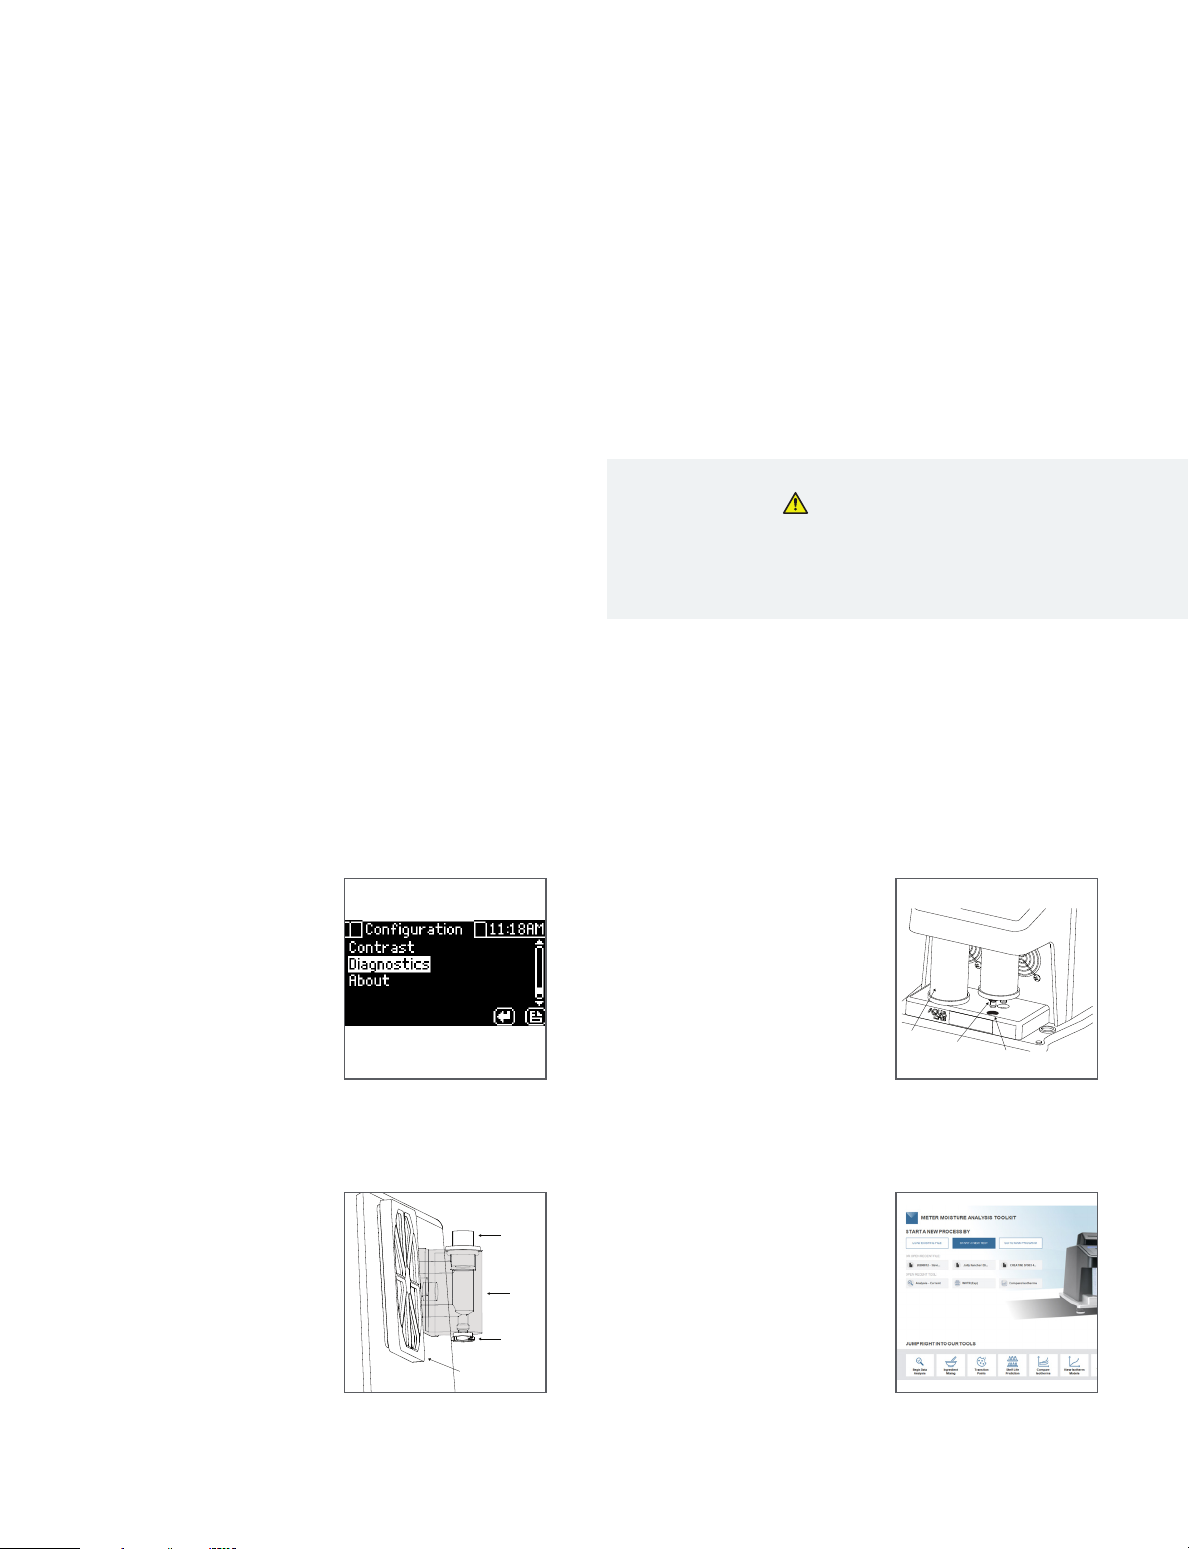
manuals.online logo
Brands
  1. Home
  2. •
  3. Brands
  4. •
  5. METER
  6. •
  7. Measuring Instrument
  8. •
  9. METER AQUALAB VSA User manual

METER AQUALAB VSA User manual

AQUALAB VSA®
VAPOR SORPTION ANALYZER
TEMPLATE USE INSTRUCTIONS
1. MODIFY COVER PAGE (bottom half of page 1)
a. Delete current image
b. Select Rectangle Frame (frame with X through it)
c. Place product image file
1. Select FILE > PLACE
2. Locate product image file
3. Select product image file to place it in Rectangle Frame.
NOTE: Product Image is created by Marketing
(Manu in Germany or Kristi in Pullman)
d. Update Product Name and Product Category
2. MODIFY EMAIL and PHONE # on BACK PAGE, if necessary (top half, page 2)
3. Edit Page 2, including updating the firmware and software numbers in the
ATTENTION box. Work with Product Owner to get correct information for all
sections.
4. EXPORT to PDF
a. Select FILE > EXPORT
b. Select METER QS PRINT
c. In PDF file, Rotate page 1 (cover & back pg) so the Cover page is on the
top half of the page, upside down and the back page is on the bottom
half of the page, right side up
Turn Template guides on/off in Layers window.
TEMPLATE SIZE and TRIM Information
Document size is 8.00” wide x 5.25” tall when folded.
Document size unfolded is 8.00” wide x 10.5” tall.
Most current template file located at https://drive.google.com/drive/u/1/
folders/1E_GxRGeCpiOxpYvXSqP4a4VwvgxES5v8 (date code is
10.8.2019 in file name).
When cutting, the Print shop should do the following:
1 Cut the left side (when looking at the document, side Logo is on) 8.25
inches from the RIGHT side.
2 Cut the right side (when looking at the document) 8 inches from the
LEFT side.
3 Score the sheet in the middle so Gray side and Front Page are equal in
size and no gray or blue shows where it shouldn’t.
4 With the document folded at score line, cut the bottom with gray side
face up, 5.25 inches from the folded edge.
SUPPORT
Have a question or problem? Our support team can help.
We manufacture, test, calibrate, and repair every instrument in house. Our scientists and
technicians use the instruments every day in our product testing lab. No matter what your
question is, we have someone who can help you answer it.
NORTH AMERICA
Email: support.food@metergroup.com
Phone: +1.509.332.5601
EUROPE
Email: support.europe@metergroup.com
Phone: +49 89 12 66 52 0
Water Tank
Fill Plug
Drain Plug
Fan Filter
3. Tank Fill Extension
Remove the black plug on the
clear plastic tank fill extension
located on the back right of the
VSA. Fill the tank with deionized
water until full. Hand tighten the
water fill plug.
NOTE: Do Not use a screwdriver
on the water fill plug.
1. Power Up and Leveling
Turn VSA on and allow it to warm
up for 2 h.
Navigate to the Diagnostics
screen in the Configuration
menu using UP and DOWN arrow
pushbuttons. Press the ENTER
pushbutton.
Scroll to the weight screen. Lightly
tap the table. Readings should
vary no more than 0.5 mg after
tapping. If so, the table is probably
too unstable for accurate readings.
Installation
AQUALAB VSA QUICK START
Software
Using the Moisture Analysis Toolkit (MAT) Installer executable
(*.exe) file (meter.ly/vsa-mat), open the MAT application and click
through the installation wizard to download the MAT software.
Please enter registration key exactly as shown (including dashes).
Be sure to keep registration key with the instrument. Each key can
be used multiple times. Refer to the AQUALAB VSA User Manual
for more detailed instructions.
Preparation
Inspect and verify that all AQUALAB Vapor Sorption Analyzer (VSA)
components arrived in good condition.
The VSA needs to be on a stable, level surface in order for the scale
to work properly. Locate an area where temperature and humidity
remain fairly constant so reading accuracy is not adversely affected.
Use the bubble level and adjustable feet on the VSA to verify the
instrument is level.
For more information, visit metergroup.com/vsa-support or
consult the AQUALAB VSA User Manual.All products have a 30-day
satisfaction guarantee.
Maintenance
Keep the AQUALAB VSA sample chamber clean to maintain the
accuracy of instrument readings. Refer to the AQUALAB VSA User
Manual for detailed cleaning instructions.
Desiccant
cartridge Black fitting
Black hole
2. Install Desiccant Tubes
Lift the tube into the area above
the desiccant receiver.
Install desiccant tubes by
orienting the black valve insert
into the black receiving hole.
NOTE: Use fingers to wet the
black valve insert with deionized
water before inserting into
receiving hole.
4. Connect and Begin Testing
Plug in USB cable to a computer,
open the MAT software, and
connect the device.VSA is now
ready to begin testing.
14510-00
10.2022
ATTENTION
Find a location where environmental temperature and humidity
remain fairly stable. Select a flat, level surface and use the
adjustable feet to level the instrument.
AQUALAB VSA®
VAPOR SORPTION ANALYZER
TEMPLATE USE INSTRUCTIONS
1. MODIFY COVER PAGE (bottom half of page 1)
a. Delete current image
b. Select Rectangle Frame (frame with X through it)
c. Place product image file
1. Select FILE > PLACE
2. Locate product image file
3. Select product image file to place it in Rectangle Frame.
NOTE: Product Image is created by Marketing
(Manu in Germany or Kristi in Pullman)
d. Update Product Name and Product Category
2. MODIFY EMAIL and PHONE # on BACK PAGE, if necessary (top half, page 2)
3. Edit Page 2, including updating the firmware and software numbers in the
ATTENTION box. Work with Product Owner to get correct information for all
sections.
4. EXPORT to PDF
a. Select FILE > EXPORT
b. Select METER QS PRINT
c. In PDF file, Rotate page 1 (cover & back pg) so the Cover page is on the
top half of the page, upside down and the back page is on the bottom
half of the page, right side up
Turn Template guides on/off in Layers window.
TEMPLATE SIZE and TRIM Information
Document size is 8.00” wide x 5.25” tall when folded.
Document size unfolded is 8.00” wide x 10.5” tall.
Most current template file located at https://drive.google.com/drive/u/1/
folders/1E_GxRGeCpiOxpYvXSqP4a4VwvgxES5v8 (date code is
10.8.2019 in file name).
When cutting, the Print shop should do the following:
1 Cut the left side (when looking at the document, side Logo is on) 8.25
inches from the RIGHT side.
2 Cut the right side (when looking at the document) 8 inches from the
LEFT side.
3 Score the sheet in the middle so Gray side and Front Page are equal in
size and no gray or blue shows where it shouldn’t.
4 With the document folded at score line, cut the bottom with gray side
face up, 5.25 inches from the folded edge.
SUPPORT
Have a question or problem? Our support team can help.
We manufacture, test, calibrate, and repair every instrument in house. Our scientists and
technicians use the instruments every day in our product testing lab. No matter what your
question is, we have someone who can help you answer it.
NORTH AMERICA
Email: support.food@metergroup.com
Phone: +1.509.332.5601
EUROPE
Email: support.europe@metergroup.com
Phone: +49 89 12 66 52 0

Other METER Measuring Instrument manuals

METER PROCHECK User manual

METER

METER PROCHECK User manual

METER SATURO User manual

METER

METER SATURO User manual

METER G3 User manual

METER

METER G3 User manual

METER ATMOS 22 User manual

METER

METER ATMOS 22 User manual

METER TEROS 11 User manual

METER

METER TEROS 11 User manual

METER AQUALAB TDL User manual

METER

METER AQUALAB TDL User manual

METER MW04 User manual

METER

METER MW04 User manual

METER VARIOS User manual

METER

METER VARIOS User manual

METER SATURO User manual

METER

METER SATURO User manual

METER AQUALAB PAWKIT User manual

METER

METER AQUALAB PAWKIT User manual

METER TEROS 06 User manual

METER

METER TEROS 06 User manual

METER THERMOLINK User manual

METER

METER THERMOLINK User manual

METER ROS 1 User manual

METER

METER ROS 1 User manual

METER AQUALAB User manual

METER

METER AQUALAB User manual

METER APOGEE SQ-521 User manual

METER

METER APOGEE SQ-521 User manual

METER APOGEE SU-221 User manual

METER

METER APOGEE SU-221 User manual

METER AQUALAB PAWKIT User manual

METER

METER AQUALAB PAWKIT User manual

METER TEROS 32 User manual

METER

METER TEROS 32 User manual

METER ACCUPAR LP-80 User manual

METER

METER ACCUPAR LP-80 User manual

METER WP4C User manual

METER

METER WP4C User manual

METER SC-1 User manual

METER

METER SC-1 User manual

METER ATMOS 22 User manual

METER

METER ATMOS 22 User manual

METER SI-400 Series User manual

METER

METER SI-400 Series User manual

METER AQUALAB 3 User manual

METER

METER AQUALAB 3 User manual

Popular Measuring Instrument manuals by other brands

ProMinent DULCOMETER D1C operating instructions

ProMinent

ProMinent DULCOMETER D1C operating instructions

Katronic KATflow 210 operating instructions

Katronic

Katronic KATflow 210 operating instructions

Kroeplin C - Series user manual

Kroeplin

Kroeplin C - Series user manual

Textron HDE Bradford White DDPM-40 Operating instructions manual

Textron

Textron HDE Bradford White DDPM-40 Operating instructions manual

CST/BERGER LD90 Original instructions

CST/BERGER

CST/BERGER LD90 Original instructions

PROMAT eti 810-140 operating instructions

PROMAT

PROMAT eti 810-140 operating instructions

DeFelsko PosiTector SPG Guide

DeFelsko

DeFelsko PosiTector SPG Guide

Pittsburgh 63613 Owner's manual & safety instructions

Pittsburgh

Pittsburgh 63613 Owner's manual & safety instructions

4tech MiniCom Guardian Quick start manual

4tech

4tech MiniCom Guardian Quick start manual

Oakton CON550 instruction manual

Oakton

Oakton CON550 instruction manual

Koganei FA Series instruction manual

Koganei

Koganei FA Series instruction manual

Siargo MF5000 Series user manual

Siargo

Siargo MF5000 Series user manual

LaMotte ColorQ DW manual

LaMotte

LaMotte ColorQ DW manual

Anritsu MS2024A/MS2026A user guide

Anritsu

Anritsu MS2024A/MS2026A user guide

Accusplit EAGLE AE190XLGM operating instructions

Accusplit

Accusplit EAGLE AE190XLGM operating instructions

Fluidwell E Series Tutorial

Fluidwell

Fluidwell E Series Tutorial

Coxmate SRT-std user manual

Coxmate

Coxmate SRT-std user manual

Amptec Research 620LK Installation, operation and maintenance manual

Amptec Research

Amptec Research 620LK Installation, operation and maintenance manual

manuals.online logo
manuals.online logoBrands
  • About & Mission
  • Contact us
  • Privacy Policy
  • Terms and Conditions

Copyright 2025 Manuals.Online. All Rights Reserved.