manuals.online logo
Brands
  1. Home
  2. •
  3. Brands
  4. •
  5. Mocka
  6. •
  7. Indoor Furnishing
  8. •
  9. Mocka Edmond Buffet User manual

Mocka Edmond Buffet User manual

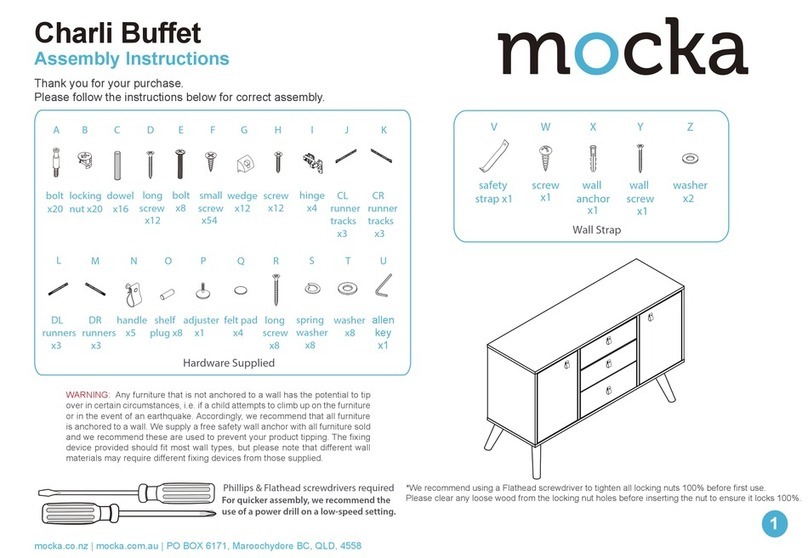
Edmond Buffet
Assembly Instructions
mocka.co.nz | mocka.com.au | PO BOX 6171, Maroochydore, QLD, 4558
1
Wall Strap
x4
washer
Z
Y
wall
anchor
x2
X
safety
strap x2
WV
screw
x2
wall
screw
x2
hinge
x4
WARNING: Any furniture that is not anchored to a wall has the potential to tip over in certain
circumstances, i.e. if a child attempts to climb up on the furniture or in the event of an earthquake.
Accordingly, we recommend that all furniture is anchored to a wall. We supply a free safety wall anchor
with all furniture sold and we recommend these are used to prevent your product tipping. The fixing device
provided should fit most wall types, but please note that different wall materials may require different fixing
devices from those supplied.
For quicker assembly, we recommend the
use of a power drill on a low-speed setting.
Phillips & Flathead screwdrivers
and hammer required
Thank you for your purchase. Please follow the instructions for correct assembly.
While we took great effort to ensure these assembly instructions were correct at
the time of printing, sometimes updates are required post production. For the
most up to date versions please refer to the product page on our website.
mocka.com.au/mocka.co.nz
Hardware Supplied
PR S
bolt
x20 x8
A B CD E FGHK
L M N
I
OTU
dowel
x16
screw
x30
slide
rail x3
slide
rail x3
slide
rail x3
slide
rail x3
Q
screw
x24
locking
nut x20
screw
x12
J
wedge screwbolt
x16
long
bolt
x8
long
screw
x8 x8
x4
bracket
x1
Allen
key
plastic
glide
V
x4
adjuster
x1
bolt
x2
x10
shelf
plug
Edmond Buffet
Assembly Instructions
mocka.co.nz | mocka.com.au | PO BOX 6171, Maroochydore, QLD, 4558
2
Panel Layout
Insert 8x bolts (C) into panel [1] and tighten with a screwdriver.
1
1
3
4
1
5
5
5
6
7
11
10
2
8
8
9
40
x4
41
30
31
32
33
35
x3
C
C
C
C
C
C
C
C
Edmond Buffet
Assembly Instructions
mocka.co.nz | mocka.com.au | PO BOX 6171, Maroochydore, QLD, 4558
3
2 3
7
3
6
7
1
4
4
Attach 3x slide rail (S) and 3x slide rail (T) to panels [7] and [4] as
shown and secure with 18x screws (E). Tighten with a screwdriver.
Attach panels [3], [4], [6] and panel [7] to panel [1] with 8x dowels (A) and
secure with 8x locking nuts (D). Tighten with a screwdriver.
E
E
EE
E
E
E
E
E
E
T
T
T
E
E
E
E
E
E
E
E
S
S
S
T
E
CR
S
CL
E
A
A
A
A
A
A
A
A
D
D
D
D
D
D
DA
D
Edmond Buffet
Assembly Instructions
mocka.co.nz | mocka.com.au | PO BOX 6171, Maroochydore, QLD, 4558
4
54
Attach panel [2] to the unit with 8x dowels (A) and secure with 8x long
screws (B). Tighten with a screwdriver.
3
3
6
6
2
Slide panels [5] down along the grooves between the panels [3], [4],
[6] and [7] to form the back of the unit as shown.
A
A
A
A
A
B
B
B
B
B
B
B
B
7
7
4
4
5
5
5
B
Edmond Buffet
Assembly Instructions
mocka.co.nz | mocka.com.au | PO BOX 6171, Maroochydore, QLD, 4558
5
6 7
40
front
back
G
G
J
J
G
L
K
L
F
F
F
F
G
G
G
G
F
F
F
FF
F
OO
OO
O
O
8
3
7
6
8
Attach 4x brackets (G) to legs [40] using 8x long bolts (J). Tighten with
an Allen key (L). Attach legs [40] and [9] to panel [2] using 16x bolt (F)
and 2x bolt (P) as shown. Tighten with an Allen key (L). Attach 4x plastic
glide (K) to the ends of the legs [40] using a hammer as shown. Attach
1x support leg [41] to panels [9] and [2] as shown. Attach 1x adjuster (N)
to the ends of the legs [41] as shown.
Insert 8x shelf plugs (O) into the unit at the desired height for the shelves
and rest the shelf panels [8] onto them. Ensure the shelves are balanced
and stable.
K
K
K
K
P
P
N
40
9
40
40
40
41
2
Edmond Buffet
mocka.co.nz | mocka.com.au | PO BOX 6171, Maroochydore, QLD, 4558
6
8 Door x2 9
Assembly Instructions
3
11
11
10
10
Q
Q
NOTE: If the doors are uneven or
there is a gap in the middle, loosen
or tighten the screw on the door
hinge until they are sitting flush.
QR
R
R
7
2
Attach 4x hinges (R) to panels [10] and [11] using 8x screws (Q),
Tighten with a screwdriver.
Attach 4x hinges (R) to panels [3] and [7] using 16x screws (Q). Tighten
with a screwdriver. Insert 2x shelf plugs (O) into panel [2].
QQ
R
R
R
R
R
QQ
QQ
QQ
QQ
O
O
Edmond Buffet
Assembly Instructions
mocka.co.nz | mocka.com.au | PO BOX 6171, Maroochydore, QLD, 4558
7
11 Drawer x310 Drawer x3
30
31
32
Insert 4x bolts (C) into panel [35]. Tighten with a screwdriver. Attach panels [30] and [31] to panel [32] secure with 4x screws (M). Tighten
with a screwdriver.
C
C
C
C
M
M
M
M
35
Edmond Buffet
Assembly Instructions
mocka.co.nz | mocka.com.au | PO BOX 6171, Maroochydore, QLD, 4558
8
13 Drawer x312 Drawer x3
30
30
31
31
35
Slide panel [33] down along the grooves between the panels [30]
and [31].
Attach panel [35] to panels [30] and [31] secure with 4x locking nuts (D).
Tighten with a screwdriver.
D
D
DD
33
Edmond Buffet
Assembly Instructions
mocka.co.nz | mocka.com.au | PO BOX 6171, Maroochydore, QLD, 4558
9
1514 Drawer x3
31
30
35
35
35
Attach slide rail (U) and slide rail (V) to the underside of the side
panels as shown. Secure with 4x screws (E) and tighten with a
screwdriver.
U
V
E
E
E
E
Insert the assembled drawers into the corresponding compartments as shown.
Ensure the drawers slide easily along the rails.
Edmond Buffet
Assembly Instructions
mocka.co.nz | mocka.com.au | PO BOX 6171, Maroochydore, QLD, 4558
10
1716
Attach 8x wedges (H) into the corners of the back of the unit and
secure with 8x screws (I). Tighten with a screwdriver. Attach 2x
safety straps (V) to the top of the back side of the unit as shown
using 2x washers (Z) and 2x screws (W). Tighten with a screwdriver.
I
H
I
H
I
H
I
H
I
H
I
H
I
H
I
H
V
Z
W
V
Z
W
V
Z
W
I
H
X
Y
Z
X
Y
Z
wall
anchor
screw
strap
washer
Once assembled lift furniture into place, do not drag. Use a drill to create a
small hole lining up with the top of the safety strap (V). Fasten to the wall
using 2x washer (Z), 2x wall anchor (X) and 2x wall screw (Y). Ensure unit
is balanced and steady before use.You’re done, enjoy!
Edmond Buffet
Assembly Instructions
mocka.co.nz | mocka.com.au | PO BOX 6171, Maroochydore, QLD, 4558
11
HOW TO ADJUST THE HINGES TO
ALIGN THE DOORS IF NEEDED.
Open the door.
1. 2. 3.
1. 2. 3.
1. 2. 3.
STEP 1
Adjust the door panelsupward or downward
STEP 2
Adjust the flush between door panel and side panel
STEP 3
Adjust the Gap beteen door
panel and side panel
STEP 4
Loosen this screw a bit. MOVE DOOR BACK OR
FORTH Re-tighten this screw.
Panel
Door
Unscrew 2 screws in round
holes loosen 2 screws in oval
holes a bit.
Tighten 2 screws in oval
holes. Screw in 2 screws in
round holes
MOVE DOOR UPWARD
OR DOWNWARD
MOVE DOOR OUTWARD
by turning this screw
counter-clockwise
KEEP DOOR IN RIGHT
POSITION MOVE DOOR OUTWARD
by turning this screw clockwise

Other Mocka Indoor Furnishing manuals

Mocka Malena User manual

Mocka

Mocka Malena User manual

Mocka Sadie Six Drawer User manual

Mocka

Mocka Sadie Six Drawer User manual

Mocka Hamptons User manual

Mocka

Mocka Hamptons User manual

Mocka Porto User manual

Mocka

Mocka Porto User manual

Mocka Scarborough Entertainment Unit User manual

Mocka

Mocka Scarborough Entertainment Unit User manual

Mocka Maya Desk User manual

Mocka

Mocka Maya Desk User manual

Mocka Brixton Bookcase User manual

Mocka

Mocka Brixton Bookcase User manual

Mocka Storage Box User manual

Mocka

Mocka Storage Box User manual

Mocka Mischa Coffee Table User manual

Mocka

Mocka Mischa Coffee Table User manual

Mocka Hamptons User manual

Mocka

Mocka Hamptons User manual

Mocka Oslo Buffet User manual

Mocka

Mocka Oslo Buffet User manual
Mocka Hamptons User manual

Mocka

Mocka Hamptons User manual

Mocka Theo User manual

Mocka

Mocka Theo User manual

Mocka Nava Four Drawer User manual

Mocka

Mocka Nava Four Drawer User manual

Mocka Aspiring User manual

Mocka

Mocka Aspiring User manual

Mocka Asta Luxe User manual

Mocka

Mocka Asta Luxe User manual

Mocka Detroit Trolley Shelf User manual

Mocka

Mocka Detroit Trolley Shelf User manual

Mocka Alps Two Door Cabinet User manual

Mocka

Mocka Alps Two Door Cabinet User manual

Mocka Jack Entertainment Unit User manual

Mocka

Mocka Jack Entertainment Unit User manual

Mocka Sadie User manual

Mocka

Mocka Sadie User manual

Mocka Orlando User manual

Mocka

Mocka Orlando User manual

Mocka Harlin Kids Bedside Table User manual

Mocka

Mocka Harlin Kids Bedside Table User manual

Mocka Boucle User manual

Mocka

Mocka Boucle User manual

Mocka Sonata User manual

Mocka

Mocka Sonata User manual

Popular Indoor Furnishing manuals by other brands

GoodHome atomia 5059340009148 installation instructions

GoodHome

GoodHome atomia 5059340009148 installation instructions

Blooma Apolima 3663602424147 manual

Blooma

Blooma Apolima 3663602424147 manual

HECOL Moveis HO-2946 Assembly instructions

HECOL Moveis

HECOL Moveis HO-2946 Assembly instructions

CALICO DESIGNS DEVONPORT 52001 Assembly instructions

CALICO DESIGNS

CALICO DESIGNS DEVONPORT 52001 Assembly instructions

Allen + Roth OPHELIA 60AL installation manual

Allen + Roth

Allen + Roth OPHELIA 60AL installation manual

Dorel DA7239 Instruction booklet

Dorel

Dorel DA7239 Instruction booklet

Seville Classics NSF WEB452 Assembly instructions

Seville Classics

Seville Classics NSF WEB452 Assembly instructions

modway EEI-3806 quick start guide

modway

modway EEI-3806 quick start guide

Balt 34419R 34450 Assembly instructions

Balt

Balt 34419R 34450 Assembly instructions

Alaterre Furniture TWIN TWIN AURORA Assembly instructions

Alaterre Furniture

Alaterre Furniture TWIN TWIN AURORA Assembly instructions

Turnstone Tour Counter Assembly manual

Turnstone

Turnstone Tour Counter Assembly manual

BUSH FURNITURE MY72701 user manual

BUSH FURNITURE

BUSH FURNITURE MY72701 user manual

Atlantic MISSION HEADBOARD Assembly instructions

Atlantic

Atlantic MISSION HEADBOARD Assembly instructions

Bell'O AVSC-2124 Assembly instructions

Bell'O

Bell'O AVSC-2124 Assembly instructions

VAS RTG40A1 Instruction booklet

VAS

VAS RTG40A1 Instruction booklet

AIS OXYGEN 120 Installation

AIS

AIS OXYGEN 120 Installation

Kimball Fluent Series Assembly instructions

Kimball

Kimball Fluent Series Assembly instructions

Ironwood WG32 manual

Ironwood

Ironwood WG32 manual

manuals.online logo
manuals.online logoBrands
  • About & Mission
  • Contact us
  • Privacy Policy
  • Terms and Conditions

Copyright 2025 Manuals.Online. All Rights Reserved.