manuals.online logo
Brands
  1. Home
  2. •
  3. Brands
  4. •
  5. Mocka
  6. •
  7. Indoor Furnishing
  8. •
  9. Mocka Hamptons Tallboy User manual

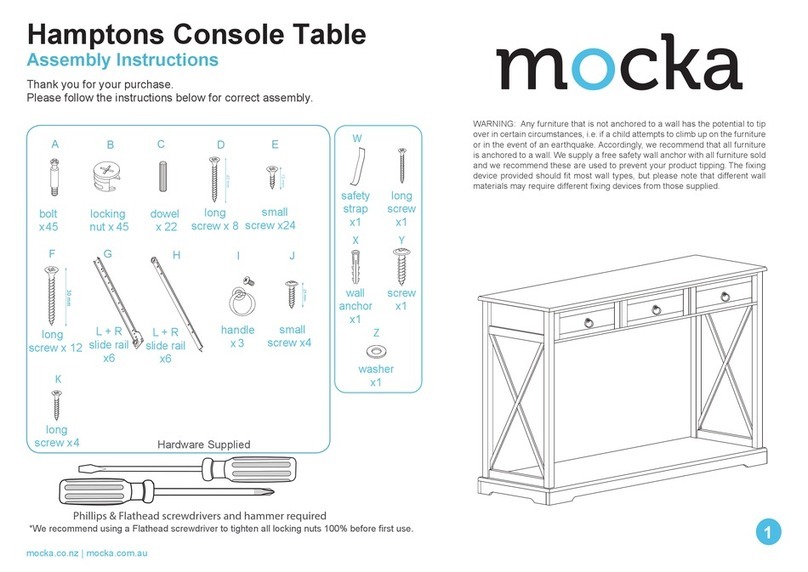
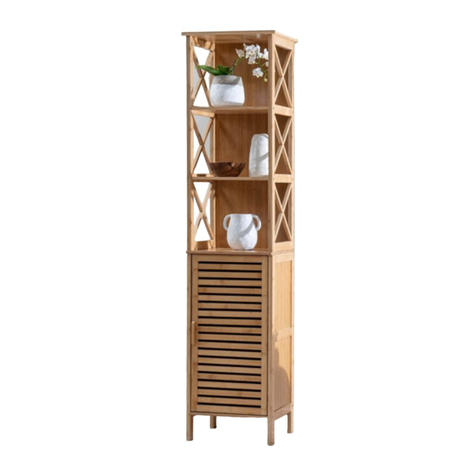
Mocka Hamptons Tallboy User manual

mocka.co.nz I mocka.com.au
ASSEMBLY INSTRUCTIONS
Hamptons Tallboy
Thank you for your purchase.
Please follow the instructions below for correct assembly.
A
51 x
bolt
B
51 x
locking
nut
C
27 x
dowel
W
1x
safety
strap
HARDWARE SUPPLIED
D
13 x
long
screw
E
50 x
small
screw
40 mm
12 mm
G
10 x
H
10 x
L+R
slide rail
J
10 x
wedge
1x
long
screw
XY
Z
1x
wall
anchor
1x
screw
1x
washer
L+R
slide rail
I
8 x
handle
K
F
23 x
long
screw
30 mm
25 mm
4 x
small
screw
*We recommend using a Flathead screwdriver to tighten all locking nuts 100% before first use.
Phillips & Flathead screwdrivers and hammer required
WARNING: Any furniture that is not anchored to a wall has the potential to
tip over in certain circumstances, i.e. if a child attempts to climb up on the
furniture or in the event of an earthpuake. Accordingly, we recommend that
all furniture is anchored to a wall. We supply a free safety wall anchor with
all furniture sold and we recommend these are used to prevent your product
tipping. The fixing device provided should fit most wall types, but please note
that dierent wall materials may require dierent fixing devices from those
supplied.
mocka.co.nz I mocka.com.au
ASSEMBLY INSTRUCTIONS
Hamptons Tallboy
1 2
Attach 4 x left slide rails (G) to panel [3] and secure with 12 x small screws (E).
Insert 3 x bolts (A) into panel [3]. Tighten with a screwdriver.
1
A
A
A
A
A
A
A
A
J
J
J
J
6
A
Insert 8 x bolts (A) into panel [1]. Attach panel [6] to panel [1] and
secure with 4 x screws (J). Tighten with a screwdriver.
G
G
G
G
G-GL
A
A
A
E
E
E
E
E
E
E
E
E
E
E
E
3
E
mocka.co.nz I mocka.com.au
ASSEMBLY INSTRUCTIONS
Hamptons Tallboy
3 4
Attach 1 x left slide rail (G) and 1 x right slide rail (G) to panel [5] and secure with
6 x small screws (E). Tighten with a screwdriver.
G
G
G
G
G-GR
4
E
E
E
E
E
E
E
E
E
E
E
E
A
A
A
E
Attach 4 x right slide rails (G) to panel [4] and secure with 12 x small screws (E).
Insert 3 x bolts (A) into panel [3]. Tighten with a screwdriver.
G-GR
G-GL
180o
5
5
E
E
E
E
E
E
E
E
mocka.co.nz I mocka.com.au
ASSEMBLY INSTRUCTIONS
Hamptons Tallboy
5 6
Insert 1 x dowel (C) into panel [5]. Attach panel [7] to panel [5] and
secure with 1 x long screw (D). Tighten with a screwdriver.
Insert 6 x dowels (C) to panels [7] and [8]. Attach panels [7] and [8] to panels
[3] and [4] and secure with 6 x locking nuts (B). Tighten with a screwdriver.
5
7
D
C
B
5
7
8
8
4
3
C
C
C
C
C
C
B
B
B
B
B
B
mocka.co.nz I mocka.com.au
ASSEMBLY INSTRUCTIONS
Hamptons Tallboy
7
8
Attach 10 x bolts (A) into panel [2]. Tighten with a screwdriver.
A
2
A
A
A
A
A
A
A
A
A
A
D
D
D
D
C
C
C
C
2
4
5
3
Insert 4 x dowels (C) into panels [3] and [4]. Attach panel [2] to panels
[3] and [4], securing with 4 x long screws (D).
mocka.co.nz I mocka.com.au
ASSEMBLY INSTRUCTIONS
Hamptons Tallboy
910
B
2
4
5
3
9
DD
W
D
D
Y
20
20
21
21
C
A
C
A
B
B
B
B
A
A
C
C
Attach 4 x bolts (A) into panels [21]. Insert 4 x dowels (C) to panels [20],
Attach panels [20] to panels [21]. Insert 4 x locking nuts (B) into panels
[20]. Tighten with a screwdriver.
Attach panel [9] to panels [2] and [5], securing with 4 x long screws (D).
Attach 1 x wall strap (W) to panel [9] using 1 x screw (Y). Tighten with a
screwdriver.
mocka.co.nz I mocka.com.au
ASSEMBLY INSTRUCTIONS
Hamptons Tallboy
11 12
Insert 6 x dowels (C) into panels [21]. Attach panels [20] and [21] to panel
[2] and secure with 10 x locking nuts (B). Tighten with a screwdriver.
Attach panel [7] to panel [19], securing with 4 x long screws (D). Tighten
with a screwdriver.
2
C
C
C
C
C
C
20
21
3
7
4
19
DD
DD
B
B
B
B
B
B
mocka.co.nz I mocka.com.au
ASSEMBLY INSTRUCTIONS
Hamptons Tallboy
13 14
Slide panels [18] between the grooves on panels [3], [4] and [9] to
form the back of the unit as shown.
Insert 6 x dowels (C) into panels [3] and [4]. Attach panel [1] to panels [3] and
[4], [9] and secure with 8 x locking nuts (B). Tighten with a screwdriver.
18
18
9
4
3
1
4
3
5
CCC
C
C
CC
B
B
BB
B
B
B
B
Small Drawers x 2
mocka.co.nz I mocka.com.au
ASSEMBLY INSTRUCTIONS
Hamptons Tallboy
15 16
Insert 8 x bolts (A) into panels [10]. Attach panels [12] and [13] to panel
[10] and secure with 8 x locking nuts (B). Tighten with a screwdriver.
A
13
12
10
B
B
B
B
A
A
A
A
Small Drawers x 2
13
16
12
Slide panels [16] between the grooves on panels [12] and [13] to form
the base of the drawer as shown.
mocka.co.nz I mocka.com.au
ASSEMBLY INSTRUCTIONS
Hamptons Tallboy
17 18
Attach panels [17] to panels [12] and [13], secure with 8 x medium
screws (F). Tighten with a screwdriver.
Small Drawers x 2 Small Drawers x 2
16
13
12
17 F
F
F
F
13
E
E
H
10
12
H
E
E
Attach 4 x slide rails (H) to panels [12] and [13] and secure with 8 x small
screws (E). Attach 2 x Handles and screws (I) into panels [10]. Tighten
with a screwdriver.
mocka.co.nz I mocka.com.au
ASSEMBLY INSTRUCTIONS
Hamptons Tallboy
19 20
Insert 15 xbolts (A) into panels [11]. Attach panels [12] and [13] to panels
[11], secure with 12 x locking nuts (B). Tighten with a screwdriver.
Large Drawers x 3 Large Drawers x 3
11
B
B
B
B
A
A
A
A
13
12
13 11
12
15
14
B
Slide panels [14] between the grooves on panels [12] and [13] to form the
base of the drawer as shown. Attach panels [15] to panels [11] and secure
with 3 x locking nuts (B).
A
mocka.co.nz I mocka.com.au
ASSEMBLY INSTRUCTIONS
Hamptons Tallboy
21 22
Attach panels [18] to panels [12], [13] and [15], secure with 15 x medium
screws (F). Tighten with a screwdriver.
Attach 6 x slide rails (H) to panels [12] and [13] and secure with 12 x small
screws (E). Attach 6 x handles and screws (I) into panels [11]. Tighten woth
a screwdriver.
Large Drawers x 3 Large Drawers x 3
F
F
F
F
15
12
18
13
F
14 E
E
E
E
I
I
12
11
13
H
H
mocka.co.nz I mocka.com.au
ASSEMBLY INSTRUCTIONS
Hamptons Tallboy
23 24
Attach 10 x wedges (K) to panels [18]. Tighten with a screwdriver.
Once assembled lift furniture into place, do not drag. Use a drill to create a
small hole lining up with the top of the safety stap (W). Fasten to wall using
wall anchor (X), washer (Z) and screw. Ensure the unit is balaced and steady
before use. You’re done, enjoy!
Strap
Washer
Wall
anchor
Wall
screw
X
Z
Wall
screw
K
K
K
K
K
K
K
K
K
K
K
K
18
18

Other manuals for Hamptons Tallboy

1

Other Mocka Indoor Furnishing manuals

Mocka Zara User manual

Mocka

Mocka Zara User manual

Mocka Sadie User manual

Mocka

Mocka Sadie User manual

Mocka Hamptons Buffet User manual

Mocka

Mocka Hamptons Buffet User manual

Mocka Dakota Coffee Table User manual

Mocka

Mocka Dakota Coffee Table User manual

Mocka Lewis User manual

Mocka

Mocka Lewis User manual

Mocka Hatcher Desk User manual

Mocka

Mocka Hatcher Desk User manual

Mocka Scarborough User manual

Mocka

Mocka Scarborough User manual

Mocka Canyon User manual

Mocka

Mocka Canyon User manual

Mocka Eclipse Coffee Table User manual

Mocka

Mocka Eclipse Coffee Table User manual

Mocka Aspen User manual

Mocka

Mocka Aspen User manual

Mocka Mischa User manual

Mocka

Mocka Mischa User manual

Mocka Brooklyn Change Table and Drawer Set User manual

Mocka

Mocka Brooklyn Change Table and Drawer Set User manual

Mocka Hobart Bedside Table User manual

Mocka

Mocka Hobart Bedside Table User manual

Mocka Asha Coffee Table User manual

Mocka

Mocka Asha Coffee Table User manual

Mocka Nyla Six Drawer User manual

Mocka

Mocka Nyla Six Drawer User manual

Mocka Six Cube User manual

Mocka

Mocka Six Cube User manual

Mocka Eliza Six Drawer User manual

Mocka

Mocka Eliza Six Drawer User manual

Mocka Zander User manual

Mocka

Mocka Zander User manual

Mocka Edmond User manual

Mocka

Mocka Edmond User manual

Mocka Eclipse Buffet User manual

Mocka

Mocka Eclipse Buffet User manual

Mocka Hobart Storage Cot User manual

Mocka

Mocka Hobart Storage Cot User manual
Mocka Zander Round Side Table User manual

Mocka

Mocka Zander Round Side Table User manual

Mocka Nine Cube User manual

Mocka

Mocka Nine Cube User manual

Mocka Genevieve User manual

Mocka

Mocka Genevieve User manual

Popular Indoor Furnishing manuals by other brands

Clou match me CL/07.56.151.65 installation instructions

Clou

Clou match me CL/07.56.151.65 installation instructions

SEI BC304400TX-COUNTRY OAK Assembly instruction

SEI

SEI BC304400TX-COUNTRY OAK Assembly instruction

Forever Redwood REDWOOD ADIRONDACK CHAIR Assembly instructions

Forever Redwood

Forever Redwood REDWOOD ADIRONDACK CHAIR Assembly instructions

Core Products CPT510 Instruction leaflet

Core Products

Core Products CPT510 Instruction leaflet

Crate&Barrel Harrison manual

Crate&Barrel

Crate&Barrel Harrison manual

modway MOD-6282 quick start guide

modway

modway MOD-6282 quick start guide

Speaka Professional 1890514 quick start guide

Speaka Professional

Speaka Professional 1890514 quick start guide

Hesperide ALLURE 139072 Assembly instructions

Hesperide

Hesperide ALLURE 139072 Assembly instructions

Vivo DESK-SHELF55A instruction manual

Vivo

Vivo DESK-SHELF55A instruction manual

WorkPro 3325882 quick start guide

WorkPro

WorkPro 3325882 quick start guide

Sonoma 71SRRCU13 Assembly instructions

Sonoma

Sonoma 71SRRCU13 Assembly instructions

KASHMIR KSMT231 Assembling Instruction

KASHMIR

KASHMIR KSMT231 Assembling Instruction

Hussmann Smart Exchange Installation & operation manual

Hussmann

Hussmann Smart Exchange Installation & operation manual

supremo LEISURE Barcelona Rectangular Table Product Assembly

supremo LEISURE

supremo LEISURE Barcelona Rectangular Table Product Assembly

Kangaroo Kabinets Aussie II K8605 Assembly instructions

Kangaroo Kabinets

Kangaroo Kabinets Aussie II K8605 Assembly instructions

GreenForest CLIVIA-JB Assembly instruction

GreenForest

GreenForest CLIVIA-JB Assembly instruction

George & Willy FELT BOARD manual

George & Willy

George & Willy FELT BOARD manual

HOM'IN POOLE ENJV721 Assembling Instruction

HOM'IN

HOM'IN POOLE ENJV721 Assembling Instruction

manuals.online logo
manuals.online logoBrands
  • About & Mission
  • Contact us
  • Privacy Policy
  • Terms and Conditions

Copyright 2025 Manuals.Online. All Rights Reserved.