manuals.online logo
Brands
  1. Home
  2. •
  3. Brands
  4. •
  5. Mocka
  6. •
  7. Indoor Furnishing
  8. •
  9. Mocka Jolt Tallboy User manual

Mocka Jolt Tallboy User manual

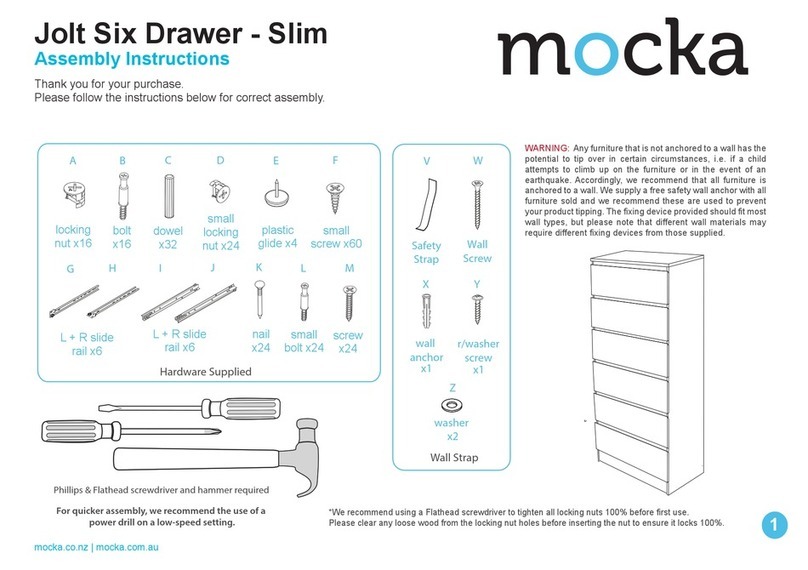
*We recommend using a Flathead screwdriver to tighten all locking nuts 100% before first use.
Please clear any loose wood from the locking nut holes before inserting the nut to ensure it locks 100%.
Hardware Supplied
x12
B
A
x17
CD
GH I
x12
x33
x17
x34
x60
12 mm
L + R L + R
bolt
locking nut
dowel
long screw
small screw
30 mm
FE
x28
x28
small bolt
small
locking nut
x4
plastic glides
J
W
safety strap
x1
x22
small nail
K
x2
washer
Z
x1
screw
r/washer
screw
x1
Y
wall
anchor
x1
X
Wall Strap
WARNING: Any furniture that is not anchored to a wall has the
potential to tip over in certain circumstances, i.e. if a child
attempts to climb up on the furniture or in the event of an
earthquake. Accordingly, we recommend that all furniture is
anchored to a wall. We supply a free safety wall anchor with all
furniture sold and we recommend these are used to prevent
your product tipping. The fixing device provided should fit most
wall types, but please note that different wall materials may
require different fixing devices from those supplied.
Phillips & Flathead screwdriver and hammer required
Jolt Tallboy
ASSEMBLY INSTRUCTIONS
1
mocka.co.nz | mocka.com.au
Thank you for your purchase.
Please follow the instructions below for correct assembly.
1 2
Screw bolt (A) into hole in part [6]. Slot together with part [4]
using 1x locking nut (B) and tighten with a screwdriver.Attach
part [9] using 1x screw (D) as shown.
To begin assembly attach 5x slide rails (H) in place on each
of the panels [2] and [3] and to both sides of panel [4] using
3x small screws (G) in each rail bracket. Fasten all screws.
G
H
3
G
G
H
G
G
H
G
2
H
G
G
H
G
G
H
G
G
A
BD
49
6
G
H
G
H
G
G
G
H
G
H
G
G
B
x1
x1
A
G
G
G
G
G
G
G
G
G
G
x36
G
G
H
G
4
G
G
H
G
4
G
G
Jolt Tallboy
ASSEMBLY INSTRUCTIONS
2
mocka.co.nz | mocka.com.au
1 2
Screw bolt (A) into hole in part [6]. Slot together with part [4]
using 1x locking nut (B) and tighten with a screwdriver.Attach
part [9] using 1x screw (D) as shown.
To begin assembly attach 5x slide rails (H) in place on each
of the panels [2] and [3] and to both sides of panel [4] using
3x small screws (G) in each rail bracket. Fasten all screws.
G
H
3
G
G
H
G
G
H
G
2
H
G
G
H
G
G
H
G
G
A
BD
49
6
G
H
G
H
G
G
G
H
G
H
G
G
B
x1
x1
A
G
G
G
G
G
G
G
G
G
G
x36
G
G
H
G
4
G
G
H
G
4
G
G
B
x10
C
x10
A
A
C
A
C
C
C
C
C
A
C
A
C
C
A
9
5
5
7
8
10
B
B
B
B
B
B
B
B
5
6
2
3
C
C
C
C
C
C
A
C
A
C
C
C
A
C
B
B
3
Screw bolts (A) and insert dowels (C) into corresponding
holes in panels [2] and [3]. Slot together with parts [5],
[6], [7], [8], [9], and [10]. Place 10x locking nuts (B) into
holes in connecting parts and tighten with a screwdriver.
Jolt Tallboy
ASSEMBLY INSTRUCTIONS
3
mocka.co.nz | mocka.com.au
4 5
Insert 4x bolts (A) and 6x dowels (C) into top panel [1].
Slot together with the rest of the cabinet. Place 4x locking
nuts (B) into top holes and tighten with screwdriver.
Connect back panels [11] together with the connector stick
[12]. Attach both panels to the cabinet using 22x nails (K) along the
sides with a hammer. Hammer 4x plastic glides (J) into the base.
11
11
12 connector
K
K
K
K
J
J
x4
C
A
x4
B
AC
A
C
A
C
B
B
1
A
C
CK
K
KK
K
K
K
K
K
K
K
K
Jolt Tallboy
ASSEMBLY INSTRUCTIONS
4
mocka.co.nz | mocka.com.au
Jolt Wardrobe
ASSEMBLY INSTRUCTIONS
5
mocka.co.nz | mocka.com.au
4 5
Insert 4x bolts (A) and 6x dowels (C) into top panel [1].
Slot together with the rest of the cabinet. Place 4x locking
nuts (B) into top holes and tighten with screwdriver.
Connect back panels [11] together with the connector stick
[12]. Attach both panels to the cabinet using 22x nails (K) along the
sides with a hammer. Hammer 4x plastic glides (J) into the base.
11
11
12 connector
K
K
K
K
J
J
x4
C
A
x4
B
AC
A
C
A
C
B
B
1
A
C
CK
K
KK
K
K
K
K
K
K
K
K
67
Small Drawers (x2) Small Drawers (x2)
Slide the base panel [17] into place in the grooves in
side and front panels.
Assemble the drawers by screwing 4x bolts (E) into the front panel
[13]/[14].Attach to side panels [15] and [16] using 4x locking nuts (F).
F
E
F
E
E
E
F
17
13 / 14
16
F
x4
15
Jolt Tallboy
ASSEMBLY INSTRUCTIONS
5
mocka.co.nz | mocka.com.au
89
Small Drawers (x2) Small Drawers (x2)
Flip drawer over and attach 2x rail components (I) to both
left and right underside of the drawer using 4x screws (G).
Repeat Steps 5 to 8 to assemble the second drawer.
Fasten back panel [18] into place using 4x long screws (D)
in the holes in the side panels.
18
D
D
D
D
G
G
G
G
Jolt Tallboy
ASSEMBLY INSTRUCTIONS
6
mocka.co.nz | mocka.com.au
89
Small Drawers (x2) Small Drawers (x2)
Flip drawer over and attach 2x rail components (I) to both
left and right underside of the drawer using 4x screws (G).
Repeat Steps 5 to 8 to assemble the second drawer.
Fasten back panel [18] into place using 4x long screws (D)
in the holes in the side panels.
18
D
D
D
D
G
G
G
G
10 11
Large Drawers (x4) Large Drawers (x4)
Assemble the drawers by screwing 4x bolts (E) into the front
panel [19]. Attach to side panels [15] and [16] using 4x locking
nuts (F).Attach support [22] with one dowel (C) and a bolt (E) to
the front panel [19], and secure with locking nut (F).
Slide the base panel [20] into place in the grooves in
side and front panels.
20
E
F
E
F
F
x4
F
22
19
16
15
C
E
E
E
F
Jolt Tallboy
ASSEMBLY INSTRUCTIONS
7
mocka.co.nz | mocka.com.au
12 13
Flip drawer over and attach 2x rail components (I) to both
left and right underside of the drawer using 4x screws (G).
Attach to support [22] using 2x long screws (D). Repeat
Steps 5 to 8 to assemble the remaining drawers.
Large Drawers (x4) Large Drawers (x4)
Fasten back panel [21] into place using 4x long screws (D)
in the holes in the side panels.
D
D
21
D
D
G
G
G
G
Dx2
22
Jolt Tallboy
ASSEMBLY INSTRUCTIONS
8
mocka.co.nz | mocka.com.au
12 13
Flip drawer over and attach 2x rail components (I) to both
left and right underside of the drawer using 4x screws (G).
Attach to support [22] using 2x long screws (D). Repeat
Steps 5 to 8 to assemble the remaining drawers.
Large Drawers (x4) Large Drawers (x4)
Fasten back panel [21] into place using 4x long screws (D)
in the holes in the side panels.
D
D
21
D
D
G
G
G
G
Dx2
22
14 15
Ensure all drawers easily slide open and
closed.
Slide all completed drawers into place on the rails
in the cabinet. When placing the top two drawers in place, ensure the
panel [13] drawer front is on the left side and the panel [14] drawer front is
on the right.
13
14
Jolt Tallboy
ASSEMBLY INSTRUCTIONS
9
mocka.co.nz | mocka.com.au
Y
W
x1
Y
W
WZ
X
wall
screw
x1
wall
anchor
wall
screw
16 17
Attach the safety strap (W) to the top of the back side of the Mocka
Set using screw (Y) and washer (Z). Tighten with a screwdriver. Once
assembled lift furniture into place, do not drag.
Move Mocka Set into desired location up against wall. Use a drill
to create a small hole lining up with the top of the safety strap (W).
Fasten to wall using wall anchor (X), washer (Z) and screw.
Ensure the Set is balanced and steady before use. You’re done, enjoy!
Washer
Strap
Z
Z
Safety
Strap
Jolt Tallboy
ASSEMBLY INSTRUCTIONS
10
mocka.co.nz | mocka.com.au

Other Mocka Indoor Furnishing manuals

Mocka Hamptons User manual

Mocka

Mocka Hamptons User manual

Mocka Addi User manual

Mocka

Mocka Addi User manual

Mocka Watson Entertainment Unit User manual

Mocka

Mocka Watson Entertainment Unit User manual

Mocka Eight Cube User manual

Mocka

Mocka Eight Cube User manual

Mocka Aspen User manual

Mocka

Mocka Aspen User manual

Mocka Zack User manual

Mocka

Mocka Zack User manual

Mocka Easton User manual

Mocka

Mocka Easton User manual

Mocka Brixton User manual

Mocka

Mocka Brixton User manual

Mocka Dakota Console Table User manual

Mocka

Mocka Dakota Console Table User manual

Mocka Kids House Bookcase User manual

Mocka

Mocka Kids House Bookcase User manual

Mocka Eve User manual

Mocka

Mocka Eve User manual

Mocka Zara User manual

Mocka

Mocka Zara User manual

Mocka Nava Three Drawer User manual

Mocka

Mocka Nava Three Drawer User manual

Mocka Amalfi Cot User manual

Mocka

Mocka Amalfi Cot User manual

Mocka Inca Four Drawer User manual

Mocka

Mocka Inca Four Drawer User manual

Mocka Hamptons User manual

Mocka

Mocka Hamptons User manual

Mocka Eliza Six Drawer User manual

Mocka

Mocka Eliza Six Drawer User manual

Mocka Savannah Side Table User manual

Mocka

Mocka Savannah Side Table User manual

Mocka Bronte Console Table User manual

Mocka

Mocka Bronte Console Table User manual

Mocka Sonata Bed Queen User manual

Mocka

Mocka Sonata Bed Queen User manual

Mocka Chelsea Buffet Three Door User manual

Mocka

Mocka Chelsea Buffet Three Door User manual

Mocka Hamptons Desk User manual

Mocka

Mocka Hamptons Desk User manual

Mocka Edmond User manual

Mocka

Mocka Edmond User manual

Mocka Asha Four Drawer User manual

Mocka

Mocka Asha Four Drawer User manual

Popular Indoor Furnishing manuals by other brands

Sony SU-AR34G instructions

Sony

Sony SU-AR34G instructions

Winners Only T2-VT100C G Series Aassembly Instructions

Winners Only

Winners Only T2-VT100C G Series Aassembly Instructions

Kallista P34500 installation instructions

Kallista

Kallista P34500 installation instructions

Focal Locus Assembly

Focal

Focal Locus Assembly

PowellKids 374-106 Assembly instructions

PowellKids

PowellKids 374-106 Assembly instructions

Alno Carousel 80 x 80 / 90 x 90 Fitting manual

Alno

Alno Carousel 80 x 80 / 90 x 90 Fitting manual

Furniture of America CM2667 Assembly instructions

Furniture of America

Furniture of America CM2667 Assembly instructions

HOLLY&MARTIN Coho 2pc Assembly instruction

HOLLY&MARTIN

HOLLY&MARTIN Coho 2pc Assembly instruction

PB TEEN Locker Bookcase 3 manual

PB TEEN

PB TEEN Locker Bookcase 3 manual

HAMPTON BAY FZS80386-ST Use and care guide

HAMPTON BAY

HAMPTON BAY FZS80386-ST Use and care guide

Lec+ Cloud 9 user manual

Lec+

Lec+ Cloud 9 user manual

Amart Furniture VIVALDI 68998 Assembly instruction

Amart Furniture

Amart Furniture VIVALDI 68998 Assembly instruction

Cooper Lighting Lumark AVID Series brochure

Cooper Lighting

Cooper Lighting Lumark AVID Series brochure

Rauch M2576 Assembly instructions

Rauch

Rauch M2576 Assembly instructions

Mainstays Queen Assembly instructions

Mainstays

Mainstays Queen Assembly instructions

Sanus Systems NFA245 manual 

Sanus Systems

Sanus Systems NFA245 manual 

GoodHome ladoga 3663602527367 Assembly instructions

GoodHome

GoodHome ladoga 3663602527367 Assembly instructions

Knight Eko Desk Assembly instructions

Knight

Knight Eko Desk Assembly instructions

manuals.online logo
manuals.online logoBrands
  • About & Mission
  • Contact us
  • Privacy Policy
  • Terms and Conditions

Copyright 2025 Manuals.Online. All Rights Reserved.