manuals.online logo
Brands
  1. Home
  2. •
  3. Brands
  4. •
  5. Mocka
  6. •
  7. Indoor Furnishing
  8. •
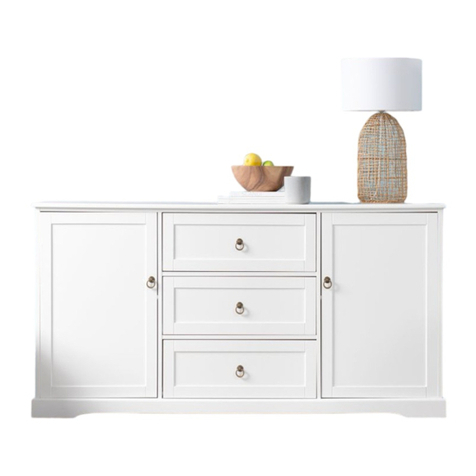
  9. Mocka Sadie Buffet Three Door User manual

Mocka Sadie Buffet Three Door User manual

Sadie Buffet Three Door
Assembly Instructions
mocka.co.nz | mocka.com.au | PO BOX 6171, Maroochydore, QLD, 4558
1
Wall Strap
x4
washer
Z
Y
wall
anchor
x2
X
safety
strap x2
WV
screw
x6
wall
screw
x2
WARNING: Any furniture that is not anchored to a wall has the potential to tip over in certain
circumstances, i.e. if a child attempts to climb up on the furniture or in the event of an earthquake.
Accordingly, we recommend that all furniture is anchored to a wall. We supply a free safety wall anchor
with all furniture sold and we recommend these are used to prevent your product tipping. The fixing device
provided should fit most wall types, but please note that different wall materials may require different fixing
devices from those supplied.
For quicker assembly, we recommend the
use of a power drill on a low-speed setting.
ABCDEF
GHJK
I
Hardware Supplied
x8
wedge plastic
glide x10
Phillips & Flathead screwdrivers
and hammer required
screw
x8
Thank you for your purchase. Please follow the instructions for correct assembly.
While we took great effort to ensure these assembly instructions were correct at
the time of printing, sometimes updates are required post production. For the
most up to date versions please refer to the product page on our website.
mocka.com.au/mocka.co.nz
bolt
x48
dowel
x24
screw
x36
locking
nut x48
screw
x12
shelf plug
x12
hinge
x4
hinge
x2
Sadie Buffet Three Door
Assembly Instructions
mocka.co.nz | mocka.com.au | PO BOX 6171, Maroochydore, QLD, 4558
2
.
Insert 4x bolts (C) into panels [3] and panel [4]. Tighten with a screwdriver.
CC
CC
1
Panel layout
1
2
3
5
5
6
712
11
13
14 17
18
19
15
15
16
16
16
16
9
10
11
10
9
11
8
4
4
3
Sadie Buffet Three Door
Assembly Instructions
mocka.co.nz | mocka.com.au | PO BOX 6171, Maroochydore, QLD, 4558
3
23
Insert 16x bolts (C) into panel [2]. Tighten with a screwdriver.
Insert 4x bolts (C) into panel [12]. Insert 4x bolts (C) into panels [7]
and [8]. Tighten with a screwdriver.
C
C
C
C
CC
CC
C
CC
C
C
CC
C
C
C
C
C
CC
C
C
12
8
7
2
Sadie Buffet Three Door
Assembly Instructions
mocka.co.nz | mocka.com.au | PO BOX 6171, Maroochydore, QLD, 4558
4
5
4
Attach panels [3] and [7] to panel [10] secure with 4x locking nuts (D)
Attach panels [4] and [8] to panel [10] secure with 4x locking nuts (D)
Tighten with a screwdriver.
Insert 12x bolts (C) into panel [1]. Attach panels [9] to panel [1] using
4x locking nuts (D). Tighten with a screwdriver.
C
C
C
C
C
C
C
C
C
C
C
C
D
D
D
D
D
D
D
D
D
D
D
D
D
1
4
10
7
10
8
3
1
9
9
Attach panels [3], [4], [7] and [8] to panel [1] using 8x dowels (A) and
secure with 8x locking nuts (D). Tighten with a screwdriver.
Attach panel [12] to panels [7] and [8] using 4x dowels (A) and secure
with 4x screws (B). Tighten with a screwdriver.
Sadie Buffet Three Door
Assembly Instructions
mocka.co.nz | mocka.com.au | PO BOX 6171, Maroochydore, QLD, 4558
5
6 7
A
A
AA
A
A
A
A
A
D
D
D
D
D
B
B
B
B
4
1
8
8
12
7
7
3
Sadie Buffet Three Door
Assembly Instructions
mocka.co.nz | mocka.com.au | PO BOX 6171, Maroochydore, QLD, 4558
6
8 9
Attach panels [13] and [14] to panel [12] using 4x dowels (A) and secure
with 4x locking nuts (D). Tighten with a screwdriver.
A
A
A
A
D
D
D
12
13
14
5
3
4
5
6
Attach panels [5] together with connect sticks [6]. Slide panels [5] down
along the grooves between the panels [3] and [4].
Sadie Buffet Three Door
mocka.co.nz | mocka.com.au | PO BOX 6171, Maroochydore, QLD, 4558
7
10
Assembly Instructions
Attach panel [2] to panels [3], [4], [13] and [14] using 8x dowels (A) and
secure with 8x screws (B), Tighten with a screwdriver.
11
AA
A
A
A
B
W
W
W
W
B
B
B
B
B
B
B
B
2
3
13
14
4
5
5
13
14
Attach panels [5] to panels [13] and [14] secure with 4x screws (w),
Tighten with a screwdriver.
12
Sadie Buffet Three Door
Assembly Instructions
mocka.co.nz | mocka.com.au | PO BOX 6171, Maroochydore, QLD, 4558
8
Insert 4x bolts (C) into each panels [15], Attach panels [15] to
panels [16] using 8x locking nuts (D). Tighten with a screwdriver.
Attach panels [15] and [16] to panel [2] using 16x locking nuts (D).
Tighten with a screwdriver. Attach 10x plastic glides (K) to the
panels [15] and [16] using a hammer as shown.
13
C
x2
C
C
C
D
D
D
D
D
D
D
D
DD
D
D
D
D
15
15
15
16
16
16
16 2
15
16
16
16
16
15
k
k
k
k
k
k
k
k
k
k
k
Sadie Buffet Three Door
Assembly Instructions
mocka.co.nz | mocka.com.au | PO BOX 6171, Maroochydore, QLD, 4558
9
14 15
3
13
14
4
11
11
11
FF
FF
F
F
F
F
F
Insert 12x shelf plugs (F) into the unit at the desired height for the shelves . rest the shelf panel [11] onto them. Ensure the shelves are balanced
and stable.
Sadie Buffet Three Door
Assembly Instructions
mocka.co.nz | mocka.com.au | PO BOX 6171, Maroochydore, QLD, 4558
10
16 Door x3
EE
E
EE
EE
I
I
I
I
I
J
J
I
J
J
EE
EE
EE
E
J
E
E
E
E
NOTE: If the doors are uneven or there is a gap
in the middle, loosen or tighten the screw on the
door hinge until they are sitting flush.
18
17
19
17
18
19
3
14
4
E
Attach 4x hinges (I) to panels [17] and [19] using 8x screws (E) and
Attach 2x hinges (J) to panel [18] using 4x screws (E). Tighten with
a screwdriver.
Attach hinges on panels [3], [4] and [14] to the unit using 24x screws (E).
Tighten with a screwdriver. Ensure the doors open and close easily.
17
Sadie Buffet Three Door
Assembly Instructions
mocka.co.nz | mocka.com.au | PO BOX 6171, Maroochydore, QLD, 4558
11
18
Attach 8x wedges (G) into the corners of the back of the unit and secure
with 8x screws (H). Tighten with a screwdriver. Attach 2x safety straps (V)
to the top of the back side of the unit as shown using 2x washers (Z) and
2x screws (W). Tighten with a screwdriver.
Once assembled lift furniture into place, do not drag. Use a drill to
create a small hole lining up with the top of the safety strap (V).
Fasten to the wall using 2x washers (Z), 2x wall anchors (X) and
2x wall screws (Y). Ensure unit is balanced and steady before use.
You’re done, enjoy!
19
H
H
H
H
H
H
H
H
G
G
G
G
G
G
G
V
Z
W
V
Z
W
Y
Z
X
Y
Z
X
V
Z
W
wall
anchor
screw
strap
washer
G
G
H
Attach panels [5] together with connect sticks [6]. Slide panels [5] down
along the grooves between the panels [3] and [4].
Sadie Buffet Three Door
Assembly Instructions
mocka.co.nz | mocka.com.au | PO BOX 6171, Maroochydore, QLD, 4558
12
HOW TO ADJUST THE HINGES TO
ALIGN THE DOORS IF NEEDED.
Open the door.
1. 2. 3.
1. 2. 3.
1. 2. 3.
STEP 1
Adjuse the door panelsupward or downward
STEP 2
Adjuse the flush between door panel and side panel
STEP 3
Adjuse the Gap beteen door
panel and side panel
STEP 4
Loosen this screw a bit. MOVE DOOR BACK OR
FORTH Re-tighten this screw.
Panel
Door
Unscrew 2 screws in round
holes loosen 2 screws in oval
holes a bit.
Tighten 2 screws in oval
holes. Screw in 2 screws in
round holes
MOVE DOOR UPWARD
OR DOWNWARD
MOVE DOOR OUTWARD
by turning this screw
counter-clockwise
KEEP DOOR IN RIGHT
POSITION MOVE DOOR OUTWARD
by turning this screw clockwise

Other Mocka Indoor Furnishing manuals

Mocka Mischa User manual

Mocka

Mocka Mischa User manual

Mocka Aspiring Change User manual

Mocka

Mocka Aspiring Change User manual

Mocka Livi Bar Stool User manual

Mocka

Mocka Livi Bar Stool User manual

Mocka Aspen User manual

Mocka

Mocka Aspen User manual

Mocka Oli Bookcase User manual

Mocka

Mocka Oli Bookcase User manual

Mocka Vibe/Olsen Tallboy User manual

Mocka

Mocka Vibe/Olsen Tallboy User manual

Mocka Addi Three Drawer User manual

Mocka

Mocka Addi Three Drawer User manual

Mocka Marlow Four Drawer User manual

Mocka

Mocka Marlow Four Drawer User manual

Mocka Zander Bench Seat User manual

Mocka

Mocka Zander Bench Seat User manual

Mocka Hudson Kids Chairs User manual

Mocka

Mocka Hudson Kids Chairs User manual

Mocka Sadie Queen bed User manual

Mocka

Mocka Sadie Queen bed User manual

Mocka Phoebe Bookshelf Large User manual

Mocka

Mocka Phoebe Bookshelf Large User manual

Mocka Tahoe User manual

Mocka

Mocka Tahoe User manual

Mocka Nava User manual

Mocka

Mocka Nava User manual

Mocka Ashford User manual

Mocka

Mocka Ashford User manual

Mocka Sadie User manual

Mocka

Mocka Sadie User manual

Mocka Kids Rocking Horse User manual

Mocka

Mocka Kids Rocking Horse User manual

Mocka Aspen Wardrobe User manual

Mocka

Mocka Aspen Wardrobe User manual
Mocka Sintra User manual

Mocka

Mocka Sintra User manual

Mocka Mikkel User manual

Mocka

Mocka Mikkel User manual

Mocka Urban Coffee Table User manual

Mocka

Mocka Urban Coffee Table User manual

Mocka Aspen User manual

Mocka

Mocka Aspen User manual

Mocka Eclipse Entertainment Unit User manual

Mocka

Mocka Eclipse Entertainment Unit User manual

Mocka Denham User manual

Mocka

Mocka Denham User manual

Popular Indoor Furnishing manuals by other brands

DESKHAUS VERTEX 2T/C Product assembly instructions

DESKHAUS

DESKHAUS VERTEX 2T/C Product assembly instructions

PHI VILLA THD7-103-3601 Use and care guide

PHI VILLA

PHI VILLA THD7-103-3601 Use and care guide

JWA ADVANCE 75106 Assembly instruction

JWA

JWA ADVANCE 75106 Assembly instruction

Enwork Odyssey installation guide

Enwork

Enwork Odyssey installation guide

Ameriwood HOME 5189026PCOM manual

Ameriwood HOME

Ameriwood HOME 5189026PCOM manual

Tenzo Mary 3370 Assembly instructions

Tenzo

Tenzo Mary 3370 Assembly instructions

Argos 615967012 Assembly instructions

Argos

Argos 615967012 Assembly instructions

Argos AH TOBY 8545550 Simple Assembly Instructions

Argos

Argos AH TOBY 8545550 Simple Assembly Instructions

Better Homes and Gardens BEDFORD BH17-084-199-14 Assembly instructions

Better Homes and Gardens

Better Homes and Gardens BEDFORD BH17-084-199-14 Assembly instructions

Rauch M2302 Assembly instructions

Rauch

Rauch M2302 Assembly instructions

BUT EDWIN CV3 Assembly instructions

BUT

BUT EDWIN CV3 Assembly instructions

Eurooffice Mex 998ET123IBKZ01W installation guide

Eurooffice Mex

Eurooffice Mex 998ET123IBKZ01W installation guide

Unfinished Furniture of Wilmington S-132 Assembly instructions

Unfinished Furniture of Wilmington

Unfinished Furniture of Wilmington S-132 Assembly instructions

Costway Honey Joy JV10036 user manual

Costway

Costway Honey Joy JV10036 user manual

Argos Home Gloss Single Wall Cabinet Grey 363/3704 Assembly instructions

Argos Home

Argos Home Gloss Single Wall Cabinet Grey 363/3704 Assembly instructions

siena GARDEN 672.978 Assembly instruction

siena GARDEN

siena GARDEN 672.978 Assembly instruction

Heritage Bathrooms ASOC26 Installation instructions and user guide

Heritage Bathrooms

Heritage Bathrooms ASOC26 Installation instructions and user guide

Blumfeldt 10033373 manual

Blumfeldt

Blumfeldt 10033373 manual

manuals.online logo
manuals.online logoBrands
  • About & Mission
  • Contact us
  • Privacy Policy
  • Terms and Conditions

Copyright 2025 Manuals.Online. All Rights Reserved.