manuals.online logo
Brands
  1. Home
  2. •
  3. Brands
  4. •
  5. Monacor
  6. •
  7. Batteries Charger
  8. •
  9. Monacor JTS CH-2 User manual

Monacor JTS CH-2 User manual

®
Vertrieb von JTS-Produkten – Distribution of JTS products
MONACOR INTERNATIONAL GmbH & Co. KG, Zum Falsch 36, 28307 Bremen, Germany
Copyright©by MONACOR INTERNATIONAL. All rights reserved. A-1700.99.02.10.2019
CH-2
Bestell-Nr. • Order No. 25.7240
Ladestation
Charging Station
www.jts-europe.com
ENGLISH
DEUTSCH
These instructions are intended for users
without any specific technical knowledge.
Please read the instructions carefully prior
to operation and keep them for later ref-
erence.
1 Applications
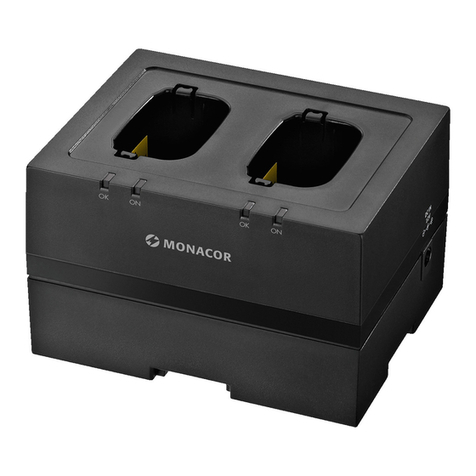
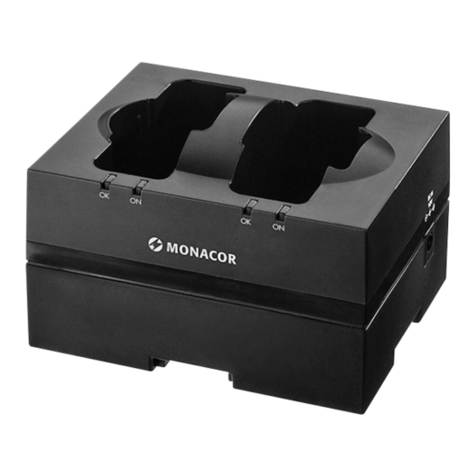
The charging station is designed for the transmitters
– UF-20TB/5, R-4TBM/5, RU-G3TB/5
(pocket transmitters)
– JSS-20/5, JSS-4B/5
(wireless hand-held microphones)
The charging station is used for charging the NiMH
batteries that have been inserted into the transmitters.
It offers two charging slots, allowing you to charge the
batteries of two transmitters at the same time.
2 Safety Notes
The units (charging station and power supply unit)
correspond to all relevant directives of the EU and are
therefore marked with .
WARNING The power supply unit uses dangerous
mains voltage. Leave servicing to skilled
personnel only. Inexpert handling may
result in electric shock.
•
Only use this charging station for charging NiMH bat-
teries. Non-rechargeable batteries may leak or even
explode if you try to charge them!
•
Always insert batteries of the same type into the
transmitter and always replace the batteries in pairs.
•
The units are suitable for indoor use only. Protect
them against dripping water, splash water and high
air humidity. The admissible ambient temperature
range is 0–40°C.
•
The heat produced inside the charging station must
be dissipated by air circulation; never cover the air
vents of the housing.
•
Immediately disconnect the power supply unit from
the mains socket
1. if the power supply unit or the charging station is
visibly damaged,
2. if a defect might have occurred after a unit was
dropped or suffered a similar accident,
3. if malfunctions occur.
In any case the units must be repaired by skilled per-
sonnel.
•
For cleaning only use a dry, soft cloth; never use
water or chemicals.
•
No guarantee claims for the units and no liability
for any resulting personal damage or material dam-
age will be accepted if the units are used for other
purposes than originally intended, if they are not
correctly connected or operated, or if they are not
repaired in an expert way.
If the units are to be put out of operation de-
finitively, take them to a local recycling plant
for a disposal which is not harmful to the en-
vironment.
Never put batteries in the household waste. Always
take them to a special waste disposal, e. g. collection
container at your retailer.
3 Charging Batteries
1)
Connect the power supply unit to the jack on the rear
side of the charging station and to a mains socket
(230 V/50Hz). Thus, the station is switched on. As
long as a charging slot is empty, its charging LED
is permanently green.
2) Insert the wireless microphone/the pocket transmit-
ter into the charging slot with its display facing the
front of the charging station. Insert only one unit into
each slot! While the batteries are being charged, the
LED will keep flashing in green. If the LED “Alert“
starts flashing in red, a fault has been detected (e.g.
defective battery).
3)
When the batteries have been fully charged, the LED
will be permanently green again. Remove the unit
from the slot.
4)
To switch off the charging station, disconnect the
power supply unit from the mains socket.
4 Specifications
Charging time: . . . approx. 3 hours for 2000mAh
batteries
Power supply: . . . . via power supply unit provided
and connected to 230V/50Hz
Dimensions: . . . . . 165 × 72 × 99 mm (W × H × D)
Weight: . . . . . . . . 315 g
Subject to technical modification.
Diese Anleitung richtet sich an Benutzer
ohne besondere Fachkenntnisse. Bitte
lesen Sie die Anleitung vor dem Betrieb
gründlich durch und heben Sie sie für ein
späteres Nachlesen auf.
1 Verwendungsmöglichkeiten
Die Ladestation ist konzipiert für die Sender
– UF-20TB/5, R-4TBM/5, RU-G3TB/5
(Taschensender)
– JSS-20/5, JSS-4B/5
(Funk-Handmikrofone)
Die Ladestation dient zum Aufladen von NiMH-Akkus,
die in den Sendern eingesetzt sind. Es sind zwei Lade-
schächte vorhanden, so dass die Akkus von zwei Sen-
dern gleichzeitig aufgeladen werden können.
2 Sicherheitshinweise
Die Geräte (Ladestation und Netzgerät) entsprechen
allen relevanten Richtlinien der EU und tragen deshalb
das -Zeichen.
WARNUNG Das Netzgerät wird mit lebensgefährli-
cher Netzspannung versorgt. Nehmen
Sie deshalb niemals selbst Eingriffe
daran vor! Es besteht die Gefahr eines
elektrischen Schlags.
•
Mit der Ladestation dürfen nur NiMH-Akkus geladen
werden. Nicht wiederaufladbare Batterien können
beim Versuch sie aufzuladen, auslaufen oder explo-
dieren!
•
Setzen Sie nur Akkus gleichen Typs in den Sender und
tauschen Sie die Akkus immer paarweise aus.
•
Die Geräte sind nur zur Verwendung im Innenbereich
geeignet. Schützen Sie sie vor Tropf- und Spritzwas-
ser sowie hoher Luftfeuchtigkeit. Der zulässige Ein-
satztemperaturbereich beträgt 0– 40 °C.
•
Die in der Ladestation entstehende Wärme muss
durch Luftzirkulation abgegeben werden. Decken Sie
darum die Lüftungsöffnungen am Gehäuse nichtab.
•
Ziehen Sie sofort das Netzgerät aus der Steckdose:
1. wenn sichtbare Schäden am Netzgerät oder an
der Ladestation vorhanden sind,
2. wenn nach einem Sturz oder Ähnlichem der Ver-
dacht auf einen Defekt besteht,
3. wenn Funktionsstörungen auftreten.
Geben Sie die Geräte in jedem Fall zur Reparatur in
eine Fachwerkstatt.
•
Verwenden Sie für die Reinigung nur ein trockenes,
weiches Tuch, niemals Wasser oder Chemikalien.
•
Werden die Geräte zweckentfremdet, nicht richtig
angeschlossen, falsch bedient oder nicht fachge-
recht repariert, kann keine Haftung für daraus re-
sultierende Sach- oder Personenschäden und keine
Garantie für die Geräte übernommen werden.
Sollen die Geräte endgültig aus dem Betrieb
genommen werden, übergeben Sie sie zur
umweltgerechten Entsorgung einem örtli-
chen Recyclingbetrieb.
Akkus dürfen nicht im Hausmüll entsorgt werden.
Geben Sie sie nur in den Sondermüll (z. B. Sammelbe-
hälter im Einzelhandel).
3 Akkus aufladen
1)
Das Netzgerät an die Buchse auf der Rückseite
der Ladestation anschließen und in eine Steckdose
(230V/50 Hz) stecken. Die Station ist damit einge-
schaltet. Die LED leuchtet konstant grün, solange
kein Gerät im zugehörigen Ladeschacht steckt.
2)
Das Funkmikrofon/den Taschensender so in den Lade-
schacht stecken, dass das Display zur Vorderseite der
Ladestation zeigt. Pro Schacht jedoch nur ein Gerät
einsetzen! Während des Ladevorgangs blinkt die
LED grün. Blinkt die LED „Alert“ rot, wurde ein
Fehler erkannt (z.B. Akku defekt).
3) Sind die Akkus voll aufgeladen, leuchtet die LED
wieder konstant grün. Das eingesetzte Gerät kann
entnommen werden.
4) Zum Ausschalten der Ladestation das Netzgerät aus
der Steckdose ziehen.
4 Technische Daten
Ladedauer: . . . . . . ca. 3 Std. bei 2000-mAh-Akkus
Stromversorgung: . über beiliegendes Netzgerät an
230V/50Hz
Abmessungen: . . . 165 × 72 × 99 mm (B × H × T)
Gewicht:. . . . . . . . 315g
Änderungen vorbehalten.
®
Vertrieb von JTS-Produkten – Distribution of JTS products
MONACOR INTERNATIONAL GmbH & Co. KG, Zum Falsch 36, 28307 Bremen, Germany
Copyright©by MONACOR INTERNATIONAL. All rights reserved. A-1700.99.02.10.2019
www.jts-europe.com
Estas instrucciones van dirigidas a usuarios
sin ningún conocimiento técnico especí-
fico. Lea atentamente estas instrucciones
antes del funcionamiento y guárdelas para
usos posteriores.
1 Aplicaciones
La estación de carga está diseñada para los emisores
– UF-20TB/5, R-4TBM/5, RU-G3TB/5
(emisores de petaca)
– JSS-20/5, JSS-4B/5
(micrófonos de mano inalámbricos)
La estación de carga se utiliza para cargar las baterías
NiMH que se hayan insertado en los emisores. Tiene
dos ranuras de carga que permiten cargar las baterías
de dos emisores al mismo tiempo.
2 Notas de Seguridad
Los aparatos (estación de carga y alimentador) cumplen
con todas las directivas relevantes de la UE y por lo
tanto están marcados con el símbolo .
ADVERTENCIA: El alimentador utiliza un
voltaje peligroso. Deje el mantenimiento en
manos del personal cualificado. El manejo
inexperto puede provocar una descarga.
•
Utilice esta estación de carga solamente para cargar
baterías NiMH. Si intenta cargar baterías no recarga-
bles, podrían derramarse o incluso explotar.
•
Inserte sólo baterías del mismo tipo en el emisor y
siempre remplace las baterías por parejas.
•
Los aparatos están adecuados para su aplicación sólo
en interiores. Protéjalos contra goteos, salpicaduras y
humedad elevada. Rango de temperatura ambiente
admisible: 0–40ºC.
•
El calor generado en el interior de la estacíon de carga
tiene que disiparse con la circulación del aire. Así
pues, no cubra las rejillas de ventilación de la carcasa.
•
Desconecte inmediatamente el alimentador de la
toma de corriente si:
1. El alimentador o la estación de carga están visi-
blemente dañados.
2. El aparato ha sufrido daños después de una caída
o accidente similar.
3. No funciona correctamente.
Sólo el personal técnico puede reparar los aparatos
bajo cualquier circunstancia.
•
Utilice sólo un paño suave y seco para la limpieza; no
utilice nunca ni agua ni productos químicos.
•
No podrá reclamarse garantía o responsabilidad
alguna por cualquier daño personal o material re-
sultante si los aparatos se utilizan para otros fines
diferentes a los originalmente concebidos, si no se
conectan correctamente, no se utilizan adecuada-
mente o no se reparan por expertos.
Si va a poner los aparatos fuera de servicio de-
finitivamente, llévelos a la planta de reciclaje
más cercana para que su eliminación no sea
perjudicial para el medioambiente.
No deposite nunca las baterías gastadas en el contene-
dor normal. Llévelas siempre a un contenedor especiali-
zado, p. ej. el contenedor selectivo de su tienda.
3 Cargar las Baterías
1)
Conecte el alimentador a la toma de la parte posterior
de la estación de carga y a un enchufe (230V/50Hz).
De este modo, se conecta la estación. Mientras esté
vacía una ranura de carga, su LED de carga se
iluminará en verde.
2)
Inserte el micrófono inalámbrico/emisor de petaca
en la ranura de carga con su visualizador mirando
hacia el frente de la estación de carga. ¡Inserte sólo
un aparato en cada ranura! Mientras se cargue las
baterías, el LED parpadeará en verde. Si el LED
“Alert” empieza a parpadear en rojo, significa que
ha habido un error (p.ej. batería defectuosa).
3)
Cuando las baterías se hayan cargado completa-
mente, el LED se iluminará permanentemente en
verde de nuevo. Quite el aparato de la ranura.
4) Para desconectar la estación de carga, desconecte el
alimentador de la toma de corriente.
4 Especificaciones
Tiempo de carga: . aprox. 3 horas para baterías rec.
de 2000mAh
Alimentación: . . . . mediante alimentador entregado
y conectado a 230V/50Hz
Dimensiones: . . . . 165 × 72 × 99 mm (B × H × P)
Peso:. . . . . . . . . . . 315 g
Sujeto a modificaciones técnicas.
Cette notice s’adresse aux utilisateurs sans
connaissances techniques particulières.
Veuillez lire avec attention la notice avant
le fonctionnement et conservez-la pour
pouvoir vous y reporter ultérieurement.
1 Possibilités d’utilisation
La station de charge est conçue pour les émetteurs
– UF-20TB/5, R-4TBM/5, RU-G3TB/5 (émetteurs de
poche)
– JSS-20/5, JSS-4B/5 (microphones main sans fil)
La station de charge permet de charger des accumula-
teurs NiMH (nickel-hydrure métallique) insérés dans les
émetteurs. Deux compartiments de charge permettent
de charger simultanément les accumulateurs de deux
émetteurs.
2 Conseils de sécurité
Les appareils (station de charge et bloc secteur) ré-
pondent à toutes les directives nécessaires de l’Union
européenne et porte donc le symbole .
AVERTISSEMENT : Le bloc secteur est ali-
menté par une tension dangereuse. Ne tou-
chez jamais l’intérieur de l’appareil, vous
pourriez subir une décharge électrique.
•
Utilisez la station de charge uniquement pour char-
ger des accumulateurs NiMH. N’essayez pas de re-
charger des batteries non rechargeables, elles pour-
raient couler ou exploser.
•
Dans l’émetteur, ne placez que des accumulateurs de
même type et remplacez toujours les accumulateurs
par paire.
•
Les appareils ne sont conçus que pour une utilisation
en intérieur. Protégez-les de tout type de projections
d’eau, des éclaboussures et d’une humidité d’air éle-
vée. La plage de température ambiante admissible
est de 0–40°C.
•
La chaleur dégagée par la station de charge doit être
évacuée par une circulation d’air correcte. En aucun
cas, les ouïes de ventilation du boîtier ne doivent être
obturées.
•
Débranchez immédiatement le bloc secteur lorsque :
1. des dommages visibles apparaissent sur la station
de charge ou sur le bloc secteur,
2. après une chute ou un cas similaire, vous avez un
doute sur l’état de l’appareil,
3. des dysfonctionnements apparaissent.
Dans tous les cas, les dommages doivent être réparés
par un technicien spécialisé.
•
Pour nettoyer, utilisez uniquement un chiffon sec et
doux, en aucun cas de produits chimiques ou d’eau.
•
Nous déclinons toute responsabilité en cas de dom-
mages matériels ou corporels résultants si les appa-
reils sont utilisés dans un but autre que celui pour
lequel ils ont été conçus, s’ils ne sont pas correcte-
ment branchés ou utilisés ou s’ils ne sont pas réparés
par une personne habilitée ; en outre, la garantie
deviendrait caduque.
Lorsque les appareils sont définitivement re-
tirés du service, vous devez les déposer dans
une usine de recyclage adaptée pour contri-
buer à leur élimination non polluante.
Ne jetez pas les accumulateurs dans la poubelle domes-
tique. Déposez-les dans un container spécifique.
3 Chargement des accumulateurs
1) Reliez le bloc secteur à la prise sur la face arrière de la
station de charge et à une prise secteur 230V/50 Hz.
La station est alors allumée. La LED brille tout le
temps en vert tant qu’aucun appareil n’est placé dans
le compartiment de charge correspondant.
2) Placez le micro sans fil/émetteur de poche dans le
compartiment de charge de telle sorte que l’affi-
chage soit dirigé vers la face avant de la station de
charge. On ne peut insérer qu’un seul appareil par
compartiment. Pendant la charge, la LED clignote
en vert. Si la LED «Alert» clignote en rouge, il y a un
dysfonctionnement (p.ex. accu défectueux).
3) Lorsque les accumulateurs sont complètement char-
gés, la LED brille à nouveau tout le temps en vert.
Vous pouvez alors retirer l’appareil.
4)
Pour éteindre la station de charge, débranchez le bloc
secteur de la prise secteur.
4 Caractéristiques techniques
Durée de charge : . 3 heures environ pour accus
2000mAh
Alimentation :. . . . par bloc secteur livré relié à
230V/50Hz
Dimensions :. . . . . 165 × 72 × 99mm (l × h × p)
Poids :. . . . . . . . . . 315 g
Tout droit de modification réservé.
CARTONS ET EMBALLAGE
PAPIER À TRIER
ESPAÑOL
FRANÇAIS
CH-2
Réf. num. • Ref. núm. 25.7240
Station de charge
Estación de Carga

This manual suits for next models

1

Other Monacor Batteries Charger manuals

Monacor BC-4 User manual

Monacor

Monacor BC-4 User manual

Monacor JTS W4-CH1 User manual

Monacor

Monacor JTS W4-CH1 User manual

Monacor BCD-1200 User manual

Monacor

Monacor BCD-1200 User manual

Monacor JTS TG-10CH18 User manual

Monacor

Monacor JTS TG-10CH18 User manual

Monacor JTS TG-10CH18 User manual

Monacor

Monacor JTS TG-10CH18 User manual

Monacor ATS-12CB User manual

Monacor

Monacor ATS-12CB User manual

Monacor BC-6000 User manual

Monacor

Monacor BC-6000 User manual

Monacor TXA-800PS User manual

Monacor

Monacor TXA-800PS User manual

Monacor img Stage Line ATS-12CB User manual

Monacor

Monacor img Stage Line ATS-12CB User manual

Monacor BC-1800L User manual

Monacor

Monacor BC-1800L User manual

Monacor BC-600L User manual

Monacor

Monacor BC-600L User manual

Monacor img Stage Line ATS-25C User manual

Monacor

Monacor img Stage Line ATS-25C User manual

Monacor IMG STAGELINE RBC-1AA User manual

Monacor

Monacor IMG STAGELINE RBC-1AA User manual

Monacor BC-1800L User manual

Monacor

Monacor BC-1800L User manual

Monacor JTS TG-10CH2 User manual

Monacor

Monacor JTS TG-10CH2 User manual

Monacor img Stage Line ATS-162PS User manual

Monacor

Monacor img Stage Line ATS-162PS User manual

Monacor BC-600L User manual

Monacor

Monacor BC-600L User manual

Monacor JTS TG-10CH2 User manual

Monacor

Monacor JTS TG-10CH2 User manual

Monacor BC-2002 USB User manual

Monacor

Monacor BC-2002 USB User manual

Monacor ATS-60PS User manual

Monacor

Monacor ATS-60PS User manual

Monacor ATS-16PS User manual

Monacor

Monacor ATS-16PS User manual

Monacor TXA-12C User manual

Monacor

Monacor TXA-12C User manual

Monacor ATS-50PS User manual

Monacor

Monacor ATS-50PS User manual

Monacor IRS-200PS User manual

Monacor

Monacor IRS-200PS User manual

Popular Batteries Charger manuals by other brands

PowerTech MB3912 instruction manual

PowerTech

PowerTech MB3912 instruction manual

URBAN VITAMIN FAIRFIELD P308.36 Series user manual

URBAN VITAMIN

URBAN VITAMIN FAIRFIELD P308.36 Series user manual

AEG 97101 Operation and safety notes

AEG

AEG 97101 Operation and safety notes

AVer C36i+ user manual

AVer

AVer C36i+ user manual

ABB A275-L59 Operation manual

ABB

ABB A275-L59 Operation manual

Choetech T585-F user manual

Choetech

Choetech T585-F user manual

Battery Life Saver BLS-12/24B user manual

Battery Life Saver

Battery Life Saver BLS-12/24B user manual

Fein ALG80 quick start guide

Fein

Fein ALG80 quick start guide

Insignia NS-CAHCC02-C Quick setup guide

Insignia

Insignia NS-CAHCC02-C Quick setup guide

Tektos Qimini pocket user manual

Tektos

Tektos Qimini pocket user manual

Logik PS3LCH112 instruction manual

Logik

Logik PS3LCH112 instruction manual

RIDGID R86049 Operator's manual

RIDGID

RIDGID R86049 Operator's manual

MSA Power Builder 10002460 instructions

MSA

MSA Power Builder 10002460 instructions

SyncEV BG EVWC2S7GG installation guide

SyncEV BG

SyncEV BG EVWC2S7GG installation guide

LSL Products TOAD-CHARGE K1 quick start guide

LSL Products

LSL Products TOAD-CHARGE K1 quick start guide

LEXIBOOK ROLL N PLAY Installation

LEXIBOOK

LEXIBOOK ROLL N PLAY Installation

Panasonic EY0L10-U1 Service manual

Panasonic

Panasonic EY0L10-U1 Service manual

Texas Instruments SLUU477 user guide

Texas Instruments

Texas Instruments SLUU477 user guide

manuals.online logo
manuals.online logoBrands
  • About & Mission
  • Contact us
  • Privacy Policy
  • Terms and Conditions

Copyright 2025 Manuals.Online. All Rights Reserved.