Monacor CTG-1NOISE User manual

ELECTRONICS FOR SPECIALISTS ELECTRONICS FOR SPECIALISTS ELECTRONICS FOR SPECIALISTS ELECTRONICS FOR SPECIALISTS ELECTRONICS FOR SPECIALISTS ELECTRONICS
CTG-1NOISE Bestell-Nr. • Order No. 29.2050
CTG-1SINE Bestell-Nr. • Order No. 29.2060
MONACOR INTERNATIONAL GmbH & Co. KG • Zum Falsch 36 • 28307 Bremen • Germany
Copyright©by MONACOR INTERNATIONAL. All rights reserved. A-1862.99.01.09.2017
Function Tester in XLR Plug
These instructions are intended for users
with basic knowledge in audio technology.
Please read the instructions carefully prior to
operation and keep them for later reference.
1 Applications
Is this situation familiar to you? The microphone
on the stage does not provide any signal to the
front of house and you are the one in charge of
finding the error? Is the error due to the micro‑
phone or the cable? Or to the multicore cable
or the mixer channel? An ohmmeter is currently
not at hand or its battery is almost discharged.
The MONACOR solution: Just connect the CTG
to the microphone cable and activate the phan‑
tom power supply – the tester will then indi‑
cate the error. Two CTG versions are available:
CTG‑1NOISE with pink‑noise generator and
CTG‑1SINE with 100 Hz sine wave generator.
2 Important Notes
The tester corresponds to all relevant directives
of the EU and is therefore marked with .
•
The tester is suitable for indoor use only. Pro‑
tect it against dripping water, splash water
and high air humidity. The admissible ambient
temperature range is 0–40 °C.
•
For cleaning only use a dry, soft cloth; never
use water or chemicals.
•
No guarantee claims for the tester and no
liability for any resulting personal damage or
material damage will be accepted if the tester
is used for other purposes than originally
intended, if it is not correctly connected, or if
it is not repaired in an expert way.
If the tester is to be put out of oper‑
ation definitively, take it to a local recy‑
cling plant for a disposal which is not
harmful to the environment.
3 Operation
1) Mute the audio system.
2) Set the mixer channel where the signal is
not available according to the signal source
(microphone, instrument etc.) and activate
the phantom power supply.
3) Instead of the signal source, connect the
tester to the audio cable.
4) The LED on the tester will indicate the error
detected:
LED Status
Flashes twice Pin 2 of the cable defective
Flashes three times Pin 3 of the cable defective
Does not light up at all
Pin 1 of the cable defective
or phantom power supply not
available
Lights up continuously
Generator signal available:
To check, unmute the audio
system; the generator signal
should be audible.
Check the signal source!
4 Specifications
Output signal
CTG‑1NOISE: . . . . . pink noise
CTG‑1SINE: . . . . . . 100Hz sine wave
Level: . . . . . . . . . . . approx. 100VPP
Connections: . . . . . . XLR, balanced
pin 1 = ground
pin 2 = signal +
pin 3 = signal −
Error indication: . . . . via LED
Power supply: . . . . . . phantom power
9– 48V (⎓)
Dimensions: . . . . . . . ⌀19mm × 74 mm
Weight: . . . . . . . . . . 32g
Housing:. . . . . . . . . . NEUTRIK XLR plug
Subject to technical modification.
Funktionstester im XLR-Stecker
Diese Anleitung richtet sich an Benutzer
mit Grundkenntnissen in der Audiotechnik.
Bitte lesen Sie die Anleitung vor dem Betrieb
gründlich durch und heben Sie sie für ein
späteres Nachlesen auf.
1 Einsatzmöglichkeiten
Kennen Sie die Situation? Das Mikrofon auf der
Bühne gibt kein Signal zum FOH‑Platz und Sie
müssen den Fehler finden. Ist es das Mikrofon
oder das Kabel? Ist es das Multicore oder der
Pultkanal? Ein Ohmmeter ist gerade nicht zur
Hand oder die Batterie darin ist leer.
Die Lösung von MONACOR: Stecken Sie einfach
den CTG an das Mikrofonkabel, schalten Sie die
Phantomspeisung ein und der Tester zeigt Ihnen
den Fehler an. Der CTG ist mit einem Rosa‑
Rauschen‑Generator (‑1NOISE) oder mit einem
100‑Hz‑Sinus‑Generator (‑1SINE) erhältlich.
2 Wichtige Hinweise für den Gebrauch
Der Tester entspricht allen relevanten Richtlinien
der EU und trägt deshalb das ‑Zeichen.
•
Der Tester ist nur zur Verwendung im Innenbe‑
reich geeignet. Schützen Sie ihn vor Tropf‑ und
Spritzwasser sowie hoher Luftfeuchtigkeit. Der
zulässige Einsatztemperaturbereich beträgt
0– 40°C.
•
Verwenden Sie zum Reinigen nur ein trocke‑
nes, weiches Tuch, niemals Chemikalien oder
Wasser.
•
Wird der Tester zweckentfremdet, falsch an‑
geschlossen oder nicht fachgerecht repariert,
kann keine Haftung für daraus resultierende
Sach‑ oder Personenschäden und keine Garan‑
tie für den Tester übernommen werden.
Soll der Tester endgültig aus dem Be‑
trieb genommen werden, übergeben
Sie ihn zur umweltgerechten Entsor‑
gung einem örtlichen Recyclingbetrieb.
3 Bedienung
1) Die Audioanlage stummschalten.
2) Den Mischpultkanal, an dem das Signal fehlt,
der Signalquelle (Mikrofon, Instrument etc.)
entsprechend einstellen und die Phantom‑
speisung einschalten.
3) Anstelle der Signalquelle den Tester an das
Audiokabel anschließen.
4) Die LED am Tester blinkt oder leuchtet ent‑
sprechend dem festgestellten Fehler:
LED Status
blinkt 2 × Kabel am Pin 2 unterbrochen
blinkt 3 × Kabel am Pin 3 unterbrochen
leuchtet gar nicht Kabel am Pin 1 unterbrochen
oder Phantomspannung fehlt
leuchtet konstant
Generatorsignal vorhanden:
Zur Kontrolle die Audioanlage
wieder lautschalten; das Gene-
ratorsignal sollte zu hören sein.
Signalquelle überprüfen!
4 Technische Daten
Ausgangsignal
CTG‑1NOISE:.. . . . . Rosa Rauschen
CTG‑1SINE: . . . . . . 100‑Hz‑Sinus
Pegel:. . . . . . . . . . . ca. 100 mVSS
Anschlüsse:. . . . . . . . XLR, symmetrisch
Pin 1 = Masse
Pin 2 = Signal +
Pin 3 = Signal –
Fehleranzeige:. . . . . . über LED
Stromversorgung: . . . Phantomspeisung
9– 48V (⎓)
Abmessungen: . . . . . ⌀19mm × 74 mm
Gewicht:. . . . . . . . . . 32 g
Gehäuse: . . . . . . . . . NEUTRIK‑XLR‑Stecker
Änderungen vorbehalten.
DeutschEnglish

ELECTRONICS FOR SPECIALISTS ELECTRONICS FOR SPECIALISTS ELECTRONICS FOR SPECIALISTS ELECTRONICS FOR SPECIALISTS ELECTRONICS FOR SPECIALISTS ELECTRONICS
MONACOR INTERNATIONAL GmbH & Co. KG • Zum Falsch 36 • 28307 Bremen • Germany
Copyright©by MONACOR INTERNATIONAL. All rights reserved. A-1862.99.01.09.2017
CTG-1NOISE Référence num.• Codice 29.2050
CTG-1SINE Référence num.• Codice 29.2060
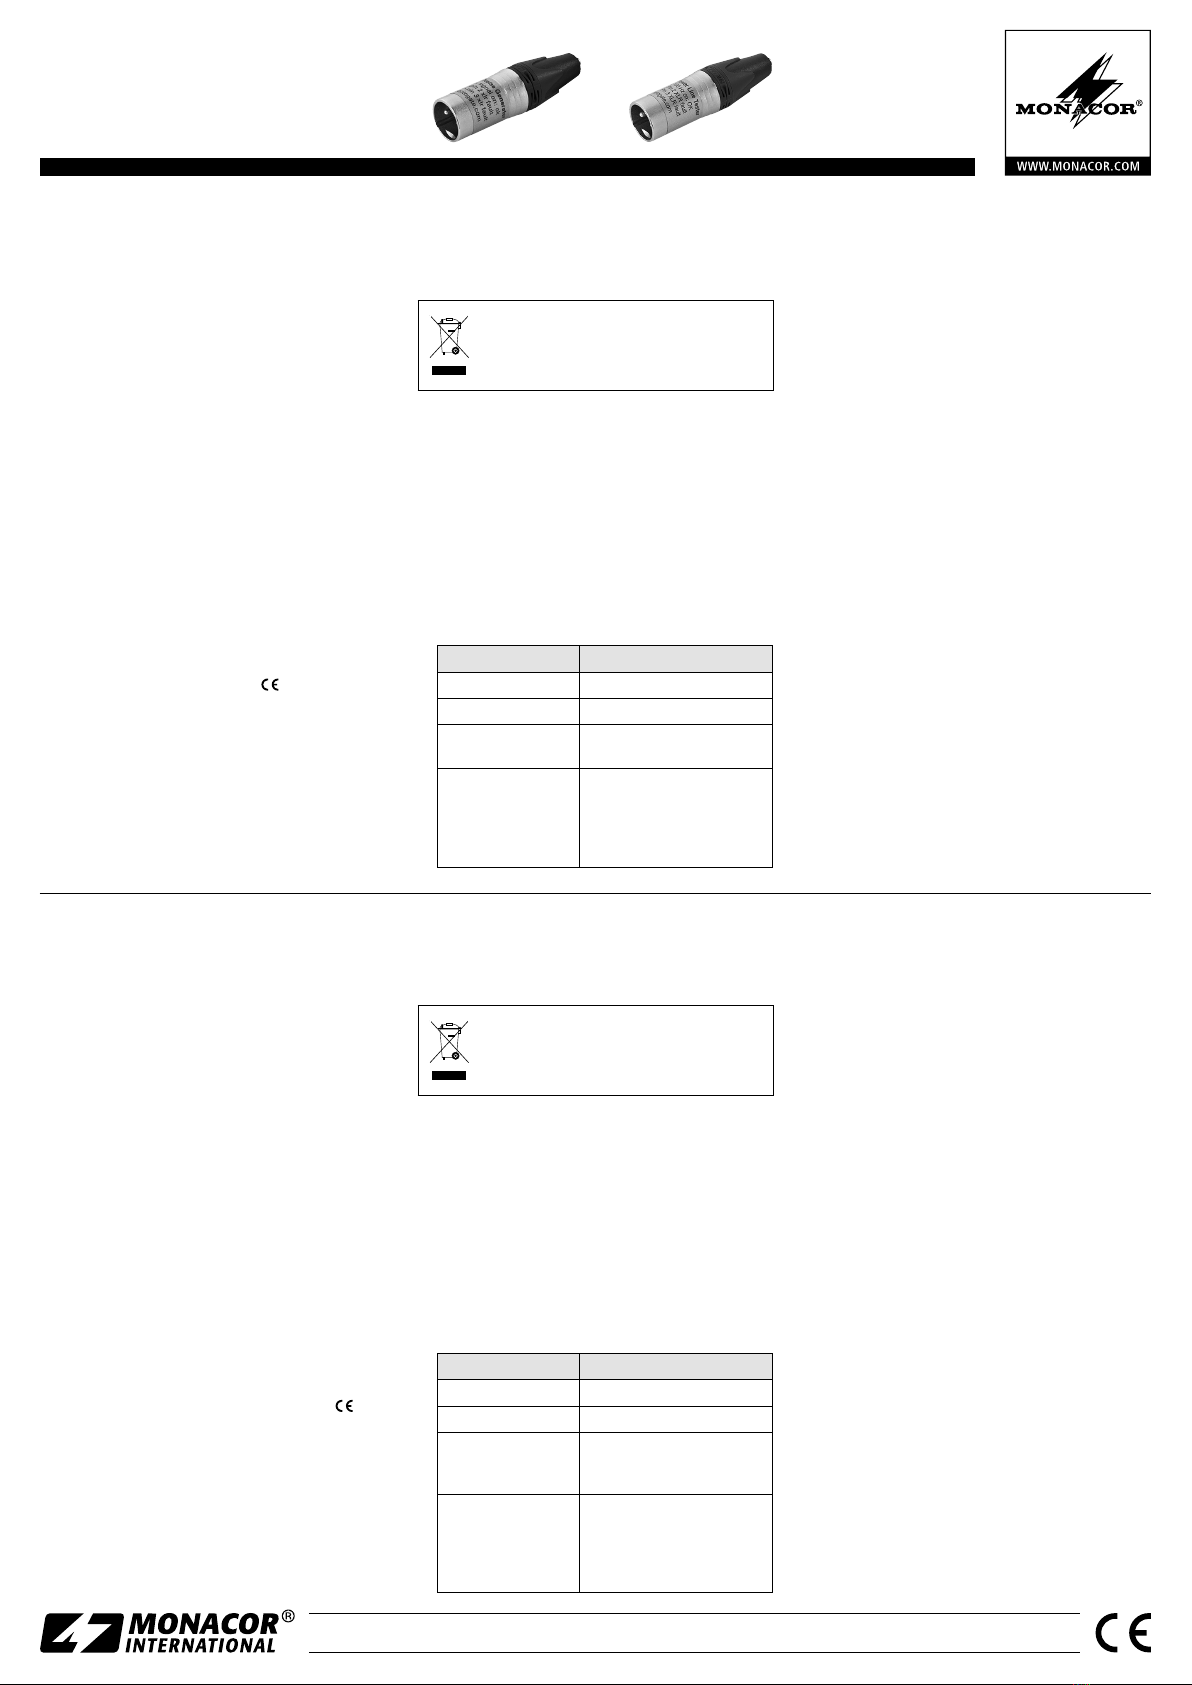
Tester delle funzioni
nel connettore XLR
Queste istruzioni sono rivolte agli utenti
con conoscenze base nella tecnica audio. Vi
preghiamo di leggerle attentamente prima
della messa in funzione e ci conservarle per
un uso futuro.
1 Possibilità d’impiego
Conoscete questa situazione? Il microfono sul
palcoscenico non dà nessun segnale al posto
FoH e dovete trovare il difetto. È il microfono o il
cavo? È il multicore o il canale della consolle? Un
ohmmetro non avete a portata di mano oppure
la sua batteria è scarica.
La soluzione di MONACOR: Inserite semplice‑
mente il CTG nel cavo del microfono, attivate
l’alimentazione phantom e il tester vi farà vedere
il difetto. Il CTG è disponibile con un generatore
di rumore rosa (‑1NOISE) o con un generatore di
tensione sinusoidale di 100Hz (‑1SINE).
2 Avvertenze importanti per l’uso
Il tester è conforme a tutte le direttive rilevanti
dell’UE e pertanto porta la sigla .
•
Il tester è previsto solo per l’uso all’interno di
locali. Proteggerlo dall’acqua gocciolante e
dagli spruzzi d’acqua nonché da alta umidità
dell’aria. La temperatura d’esercizio ammessa
è 0– 40°C.
•
Per la pulizia usare solo un panno morbido,
asciutto; non impiegare mai acqua o prodotti
chimici.
•
Nel caso d’uso improprio, di collegamenti sba‑
gliati o di riparazione non a regola d’arte del
tester, non si assume nessuna responsabilità
per eventuali danni consequenziali a persone
o a cose e non si assume nessuna garanzia
per il tester.
Se si desidera eliminare il tester defi‑
nitivamente, consegnarlo per lo smal‑
timento ad un’istituzione locale per il
riciclaggio.
3 Funzionamento
1) Mettere in muto l’impianto audio.
2) Impostare il canale del mixer con il segnale
mancante secondo la fonte dei segnali (micro‑
fono, strumento ecc.) e attivare l’alimenta‑
zione phantom.
3) Al posto della fonte dei segnali, collegare il
tester con il cavo audio.
4) Il LED sul tester lampeggia oppure si accende
secondo il difetto trovato:
LED Stato
lampeggia 2 × cavo al pin 2 interrotto
lampeggia 3 × cavo al pin 3 interrotto
non si accende cavo al pin 1 interrotto oppure
alimentazione phantom assente
rimane acceso
segnale del generatore presente:
come controllo rimettere l‘audio
dell‘impianto audio; si dovrebbe
sentire il segnale del generatore.
Controllare la fonte dei segnali!
4 Dati tecnici
Segnale d’uscita
CTG‑1NOISE:.. . . . . rumore rosa
CTG‑1SINE: . . . . . . sinusoidale 100Hz
Livello: . . . . . . . . . . ca. 100mVPP
Contatti:. . . . . . . . . . XLR, bilanciato
pin 1 = massa
pin 2 = segnale +
pin 3 = segnale –
Indicazione difetto: . . tramite LED
Alimentazione: . . . . . alimentazione phantom
9– 48V (⎓)
Dimensioni:. . . . . . . . ⌀19mm × 74 mm
Peso:. . . . . . . . . . . . . 32 g
Corpo: . . . . . . . . . . . connettore XLR NEUTRIK
Testeur de fonctionnement
dansfiche XLR
Cette notice s’adresse aux utilisateurs avec
des connaissances de base en audio. Veuillez
lire la présente notice avec attention avant le
fonctionnement et conservez‑la pour pou‑
voir vous y reporter ultérieurement.
1 Possibilités d’utilisation
Vous connaissez la situation ? Le microphone sur
scène n’émet aucun signal vers le public et vous
devez trouver d’où vient le problème. Est‑ce le
microphone ou le câble ? Est‑ce le multiconduc‑
teurou le canal de la table de mixage? Vous
n’avez pas d’ohmmètre sous la main ou la bat‑
terie est vide.
La solution de MONACOR : branchez tout sim‑
plement le CTG au cordon micro, allumez l’ali‑
mentation fantôme et le testeur indique l’erreur.
Le CTG est disponible avec un générateur de
bruit rose (‑1NOISE) ou avec un générateur de
100Hz sinus (‑1SINE).
2 Conseils importants d’utilisation
Le testeur répond à toutes les directives néces‑
saires de l’Union européenne et porte donc le
symbole .
•
Le testeur n’est conçu que pour une utilisation
en intérieur. Protégez‑le de tout type de pro‑
jections d’eau, des éclaboussures et d’une hu‑
midité élevée de l’air. La plage de température
de fonctionnement autoriséeest de 0– 40°C.
•
Pour le nettoyage, utilisez un chiffon doux
et sec, en aucun cas d’eau ou de produits
chimiques.
•
Nous déclinons toute responsabilité en cas de
dommages matériels ou corporels résultants si
le testeur est utilisé dans un but autre que celui
pour lequel il a été conçu, s’il n’est pas cor‑
rectement branché ou s’il n’est pas réparé par
une personne habilitée; de même, la garantie
deviendrait caduque.
Lorsque le testeur est définitivement
retiré du service, vous devez le déposer
dans une usine de recyclage adaptée
pour contribuer à son élimination non
polluante.
CARTONS ET EMBALLAGE
PAPIER À TRIER
3 Utilisation
1) Coupez le son de l’installation audio.
2) Réglez le canal de la table de mixage sur
lequel le signal est absent, en fonction de
la source de signal (micro, instrument ...) et
allumez l’alimentation fantôme.
3) Reliez le testeur au cordon audio à la place de
la source de signal.
4) La LED sur le testeur clignote ou brille selon
l’erreur constatée :
LED Etat
clignote 2 × câble au pin 2 interrompu
clignote 3 × câble au pin 3 interrompu
ne brille pas câble au pin 1 interrompu ou
alimentation fantôme manquante
brille en continu
le signal du général existe : pour
le contrôle, activez le son de
l‘installation audio : le signal du
générateur devrait être audible.
Vérifiez la source de signal !
4 Caractéristiques techniques
Signal de sortie
CTG‑1NOISE:. . . . . bruit rose
CTG‑1SINE: . . . . . . 100Hz sinus
Niveau: . . . . . . . . . 100mVCC environ
Branchements:. . . . . XLR, symétrique
pin 1 = masse
pin 2 = signal +
pin 3 = signal −
Indication d’erreur: . via LED
Alimentation:. . . . . . alimentation fantôme
9– 48V (⎓)
Dimensions:. . . . . . . ⌀19mm × 74 mm
Poids:. . . . . . . . . . . . 32g
Corps: . . . . . . . . . . . fiche XLR NEUTRIK
Tout droit de modification réservé.
FrançaisItaliano
Con riserva di modifiche tecniche.
This manual suits for next models
5
Other Monacor Test Equipment manuals

Monacor
Monacor img Stage Line STROBE-192 User manual

Monacor
Monacor img Stage Line STROBE-10LED User manual

Monacor
Monacor LED-300DX/WS User manual

Monacor
Monacor CT-1 User manual

Monacor
Monacor DMX-1TEST User manual

Monacor
Monacor HYB-700TEST User manual

Monacor
Monacor IMG STAGELINE STROBE-170DMX User manual

Monacor
Monacor CT-3 User manual

Monacor
Monacor img Stage Line SL-100 User manual

Monacor
Monacor IMG Stageline STROBE-185 User manual