MSI US54G User manual

1. ENGLISH................................................…3
2. DEUTSCH................................................13
3. FRANÇAIS...............................................23
4. ESPAÑOL................................................33
5. ITALIANO.................................................43
6. NEDERLANDS........................................ 53
7. ČESKY..................................................... 63
8. PORTUGUÊS.......................................... 73
9. POLSKI....................................................83
10. PУCCKИЙ................................................93
11. Polski.....................................................103
12. Pols........................................................113
13. Polski.....................................................123
14. ไทย...................................................….133
15. 简体中文.................................................143
16. 繁體中文.................................................153
Version 1.0
P/N: G52-C6861X1

For Radio Product (purly) (EMC+LVD+RF)
EC DECLARATION OF CONFORMITY (EUROPE)
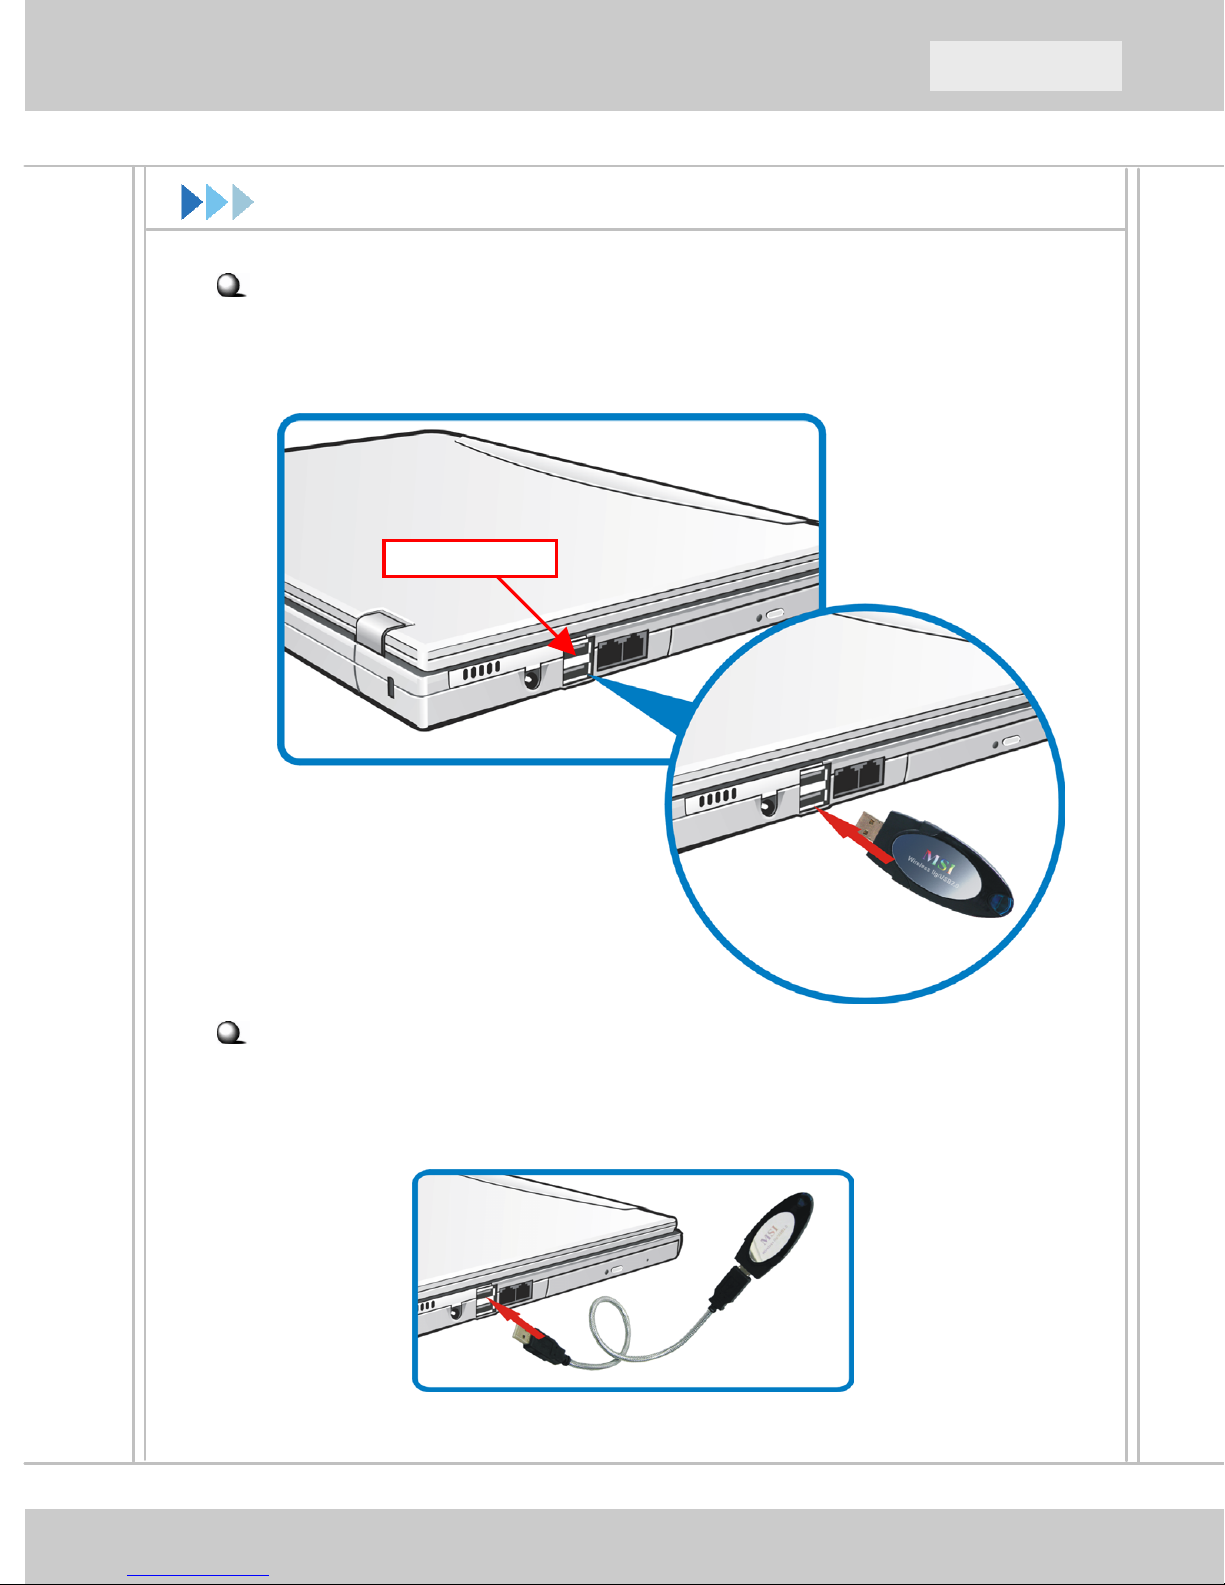
MICRO-STAR INTERNATIONAL declares that the Wireless 11g USB2.0
Stick (MSI US54G) conforms to the specifications listed below, following
the provisions of the European R&TTE directive 1999/5/EC and Low
Voltage Directive 73/23/EEC:
EN 301 489-1..., EN301 489-n (n depends on product requirement) General
EMC requirements,
EN 609 50 Safety requirement,
EN 300 328-2 Technical requirement for Radio equipment.
NOTE: This equipment is intended to be used in all EU and EFTA countries.
Outdoor use may be restricted to certain frequencies and/or may require a
license for operation. For more details, please contact MICRO-STAR
INTERNATIONAL.
NOTE: Combinations of power levels and antennas resulting in a radiated
power level of above 100 mW are considered as not compliant with the
above mentioned directive and are not allowed for use within the European
community and countries that have adopted the European R&TTE directive
1999/5/EC and/or the CEPT recommendation Rec 70.03. For more details
on legal combinations of power levels and antennas, please contact
MICRO-STAR INTERNATIONAL.
Technical Support:
1. Visit the MSI website for technical guide, driver and software updates,
and other information: http://www.msi.com.tw/

ENGLISH

4
Before You Begin
This Quick Start Guide can be used for your MSI US54G – the
Wireless 11g USB2.0 Stick, providing you with easy installation steps
to help you build your network easily and quickly. For further
instructions, please refer to your User’s Guide. For the latest
information or other technical support, please visit MSI website at:
http://www.msi.com.tw.
How to Use This Guide
If you want to... refer to...
install your wireless network adapter page 5
install software page 6 ~ 7
connect the network page 8 ~ 11

5
QuickStartGuide
Hardware Installation
Connection 1
The hardware installation for US54G is simply plugging it into an
available USB port on your desktop/notebook computer.
Connection 2
If necessary, you can connect the provided USB cable to your
computer, and connect US54G to the cable.
USB port
Installing US54G

6
Software Setup
After installing the wireless adapter to your computer and then turning
on the computer, the operating system will detect a new device and
start the configuration automatically. Please CANCEL the system’s
Add New Hardware Wizard here to install the required driver and
utility from InstallShield Wizard of your Software CD.
Insert the Software CD into your CD-ROM drive, and the Setup
program should launch automatically.
If the Autorun program does not launch automatically, click Start at
the taskbar and select Run.... Type E:\setup.exe (where E is your
CDROM drive) in the Open box and click OK to launch the Setup
program manually.
The main screen of Setup program will appear as below. Click the
Install Software button.
X

7
QuickStartGuide
Software Setup (2)
The welcome screen of InstallShield Wizard appears. Click Next.
Read and accept the License Agreement; then, click Next.
In the following window, enter the user’s information (User Name and
Organization) in the respective fields; then, click Next.
Click Install and the program will copy the necessary files to the
system. The progress indicator shows the installing status.
Click Finish when the installation is completed. The MSI Wireless
LAN icon will appear in the status area.
MSI Wireless LAN icon
Y
Z
[

8
Connecting Network
After installing the software, the MSI wireless adapter provides you
with a convenient and powerful utility that allows you to set up,
configure, and know your networking status easily and clearly.
Your MSI wireless adapter can be used by two networking modes:
Infrastructure mode and Ad-hoc mode.
Infrastructure Mode allows your computer to communicate with the
other computers in the network through an Access Point.
To connect the Access Point:
1. Click the MSI Wireless LAN icon to bring up the Wireless
Network Connection window.
2. In the list of Available wireless networks, select (highlight) the
network you want, and then click Connect.
select
click

9
QuickStartGuide
Connecting Network (2)
Advanced Settings for Infrastructure Mode
Follow the instructions below to configure advanced settings in the
Infrastructure mode.
1. Click Advanced in the Wireless Network Connection window.
2. You can click Refresh to search the available Access Points in the
network again. The results will be displayed in the Available
Networks field.
3. Select one network (Access Point) you want, and click Configure
to set up the selected network.
4. For security purpose, you can set up the Network Key and
Authentication.
5. Click OK to complete the configuration. The MSI Wireless LAN
icon indicates the connection status.

10
Connecting Network (3)
Ad-hoc Mode allows your computer to communicate directly with any
computer installed with compatible wireless adapter.
To build the Ad-hoc network:
1. Click the MSI Wireless LAN icon to bring up the Wireless
Network Connection window. Then, click Advanced.
2. Click Add.
3. Set up the Network Name (SSID) and Network Key (if needed)
for the Ad-hoc network.
4. Check “This is a computer-to-computer [ad hoc] network;
wireless access points are not used” option and click OK to
enable the Ad-hoc mode, and return to the Wireless Connection
window.

11
QuickStartGuide
Connecting Network (4)
5. Click OK to complete the configuration. The MSI Wireless LAN
icon indicates the connection status.
The computer setting up this Ad-hoc network through the procedure is
the designated administrator of the network. Any computer can
access the network by selecting Connect in the Wireless Network
Connection window.
Enter a Network
Name (SSID)
Check this option
Setup the WEP and
Authentication for
your need

12

DEUTSCH

14
Bevor Sie anfangen
Diese Kurzanleitung erlaubt es Ihnen, Ihren MSI US54G – einen 11g
USB2.0 Wireless LAN Netzwerkadapter, in einigen leichten Schritten
zu installieren und somit Ihr Netzwerk ebenso leicht und schnell
aufzubauen. Weiter gehende Informationen entnehmen Sie bitte Ihrem
Benutzerhandbuch. Um die neuesten Information oder weitere
technische Unterstützung zu erhalten, suchen Sie bitte die MSI Website
auf: http://www.msi-computer.de.
Wie Sie diese Anleitung verwenden
Wenn Sie beabsichtigen... schlagen Sie nach auf...
Ihren WLAN-Adapter zu installieren Seite 15
Software zu installieren Seite 16 ~ 17
Verbindung zum Netzwerk herzustellen Seite 18 ~ 21

15
QuickStartGuide
Installation der Hardware
Anschlussweise 1
Die Hardwareinstallation des US54G besteht einfach darin, ihn in
einen freien USB Port Ihres Desktop Computers oder Notebooks
einzustecken.
Anschlussweise 2
Falls notwendig, können Sie die Verbindung zwischen dem Rechner
und dem US54G auch unter Verwendung des beigelegten USB Kabels
herstellen.
USB Port
Installation US54G

16
Installation der Software
Nachdem Sie den WLAN Adapter installiert haben, wird Ihr
Betriebssystem nach dem Einschalten das neue Gerät erkennen und
automatisch die Konfiguration starten. Bitte klicken Sie auf
ABBRECHEN und beenden Sie so den Hardware Assistenten Ihres
Betriebssystems. Starten Sie stattdessen den InstallShield Wizard
von der beigelegten Software CD, um die benötigten Treiber und das
Konfigurations-Utility zu installieren.
Legen Sie die Software CD in Ihr CD-ROM Laufwerk, das
Einrichtungsprogramm sollte automatisch starten.
Startet das Programm nicht automatisch, klicken Sie auf Start in der
Taskleiste und wählen Sie Ausführen…. Geben Sie im Fenster
“Ausführen” E:\setup.exe ein (wobei EIhr CDROM Laufwerk
bezeichnet) und klicken Sie auf OK, um das Einrichtungsprogramm
von Hand zu starten.
Das Hauptfenster des Einrichtungsprogramms erscheint wie unten
dargestellt. Klicken Sie auf die Schaltfläche “Install Software”.
X

17
QuickStartGuide
Installation der Software (2)
Der Startbildschirm des InstallShield Wizard erscheint. Klicken Sie auf
Next.
Lesen Sie die Lizenzvereinbarung (License Agreement) und nehmen
Sie diese an (Accept), klicken Sie danach auf Next.
Geben Sie im folgenden Fenster Ihre Nutzerdaten (Benutzername
-User Name- und Organisation) in die entsprechenden Felder ein,
klicken Sie auf Next.
Klicken Sie auf Install, damit das Programm die notwendigen Dateien
auf Ihr System kopiert. Die Fortschrittsanzeige gibt den Fortgang der
Installation wieder.
Klicken Sie auf Finish, wenn die Installation abgeschlossen ist. Das
MSI Wireless LAN Icon erscheint nun im Statusbereich der Taskleiste
unten rechts.
MSI Wireless LAN Icon
Z
[
Y

18
Verbindung zum Netzwerk
Nach der Installation der Software wartet die MSI WLAN-Karte mit
einem bequemen und leistungsfähigem Utility auf, das es Ihnen
gestattet, Ihre Karte leicht und übersichtlich einzurichten, zu
konfigurieren und den Status Ihrer Verbindung zum Netzwerk zu
überwachen.
Ihr MSI WLAN Adapter kann in zwei Netzwerkmodi verwendet
werden: “Infrastructure mode” und “Ad-hoc mode”.
Der “Infrastructure Mode” gestattet es Ihrem Computer, mit anderen
Rechnern im Netzwerk über einen Access Point zu kommunizieren.
Herstellung der Verbindung zu einem Access Point:
1. Klicken Sie auf das MSI Wireless LAN Icon, um das Fenster
“Wireless Network Connection” aufzurufen.
2. Wählen Sie in der Liste der verfügbaren WLANs Ihres durch
anklicken und hervorheben aus und klicken Sie dann auf “Connect”.
Auswählen
Anklicken

19
QuickStartGuide
Verbindung zum Netzwerk (2)
Erweiterte Einstellungen für den “Infrastructure Mode”
Befolgen Sie die folgenden Anweisungen, um erweiterte Einstellungen
im “Infrastructure Mode” vorzunehmen.
1. Klicken Sie auf “Advanced”im Fenster “Wireless Network
Connection”.
2. Klicken Sie auf “Refresh”, um erneut nach den verfügbaren
Access Points im Netzwerk zu suchen. Das Ergebnis wird im
Feld “Available Networks” präsentiert.
3. Wählen Sie ein Netzwerk (einen Access Point) aus und klicken
Sie auf “Configure”, um den Zugang zum ausgewählten Netzwerk
zu konfigurieren.
4. Aus Gründen der Sicherheit können Sie den Schlüssel des
Netzwerks (Network Key) und die Authentifikation festlegen.
5. Klicken Sie auf “OK”, um die Konfiguration zu vervollständigen.
Das MSI Wireless LAN Icon zeigt den Verbindungsstatus an.

20
Verbindung zum Netzwerk (3)
Der “Ad-hoc Mode” ermöglicht es Ihrem Rechner, direkt mit jedem
Computer Verbindung aufzunehmen, der mit einem kompatiblen
WLAN-Adapter ausgestattet ist.
Herstellung einer “Ad-hoc” Netzwerkverbindung:
1. Klicken Sie auf das MSI Wireless LAN Icon, um das Fenster
“Wireless Network Connection” aufzurufen. Klicken Sie als
nächstes auf “Advanced”.
2. Klicken Sie auf “Add”
3. Stellen Sie den Netzwerknamen (SSID) und Netzwerkschlüssel
(Network Key – sofern notwendig) ein, um eine “Ad-hoc”
Netzwerkverbindung herzustellen.
4. Markieren Sie die Option “This is a computer-to-computer [ad
hoc] network; wireless access points are not used”
(ausschließlich Verbindung von Rechner zu Rechner, keine
Access Points verwendet). Klicken Sie dann auf “OK”, um den
“Ad-hoc mode” zu aktivieren und kehren Sie zum Fenster
“Wireless Connection”zurück.
Other manuals for US54G
1
Table of contents
Languages:
Other MSI Adapter manuals