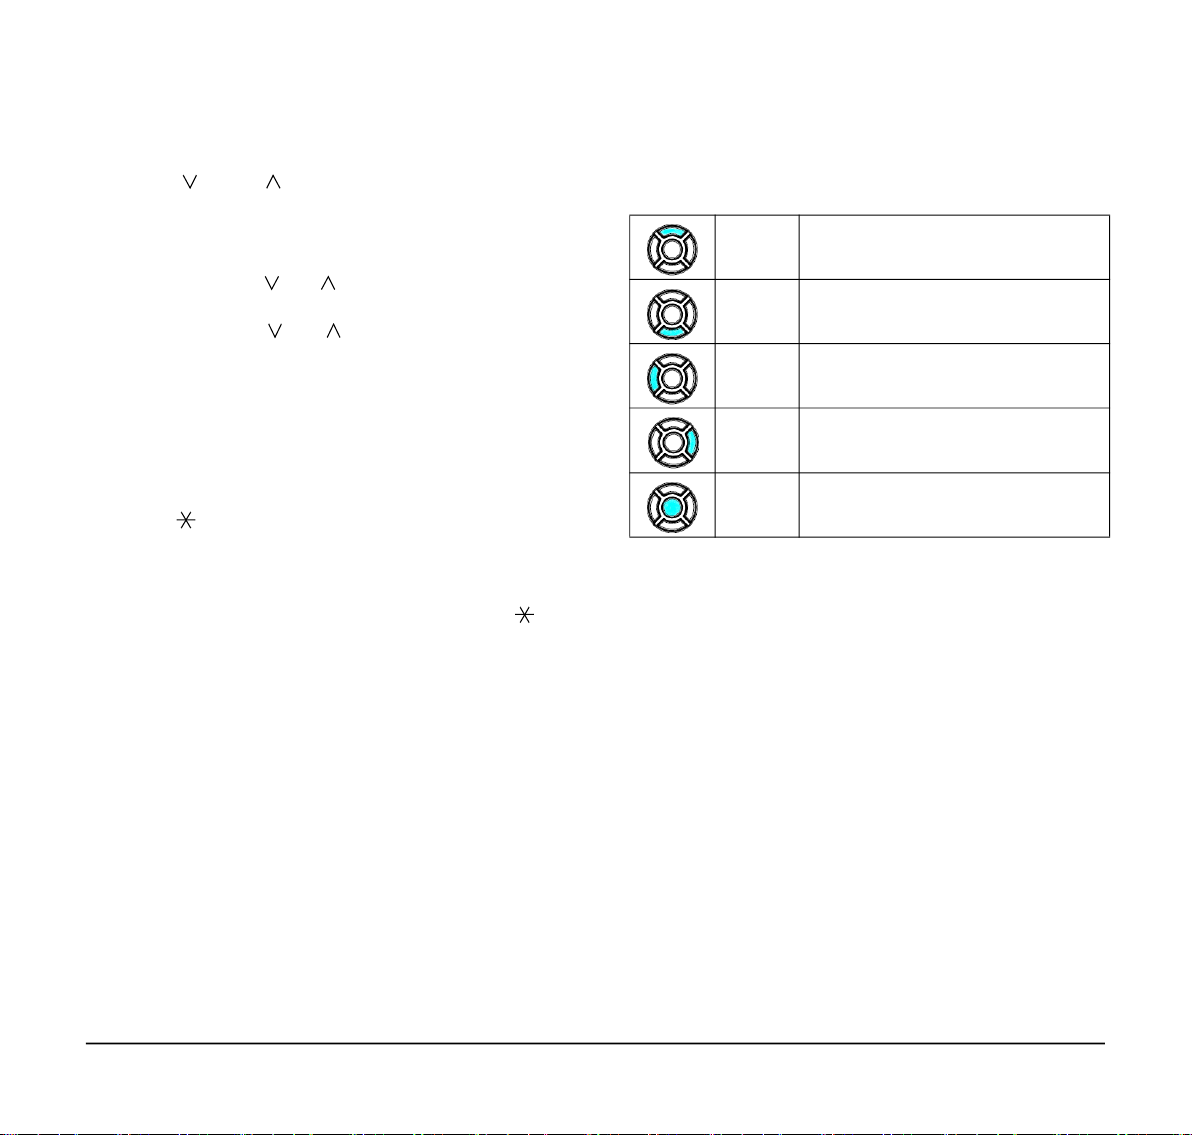
NEC DT510 User manual

DT510
NEC Enterprise Communication Technologies, Inc.
February 2022
NDA-32058
Issue 1.0
USER GUIDE
SV9100
®


NEC Enterprise Communication Technologies, Inc. reserves the right to change the
specifications, functions, or features at any time without notice.
NEC Enterprise Communication Technologies, Inc. has prepared this document for
use by its employees and customers. The information contained herein is the property of
NEC Enterprise Communication Technologies, Inc. and shall not be reproduced
without prior written approval of NEC Enterprise Communication Technologies, Inc.
Dterm and UNIVERGE are registered trademarks of NEC Corporation. Windows is a
registered trademark of Microsoft Corporation.
Copyright 2022
NEC Enterprise Communication Technologies, Inc.
3929 W. John Carpenter Freeway
Irving, TX 75063
Communications Technology Group


- 1 -
TABLE OF CONTENTS
1. INTRODUCTION
General ........................................................................................................................... 1
Face Layout ................................................................................................................... 1
Keys And Parts ............................................................................................................. 2
Simple Operation by Cursor Key ................................................................................. 4
2. TERMINAL SETUP
Terminal Setup With the Up/Down Key ....................................................................... 5
Terminal Setup With the Feature Key ......................................................................... 6
3. FEATURE OPERATION
Answering Calls ............................................................................................................ 9
Placing Calls ................................................................................................................ 10
Microphone Control .................................................................................................... 12
Speakerphone Calls .................................................................................................... 12
Group Listen ................................................................................................................ 12
Holding Calls ............................................................................................................... 12
Transferring Calls ....................................................................................................... 13
Conference .................................................................................................................. 13
Call Park – System ...................................................................................................... 14
Station Busy/No Answer Options .............................................................................. 14
CO/PBX Dialing Options ............................................................................................. 17
Call Pickup ................................................................................................................... 19

- 2 -
TABLE OF CONTENTS
Paging .......................................................................................................................... 20
Background Music ...................................................................................................... 22
Call Forwarding ........................................................................................................... 22
Selectable Display Messaging ................................................................................... 24
Station Relocation ...................................................................................................... 25
Code Restriction, Dial Block ...................................................................................... 25
Account Code Entry ................................................................................................... 26
Automatic Call Distribution (Acd) ............................................................................. 27

1
1.
1. INTRODUCTION
General
This guide explains how to operate DT510 under the
following headings.
CHAPTER 1 INTRODUCTION
Explains the configuration of this guide and
contains the following information.
�Face layout
�Keys and Parts
CHAPTER 2 TERMINAL SETUP
Explains the operating procedures for terminal
settings of the DT510.
CHAPTER 3 FEATURE OPERATION
Explains operating procedures for various
Telephony Server features.
Face Layout
DT510 (DTK-6DE-1)

2
1.
Keys And Parts
DT510
(6-BUTTON WITH MONOCHROME DISPLAY)
(1) Handset
Used for sending/receiving voice.
(2) Exit Button
To exit the Menu or Help mode and go back to the
time display.
(3) Speaker
Used when originating a handsfree call.
(4) Dial Keypad
Dial the called party number or feature access
code.
(5) Hold Key
To place an internal or external call on hold.
(6) Transfer Key
Allows the station user to transfer established
calls to another station, without attendant
assistance.
(7) Speaker Key
To control the built-in speaker which can be used
for:
Hands-Free dialing/monitoring.
LED on key lights when the key is active.
* The DT510 includes support for half duplex
hands-free mode.
(8) Cursor Key
By using this key, you can access various
features with a simple operation.
Details on Cursor Key
(18)
(17)
(16)
(15)
(14)
(13)
(12)
(11)
(10)
(9)
(8)
(4) (5) (6) (7)
(1)
(2)
(3)
(a-1) Volume (UP) key (Four-way scroll up key)
(b) Redial key (Four-way scroll left key)
(c) Enter key
(d) Directory key (Four-way scroll right key)
(a-2) Volume (DOWN) key (Four-way scroll down key)
(b) (d)
(a-2)
(c)
(a-1)

3
1.
(a) Up/Down
( DOWN UP)
Used to adjust speaker/receiver volume, and
ringer volume.
�Speaker/Receiver Volume:
Press ( ) or ( ) key during conversation.
�Ringer Volume:
Press ( ) or ( ) key during ringing.
(b) Redial
(Last Number Call, Speed Calling-Station/
Group) Press this key to activate redial
feature. Press Redial and scroll back
through numbers that have been dialed.
When the desired number is displayed, press
or # to activate dialing.
Note: A-law Countries [Europe, Australia,
Russia, Latin America, Middle near East,
other Asian nations]: #
µ-law Countries [North America]: .
(c) Enter
Use this key to determine the selected item
in the menu.
(d) Directory
Pressing this key opens Directory menu.
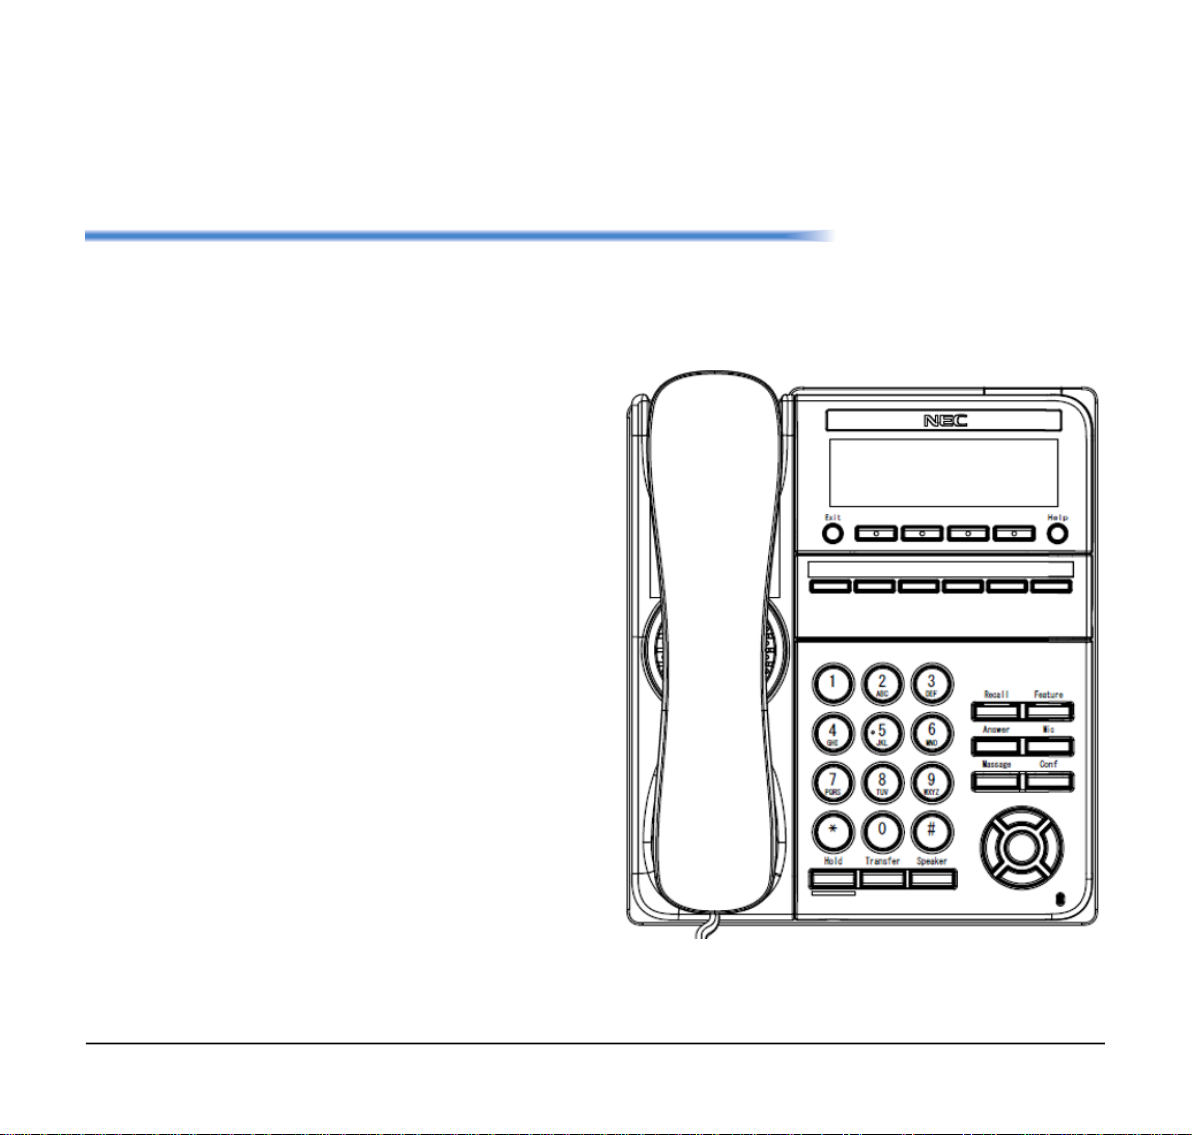
(9) Conf Key
Press key to establish a three-way conversation.
LED on key lights when key is active.
(10) Message Key
Press key to access the voice mail system.
(11) Mic Key
To respond handsfree. LED lights during
speakerphone operation.
(12) Answer Key
When LED on this key is lit, press this key to
answer a waiting call.
(13) Feature Key
To activate features such as terminal setup, and
to program One-Touch Speed Dial Keys.
(14) Recall Key
To finish a call and hear the dial tone.
Up Move the highlighted area one line up
the screen.
Down Move the highlighted area one line
down the screen.
Left Go back to the previous screen.
Right Go to the screen which corresponds
to the highlighted menu item.
Enter Go to the screen which corresponds
to the highlighted menu item.

4
1.
(15) Programmable Keys
These keys can be programmed as Flexible line
key/Programmable feature key by System
Administrator.
(16) Help Key
To display explanations of the Softkeys on the
LCD.
Note: Not all Help contents are displayed. For details,
contact the System Administrator.
(17) Soft Keys
Any feature shown at the bottom of the LCD is
available. The appropriate feature key is
displayed on the screen according to the call
handling process.
(18) LCD (Liquid Crystal Display)
The LCD (Liquid Crystal Display) provides DT510
activity information plus date, time and Softkey
Operation with a 28-character, 4-line display
capability.
Simple Operation by Cursor Key
By using the Cursor Key, the DT510 user can have
access to Call History, Directory and terminal settings
with simple operation.
As an example, the following shows the operations how
to access to Directory menu.
List Dir ICM Prog
101 STA101
28 APR MON 8:45AM
Press Directory Key
Dial

5
2. TERMINAL SETUP
This chapter describes operating procedures for
terminal settings by the UP/DOWN key and Feature
keys.
Terminal Setup With the Up/Down
Key
To Adjust Handset Receiver Volume
Press the Up/Down key in the off-hook status or during
the call.
To Adjust Speaker Volume
Press the Up/Down key during speakerphone
operation or during the call.
To Adjust Ringer Tone
Press the Up/Down key during ringing.
To Adjust LCD Contrast
Press the Up/Down key in the on-hook status.
HANDSET
SPEAKER
RING
LCD

6
Terminal Setup With the Feature
Key
Microphone On/Off
LED on Mic key shows the status of the built-in
microphone.
(1) Press Mic.
To Select Ringer Tone
(1) Press Speaker and dial 720.
(2) Dial 1 to set Intercom ring; Dial 2 to set Trunk
ring.
(3) Dial code for the desired ring pattern (1~8).
Display below shows when INT is selected.
(4) Press Speaker to hang up.
Listening to the Incoming Ring Choices
(1) Press Speaker and dial 711.
(2) Dial 1 to listen to Intercom ring; Dial 2 to listen to
Trunk ring.
(3) For Intercom Ring:
Dial the code for the ring pattern you want to hear
(1-8).
-OR-
For Trunk Ring:
Dial code for the ring pattern you want to hear
(Ring1-3, Melody 4-8). If you select Ring 1-3, a second
screen prompts for the tone pattern (1-4).
1: INT 2: EXT
SET INCOM RING
INCOM RING 1-8:?
SET INT INCOM RING
Tone No. Tone Range
1 High
2 Mid Range
3 Low
4 Ring Tone 1
5 Ring Tone 2
6 Ring Tone 3
7 Ring Tone 4
8 Ring Tone 5
Tone No. Tone Range
1 Ring Tone 1
2 Ring Tone 2
3 Ring Tone 3
4 Melody 4
5 Melody 5
6 Melody 6
7 Melody 7
8 Melody 8

7
(4) Press Speaker to hang up.
Changing your Extension Incoming Ring Tone
(1) Press Speaker and dial 720.
(2) Dial 1 to set Intercom ring; Dial 2 to set Trunk
ring.
(3) Dial 1 to set the Tone; Dial 2 to set the Melody.
The display below shows when INT is selected
and Program 15-02-78 is enabled
(4) The following is displayed when 2: Melody is
selected.
Displayed when ring tone setting is completed
and ring tone is played.
(5) Press Speaker to hang up.
Listening to the Incoming Ring Choices
(1) Press Speaker and dial 711.
(2) Dial 1 to listen to Intercom ring; Dial 2 to listen to
Trunk ring.
(3) For Intercom Ring:
Dial the code for the ring pattern you want to hear
if Program 15-02-78 is enabled
(Tone:1, Melody:2).
-OR-
1: INT 2: EXT
SET INCOM RING
TONE:1 MELODY:2
SET INT INCOM RING
SET INT INCOM RING
MELODY: 1-5
Tone Type Tone No. Tone Range
Tone:1
1 High
2 Medium
3 Low
Melody: 2
4 Melody 1
5 Melody 2
6 Melody 3
7 Melody 4
8 Melody 5
SETTING COMPLETE
SET INT INCOM RING

8
For Trunk Ring:
Dial code for the ring pattern you want to hear
(Tone:1, Melody:2).
(4) Press Speaker to hang up.
Tone Type Tone No. Tone Range
Tone:1
1 High
2 Medium
3 Low
Melody:2
4 Melody 1
5 Melody 2
6 Melody 3
7 Melody 4
8 Melody 5

9
3. FEATURE OPERATION
Answering Calls
Ringing Calls
(1) Lift the handset.
(2) Start conversation.
Note: When assigning the Delayed Ringing feature,
incoming calls will first ring at a primary station. If the
call is unanswered after a preprogrammed time
interval, calls will also ring at the assigned secondary
station.
Ringing Calls to a Second Incoming Extension/
CAR/VE Key
(1) Lift the handset.
(2) Start conversation.
Note: A Second Incoming Extension key must be assigned to
appear and ring.
Note: A Line key must be available to answer an incoming
outside call
Answering Outside Calls Using the Answer Key
(1) Receive outside call.
(2) Press the Answer key.
(3) Talk with the incoming calling party.
(4) When additional outside calls are received, press
the Answer key to place the current call on hold
and connect the multiline terminal user to the
next call.
TALKING TO STA 12345
2-11 MON 10:15AM
Conf
Ringing
Line 001
List Dir ICM Prog
Answered
Line 001 00:10
Conf Rpt Save

10
Voice Announce Calls
(1) Adjust the Speaker volume as needed.
Note: On SV9100 if MIC key is not lit the
user cannot answer voice announce calls
without lifting the handset.
(2) Respond hands free.
Note: The handset may be used any time
during the conversation.
Camp-on (Call Waiting)
Receive the camp-on tone while on another call:
(1) When a Camp On is set from another station,
complete the present call and a Call Back will ring
the station that set the Camp On.
(2) When the Camp On station answers and rings
the phone, lift the handset or press the Speaker
key.
Off Hook Signaling
With a call in progress:
(1) Receive Off-Hook signaling.
(2) Press the Answer key, then converse with the
second party.
Note: The second call may be placed on Hold.
Note: Press the flashing Line key or Conf key to return
to the first call.
Placing Calls
Internal Calls
(1) Lift the handset.
(2) Dial a station number or 0 (for attendant).
(3) Voice announce after the tone burst, or wait for
the ringing call to be answered.
Outside Calls
(1) Lift the handset.
(2) Dial the trunk access code (i.e. 9).
-OR-
(1) Press an idle Programmable Outside Line key.
(2) Dial the telephone number.
(3) Converse.
Trunk Queuing
After pressing a busy Line key and receiving the trunk
busy indication:
(1) Dial # or press Trunk Queuing/Camp On key
(Service Code 751:35).
(2) Replace the handset.
Note: When a line is available, your telephone will
ring; lift the handset and place the call.
UP
DOWN
TALKING TO STA 12345
2-11 MON 10:56AM
Conf
2142622000
Line 001 00:15
Conf Rpt Save Trf

11
Last CO/PBX Number Redial
(1) Without lifting the handset,
press the Redial key.
(2) To redial the last number, press #.
-OR-
Search for the desired number from the Redial
List by pressing the List Softkey and then the
Redial Softkey.
(3) Press the Up Arrow/Down Arrow or VOLUME
UP/VOLUME DOWN keys to search for the
desired number.
(4) Lift the handset or press Speaker to place the
call.
Speed Dial – System/Group/Station
To dial a Station Speed Dial number:
(1) Press the Speaker key.
(2) Dial #7 (default Service Code).
Note: To preselect, press a Line key in step 1 (instead
of Speaker).
(3) Dial the Station Speed Dial buffer number (0~9):
1 = Station Speed Dial buffer 1
2 = Station Speed Dial buffer 2
:
:
0 = Station Speed Dial buffer 10
Note: The stored number dials out.
Note: Unless you preselect, Trunk Group Routing
selects the trunk for the call. The system may optionally
select a specific Trunk Group for the call.
Note: If you have a DSS Console, you may be able to
press a DSS Console key to chain to a stored number.
To dial a Station Speed Dialing number:
(1) Press the Speaker key.
(2) Dial #2 (default Service Code).
-OR-
(3) Press the Redial key.
-OR-
(4) Press the System Speed Dialing key (Service
Code 751:27).
Note: To preselect, press a Line key in step 1 (instead
of pressing Speaker).
(5) Dial the Station Speed Dial buffer number
(Default: 000~999).
The stored number dials out.
Note: Initially (at default), there are 1000 System Speed
Dial buffers.
Note: Unless you preselect, Trunk Group Routing selects the
trunk for the call. The system may optionally select a specific
Trunk Group for the call.
Note: If you have a DSS Console, you may be able to press
a DSS Console key to chain to a stored number.
Redial CID
LIST MENU
92142622000 NEC
2-13 WED 5:28PM
Conf Rpt Save Trf

12
To dial a Group Speed Dialing number:
(1) Press the Speaker key.
(2) Dial #4 (default Service Code).
-OR-
(3) Press the Redial key.
-OR-
(4) Press the Group Speed Dialing key (Service
Code 751:28).
Note: To preselect, press a Line key in step 1 (instead
of pressing Speaker).
(5) Dial the Group Speed Dial buffer number ( none
at default).
Note: Initially, there are no Group Speed Dial buffers
assigned.
Note: Unless you preselect, Trunk Group Routing selects the
trunk for the call. The system may optionally select a specific
Trunk Group for the call.
Note: If you have a DSS Console, you may be able to press
a DSS Console key to chain to a stored number.
Microphone Control
(1) Press the MIC key.
(2) A lit MIC LED indicates that the MIC is on.
Speakerphone Calls
(1) Press the Speaker key and the Speaker LED
lights.
(2) Ensure that the MIC LED is lit.
(3) Place an internal or outside call.
(4) Converse.
(5) Press the Speaker key to disconnect the call.
Note: The handset may be used at any time during the
conversation. To resume hands free operation or to
monitor a call, press the Speaker key (the Speaker LED
lights) and replace the handset.
Group Listen
To initiate Group Listen:
(1) Place or answer a call using the handset.
(2) Press the Speaker key twice (do not hang up).
Note: The Speaker LED flashes.
Note: You can talk to the caller through the handset.
Your coworkers hear your caller’s voice over your
telephone’s speaker.
Note: When you press the Speaker key once, you turn
your Speakerphone on. The second press turns on
Group Listen. Pressing the Speaker key a third time
cancels the Group Listen feature.
Holding Calls
System Hold
With a call in progress:
(1) Press Hold.
GROUP LISTEN
2-13 WED 5:40PM
Conf

13
Exclusive Hold
With a call in progress:
(1) Press the Exclusive Hold key (Service Code
751:45).
Note: To retrieve a held call, press the flashing Line
key or ICM key (Internal calls).
Note: Calls on System Hold can be retrieved from any
multiline terminal with the held line appearance.
Note: After a preprogrammed time, the held call will
recall to the originating station.
Transferring Calls
Using Manual Dial
With a call in progress:
(1) Press the Transfer key.
(2) Dial the station number.
(3) Announce the call (optional).
(4) Replace the handset.
Using Direct Station Selection (DSS)
With a call in progress:
(1) Press the Transfer key.
(2) Press the programmed DSS.
(3) Announce the call (optional).
(4) Replace the handset.
Note: If the called station is busy, replace the handset
to initiate a camp-on. Unanswered camp-on calls and
unscreened transfers will recall to the transferring
station.
Note: To return to the original party, press the flashing
Line key or Conf key.
Note: A Programmable Function Key may be
assigned for DSS.
Note: To transfer a call directly to a personal voice
mailbox, dial 8 after dialing the station number.
Conference
(1) Establish an intercom or trunk call.
(2) Press Conf or Conference softkey (Service
Code 751:07).
(3) Dial the extension you want to add.
-OR-
Access an outside call.
Note: To get the outside call, you can either press a
Line key or dial a trunk/trunk group access code.
(4) When the called party answers, press the Add
softkey or Conf twice.
Note: If you cannot add additional parties to your
conference, you have exceeded the system’s Conference
limit.
HOLD STA 12345678
2-13 WED 5:40PM
InPg ExPg P/U
HOLD STA 12345678
2-13 WED 5:40PM
InPg ExPg P/U

14
(5) Repeat steps 2~4 above to add more parties.
Call Park – System
To Park a call in a system orbit:
Note: You can Park intercom or trunk calls.
(1) Press the Park key (Service Code 752: *04 +
orbit).
Note: The Park key LED lights.
(2) Use Paging to announce the call.
(3) Press the Speaker key to hang up.
Note: If not picked up, the call will recall you.
-OR-
(1) Press the Transfer key.
(2) Dial #6831 and the Park orbit (01~64).
Note: If you hear a busy tone, the orbit is busy. Try
another orbit.
(3) Use Paging to announce the call.
(4) Press the Speaker key to hang up.
Note: If not picked up, the call will recall you.
To pick up a Parked call:
(1) Lift the handset.
Press the Park key (Service Code 752:
*04 + orbit).
-OR-
(1) Press the Speaker key.
(2) Dial *6 and the Park orbit (01~64).
Station Busy/No Answer Options
Callback
To place a callback:
(1) Call an unavailable (busy or unanswered)
extension.
(2) Dial # or press the Callback key (Service Code
751:35).
(3) Hang up.
(4) Lift the handset when the busy extension calls
you back.
TALKING TO STA 12345
2-11 MON 10:56AM
Conf
ICM DIAL
CONF
AnHd Dir
PARK HOLD
Park No. Dial
ANS HOLD
Park No. Dial
This manual suits for next models
1
Table of contents
Other NEC Telephone manuals

NEC
NEC Xen IPK II User manual

NEC
NEC Xen Master User manual

NEC
NEC Univerge SV9100 User manual

NEC
NEC Electra 16/48 User manual

NEC
NEC NEAXMail AD-64 User manual

NEC
NEC Portrait 308 User manual

NEC
NEC NEAX7400 ICS M120e User manual

NEC
NEC AT-55 User manual

NEC
NEC UNIVERGE SV7000 User manual

NEC
NEC UNIVERGE SL2100 User manual

NEC
NEC AT-40 User manual

NEC
NEC Univerge SV9100 User manual

NEC
NEC Xen Topaz User manual

NEC
NEC DT330 Reference guide

NEC
NEC Aspire Instruction manual

NEC
NEC Univerge SV8100 DT310 User manual

NEC
NEC NEC Dterm Series E User manual

NEC
NEC Aspire User manual

NEC
NEC SL1000 User manual

NEC
NEC UNIVERGE SL2100 User manual