NEC DXE Series User manual

D
DX
XE
E
S
Se
er
ri
ie
es
s
NEC INFRONTIA ISDN BUSINESS COMMUNICATION SYSTEM
D
DE
EC
CT
T
H
Ha
an
nd
ds
se
et
t
(
(D
DH
HA
AL
L
M
Mo
od
de
el
l)
)

1
Contents
FOR YOUR SAFETY....................................................................................................... 3
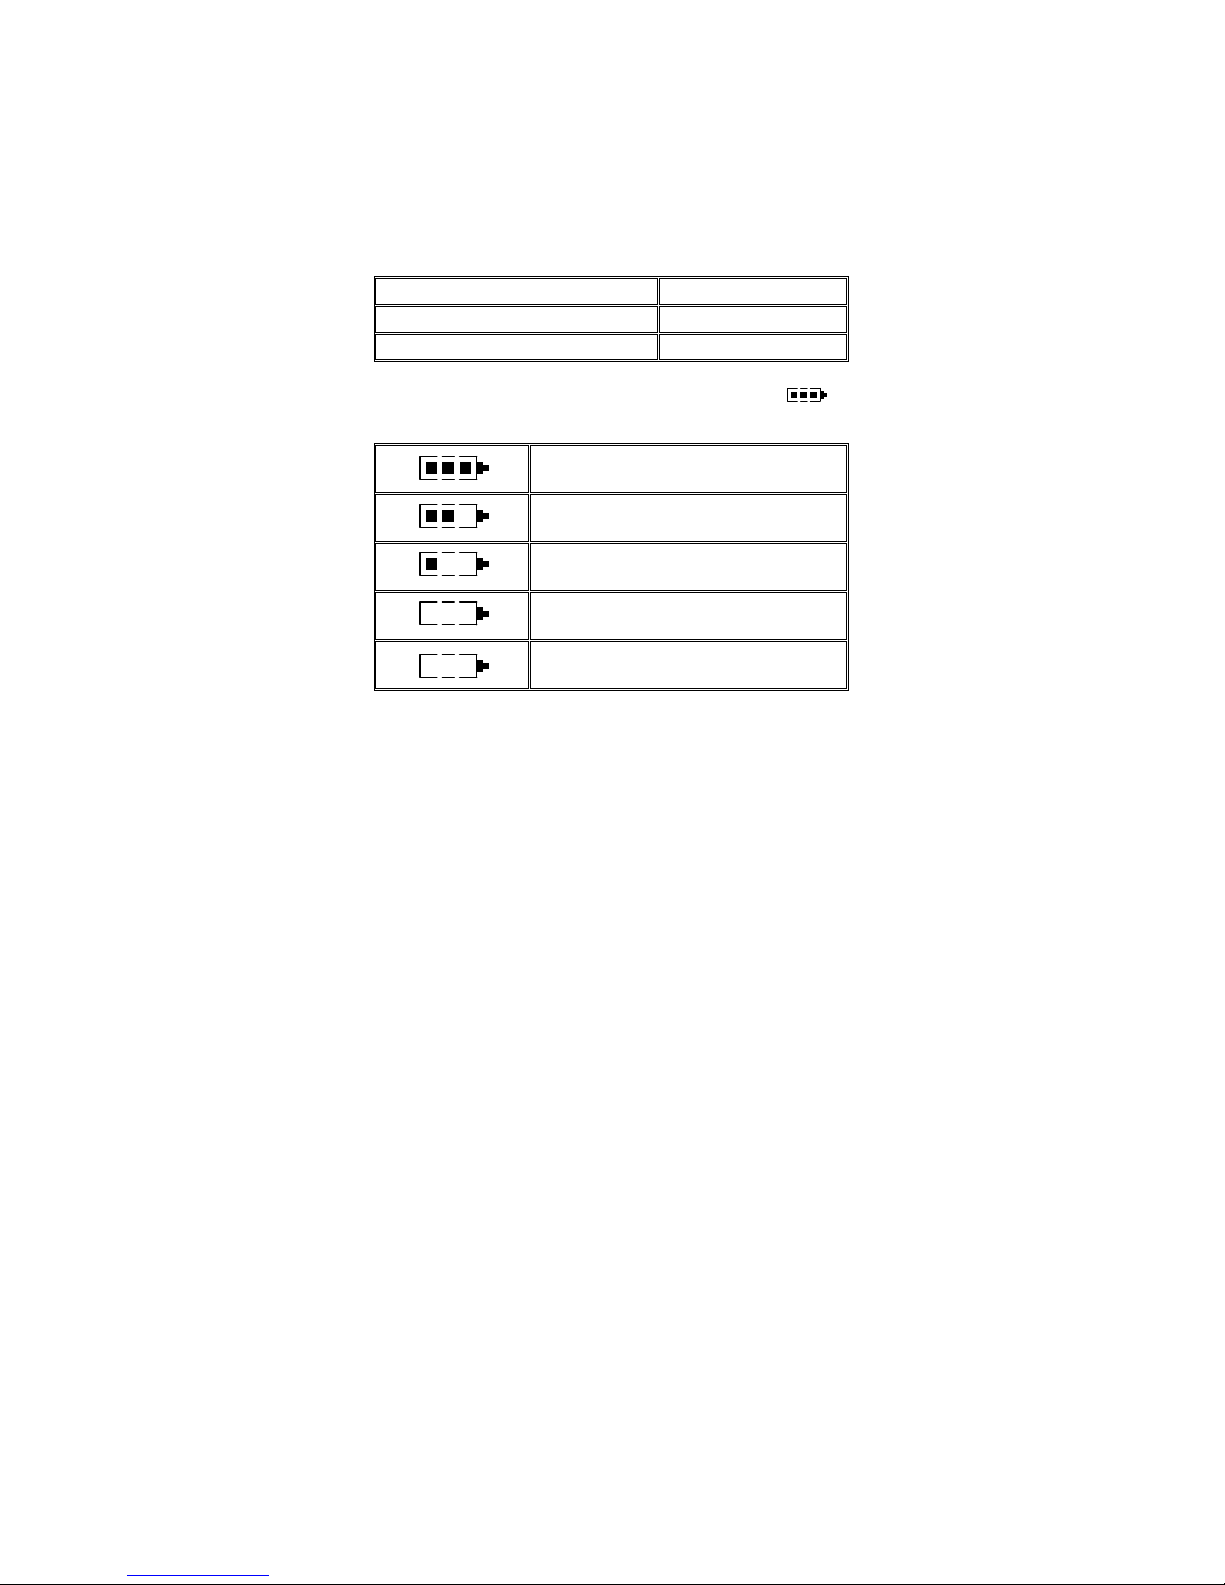
BATTERY INFORMATION........................................................................................... 6
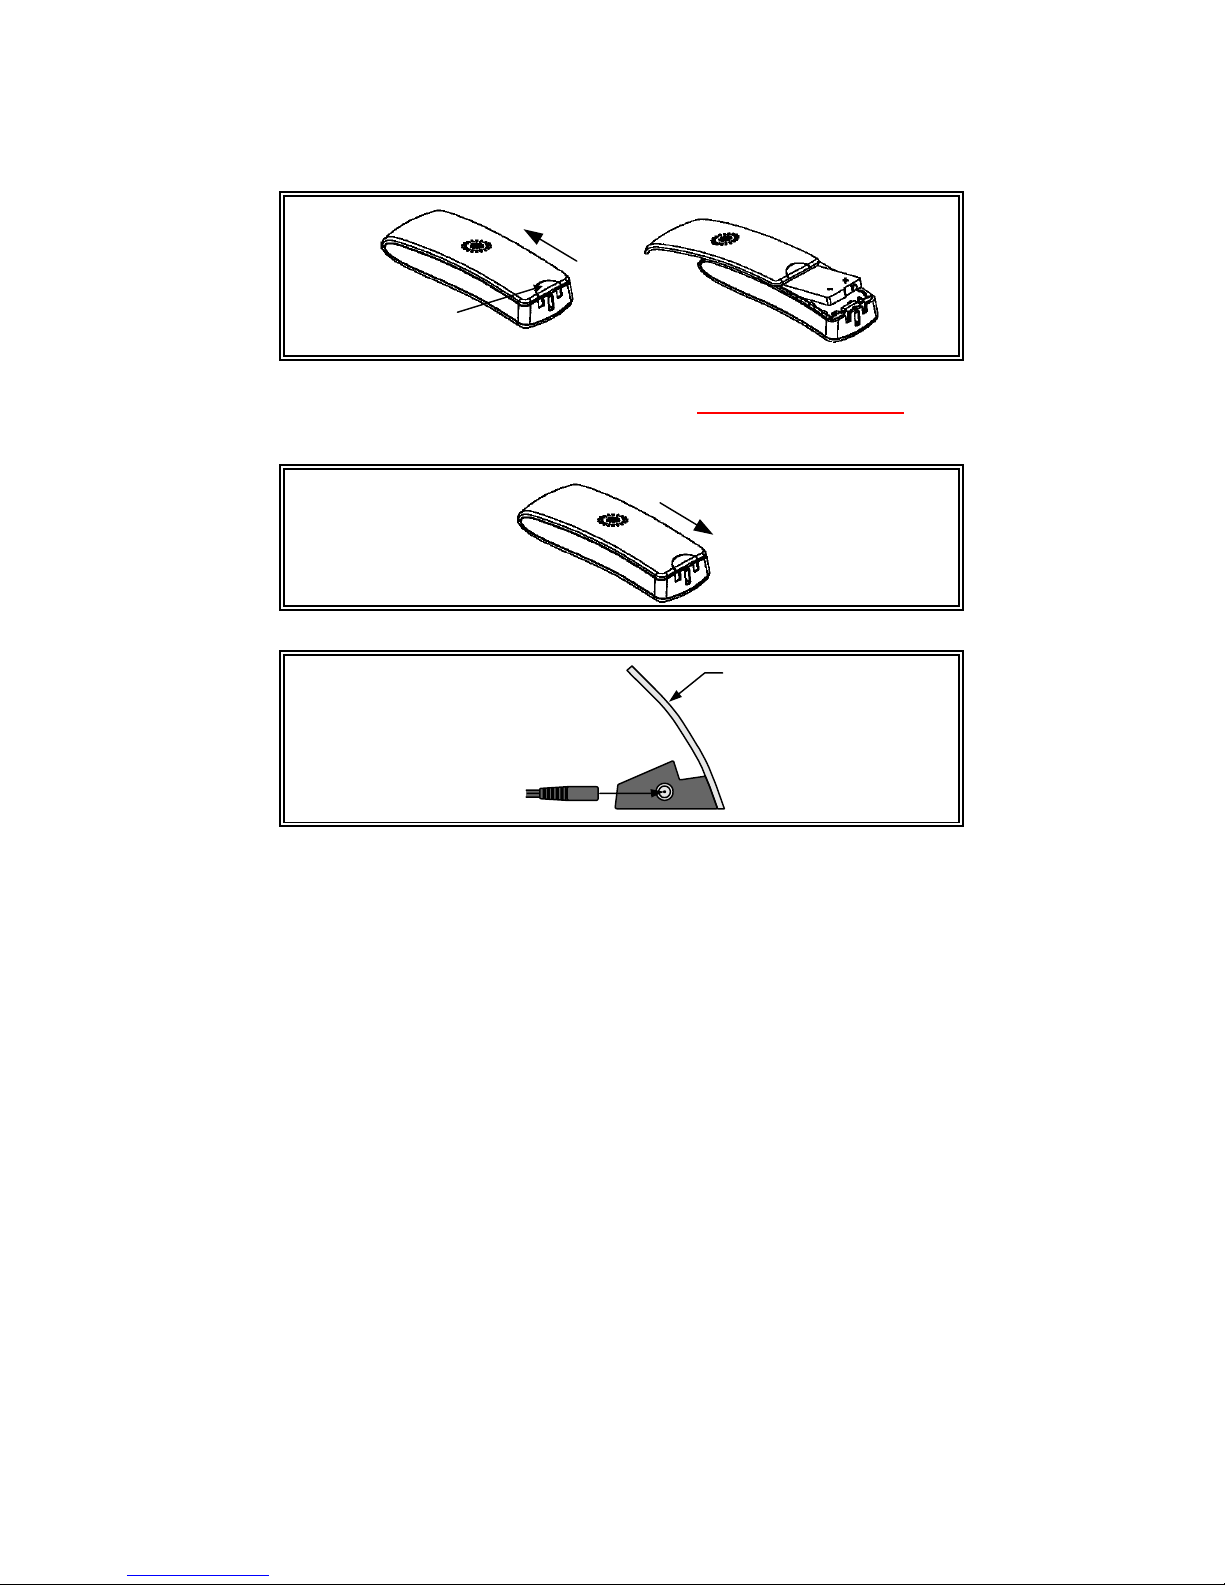
Fitting the Battery Pack and Charger .............................................................................. 6
Charging & Operating Time............................................................................................ 7
HANDSET LAYOUT........................................................................................................ 8
Location of Controls........................................................................................................ 8
DISPLAY LAYOUT ......................................................................................................... 9
BASIC SET UP................................................................................................................ 10
Switching the Handset ON / OFF.................................................................................. 10
User Name Setting......................................................................................................... 10
Entering Alphabetical Characters.................................................................................. 11
Adjusting the Receiver Volume .................................................................................... 12
Ringer Setting................................................................................................................ 12
Language Selection ....................................................................................................... 14
USING THE HANDSET................................................................................................. 15
Making Calls ................................................................................................................. 15
Answering Calls ............................................................................................................ 16
Mute .............................................................................................................................. 17
Hold and Transfer.......................................................................................................... 18
Telephone Book (TelBook)........................................................................................... 19
Redial List ( )................................................................................................... 24
Caller List...................................................................................................................... 25
Telephone Options ........................................................................................................ 29
SECURITY ...................................................................................................................... 30
Pin Number ................................................................................................................... 30
Key Pad Lock................................................................................................................ 33
MENU CHART ............................................................................................................... 34

2
TELEPHONE SYSTEM FEATURES .......................................................................... 35
Abbreviated Dialling ..................................................................................................... 35
Account Code................................................................................................................ 35
Alarm Clock .................................................................................................................. 36
Break In......................................................................................................................... 36
Call Forward.................................................................................................................. 36
Call Pickup .................................................................................................................... 37
Callback/Camp On ........................................................................................................ 37
Conference .................................................................................................................... 38
Department Group Calling ............................................................................................ 38
Dial Block ..................................................................................................................... 39
Do Not Disturb (DND).................................................................................................. 39
Doorphone..................................................................................................................... 39
Hold............................................................................................................................... 40
Night Service................................................................................................................. 41
Paging............................................................................................................................ 41
PC Based Voice Mail Connection................................................................................. 42
Personal Code................................................................................................................ 43
Room Monitor ............................................................................................................... 44
Tandem Ring................................................................................................................. 44
Toll Restriction.............................................................................................................. 45
Transfer ......................................................................................................................... 45
Trunk Call ..................................................................................................................... 45
Unsupervised Conference.............................................................................................. 47
Virtual Extension........................................................................................................... 47
Walking Toll Restriction............................................................................................... 47

3
FOR YOUR SAFETY
- Do not place the handset in locations where the temperature may rise, such as in
direct sunlight or near heating devices. If the handset is exposed to excessive
temperatures the handset is likely to suffer from deformation or discolouration.
The exposure the excessive temperatures may also lead to malfunction and in
extreme cases ignition of the internal circuitry.
- Do not disassemble or modify the handset. If attempted this may lead to
malfunction of the handset and may lead to a fire hazard. Any attempt to
disassemble the handset will invalidate the warranty and repair of the handset
may be declined.
- The handset charging unit should only be connected to 220-240VAC outlets.
- Do not place the handset in a microwave oven or high pressure container. This
may cause heat ignition or explosion.
- Do not touch any part of the equipment including the charging unit with wet
hands as this will present a risk of electric shock and will lead to the handset or
charger malfunctioning.
- If the electric cord to the charger is damaged it must be replaced by your supplier
immediately.
- Only the battery pack specifically designed for the handset can be used. Contact
the supplier for a replacement battery. Never dispose of the battery in a fire or
other heart source as this may lead to heat generation, ignition or explosion.
Never disable or modify the battery as this may lead to as this may lead to heat
generation, ignition or explosion.
- Do not connect the contact points on the handset to anything which might short
circuit the contacts. Do not carry or store the battery pack with metal items such
as necklaces and coins which could lead to the battery contacts shorting. This
could cause heat generation, ignition or explosion.
- If at any time the following are noticed while using the handset, charging, or
storing the battery pack remove the handset from the charger and do not use the
handset;-
o Offensive Smell
o Heat is generated by the battery pack or handset
o Discolouration of the handset or battery pack
o Deformation of the handset or battery pack
o Anything unusual

4
For Your Safety (Cont’d)
- If any liquid leaks from the handset or battery pack stop using the handset. Do
not expose the liquid or the handset or battery pack to any heat or fire. The
electrolyte may be ignite and result in fire or explosion.
- If the any liquid from the battery pack or handset comes into contact with your
eyes rinse with cold clean water immediately and consult a doctor immediately
- If any liquid leaked from the battery comes into contact with your skin or
clothing rinse immediately with cold water. Contact with your skin could lead to
a skin rash. If a rash appears and if there is any discomfort contact a doctor.
- Never solder the battery pack. This will cause heat generation and may lead to
ignition or explosion
- If the handset charging unit is damaged in any way disconnect the charger from
mains supply, taking care not to touch any damaged parts. Contact your supplier
for a replacement item.
- Do not expose the handset or charger unit to steam or high humidity. Exposure to
these conditions may lead to malfunction of the handset or charger and may
result in a risk to electric shock
- Abuse of the handset, such as throwing or dropping the handset may lead to
malfunction and cause heat generation, ignition or explosion
- During thunder storms remove the charging unit from the mains supply as
lighting may result in the risk of electric shock and present a fire hazard.

5
For Your Safety (Cont’d)
Note
Do not use the phone at the following places.
) In direct sunlight or near heating devices or boilers.
) Humid places or where the phone may be exposed to water, oil or chemicals.
) Dusty places or where iron powder or harmful gases can be produced.
) At places where the temperature drops below 5ºC.
) Where magnetism or electric wave may be received.
Do not leave the AC/DC adapter (power source) of the battery charger unplugged.
This will prevent charging of the handset.
Do not drop the phone or subject it to strong impact.
Use the phone at places with the ambient temperature from 5 to 35ºC, where it
will not be subject direct sunlight.
Do not use it in a bathroom. Do not soak it in water.
Do not expose it to running water.
When water splashes on the phone, wipe off with a dry cloth as soon as possible.
Do not leave the phone, if it has become wet, where the temperature can drop
under 0ºC.
When water drops on the holes of the receiver and microphone, wipe off before
use. (Otherwise the volume may be reduced.)
Do not put a phone in the battery charger if it has wet terminals.
When using the phone outside be careful not to expose it to rainfall.
Important Notice before using a DECT Handset
The DECT Handset uses wireless communication technology, therefore
sometimes some of the features / functions may not be activated due to the
environmental condition. We recommend that you do not use a DECT Handset fo
r
essential communication such as ACD Agent, Guest Room Telephone (Hotel),
Client’s Telephone, for medical emergencies etc.

6
BATTERY INFORMATION
Fitting the Battery Pack and Charger
1. Push the back cover of DECT Handset upwards and insert the battery pack.
2. Make sure the battery contacts correctly positioned. (Check battery polarity)
3. Replace the back cover correctly.
4. Connect the AC-DC Adapter plug to the socket on the left side of Handset Holder.
5. Put the AC-DC Adapter into the commercial AC socket.
6. Place the DECT Handset onto the Handset Holder. The battery will automatically
start charging.
Slide
Push
Slide
Handset Holder
(Left side view)
AC-DC Adapter

7
Charging & Operating Time
Charge the battery for 6-7 hours before using the DECT Handset for the first time.
This safety precaution extends the lifetime of your battery. The maximum
performance of the battery is only reached after 3 to 5 charging / discharging cycles.
Place the DECT Handset in the Holder regularly, in order to reach the optimum
battery charge.
Charging Time (to full capacity) 6-7 hours
Call Time (fully charged) up to 8 hours
Standby Time (fully charged) up to 80 hours
The charge level of the battery shall be indicated by the in the Display.
The symbol has the following meaning.
75-100% charged
50-75% charged
25-50% charged
0-25% charged
(Frame flashes) nearly discharged
Note : When the battery has been replaced, there is no charge level display until a
whole charge and discharge cycle has been completed.
When the battery capacity is nearly exhausted, you may hear 3 short beep tone
repeated once a minute as a warning. If you are making a call at the time, you may
still have up to 5 minutes of call time before the handset switches itself off.

8
HANDSET LAYOUT
Location of Controls
Name Description
Display 96 ×48 dot, 5 Lines ×16 Characters
Multi-Language
(Up to 10 languages)
English, German, Spanish, French, Italy,
Dutch, Portuguese, Swedish, Danish, Norwegian
Telephone Book Up to 40 bins (26 digits, 16 characters)
Incoming Call History (Caller List) Up to 10 calls
Redial List Up to 10 calls
Call Duration Timer No
Handsfree No
Headset Mode No
Data Communication No
13
2
46
5
79
8
#
0
B
A
C
F
E
D
K
J
L
O
N
M
G
H
I
U
T
V
Z
Y
W
X
P
Q
S
R
ReceiverLED ring
Soft Keys
Off/On-Hook Key
Scroll Keys
Recall Key
Microphone
Dial Keys
Clear Key
Lights up when there
is an incoming call.
Used for feature
setting.
Used to off/on-hook
the call.
Used for menu
selection and Receiver
volume control.
(7 Levels)
Used to transfer the
call.
Used for numbers /
alphabets entry.
Used to return a
display indication to
the initial state.
Display
Indicates quick
guidance
information, dialled
number and so on.

9
DISPLAY LAYOUT
Symbol Line
Symbol Description
Ringer off (Silence)
Signal strength is good if at least 2 bars are visible
On : active on a call, Flashing : incoming call
Battery charging status (see Page 7)
Text Li nes
The text lines display the information on the current call status or menu lists and
texts. In the idle state, it displays the system name with extension number and user
name.
Soft Key Line
Symbol Description
Use to select the desired call from Redial List.
Move the cursor by pressing Scroll Keys in order to select the
desired call or menu.
Move the cursor to the beginning or end of the entry by pressing
Scroll Keys.
Illumination (Back-Light)
The display is automatically illuminated when there is an incoming call or when
you press a key. The illumination is switched off again automatically about 10 sec
after the last key was pressed.
Symbol Line
Text Lines (3 Lines)
Soft Key Line
TelBook
ABC CORP
Menu
MIKE
208

10
BASIC SET UP
Switching the Handset ON / OFF
You can switch the handset ON by pressing
Off/On-Hook Key more than 2 seconds. You switch
it OFF by pressing Off/On-Hook Key again for more
than 2 seconds in the idle state.
User Name Setting
You can register the name on your handset.
Note : The user name shall be used just for the identification of handset. The user
name is displayed on your handset during idle status, and is not registered to
the system.
1
Press "Menu" Key.
TelBook
ABC CORP
208
Menu EscOK
Telephone Book
System
Telephone Options
EscOK
Opt. Charge ind.
Coverage Warning
User Name
EscOK
Edit Name
MIKE
2
Select "Telephone Options" by
pressing Scroll Key, then press
"OK" Key.
3
Select "User Name" by pressing
Scroll Key, then press "OK" Key.
4
Enter the user name by using dial
digit keys, then press "OK" Key.
TelBook
ABC CORP
208
Menu
MIKE
The display shall be changed as
below.
65
Press Clear Key to finish.

11
Entering Alphabetical Characters
ÄÅÀÁÃÆÇ
ÈÉÊË
ÌÍÎÏ
ÑÖÒÓÔÕØ
ß
ÜÙÚÛ
ABC2
1?! , . : " '
DEF 3
GH I 4
JKL5
MNO 6
PQRS7
TUV8
WXY Z 9
0@$&
(Space)
+=-~<>^%
#(){}[]/ _
\
Back Space Key
Move the cursor to the begining of the entry.
Move the cursor to the end of the entry.
3
4
6
5
7
9
8
#
0
1
2
;

12
Adjusting the Receiver Volume
The Scroll Key can be used to adjust the Receiver
volume to any one of 7 levels during Off-Hook
condition. The volume level adjustment is shown on
the display.
Ringer Setting
Melody : Up to 10 melodies are provided, and you can assign a different melody to
distinguish between an internal and external call.
Menu
1
Press "Menu" Key.
2
Select "Ringer Settings" by
pressing Scroll Key, then press
"OK" Key.
3
Select "Melodies" by pressing
Scroll Key, then press "OK" Key.
4
Select the call type by pressing
Scroll Key, then press "OK" Key.
5
Select a melody by pressing
Scroll Key, then press "OK" Key.
MIKE
EscOK
Key Lock
Caller List
Ringer Settings
EscOK
Type
Level
Melodies
6
Select the other call type to set a
melody, or press "Esc" Key to
return "Ringer Settings" menu.
TelBook
ABC CORP
208
Menu
EscOK
Messages
Extern
Intern
EscOK
Intern
3
EscOK
VIP
Extern
Intern

13
Ringer Type : You can select the type of ringer.
Melody Calls are signalled with the complete melody.
Silence All ringer signals are off. In the idle state,
“Ringer Off” symbol shall be displayed.
Chirp Short melody, signalled only once.
Volume : You can adjust the volume level of the ringer signal (6 levels).
1
Select "Type" by pressing Scroll
Key, then press "OK" Key.
2
Select the call type by pressing
Scroll Key, then press "OK" Key.
EscOK
Melodies
Level
Type
EscOK
Chirp
Melody
Silence
1
Select "Level" by pressing Scroll
Key, then press "OK" Key.
2
Select type of call by pressing
Scroll Key.
EscOK
Melodies
Type
Level
EscOK
Extern
Intern
3
Press Scroll Key to adjust the
volume, then press "OK" Key.
EscOK
2
Intern

14
Language Selection
You can select one of 10 languages from the List if necessary. (English / German /
Spanish / French / Italy / Dutch / Portuguese / Swedish / Danish / Norwegian)
1
Press "Menu" Key.
2
Select "Telephone Options" by
pressing Scroll Key, then press
"OK" Key.
3
Select "Language" by pressing
Scroll Key, then press "OK" Key.
4
Select the language by pressing
Scroll Key, then press "OK" Key.
5
Press Clear Key to finish.
EscOK
Francaise
Deutsch
English
MIKE
TelBook
ABC CORP
208
Menu EscOK
Telephone Book
System
Telephone Options
EscOK
Coverage Warning
User Name
Language

15
USING THE HANDSET
Making Calls
To make an Intercom Call :
Note : Pre-set Dialling (dial the number, then press Off/On-Hook Key) is also
possible.
To make an External Call :
Note 1 : Following trunk access functions may also be available. (It depends
on the system setting. Contact your supplier for the availability.)
- Specified Trunk Access (805 + Trunk No.)
- Trunk Group Access (804+Trunk Group No.)
Note 2 : Pre-set Dialing (dial the number, then press Off/On-Hook Key) is also
possible.
To redial a call :
1
Press Off/On-Hook Key.
(Confirm Dial Tone.)
2
Dial the desired extension
number.
???
1
Press Off/On-Hook Key.
(Confirm Dial Tone.)
2
Seize an idle Trunk.
3
Confirm Dial Tone. Dial the
desired telephone number.
? ? ?
9
1
(On-Hook Condition)
Press Scroll Key.
2
Select the desired number by
pressing Scroll Key, then press
Off/On-Hook Key to place a call.
EscTelBook
303
90352825862
204

16
Answering Calls
To answer an Incoming Call :
To reject an Incoming Call before answering :
Note : The calling party on Intercom or MSN/DDI shall receive Busy Tone.
CLIP Indication
The CLIP (Telephone Number / Extension Number) is displayed when there is an
incoming call. If the delivered CLIP is stored in your Telephone Book, the
associated name shall be displayed. If there is an incoming call without CLIP,
“Unknown Number” message is displayed.
2
Press Off/On-Hook Key to
answer a call.
1
DECT Handset shall ring.
(The LED ring shall flash.)
RejectMute
Intern
209
1
DECT Handset shall ring. Press
"Reject" Key.
2
The DECT Handset shall return
to the idle state.
RejectMute
Intern
209 MIKE
TelBook
ABC CORP
208
Menu

17
Mute
To set / cancel the Mute :
You can switch the microphone on your handset off so that the other party does not
hear anything from your end.
2
Press "Unmute" Key to cancel.
1
(While talking) Press "Mute"
Key.
MenuMute
Intern
209
NextUnmute
Intern
209

18
Hold and Transfer
To hold / retrieve a call : (Exclusive Hold)
To transfer a call :
If the destination extension is busy
1
(While talking) Press Recall Key
to hold a call.
2
Press Recall Key again to retrieve
a call.
2
Dial the extension number you
want to transfer the call to.
1
(While talking) Press Recall Key
to hold the call.
? ? ?
4
Press Off/On-Hook Key to
complete the transfer.
3
Make announcement if the
dialled extension answers.
<Screened Transfer>
<Unscreened Transfer>
Go to Step
4
immediately.
1
Press Off/On-Hook Key.
2
The Hold Recall shall appear
immediately. Press Off/On-Hook
Key to retrieve a original call.

19
Telephone Book (TelBook)
The DECT Handset has 40 speed dialling bins for personal use. Both the telephone
number and name can be stored so you can quickly place an outgoing call without
dialling the telephone number.
Storing a Telephone Number and Name :
Note 1 : If at least one bin has been stored, you will need to press “Next” key after
pressing “TelBook” key from the idle state; this then enables you to press
‘New’ key and continue from step 3
Note 2 : When storing an external number in the Telephone Book, prefix the
number with the digit 9 to access an external trunk line.
Note 3 : Refer to Page 11 for entering alphabetical characters.
1
Press "TelBook" Key.
2
Press "New" Key.
New Esc
Empty
_
EscOK
3
Dial telephone number you want
to store, then press "OK" Key.
4
Enter name you want to store,
then press "OK" Key.
5
The stored name shall be
displayed as below. Press Clear
Key to finish, or press "New"
Key to continue. Go to Step
3
MIKE
TelBook
ABC CORP
208
Menu
Enter Number
_
EscOK
Enter Name
NextNew
NEC-I EU
Other manuals for DXE Series
1
This manual suits for next models
1
Table of contents
Other NEC Telephone manuals

NEC
NEC SV8300 User manual

NEC
NEC 8IPLD Instruction manual

NEC
NEC Univerge SV8100 Use and care manual

NEC
NEC Dterm Series i User manual

NEC
NEC UT880 User manual

NEC
NEC UX5000 User manual

NEC
NEC DT310 User manual

NEC
NEC UNIVERGE SV9100 DT750 User manual

NEC
NEC UNIVERGE SL2100 User manual

NEC
NEC DS1000 User manual