NEC IP4VVW-24TXH-B TEL User manual

Using Your Terminal
• IP4WW-( )*TXH-8 TEL ......
Call
Indicator
Lamp
./
This lamp flashes fast when a call is ringing and
Handset
•.•••.
·
.•
·
••
:.:·
· .....
Exit
Key
./
flashes slowerwhen a message has been left.
Exit
~ny
scre
.
~n
and
retu~
......
•......
Alphanumer
ic
Display
the
d1splay
to Time &
Da
te ./ / The LCD has 3 lines, 24 characters with
fF
=====:~==
~~===
====~g"~
·
~·
Ffl
/
backlight.
~,l~r
~
~~
~
.
~
:
::J..
~
-.....
..
.....
1
.
........
Jf
.....
sott
Keys
1l\ The Soft Keys show the available features for
your current activity. Any feature shown at the
bottom
of
the LCD is available.
\\
~
:I~
_Ql-
1
~-~~-~~~~
.
-
1
:
Q:
1
:.
~:~p
u
~!y
can press this key followed by a
~
programmable key to check what Line or
Programmable Feature is assigned on the key.
:=:
Programmable
Function
Keys
.,;
\
/
~co
:=:
Flexible Line keys or Feature Keys assigned by
;;
/
~c"'
1 , the System Administrator.
;;:,o,
~:::o
1
1
1
~~~~
~~
~
1
~""o
~~
.....
Flash
Key
.,.
;>'c>
1
----------
-,
4··
····
p
~
:r.,c
I
CD
m-
m-
I
.....
-Press key to finish an outside call and hear the
co
.,;
fr.,C
I 1 2 3 I I h " dial tone.
~
p~oc:>
l
I •
cc:i
~
c
I - ollll. -I - -
1 °
:mmm
:··
.r·
~
.....
Transfer
Key
' I
:mmm
:
cr
·····
.....
·
~(
\1
~w~J~~~
··
l tj ftr.;:=i 9==1·
~o..
"'
~.)'
:•
: /
'---ID~--r
.
II
Dial
Keys
Speaker
. : :
....,
..
...
HOLD
Key
Press this key to place
an internal or external
call on hold.
Speaker
Key
·.
Controls the built-in speaker, which
can be used for Handsfree dialing/
monitoring. LED
on
key lights when
key is active.
Allows the extension userto transfer established
calls to another extension.
DND
Key
(Do Not Disturb)
Setup a Do Not Disturb
if
pressed during a call.
Mute
(Microphone)
Key
Mute handset or Handsfree Microphone. LED
lights when microphone is muted.
Clear
/
Back
Key
Press this key to cancel the current action or
delete a character.
Cursor
Key
Access various features with simple operation.
Volume (UP)
Key
Redial
Key
Directory
Funct
ions
or
* 12 Programmable Function Keys are available for IP4VVW·
12TXH
-8 TEL.
24 Programmable Function Keys are available for IP4VVW-24TXH-B TEL.
The illustration
shows
IP4VVW-24TXH
-8
TEL.
Volume (DOWN)
Key
Handsfree
Options
-Handsfree lets you place and answer calls by pressing "Speaker" instead
of
using the handset.
-With Automatic Handsfree, you can press a Speaker Key without lifting the handset. Normally, you have
Automatic Handsfree.
-Use Handsfree Answerbackto answer a voice-announced Intercom call by speaking toward your phone without
lifting the handset.

For Your Convenience
• Programmable Function Keys
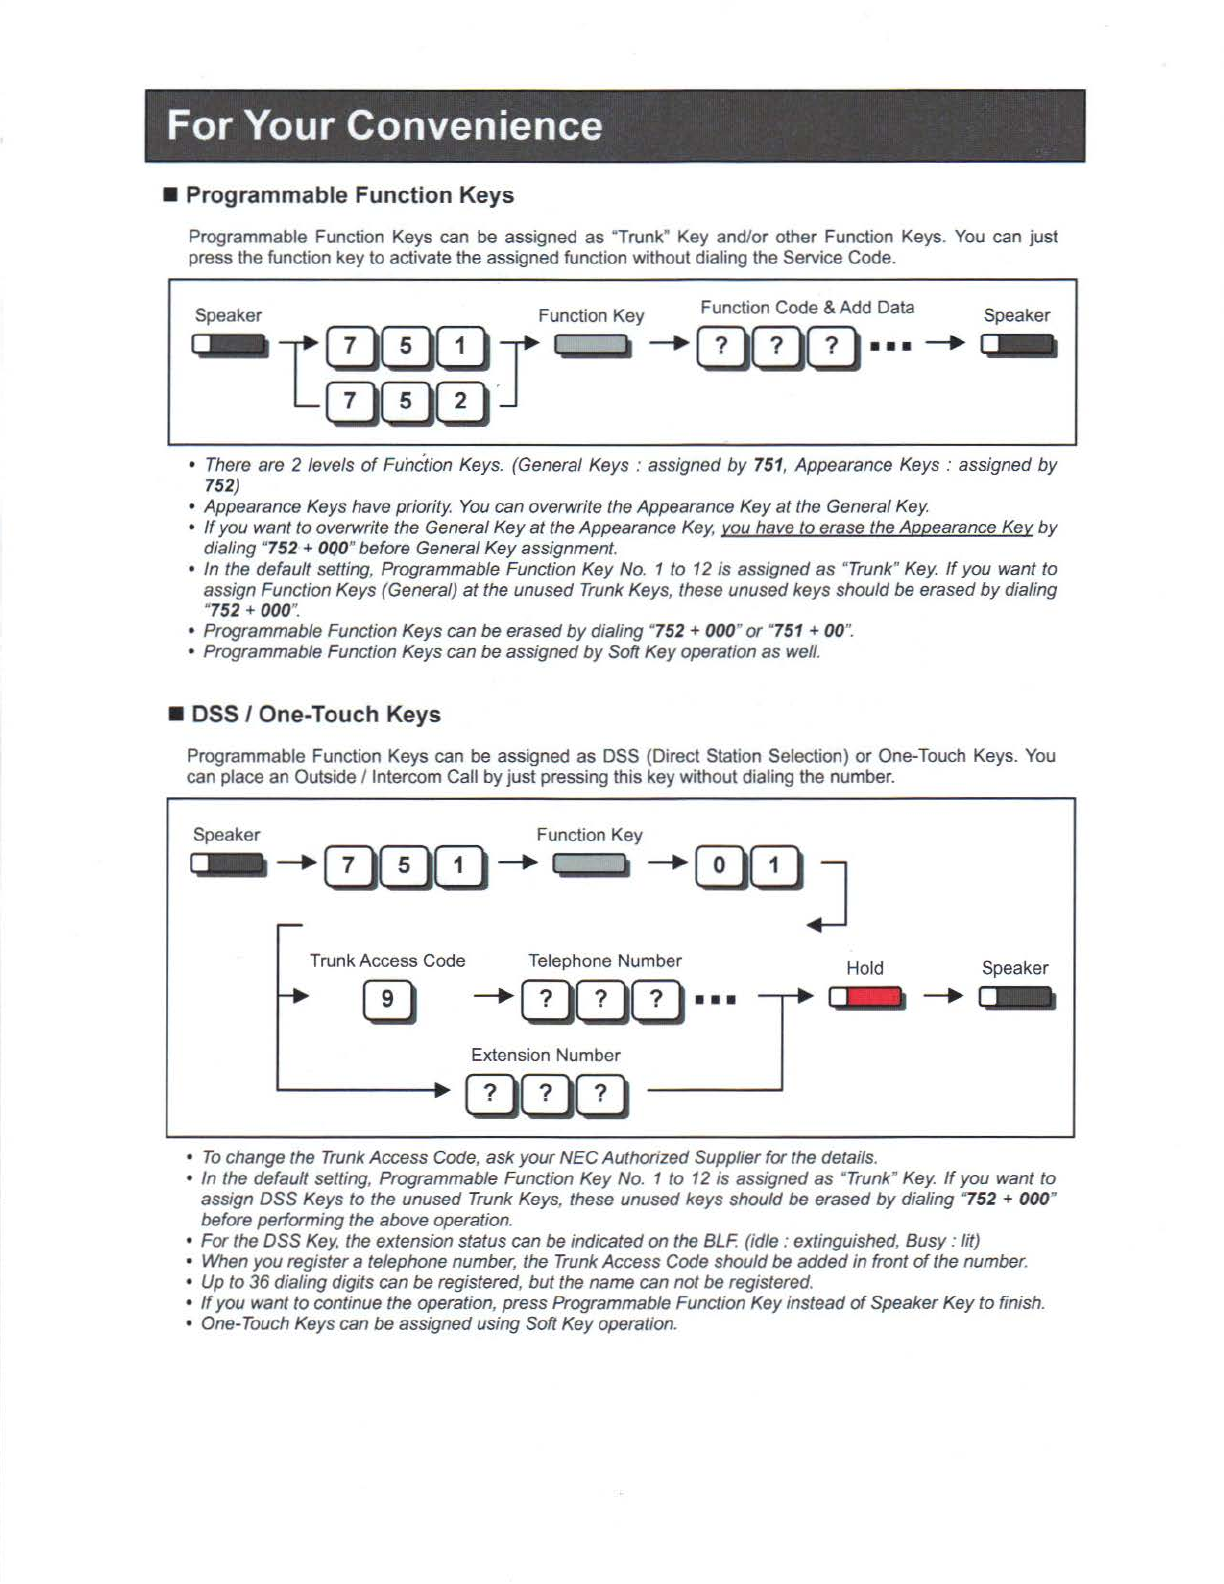
Programmable Function Keys can be assigned as "Trunk" Key and/or other Function Keys.
You
can just
press the function key to activate the assigned function without dialing the Service Code.
Speaker
~
Speaker Function Key Function Code & Add Data
~T0CDQJJ
I h --+000···--+
L0C!JCif
• There are 2 levels
of
Function Keys. (General Keys : assigned
by
751, Appearance Keys : assigned
by
752)
• Appearance Keys have priority. You can overwrite theAppearance
Key
at
the General
Key.
•
If
you want to overwrite the General
Key
at
the Appearance
Key,
vou have
to
erase the Appearance
Key
by
dialing "752 +
OQO
"before General
Key
assignment.
• In the default setting, Programmable Function
Key
No
. 1 to 12
is
assigned
as
"Trunk" Key.
If
you want to
assign Function Keys (General)
at
the unused Trunk Keys, these unused keys should be
erased
by
dialing
"752 +
00
0
".
• Programmable Function Keys can be erased
by
dialing "752 + 000"
or
"751 + 00
".
• Programmable Function Keys can be assigned
by
Soft
Key
operation
as
well.
• DSS I One-Touch Keys
Programmable Function Keys can be assigned as DSS (Direct Station Selection)
or
One-Touch Keys.
You
can place an Outside /Intercom Call
by
just pressing this key without dialing the number.
Speaker Function Key
~
~
0C!JQJ- •-[!}QJJ
TrunkAccess Code Telephone Number Hold Speaker
--+000···
-~
~
--+~
Extension Number
•
To
change the TrunkAccess Code, ask
your
NEGAuthorized Supplierforthe details.
•
In
the default setting, Programmable Function
Key
No
. 1 to 12
is
assigned
as
"Trunk" Key.
If
you
want
to
assign OSS Keys
to
the unused Trunk Keys, these unused keys should be erased
by
dialing "752 + 000"
before performing the above operation.
•
For
the
DSS
Key,
the extension status can be indicated on the BLF. (idle : extinguished, Busy : lit)
• When
you
registera telephone
number
, the Trunk Access Code should
be
added
in
front
of
the
number
.
• Up
to
36
dialing digits can be registered,
but
the name
can
not
be
registered.
•
If
you want
to
continue the operation, press Programmable Function
Key
instead
of
Speaker
Key
to
finish.
• One-Touch Keys can be assigned using Soft
Key
operation.
Example.....extension 102 calls extension 101 and 102 presses the soft-key [MSGW] which turns the light on at extension 101.
The message waiting light at extension 101 stays on until 101 calls back the extension that turned it on (102).
To extinguish the light at extension 101, simply dial the person who light the light at that phone.
It should say in the display with several arrows ( >>102 )
You can turn another extension's message waiting light on from your extension

Placing Calls
• Place an Outside Call <Quick Access>
Trunk Key
• Listen
to
the Dial Tone before dialinga Telephone Number.
• You
can
have function keys for Trunks
or
Trunk Groups.
Ask
your
NEGAuthorized Supplierforthe details.
• Place an Outside Ca.
ll
,<Access by Code>
Speaker TrunkAccess Code
Te
lephone Number
~r+
------r+~
000
...
+
~'
Trunk Group
No
.
~00~+0
Trunk No.
+
(e.g. : 005
=Trunk
No.5)
•
To
change the Trunk Access Code,
ask
your
NEGAuthori
zed
Supplierforthe details.
• Listen
to
the Dial
Tone
before dialing a Telephone Number.
•
If
the Trunk Group
number
is
greater than
10,
you
should
enter
2 digits (e.g.
11
: Group 11) afterdialing
?04".
Ask
your
NEG AuthorizedSupplierforthe details.
•
Ask
your
NEGAuthorizedSupplierfor the Trunk
Number
dialing dig
its.
• Place an Intercom Call <Dial Access>
• Your call will ring
or
voice-announce.
If
you
hear
ringing, wait for
an
answer.
If
you
hear a beep, begin
speaking. Dialing "1w changes voice/ring mode
(if
the destination
is
Multi-line Terminal).
Transferring calls directly to a voice mail box
While on an active call press the "Transfer" fixed key, then press the "More" soft key.
Now press the "VMGS" soft key, Dial the destination mail box number,
finally hang up to complete the transfer.
Transferring calls to an outside phone number
While on an active call press the "Transfer" fixed key, dial [9] + [1] + the ten digit phone number.
Once the call has been placed and answered, simply hang up to complete the transfer.
To retrieve the original call back, simply press the "Line" appearance button the call originated on

Placing Calls Quickly
• Last Number Dialing
Redial List
Dialed
Number
01/10
Dialed
Number
03/10
2142622000
9725551399
DEC
TUE
22
03:29
PM
DEC
TUE
22
01:12P
M
On-Hook
Condition
~
__.
•
__.
'
__.
Press several times
to
search
Quick Redial Speake'r
[!)[!)-
~
'
c:..
__.
LINE
03
=o-
~
'
Trunk Key
I
.<·
·~
~
__.
Lnd
Save
Rls
0
t'!J'IA
c::::a
c=:::l
• The system retains the last
10
numbers dialed, which can be reviewed
and
redialed.
•
To
cancel the Redial Listoperation, press "Clear/Back"
Key.
• Callback by Received Number
Received
Call
01/10
8175556000
DEC
TUE
22
04:31PM
On-Hook
Condition
__.
~
Received
Call
03/10
4695551012
DEC
TUE
22
11:38AM
Press several timesto search
~
'
• Ca//er-
10
function is required to use
th
is operation for outside calls.
Ask
your NEC Authorized Supplier for
more details.
•
To
cancelthe Callback operation, press "Clear/Back"
Key.

For more Convenient Use...
• Do Not Disturb (DND)
On-Hook
Condition
~
OND
c=-
C!J
DND : Trunk Incoming Call
0 DND : Intercom Incoming Call
(2)
DND:
Trunk & Intercom Incoming Call
C!J
DND : Transferred (CFW) Call
~
DND : Cancel
• When you setDND function, DND Key is fit andthe Internal Dial
Tone
pattern changes.
• Conference
frJ
I
2-8
TUE
3:03PM
~
~
~-
c
_
o
_
n
_
f
________________
-J
Talking 0 tJ- -
~ ~
0
Repeat for
additionalparties
Extension Number
n:
000
Telephone Number
Trunk Key
I
V:\
:&t-l +
00
...
-
frJ
I
2-8
TUE
3:03PM
~
~
~--
Ad
__
d
___
R_l _s
__________
~
Talking 0 tJ- -
c:::::::::a
c:::l
0
.............
..
.......
..+
l..__
se
_
g
_
i
_
n
_
o~
_
·
r
____
C
_
O
-
NF
~
~
-
c
~
0_-
-
~ ~
Q Start
0 Conference
•
You
can repeat this operation to
add
more parties.
•
You
may
be able to have up to 16 parties (including your terminal).
You
may need to adjust the volume
level due to the environment where calfs are placed.
Ask
your NECAuthorized Supplier
for
the details.

For more Convenient Use...
• Call Forwarding I Follow Me
When you set Call Forward I Follow Me, the destination extension is displayed on the LCD and the Internal
Dial Tone pattern ischanged. (Call Forward I Follow Me can be set using a Soft Key).
Call Forward Immediate I
I
Set
Extension Number
Speaker
~
~
~~[~
000
Speaker
c=-
---.
---.
---.
c=-
On
-Hook
Condition
lmm~::dic;nt::
Key 0
~
---.
1
%:'W~~
/II
0
(SC751+10)
Call ForWard when Busy I
I Set Extension Number
Speaker
C?,,~
.
~[~
000
Speaker
c=-
---.
--+
---.
c=-
On-Hook
Condition when Busy Key 0
~
--+
I
:P
i
N/~
''
'
0
(SC751+11)
Call Forward when
No
Answer I
I
Set
Extension Number
Speaker
~~::?[~
000
Speaker
c=-
---.
--+ --+
c=-
On-Hook
Condition No Answer Key 0
~
---.
("
·;J2;
::
})
0
(SC751 +12)
I
Call Forward when BusyI
No
Answer 1 Set Extension Number
Speaker
~
:,
!~:}~:
"
}
[
~a
:
c
~
000
Speaker
c=-
--+ --+ --+
c=-
On-Hook
Condition Busy I No Ans Key 0
~
---.
l ?
T*w
t 0
(SC751+13)

For more Convenient Use...
• Call Forwarding I Follow Me (Cont'
d)
Call Forward Both
Ring
I
I Set Extension Number
Speaker
~~:?[~
000
Speaker
c:..
~
~
~
c:..
On-Hook
Conditi
on
Both Ring Key
(I}
~
~
f
NtpfM
.) 0
(SC751,..14)
Call Forward Follow
Me
I
I Set Extension Number
Speaker
~~~~[~
000
Speaker
c:..~
~
~
c:..
On
-Hook
Condition Follow Me Key
(I}
~
~
I
:·
\
;.
fi
· h 0
(SC751+15)
Admin:
Setting the Time
Go to the "Admin" extension (usually x101)
While the phone is idle, press the "Menu" soft key, dial [0][0], you will be at the "Time" setting,
Press the "Select" soft key, enter the time (HH:MM:SS, 24-hour clock).
Press the "Save" soft key to complete the entry.
Setting the Date
Go to the "Admin" extension (usually x101)
While the phone is idle, press the "Menu" soft key, dial [0][0], as above you will be at the "Time" setting,
Press the "Next" soft key, now you are at the "Date" setting, Press the "Select" soft key,
Enter the date (DD/MM/YYYY).
Press the "Save" soft key to complete the entry.

Soft Keys Operation
• "Me
nu
" So
ft
Key
The following table
shows
the menu structure
of
"
Menu
" Soft Key. You can reach
the
desired feature using
the following operation.
2-8
TUE
3:03PM
200
Menu
Dir
VM
:
00
CL:
00
Prev
Next
Select
Exit
...
Prev
Next
Select
Ba
ck
It
is
possible
to
search the desired feature
by
pressing Cursor the Keys
(Up
I Down I Right I Left) several
times instead
of
"
Prev
"
or
~
NI:lxf
Soft
Keys,
or
it's possible to access the d
es
ired feature directly
by
dialing
the 2 digit Menu Code afterpressing the "
Menu
" Soft Key.
Item
Menu
Code
Next
Operation
after
pressing
the
"
Select
"
10 : Volume
Preference
20 : Display
Preference
30
: Feature
Preference
40
: Ring
Preference
50 : Key
Assignment
60 : Call
Forwarding
70
: Speed Dial
80
: Name and
Language
90:
Option
Preference
00
:
Admin
11
: Ring
12
: Off-Hook
Ring
21
: Contrast
22 : Min Brightness
23 : Max Brightness
31
:Voice Announce
32 : Handsfree Reply
33 : Auto CallTimer
34 : Preview Dial
35 : Illuminated Dialpad
36 :Auto Call Screening
37 : Incoming Page
38
: Ringing Line Preference
39 : Auto Backlit
41 : Intercom
42
: Line Keys
43 : Each Line Keys
51 : Feature Keys
52 : Primel
in
e Key
61 : Immediate
62 : Ring
No
Ans
63 : Busy
No
Ans
64 : Call Forward AME
65 : Display Message
66
: Follow Me
67
: Both
Ring
71
: Personal Speed Dial
72
: Company Speed Dial
81
: Extension Name
82
: Display Language
91
· Headset Mode
92 : Headset VoiceAnnounce
93
: System Information
94 : VoiPDB Information
95 :Auto Backlit (Threshold)
96 :
IP
Address Information
97:
IP
Phone log off
98: Change login password
01
: Time
02
: Date
03
: Extension Name
04
: Clear All Call Fwd
05 : System Night Key Mode
Press "Down· or ·
up
· to adjust the selected option.
Press "Down· or·
up
· to adjust the selected option.
For the selected option, press "
On
" (enable) or
"Off" (disable).
Press "<<" or ">>" to select and save option.
Press "<<"
or"
>>
" to select and saveoption.
Press "
Se
t" or ·cancel",
en
ter
the
destination and
selectop
ti
on to save.
Enter Bin number and Phone number, Name and
save.
For Name, enter the name using Alphanumeric
Characters, For Language, press "« "
or
"» " to
select and save.
For Headset option, press ·
on
· (enable)
or
"Off"
(disable).
ForSystemI VoiPDB information (IPAddress,
MAC
Address), press "Select". For Auto Backlit, select
threshold option to save.
Fo
r Time, Date and
Extens1on
Name, enter the
Time, Date and Extension Number and Name to
save. For Clear
Al
l Call
Fwd
, press "
Yes
·.

Option : In-Mail (Voice Mail)
Optional
hardware
and
System
setting
is
necessary
to
use In-Mail (Voice Mail) feature.
Ask
your
NEC
Authorized
Supplier
for
the
detail
s.
• Log-On
to
the
In-Mail
Speaker Voice Mail Pilot Number Your Mailbox Number Security Code (ifit is set)
~-+c:)c:)c:)-+c:)c:)c:l-+c:lc:lc:lc:l-+
Main
Me
nu
While listening y
ou
can
:
EraseMsg Pa!M&'ResumeListening
Haw
Msg F
OIWai'Cied
Listen to
Next
Msg Select
New
Message
LiSt
M
al<e
Cal to
Sender
Back
up
a
Few
Seconds Select Saved Message
LiSt
Get
Ti
me
, Date B
ac
k
up
to
BegiMing
Select
All
Message
List
SA
ve
Message
Go
Ahead
a Few
Seconds
Ed
Listen
Mode
Callers hearyour
actiw.
greeting (1-3)only ifyou
do
notan-orarebusy
.
lf
A~oAltendant
Dt>D
is
ON
,
the
A~
Attendant
does
notring your
phone
. Callers
immediatelyhearyour
active
!lf"eting.
If
OFF.
the
A~
Attendant will
try
your
extension.
While
recordong
youcan :
Pause/Resune
Erase Recording
End
Recording
The mailbox options are :
SecurityCode
Enter
mailbox
oomber
,
then
.
Reenter
maolbox
number
Send Message
Auto Time Stamp
Ex
l toMain Menu
3999

Option : In-Mail (Voice Mail)
• Mailbox Greeting
Greeting Return to
c,-
ffi
Greeting
No.
(1-3) Record Stop
REC
Main Menu
-
C:::-
0
-~
0
Log-On to
the In-Mail
listen
Erase
• Selected Greeting (one
of
three) becomes active.
• Mailbox Security Code
Recording
-c
:::
-
r:
·h
}-
Listening
Mailbox Security Code Confirmation Return to
c
'-
[
60
)[
0
: } - 0 [
?
<
•
t
~'
·
}r
''~
lr?}-(t;p;7
:)
"
Log-On
to
r
~~
Seourity Code r
the In-Mail
~
0
• Dialed Security Code can be canceled
by
pressing "4" instead
of
"2 (Accept)".
•
In
case the "In-Mail Advanced Features License (SL-VM-ADVANCE LIC)" is provided,
or
during Free Trial
period(60 days after
new
installation), the type
of
Security Code can be assigned as below.
-Dial 4 digits Security Code followed
by
"7":
Security Code for
all
log-on
-Dial 4 digits Security Code followed
by
"6
":
Security Code forremote log-on only
• SystemAdministratorcan delete a Mailbox Security Code.
To Access your Voice Mail Box from outside the system.
Dial into the Automated Attendant Menu (Main Number)
From the main greeting, dial [#] + your mailbox number in one single step.
Ex: [#][1][0][1]
If you setup a password then the system will ask you to enter your password after you entered your mailbox number
Ex: [#][1][0][1] "Enter your security code" [x][x][x][x] "You have ....."

Option : In-Mail (Voice Mail)
• Listen to Left Messages in your Mailbox
ConvenientOperation by Function Key I
J
On-Hook Mailbox Key Security Code
(if
itis set)
List
en
Condition (
,'
;;
~~
:~:~':'
l
(2)(2)(2)(2) 0
~
--. --.
--.
--.
(SC751+77
+Ext
No,)
Convenient Operation by Soft Key I
I
On-Hook
2-a
TUE
3:03PM
Security Code
(if
it isset)
Condition
200
~
--.
M
enu
Dir
VM:03
CL:OO
0 -
c::::l
tJ-
~
0
Basic Operation without Function Key
(2)(2)(2)(2)
+
Vmail
-
Mailbox:200
Msgs
New: 3
Arch:
1
Lstn
Greet
LvMsg
More>
o-
-
~~o
I
J
Voice Mail Pilot Number Mailbox Number
(Unique Dial
Tone)
~
~
Listening
Listening
Listening
Admin:
Record Main Greeting(s)
While the phone is idle, press the "VM" soft key, when the voice mail answers, press the "More" soft key,
now press the "Mgr" soft key, then press the "Instr" soft key,
Enter the message number to record... (Typically Day or Open greeting is 001, Night or Closed greeting is 002)
Follow the prompts to record.
Hang up when finished.
This manual suits for next models
1
Table of contents
Other NEC Telephone manuals

NEC
NEC SL1100 User manual

NEC
NEC DS1000 Technical specifications

NEC
NEC Dterm Series i User manual

NEC
NEC P/N 1093099 Owner's manual

NEC
NEC DS1000 How to use

NEC
NEC SL1100 User manual

NEC
NEC UNIVERGE SV9300 DT410 User manual

NEC
NEC DS2000 IntraMail User manual

NEC
NEC ASPILA EX User manual

NEC
NEC ELECTRA ELITE IPK II User manual

NEC
NEC Dterm III 16DC User manual

NEC
NEC SL1100 User manual

NEC
NEC Single Line Telephone User manual

NEC
NEC Xen Topaz User manual

NEC
NEC Univerge SV8100 User manual

NEC
NEC DSX User manual

NEC
NEC Dterm Series i User manual

NEC
NEC Univerge SV8100 User manual

NEC
NEC NVM-CA Series Quick setup guide

NEC
NEC Univerge SV8100 User manual