NEO FOLLOWER 15R User manual

USER MANUAL / MANUAL DE USUARIO
PLEASE READ THE INSTRUCTIONS CAREFULLY BEFORE USE
POR FAVOR LEA LAS INSTRUCCIÓNES ANTES DE USAR
FOLLOWER
15R
FOLLOW SPOT POWERED BY A
PHILIPS PLATINUM® 15R LAMP

Overview
Follower 15R
Follow spot powered by a Philips Platinum® 15r lamp
Follower 15R is a follow spot powered by a Philips
Platinum® 15R lamp featuring motorized linear
dimming, CTO and a motorized color wheel with
5 dichroic lters, including CTB. The unit provides
manual control for iris, shutter and zoom (5° to
10°). Follower 15R also has an eective projection
distance range of 15-50 meters, making it ideal for
theater or studio applications.
Source & Optics
• Light Source: Philips® Platinum 15R
• Color temperature: 8000K
• Lamps life: 2000 hours
• Manual zoom: 5º-10°
• Projection distance of 15-50 meters
Photometric data
• Luminous Flux: 5697 lux @ 10m (32 .)
Eects & Functions
• Motorized linear CTO
• Motorized color wheel: 5 dichroic lters includ-
ing CTB + open
• Manual Iris
• Manual shutter
• Focus: Manual focusing
• Dimmer: Motorized linear dimming from
0-100%
• Frost: 0-100%
• Control panel: Friendly & simple control
• Manual version available
Physical
• Full color LCD graphic display
• DMX connectors: 4 XLR connectors (XLR-3 In
and Out; XLR-5 In and Out)
• Dimensions: 338x932x323 mm. / 13.3x36.7x12.7
in.
• Weight: 23 Kg. / 50 Lbs.

p. 3NEO FOLLOWER 15 R
ENGLISH VERSION
CAUTION!
Unplug mains lead before opening the housing.
Every person involved with the installation, operation and
maintenance of this device has to: -be qualied
-follow carefully the instructions of this manual
1. Introduction
Thank you for having chosen this professional Followspot
Lighting. You will see you have acquired a powerful and ver-
satile device. Unpack the device. Inside the box you should
nd:
• 1. One power cables
• 2. Manual
• 3. One warranty card and certication
• Please check carefully that there is no damage caused by
transportation. Should there be any, consult your dealer
and don’t install this device.

2. Fixture Overview
1: Dimming
2: Color Temperature
3: Iris
4: Frost
5: Framing
6: Adjust beam angle
7: Colored papers
8: Fuse
9: Power supply
10: Power switch
11: Hand
12: Lamp bracketrear metal panel
13: Lens
p. 4NEO FOLLOWER 15 R
ENGLISH VERSION

3. General guidelines
3.1) Important safety warns
This device has le the factory in perfect condition. In order
to maintain this condition and to ensure a safe operation, it is
absolutely necessary for the user to follow the safety instruc-
tions and warning notes written in this user manual.
IMPORTANT:
Damages caused by the disregard of this user manual are
not subject to warranty. The dealer will not accept liabili-
ty for any resulting defects or problems.
• If the device has been exposed to temperature changes
due to environmental changes, do not switch it on im-
mediately. The arising condensation could damage the
device. Leave the device switched o until it has reached
room temperature.
• The electric connection must carry out by qualied person.
• Make sure that the available voltage is not higher than
stated at the end of this manual.
• Make sure the power cord is never crimped or damaged
by sharp edges. If this would be the case, replacement of
the cable must be done by an authorized dealer.
• Always disconnect from the mains, when the device is
not in use or before cleaning it. Only handle the power
cord by the plug. Never pull out the plug by tugging the
power cord.
• During initial start-up some smoke or smell may arise.
This is a normal process and does not necessarily mean
that the device is defective, it should decrease gradually.
• Please don’t project the beam onto combustible sub-
stances.
• If the external exible cable or cord of this luminaire is
damaged, it shall be exclusively replaced by the manu-
facturer or his service agent or a similar qualied person
in order to avoid a hazard.
p. 5NEO FOLLOWER 15 R
ENGLISH VERSION

Please be aware that damages caused by manual modi-
cations to the device are not subject to warranty. Keep
away from children and non-professionals.
3.2) General guidelines
• This device is a lighting eect for professional use on
stages, in discotheques, theatres, etc., the device was
designed for indoor use only.
• This xture is only allowed to be operated with the max
alternating current which stated in the technical speci-
cations in the last page of this manual.
• Lighting eects are not designed for permanent opera-
tion. Consistent operation breaks may ensure that the
device will serve you for a long time without defects.
• Do not shake the device.Avoid brute force when install-
ing or operating the device.
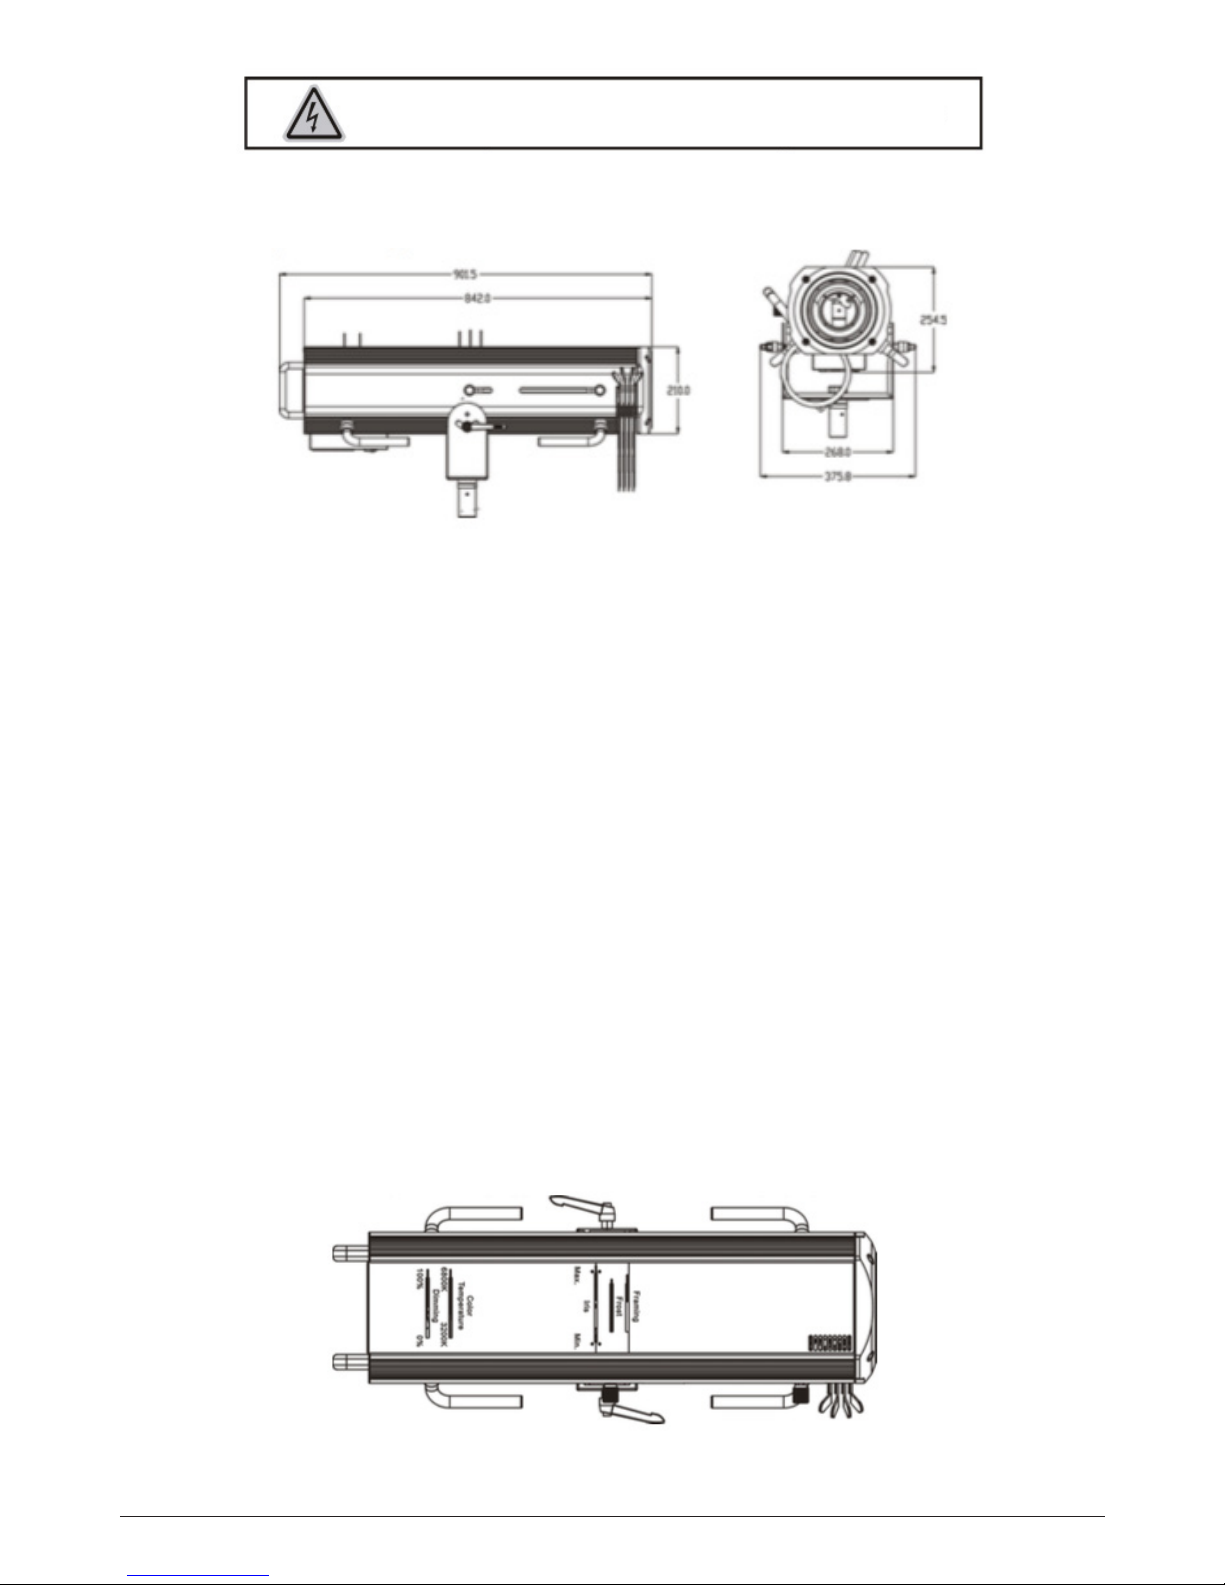
• While choosing the installation-spot, please make sure
that the device is not exposed to extreme heat, moisture
or dust. Please don’t project the beam onto combustible
substances.The minimum distance between light-output
from the projector and the illuminated surface must be
more than 3 meter.
• If you use the quick lock cam in hanging up the xture,
please make sure the quick lock fasteners turned in the
quick lock holes correctly.
• Operate the device only aer having familiarized with its
functions. Do not permit operation by persons not qual-
ied for operating the device. Most damages are the re-
sult of unprofessional operation.
• Please use the original packaging if the device is to be
transported.
• For safety reasons, please be aware that all modica-
tions on the device are forbidden.
• If this device will be operated in any way dierent to the
one described in this manual, the product may suer
damages and the guarantee becomes void. Further-
more, any other operation may lead to short-circuit,
burns, electric shock, lamp explosion, crash, etc.
p. 6NEO FOLLOWER 15 R
ENGLISH VERSION

Installation Instructions
4.1) Installing or replacing the lamp
CAUTION
Only install the lamp with the device unplugged from the mains.
Before replacing the lamp let the lamp cool down, because
during operation, the lamp can reach very high temperature.
During the installation of halogen lamps do not touch the
glass bulbs bare handed. Always use a cloth to handle the
lamps during insertion and removal.
Do not install lamps with a higher wattage. They generate
higher temperatures than which the device was designed for.
For the installation, you need one: PLATINUM 15R
Procedures:
1) Unscrew the 3 screws (A, B, C) on the bottom of the hous-
ing, holding the plate where the lamp is underneath. Careful-
ly remove the metal plate.
2) Insert the lamp counter-clockwise 35 degree into the lam-
pholder, then turn clockwise 35 degree to put it into the right
position. Attention: please wrap the lamp with the so cloth
that comes with the packing, avoid naked hand contact to
the lamp directly.
3) Put the lampholder back position aer install the lamp,
tighten the screw and complete the installation.
Please remember the lamp is not a hot-restrike type, you
must wait for approximately 10 minutes aer having turned
o the lamp before you can turn it back on again.
p. 7NEO FOLLOWER 15 R
ENGLISH VERSION

CAUTION
Do not operate this device with open cover
Layout Drawings:
5. Instructions
5.1 Dimming/color temperature adjust-
ment instruction
1) Dimming: linear dimming-Intensity 0% to 100%.
Instruction: dimming according to silkscreen instruction by
slider.
2) Color temperature: linear adjustment from 3200K to
6800K.
Instruction: adjust color temperature according to silkscreen
instruction by slider.
3) Iris: adjust Min. to Max linearly.
Instruction: adjust iris according to silkscreen instruction by
slider.
4) Frost: soen the edge of spot
Instruction: push the adjusting lever, please adjust the frost
eect according to the xed position of the silk-screen.
5) Framing: prole from up to down.
p. 8NEO FOLLOWER 15 R
ENGLISH VERSION

Instruction: prole according to silkscreen instruction.
5.2 Beam angel adjustment instruction
adjust beam angle: linearly adjusting
beam angel from 5° to 10°
Instruction: move sliders on both sides to focus and zoom.
(Attn: must keep both sides move to same value )
p. 9NEO FOLLOWER 15 R
ENGLISH VERSION
6. Cleaning and maintenance
The following points have to be considered during the in-
spection:
1) All screws for installing the devices or parts of the device
have to be tightly connected and must not be corroded.
2) There must not be any deformations on the housing, col-
or lenses, xations and installation spots (ceiling, suspen-
sion, trussing).
3)The electric power supply cables must not show any dam-
age, material fatigue or sediments. Further instructions de-
pending on the installation spot and usage have to be ad-
hered by a skilled installer and any safety problems have to
be removed.
In order to make the lights in good condition and extend the
life time, we suggest a regular cleaning to the lights.
1) Clean the inside and outside lens each week to avoid the
weakness of the lights due to
accumulation of dust.
2) Clean the fan each week.
3) A detailed electric check by approved electrical engineer
each three month, make sure that
the circuit contacts are in good condition, prevent the poor
contact of circuit from overheating.
We recommend a frequent cleaning of the device. Please use
a moist, lint- free cloth. Never use alcohol or solvents.
There are no serviceable parts inside the device except for
the lamp. Please refer to the instructions under “Installa-
tion instructions”.
Should you need any spare parts, please order genuine parts
from your local dealer.

Descripción
Follower 15R
Seguidor spot con lampara Philips Platinum® 15r
Follower 15R es un spot seguidor que tiene una lám-
para Philips Platinum® 15R y cuenta con dimmer lin-
eal motorizado, CTO y una rueda de color motoriza-
da con 5 ltros dicroicos, incluyendo CTB. La unidad
provee control manual para iris, obturador y zoom
(5° to 10°). Follower 15R cuenta a su vez con un rango
de proyección efectivo de 15-50 metros, haciéndolo
ideal para aplicaciones de teatro o estudio.
Fuente & Ópticas
• Fuente de luz: Philips® Platinum 15R
• Temperatura color: 8000K
• Vida útil promedio: 2.000 horas
• Zoom manual: 5º-10º
• Distancia de proyección de 15-50 metros
Datos fotométricos
• Flujo lumínico: 5697 lux @ 10m (32 .)
Efectos y funciones
• Ajuste CTO lineal y motorizado
• Rueda de color motorizada: 5 ltros dicroicos
incluyendo CTB + abierto
• Iris manual
• Obturador manual
• Foco: foco manual
• Dimmer: dimmer motorizado lineal 0-100%
• Frost: 0-100%
• Panel de control: Control simple y amigable
• Versión manual disponible
Físico
• Pantalla LED gráca a color
• Conectores DMX: 4 conectores XLR (XLR-3 en-
trada y salida; XLR-5 entrada y salida)
• Dimensiones: 338x932x323 mm. /
13.3x36.7x12.7 in.
• Peso: 23 Kg. / 50 Lbs.

p. 11NEO FOLLOWER 15 R
VERSIÓN ESPAÑOL
ADVERTENCIA
Desconecte el equipo del suministro eléctrico antes de abrirlo.
1. Introducción
Contenido de la caja:
1. El equipo.
2. Cable de suministro eléctrico.
3. Manual del usuario.
4. Tarjeta de garantía.
Luego de adquirido el producto, procure retirarlo de su em-
balaje con cuidado. Revise detenidamente que no se haya
dañado durante el envío. En caso de que encuentre daños o
piezas faltantes, no instale el equipo y póngase en contacto
de inmediato con su proveedor.

2. Descripción del equipo
1: Dimmer
2: Temperatura color
3: Iris
4: Frost
5: Encuadre
6: Ajuste de ángulo de haz
7: Filtros dicroicos
8: Fusible
9: Fuente de alimentación
10: Interruptor
11: Agarradera
12: Panel metálico
13: Lentes
p. 12NEO FOLLOWER 15 R
VERSIÓN ESPAÑOL

3. Indicaciones generales
3.1) Advertencias de seguridad
PELIGRO
No manipule los cables. Alto Voltaje. Riesgo de descarga eléctrica.
El equipo fue entregado en perfectas condiciones. Procure
seguir las instrucciones y advertencias de seguridad del
manual para garantizar el buen estado del equipo y su fun-
cionamiento seguro.
Importante:
La garantía no cubre daños provocados por el uso inapro-
piado de este producto. El fabricante y el proveedor no
aceptarán responsabilidad por el mal uso del equipo.
• En caso de que el equipo haya sido expuesto a cambios
de temperatura drásticos, no lo encienda de inmedia-
to. La condensación puede causar daños en el equipo.
Manténgalo apagado hasta que alcance la temperatura
ambiente.
• El equipo cuenta con grado de protección I, por lo cual es
primordial que esté conectado a tierra.
• Reemplace las piezas ópticas y la pantalla protectora si se
dañan e impiden el óptimo funcionamiento del equipo.
• La instalación eléctrica del equipo debe ser realizada por
un profesional certicado.
• Compruebe que el voltaje utilizado no sea superior ni
inferior a los valores indicados en el presente manual.
• Verique que el cable de suministro eléctrico no se en-
cuentre cortado o dañado. Si ese fuera el caso, contacte
a su proveedor para reemplazarlo por otro cable en óp-
timas condiciones.
• Desconecte el equipo del suministro eléctrico cuando
necesite limpieza o cuando no esté en funcionamiento.
Nunca tire del cable para desconectar la unidad. En su
lugar, utilice el conector.
• En la primera puesta en marcha del equipo es posible
que detecte olor o humo. Es un proceso normal y no im-
plica que el equipo sea defectuoso. El olor irá disminuy-
endo gradualmente.
• Evite proyectar el haz del equipo sobre sustancias in-
amables.
• Si se daña alguna pieza (lente, cable de suministro eléc-
trico) procure que el reemplazo lo realice el proveedor o
un profesional calicado para evitar riesgos.
PELIGRO
Evite tocar el equipo durante su funcionamiento. La cubierta levanta
temperatura.
PELIGRO
No mire en forma directa a la fuente de luz. Las personas fotosensitivas
corren riesgo de sufrir convulsiones.
La garantía no cubre daños provocados por la introducción de
modicaciones manuales en el equipo. Mantenga el equipo
fuera del alcance de niños y personas inexpertas.
p. 13NEO FOLLOWER 15 R
VERSIÓN ESPAÑOL

3.2) Lineamientos generales
Esta equipo se diseño para uso profesional en escenarios,
discotecas, teatros, etc. Debe ser usado únicamente en es-
pacios interiores.
• Utilice el equipo únicamente con la corriente alterna in-
dicada en las especicaciones técnicas, ubicadas en la
última página del presente manual.
• Los efectos de luz no están diseñados para funcionar de
forma permanente. Procure que el equipo descanse an-
tes de volver a utilizarlo para prolongar su vida útil.
• No sacuda el equipo. Evite utilizar o instalar el equipo de
forma brusca.
• Al elegir el punto de instalación, procure que el equipo
no quede expuesto al calor, humedad o polvo en exceso.
La distancia mínima requerida entre la salida de luz del
equipo y la supercie a iluminar debe ser superior a los
3 metros.
• Si emplea soportes con cierre rápido para la instalación del
equipo, verique que las trabas estén bien aseguradas.
• Procure familiarizarse con las instrucciones antes de uti-
lizar el equipo. No permita que personas inexpertas ope-
ren la unidad. La mayoría de los daños son consecuencia
del uso inapropiado o poco profesional del equipo.
• Utilice el embalaje original si precisa trasladar el equipo.
• Si opera el equipo de alguna forma no descrita en el pre-
sente manual, el producto puede sufrir daños severos.
La garantía no cubre aquellos daños provocados por el
uso indebido del equipo. Cualquier otro uso de la uni-
dad puede causar cortocircuitos, descargas eléctricas,
explosión de la lámpara, etc.
p. 14NEO FOLLOWER 15 R
VERSIÓN ESPAÑOL

4. Instalación
4.1) Instalación o sustitución de la
lámpara
• Aguarde a que lámpara se enfríe antes de reemplazarla,
puesto que puede alcanzar altas temperaturas durante
su funcionamiento.
• Siempre utilice guantes al momento de colocar o remov-
er lámparas halógenas
PRECAUCIÓN
Desconecte el equipo del suministro eléctrico antes de reemplazar
la lámpara.
PRECAUCIÓN
Reemplace la lámpara si se daña o se deforma.
PRECAUCIÓN
Reemplace la lámpara luego de 2000 horas de uso. Utilice únicamente
lámparas Philips™ Platinum originales. Cualquier otro tipo de lámpara
causará daños en el equipo y anularán la garantía.
1) Sostenga la placa bajo la cual se encuentra la lámpara
mientras aoja los tres tornillos (A, B, C) de la parte inferior
de la cubierta. Extraiga con cuidado la placa de metal.
2) Instale la lámpara dentro del portalámparas, girándola 35°
en sentido contrario a las agujas del reloj. Luego gire la lám-
para hacia la derecha para asegurarla. Atención: Envuelva la
lámpara con el paño que viene incluido en la caja. Evite el
contacto directo.
3) Vuelva a colocar el portalámparas en su lugar y ajuste los
tornillos.
Recuerde que la lámpara no es de reencendido en caliente.
Aguarde alrededor de 10 minutos antes de encender el equi-
po nuevamente.
• No instale lámparas de potencia superior, ya que generan
mayor temperatura de la recomendada para el equipo.
Modelo de lámpara: PLATINUM 15R
p. 15NEO FOLLOWER 15 R
VERSIÓN ESPAÑOL

PRECAUCIÓN
No utilice el equipo con la tapa abierta
Dimensiones
5. Instrucciones de uso
5.1 Ajuste de dimming y temperatura color
1. Dimming: Lineal. Intensidad 0-100%.
Instrucciones: Deslice el control ubicado en el equipo de acu-
erdo con las indicaciones impresas.
2. Temperatura color: Lineal. De 3200K a 6800K.
Instrucciones: Deslice el control ubicado en el equipo de acu-
erdo con las indicaciones impresas.
5.2 Ajuste del ángulo de haz
Ángulo de haz: lineal de 5° a 10°.
Instrucciones: Deslice los controles de un lado al otro para
ajustar el foco y el zoom.
(Nota: Ambos ajustes deben tener el mismo valor.)
3. Iris: Ajuste lineal de mínimo a máximo.
Instrucciones: Deslice el control ubicado en el equipo de acu-
erdo con las indicaciones impresas.
4. Frost: Suaviza los bordes del spot.
Instrucciones: Presione la palanca de ajuste de acuerdo con
las indicaciones impresas.
5. Framing: Perle de arriba hacia abajo.
Instrucciones: Deslice el control ubicado en el equipo de acu-
erdo con las indicaciones impresas.
p. 16NEO FOLLOWER 15 R
VERSIÓN ESPAÑOL

6. Limpieza y mantenimiento
Procure seguir estas indicaciones al momento de instalar el
equipo:
1) Todos los tornillos utilizados para instalar el equipo o par-
tes del equipo deben estar en óptimas condiciones y deben
ser bien asegurados
2) No debe haber deformaciones en el equipo (cubierta, l-
tros de color, etc.) ni en el lugar de instalación (cielos rasos,
truss, estructuras suspendidas).
3) El cable de suministro eléctrico no debe estar cortado,
dañado ni desgastado.
Para mayor información sobre funcionamiento e instalación,
contacte a un profesional calicado.
PRECAUCIÓN
Desconecte el equipo del suministro eléctrico antes de realizar cualquier
tarea de mantenimiento
p. 17NEO FOLLOWER 15 R
VERSIÓN ESPAÑOL
REMARK: errors and omissions for every information given in this manual excepted. All information is subject to change
without prior notice.
OBSERVACIÓN: El proveedor no asumirá responsabilidad por los errores u omisiones del manual. La información de este man-
ual está sujeta a cambios sin previo aviso.

neo.amproweb.com
Table of contents
Languages:
Other NEO Dj Equipment manuals

NEO
NEO STEAM INFINITE 450 User manual

NEO
NEO NEO STRIP GOLD User manual

NEO
NEO Sion User manual

NEO
NEO Blinder 64 User manual

NEO
NEO ION 610B RGBW User manual

NEO
NEO Flex Par User manual

NEO
NEO Proton 12 HEX USB User manual

NEO
NEO FOLLOWER 400 LED User manual

NEO
NEO PROTON 12 USB User manual

NEO
NEO FLEX STRIP User manual

NEO
NEO ION 132 F User manual

NEO
NEO ELIPSOLED LITE 50 User manual

NEO
NEO PROTON IP 7 QA User manual

NEO
NEO ION 280F User manual

NEO
NEO Moving Torch User manual

NEO
NEO PROTON IP User manual

NEO
NEO ION 740Z User manual

NEO
NEO FRESNELED COLOR User manual

NEO
NEO NEO DOTZ User manual

NEO
NEO Mini Panel User manual