Neoline WIDE S61 User manual

NEOLINE WIDE S61
User Manual
CAR VIDEO RECORDER
WITH WI-FI CONNECTION

2
Dear Purchaser,
Thank you for acquiring Neoline WIDE S61 dashboard camera. Please carefully read
this manual to the end in order to correctly use the device and extend its service life.
Retain User Manual to consult it if necessary in future.
Content
1. Operational Conditions ...........................................................................................................3
2. Technical Specications..........................................................................................................5
3. List of Equipment.......................................................................................................................6
4. Description of Device and Buttons .....................................................................................7
5. Installation of Dashboard Camera......................................................................................9
6. Operation...................................................................................................................................11
7. Application Wide S6x use by example ОС Android....................................................16
8. Troubleshooting......................................................................................................................27

3
• Get acquainted with conditions of in-warranty service.
• Do not install or remove memory card when the dashboard camera is switched
on to avoid damage to the device and recorded video les.
• Only use high-quality microSD cards not lower than Class 10 with support of
UHS-1 protocol to avoid recording dropouts and delayed images.
• Use of 8Gb to 128Gb card is recommended.
• Device should only be used with accessories from the delivery set. NEOLINE
disclaims responsibility for possible damages to the product in case accessories
of third-party manufacturers are used.
• Do not expose the product to the eect of re, moisture or chemically active
substances (petrol, solvents, reagents etc.).
• Disassembly or modication of the product is prohibited.
• NEOLINE shall not be held responsible for loss of data and/or damage, whether
direct or indirect, caused to the user or to a third party through improper use of
the device or software, incorrect installation, use of accessories not included in
the delivery set.
• Important! In some motor cars, power to 12/24V socket is delivered also with
ignition o. To avoid the accumulator discharge, it is recommended to discon-
nect the dashboard camera from the vehicle network.
• Format the microSD card not rarer than once in two months to avoid damage
of its le system.
• Observe temperature conditions of storage and operation (see technical speci-
cations). Do not allow lasting sun exposure of the device.
• Do not remove memory card from working device to avoid data loss and breakage.
• This device is intended for use with a transparent windshield or light-colour
heat-reecting lm. Video recording quality will decrease in case the device is
installed on a tinted glass or a glass with dark heat-reecting lm.
1. Operational Conditions

4
• Mount the camera so to obtain a maximum eld of view. It is PROHIBITRD to
install the camera in a place where the device can cover the vision and reduce
the safety of driving. Neither Neoline nor their authorized partners shall be
held responsible for whatever damage or loss of data as a result of improper
holder installation.
• Built-in supercapacitor is designed for correct completion of video recording.
Operation of the device is only possible with connected external power supply
• In view of vehicle driving safety as well as in accordance with local legislation,
do not manipulate with the device when driving a vehicle.
• Set correct date and time prior to use the device.
• Heating of camera housing is a normality.
• Be careful during operation, do not allow dropping or squeezing of the
dashboard camera
Manufacturer reserves the right to bring amendments in the equipment list,
hardware and software of the device without prior notication.
Prior to commencement of use, it is assumed that you agree with the above
provisions
The present user manual is valid at the time of printing.
Please nd actual information at www.neoline.com in the card of respective
product, section “Download”.

5
2. Technical Specications:
• Video resolution: Full HD 1920*1080 (30 k/s)
• Sony Sensor
• Viewing angle: 140°
• Screen size: 1.5 inches
• Built-in supercapacitor*
• Antiglare CPL-lter
• Video recording format: MOV (H.264)
• Built-in microphone/loudspeaker
• WDR function
• Wi-Fi
• G-sensor
• Motion sensor
• Loop recording: 1/2/3 min
• Continuous recording
• Automatic ON
• Date/time stamp
• Number plate stamp
• MicroSD 8GB - 128GB (Class 10)
• Storage temperature -20˚ to +70˚
• Operation temperature -10˚ to +60˚
• Input voltage: DC 5V, 1.5А
• Memory unit input voltage: DC 12-24V
• Dimensions: 65 x 19 x 42 mm
• Weight: 58 g
* Dashboard camera is designed for operation in a wide range of temperatures.
Supercapacitor, in contrast with accumulator battery, is more durable and
ecient in operation under low and high ambient temperatures.

6
3. List of Equipment
• Dashboard camera Neoline Wide S61
• Fastening on glass with suction cup
• CPL-lter
• Car charger 2 USB ports
• User manual
• Warranty card

7
8
9
10
11
5
6
7
12
4
3
2
1
13
14
4. Description of Device and Buttons
1. Operation indicator
2. ON/OFF button
3. Menu button
4. Mode button
5. Up/Lock button
6. Conrm button
7. Down/Audiorecording ON button
8. Mounting slot
9. Lens
10. Loudspeaker
11. mini USB connection
12. Memory card slot
13. Reset button
14. Microphone

8
Description of indicator operation
Status
Button
ON/OFF (only active with
connected external power
supply)
Menu
Mode
Up
Down
Conrm
Reload
Press to switch on the device. Press and hold
during 3 seconds to switch o. In Recording
mode, press to create a still picture.
In Standby mode, press to enter the Settings
menu of the device. In Playback mode, press to
select submenu for le handling.
In Standby mode, press to change between
modes Recording/Photo/Playback
Press to navigate up the menu or the list of les
in Playback mode. In Recording mode, press to
lock the le against overwriting.
Press and hold to activate/ deactivate Wi-Fi
Press to navigate down the menu or the list
of les in Playback mode. In Recording mode,
press to switch ON/OFF audio recording.
Press to start/stop recording in Standby/
Recording mode. Press to conrm a setting in
the menu. Press to start the playback of a le in
Playback mode.
Press if the device does not respond to com-
mands upon button pressing.
Meaning
Description
Blue blinking
Blue constantly lighted
Blue blinking
Turquoise constantly lighted
Recording goes on
Recording stopped
Firmware upgrade
Wi-Fi activation

9
5. Installation of Dashboard Camera.
Windshield Mounting
- Choose in advance a place for the dashboard camera installation in
the motor vehicle.
- Mount the holder on the device. Move it in the bracket holder until it stops.
- Firmly hold the bracket base on the windscreen to x it.

10
Adjustment of Device Position
- Loosen the knob to rotate the device vertically or horizontally.
- Adjust the view angle, rotating the lens in required direction (right-left, up-
down). Position the lens so that the camera captures the image in proportion
- “30% sky/70% road” to reach the best lming results.
- Then tighten the knob to securely x the dashboard camera.
Power Connection
Only use power adapter included in the product delivery set to supply the device
and charge the battery. Connect the charger to the dashboard camera, then con-
nect the charger plug into the car cigarette lighter/socket.
After car engine is started, the device will automatically switch on.

11
Note
For optimal view, the device should be mounted next to the rear view mirror
on the centreline and top of the windscreen.
Position the lens so that the camera captures the image in proportion
“30% sky/70% road” to reach the best lming results.
Use of Antiglare (CPL) Filter
Antiglare (CPL) lter is an optical lter intended to remove glares and reec-
tions from the windscreen for improvement of the videolming quality.
To reach the best results of videolming with use of CPL lter, please follow
instructions below:
1. Install the dashboard camera on the windscreen in accordance with
the above recommendations.
2. Put a white sheet of paper on the dashboard.
3. Rotate CPL lter until reection of the white paper sheet on the camera
screen becomes minimal.
In dark hours of the day it is recommended to remove CPL lter to reach
the best results of lming.
6. Operation
Preparation of the device
А. Insert MicroSD card into the memory card slot.
Switch o the device before memory card installation and insert memory card
until it is fully xed.
Card installation:
Position MicroSD card against
the slot as shown on the gure
and insert till it goes click.
Card removal: carefully press the card
and the remove it from the slot.
12
IMPORTANT: Attempting to insert the memory card with a wrong side can
damage the device and the memory card itself. Make sure the memory card
is in correct position.
Warning: Do not apply too much eort when installing the memory card in order to
avoid damage of the device. To install, insert MicroSD into the slot until it is xed (goes
click); if necessary, use a needle to seat the card. To remove the card, press on it until
click and remove from the slot, use a needle if necessary.
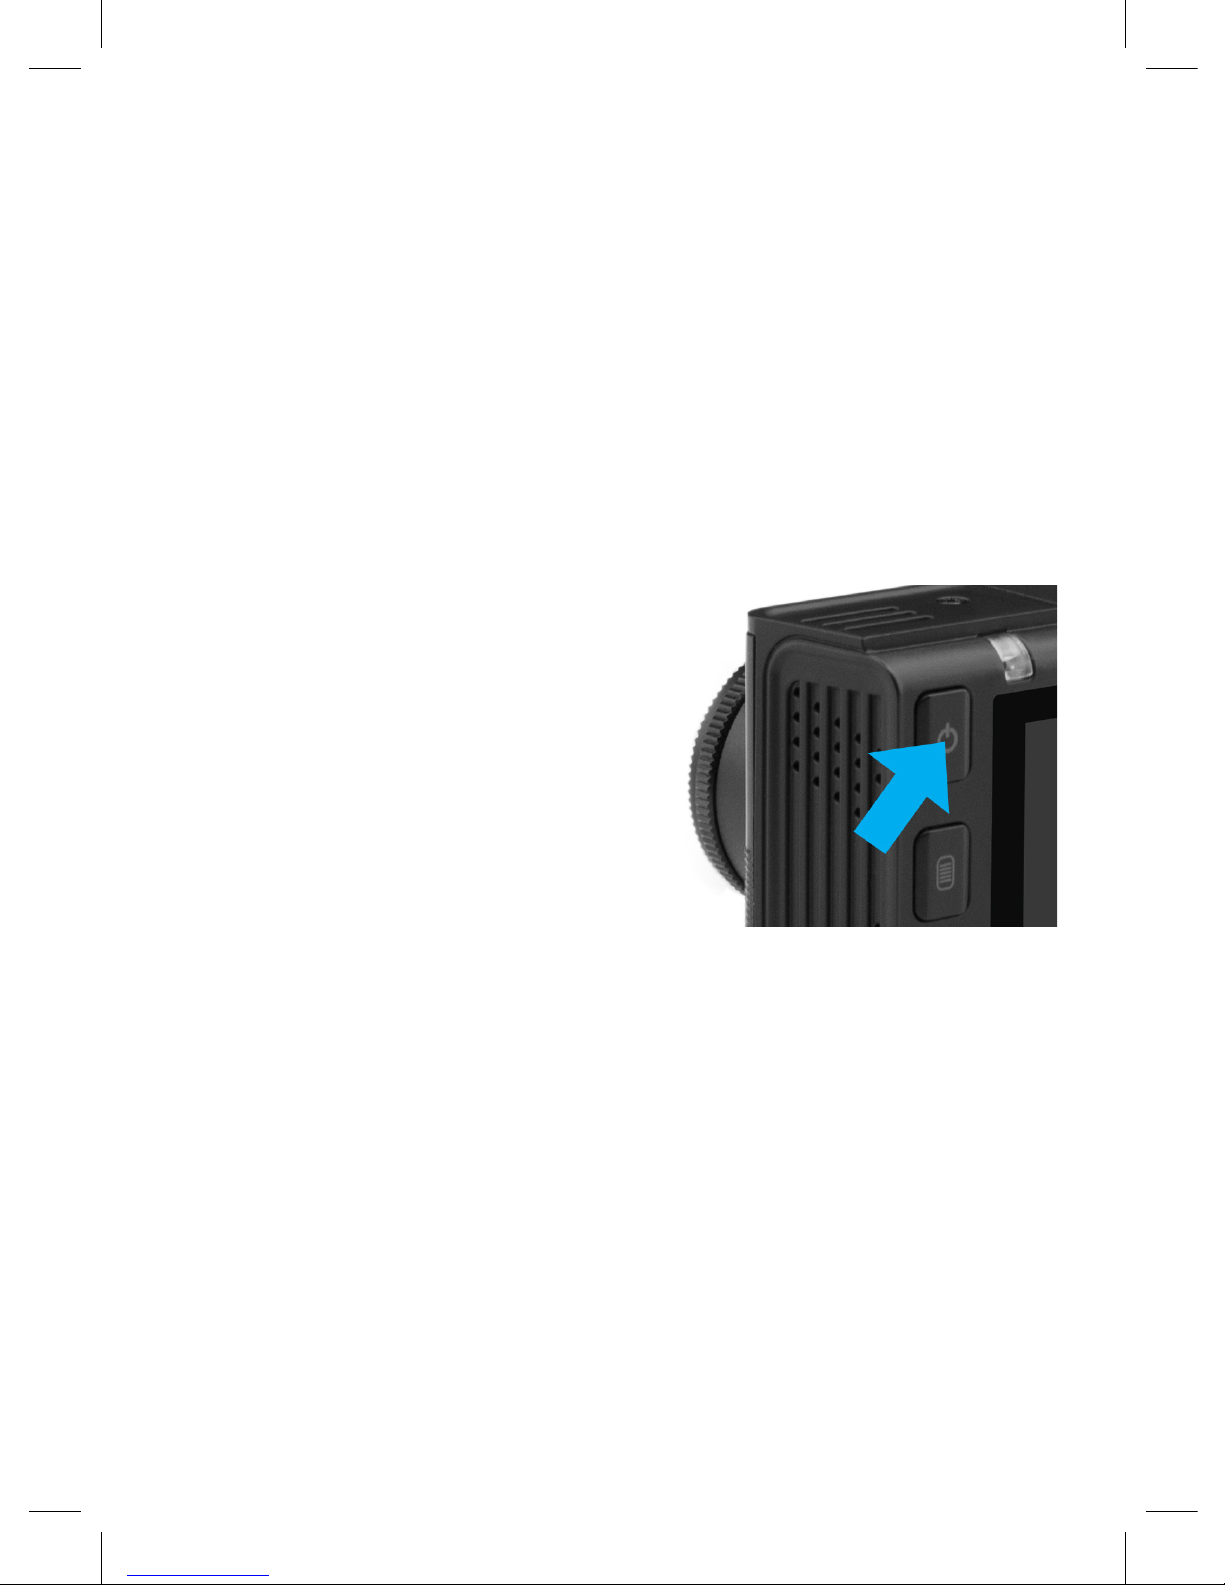
Switching ON/OFF the device
After car engine is started, the device automatically
switches on.
To switch on the device manually,
press power button.
To switch o the device, press power button and
hold it for 3 seconds.
Loop recording
1) Insert MicroSD card into the memory card slot – Loop Recording mode will be
automatically switched on.
2) Length of videorecordings can be 1/2/3 minutes. It is recommended setting the
recording cycle to 3 minutes.
3) When the memory card has no more space for new videorecordings, the device
will automatically replace by them the old videoles except those protected against
deletion.
4) Videorecordings lmed in Loop Recording mode are stored in Movie folder.

13
Emergency recording
Designed for protection of current videole against rewriting and deletion. To pro-
tect the current videole, press Up button and the recorded videole will be marked
with a special mark, which will prohibit the device from deletion and rewriting of this
le. The screen will display the respective icon.
Emergency recording switches on automatically upon response of G-sensor (sharp
acceleration, braking) or collision. Emergency recording is automatically locked in
order to avoid deletion during the loop recording. Files protected against rewriting
are stored on the memory card in Movie/SOS folder.
Firmware update
1) Download the rmware le from ocial website www.neoline.ru, extract the le
from the archive.
2) Format the memory card and transfer the unzipped le in MicroSD the
memory card.
3) Insert the memory card with the downloaded le into slot of the dashboard
camera.
4) Connect the device to the power supply and switch it on.
5) Light indicator will blink while the rmware le is uploaded on the device.
6) When the process is completed, the device will automatically reload.
7) Check in Settings menu whether a correct rmware version is displayed.
8) Format the memory card via menu of the dashboard camera.
Important! Do not disconnect power supply of the dashboard camera during
the rmware update.

14
Motion sensor
Upon detection of motion in front of the camera lens, the device will automati-
cally switch on recording that will last during 10 seconds. Each new detected mo-
tion will initiate 10-second long recording. Such les are stored on the memory
card in Movie folder.
This function is only available with connected external power supply and is
intended for recording on motionless motorcar.
Do not switch on the motion sensor during drive since it can lead to incorrect
operation of the device.
File playback/deletion. Playback
- In Standby mode, press twice Mode button.
- Use Up/Down and Conrm buttons to select le for viewing.
- Use Up/Down buttons to select le required for viewing and press Conrm
button to start playback.
Deletion
- Press Menu button to enter the submenu.
- Use Up/Down buttons to select “File Deletion” and press Conrm button.
- Press button to conrm the deletion operation.
Note.
Deleted les cannot be restored. Create backup copies of les prior to
deletion if necessary.
Element Description
Delete One
Delete All
Delete this le
Delete all les

15
Menu elements
- Video resolution: 1080FHD 1920*1080/720p 1280*720/WVGA 800*480/
VGA 640*480
- Loop recording: 1 minute/ 2 minutes/ 3 minutes
- WDR: O/On
- Exposure: -2 to +2
- Motion sensor: O/On
- Audio recording: O/On
- Date/time stamp: O/On
- Sensitivity of G-sensor: O/ Low/ Medium/ High
- Number plate stamp: enter number plate of motorcar using numbers and
Latin letters. Use Mode button to switch from literal input to numeric
- Wi-Fi: O/On
- Date/time: use Up/Down/Conrm buttons to set date and time
- Button sound: O/On
- Language: English/Russian
- Mains frequency: 50 Hz/60 Hz
- Automatic display disconnection: O/ 30 seconds/ 1 minute/ 2 minutes
- Formatting: use to format the memory card. Important! Files cannot be
restored after formatting of the memory card. Use USB connection to save
the required les on the computer prior to formatting.
- Default settings: use to restore factory settings.
- Software version: information about rmware version.

16
Application Wide S6x use by example ОС Android
Connection
- Download and install Neoline Wide SX annex
- Make sure DVR is on
- Press and hold for 3 seconds the Wi-Fi activation button on the DVR. When Wi-Fi
is activated, the display of the DVR will display the device name and the basic
password for connection
- In Wi-Fi settings of your cellphone
Connect to the DVR, having chosen
a corresponded network with
device name

17
- run the application

18
Application menu items
Recorder Files
In this window, a list of les recorded on the memory card of the DVR is available.
Attention! When you enter the le browsing menu, recording stops.

19
3 tabs are available for the user :
Video - tab is used to select the necessary les from the downloading into the
memory of the cellphone. To download, click the icon next to the le.
When clicking on in the upper right corner, you can select the les you
need to download or delete. Having marked the necessary les, click either
to download les or to delete them from the memory card.
Image - the tab is made for downloading images into the cellphone memory.
Blocked - the tab is made for downloading les blocked by a shock sensor or by
pressing the record blocking button.
Uploaded les
In this window, a list of les downloaded from the application into the memory
of your cellphone is available. Tabs and actions are similar to the Recorder Files
window.
When clicking on the le from the list of downloaded ones the user can
- view le

20
- make the screenshot of the current frame
Table of contents
Other Neoline Dashcam manuals

Neoline
Neoline X3000 User manual

Neoline
Neoline WIDE S49 User manual

Neoline
Neoline G-TECH X81 User manual

Neoline
Neoline X3000 User manual

Neoline
Neoline G-TECH X62 User manual

Neoline
Neoline X-COP R750 User manual

Neoline
Neoline G-TECH X72 User manual

Neoline
Neoline G-TECH X77 User manual

Neoline
Neoline G-TECH X5x series User manual

Neoline
Neoline G-Tech X27 User manual


