Neoline WIDE S55 User manual

NEOLINE WIDE S55
CAR DWR
User’s manual

2
Dear customer!
Thank you for purchasing the Neoline WIDE S55. Please read this manual carefully to
the end in order to properly use the device and extend its service life. Keep the user’s
manual for reference should it becomes necessary in the future.
Contents:
1. Operating conditions ...............................................................................................................3
2. Technical specications...........................................................................................................5
3. Package Contents......................................................................................................................6
4. Description of the device and indicators..........................................................................7
5. Installing the DVR ...................................................................................................................10
6. Operation of the device........................................................................................................12
7. Possible problems and their causes................................................................................. 22

3
• Read the terms of the warranty service.
• Do not install or remove a memory card while the DVR is on. Otherwise, it may
damage the device and the recorded video les.
• Use only high-quality microSD cards of no lower than class 10 with UHS-I proto-
col support, in order to avoid recording and image delays.
• It is recommended to use memory cards from 8 GB to 64 GB.
• The device must be used only with the accessories included in the package.
Company Neoline is not responsible for any possible damage to the product if
third-party accessories are used.
• Do not expose your product to re or moisture, to chemicals (petrol, solvent,
reagents, etc.).
• Do not disassemble or modify the product.
• Company Neoline shall not be liable, directly or indirectly, for loss of data and/
or damage caused to the user or third party by incorrect use of the device or
software, incorrect installation, or use of accessories that are not included in the
package.
• Attention! In some cars, power is supplied to the 12 / 24V socket even when
the ignition is switched o. To avoid discharging the battery, we recommend that
you disconnect the device from the vehicle’s mains.
• Format the MicroSD card at least once every two months to avoid damaging its
le system.
• Observe the temperature conditions for storage and operation (see specica-
tions). Do not expose the unit to sunlight for long periods of time.
1. Terms of Use

4
• This device is intended for use with a transparent wind shield or a light heat-
shielding lm for wind shields. The quality of video recording will decrease if
the device is installed on tinted wind shield or a wind shield with a dark heat-
shielding lm.
• Set the camera so that you get the maximum eld of view. DO NOT place the
camera in a place where the device can close the view and reduce the safety
of driving. Company Neoline, or authorized partners of the company, are NOT
responsible for any damage or loss of data due to inappropriate installation of
the holder.
• For safety reasons, during the driving of a vehicle, and in accordance with local
legislation, do not manipulate the device while driving.
• Before using the device, set the time zone - the time and date will be set
automatically.
• Heating of the housing in the operating mode is normal.
• Be careful when operating - do not drop or crush the DVR.
• There are restrictions on use in cars with athermal or heated wind shields. Due
to the fact that these wind shields contain metal spray in their design, the proper
functioning of the GPS module may be impaired.
• The satellite location time can increase depending on weather conditions, time
of day, terrain and design features of the car.
The manufacturer reserves the right to change the equipment,
hardware and software of the device without prior notice.
This user manual is valid at the time of printing. The latest information can be
found on the website www.neoline.ru in the corresponding product tab in the
Download section.
Before using the device, it is assumed that you agree with the aforementioned
provisions.

5
2. Technical specications
• Camera Resolution:
- WFHD 2560*1080 (30 fps)
- Super HD 2304*1296 (30 fps)
- Full HD 1920*1080 (45 fps)
- HDR Full HD 1920*1080 (30 fps)
• Viewing Angle: 150 ° (diagonally)
• Screen size: 2.7 inches
• Built-in GPS
• Built-in battery: 180 mAh
• Video recording format: MOV (H.264)
• Built-in microphone / speaker
• G-sensor
• Motion Sensor
• Parking mode
• Cyclic recording: 1/3/5 min
• Continuous recording
• Auto power on
• Date / time stamp
• License plate number stamp
• Geolocation stamp
• MicroSD 8GB - 64GB (Class 10)
• Storage temperature -20˚ to + 70˚
• Operating temperature -10˚ to + 60˚
• Input voltage: DC 5V, 1.5A
• Input voltage of a charger: DC 12-24V
• Dimensions: 101 x 53 x 29 mm
• Weight: 80g

6
3. Package contents:
• Video recorder Neoline Wide S55
• Mounting on the glass with suction cup
• USB cable
• Charger
• User’s manual
• Warranty card

7
4. Description of the device and indicators
1. MicroSD card slot
2. Speaker
3. Lens
4. Charge indicator
5. Recording indicator
6. Up
7. Menu button
8. Down
9. Photo button
10. Play / Lock button
11. Conrmation button
12. Reset button
13. Holder mounting slot
14. Micro USB port
15. Power On / O button
1
2
4
6
7
8
5
11
10
9
3
12 13 14 15

8
1. Operating mode
2. Power Supply Indicator
3. Memory card status
4. Duration of a cyclic recording
5. Parking mode status
6. GPS Connection Status
7. Duration of current video
8. Video quality
9. Video resolution
10. Audio recording status

9
Button
Power on / o
Playback / Lock
Up
Menu
Down
Photo
Conrmation
button
Reloading
Indicator Status
Description of indicators
Value
Charge Red
Is not lit up
Blue, blinking
Blue permanent
Battery is charging
The battery is fully charged
Recording in progress
Recording is stopped
Records
Press to turn on the device. Press and hold for 3
seconds to turn o.
Press to navigate up the menu or les in Playback
mode.
Press to enter the device settings menu.
In Playback mode, press to return to the previous
menu.
Press to navigate down the menus or les in Playback
mode. In the recording mode, press to turn on / o
the sound recording.
In the standby or recording mode, press to take a
picture.
In the recording mode, press to block the current le
from overwriting. In the standby mode, press to enter
the Playback mode.
Press to start / stop recording in the standby / record mode.
Press to conrm the setting in the menu. Press to start
playback of the le in Playback mode.
Press if the device is stuck and does not respond to com-
mands.
Description
10
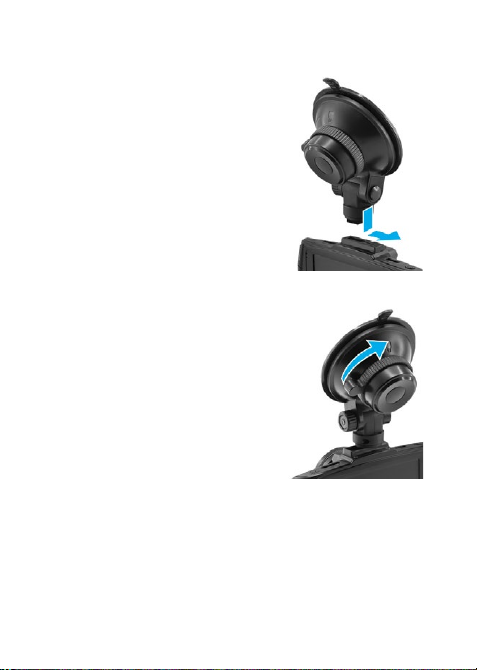
5. Installation of the DVR Installation
on the wind shield
- Determine the place in advance
installation of the DVR in the car.
- Install the bracket on the device.
Slide it in the bracket holder until it stops.
-Firmly holding the base of the
bracket x it on the windshield
by turning the xing clamp
clockwise until it stops.
Adjusting the position of the device
- Loosen the knob to rotate the device vertically.
- Adjust the viewing angle by turning the lens in the desired direction (right-to-
left, up-down). In order to achieve the best shooting recording result set the lens
so that the recorder would capture the image in the proportion of“30%
sky / 70% road.
11
- Then, tighten the knob to securely lock the recorder.
Power connection
Use only the supplied power adapter to power the device and charge the
battery.
- Connect one end of the power adapter to the“Micro USB” port on the device.
Connect the other end of the adapter to the car cigarette lighter socket. After
starting the car engine, the device will automatically turn on.

12
6. Operation of the device
Preparing the device
A. Insert the MicroSD card into the memory card slot.
Before inserting the memory card, turn o the device, insert the memory card
until it is fully secured.
Insertion of the card: Bring the microSD card to the slot, as shown in the picture
and insert until it clicks.
Extraction of the card: Carefully press the card and then remove it from the slot.
ATTENTION: Attempt to insert a memory card with the wrong side may
damage the device and the memory card itself. Make sure that the memory
card is in the correct position.
Warning: When inserting a memory card do not apply excessive pressure in
order to avoid damaging the device. To insert a memory card, insert the MicroSD
card into the slot until it locks (until it clicks), if necessary, use the pin to put in
the card. To remove the memory card, press the card until it clicks and remove
the card from the slot, if necessary, use the pin to insert the card.

13
Powering the device on and o
Automatic on / o
After starting the car engine, the device will automatically turns on.
Manual on and o
- To turn on the device manually, press the power button.
- To turn o the device, press and hold the power button for 3 seconds.
Cyclic recording
1) Insert the MicroSD card into the memory card slot and the Cyclic recording
mode will be automatically turned on.
2) The duration of video recordings can be 1/3/5 minutes. It is recommended to
set the cycle for 3 minutes in the settings.
3) When there is no space left on the memory card to record new videos, the
device automatically replaces old video les with new ones, except those that are
protected from deletion.
4) Videos recorded in the cyclic recording mode are stored in the folder: Normal.

14
Emergency recording
It is designed to protect the current video le from overwriting
and deletion. In order to protect the current video le, during video record-
ing press the Play / Lock button till the recorded video le (10 seconds before
pressing the + record cycle length) will be marked with a special label that will
prohibit device to delete and overwrite this le. The screen will display
corresponding icon.
Emergency recording is automatically activated when the G-sensor is triggered
(sudden acceleration, deceleration) or collision. The emergency recording is
automatically locked to prevent erasing during the cyclic recording.
Updating of the GPS database
1) Download the le from the database of the ocial site www.neoline.ru,
extract the le from the archive.
2) Extract the edogdata.dat le from the archive and transfer it to the root of the
preformatted MicroSD memory card.
3) Insert the memory card with the downloaded le into the DVR slot.
4) Connect the device to a power source - it will automatically turn on.
5) The message“Update radar database?” Appears on the screen. You must
select by pressing the“up”or “down”button and press the “OK”button.
6) Wait until the update is complete.
7) When the process is complete, the device will automatically reboot.
Attention! Do not unplug the DVR while updating the GPS base
Parking mode
Parking mode is designed to record events in the parking from the built-in
battery.

15
This function allows to activate the sensor of the G-sensor when the device is
turned o. The device will automatically switch to this mode after turning it o.
If the G sensor registers a push or a blow to Your car, recording will start auto-
matically even if the recorder is turned o and no external power is supplied.
If the external power is supplied to the DVR, after switching on, the device will
continue to record video in normal mode and will not turn o.
Motion Sensor
When this function is enabled, the recording will start automatically if a motion
is registered in the frame. Available only when the external power is connected.
Note: This function is designed for use on a stationary car. Do not turn on the
motion sensor while driving - this may cause the recording to stop and the
memory card to be completely lled.
Playing / deleting les Playback
- In standby mode, press the Play button
- Using the Up / Down and Conrm buttons select the Emergency Record or
Normal video for viewing.
- Using the Up / Down buttons, select the le you want to view and press the
Conrm button to start playback.
Deleting
- Press the Menu button to enter the main menu.
- Use the Up / Down buttons to select “Delete le” and click the Conrm button.
- Use the Up / Down buttons to select a folder and click the Conrm button.
16
- Use the Up / Down buttons to select the le to be deleted, and then click the
Conrm button to enter the le deletion menu.
- Use the Up / Down buttons to select an option.
- Press the button to conrm the deletion.
Note.
Deleted les can not be recovered. Back up the les before deleting.
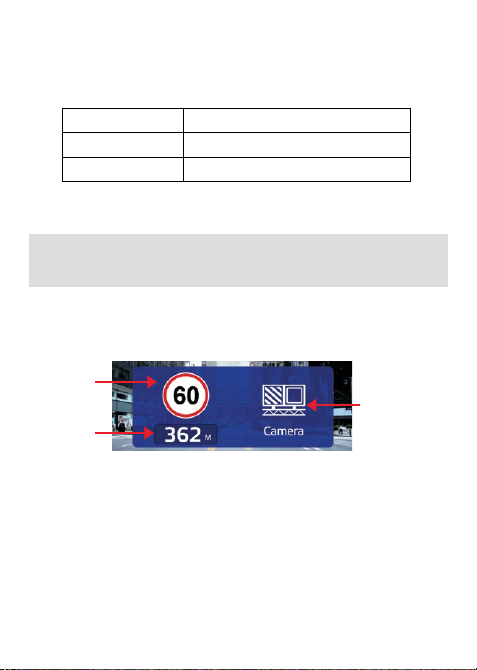
Notication of detected police radars and cameras from the GPS base
Neoline Wide S55 will make an audio and voice notication of the police radar
and display the information on the display, which will contain:
- type of police radar;
- distance to it;
- allowed speed for this road section
- average vehicle speed (when detecting “Average Speed Control”)
Element
Delete one Delete this le
Delete all lesDelete everything
Description
Allowed
speed
Type of police radar or
camera
Distance to
the site of
police radar

17
Cameras of average speed control “AVTODORIYA”
“Average Speed Control”system that consists of 2 cameras that are installed on
a road section within 500 m - 10 000 m from each other. When driving through
the 1st camera, the passing time is recorded. When driving through the 2nd
camera, the passing time is recorded as well and the average speed of the
vehicle is calculated. If the average speed of the car in
the area between the two cameras was higher than allowed, then a ne is
automatically imposed.
When detecting cameras of “Average Speed Control” Neoline Wide S55 treats
this system as follows:
- Showing of the distance on the display to the 1st camera and Voice alert
- After the passage of the 1st camera, the average speed will be calculated
- When approaching the 2nd camera, a notication“Video control is com-
pleted” will be issued
Average speed Current speed
18
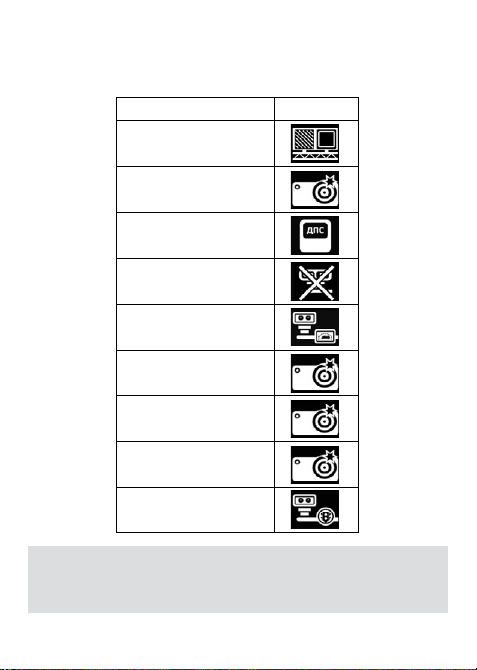
Types of police radar and trac control cameras
Note: after notication of the police radar, the permitted speed is an-
nounced on the current section of the road.
For example:“Radar Arrow, 60 kilometers per hour”
Video control
Arrow
Speed control
Police Post
Mock-up
Average Speed control
Radar to the back
Curbside control
Separating line control
Intersection
Picture

19
Menu items
Basic settings
- Video resolution: 2560*1080 30P 21:9/ 2304*1296 30P 16:9/ 1920*1080 45P
16:9/ HDR1920*1080 30P 16:9/ 1920*1080 30P 16:9
- Quality: Best / Good / Basic
- Cyclic recording: O / 1 minute / 3 minutes / 5 minutes
- Audio recording: O / On
- Stamps: Date / Time / GPS. Click the Conrm button to add the stamp.
- License plate number stamp: enter the car license plate number stamp, using
numbers and letters of the Latin alphabet.
- White balance: Auto / Incandescent / Sunny / Cloudy / Fluorescent Lamp
- Exposition: -2 to +2
- Language: English / Russian
- Setting the date / time: use the Up / Down / Conrm buttons to set the
date and time.
- Adjusting the volume: Loud / Normal / Quiet / Silent
- Sound of buttons: O / On
- Auto power o: O / 1 minute / 3 minutes / 5 minutes
- Display auto power o: O / 30 seconds / 1 minute / 3 minutes
- GPS info: status on the GPS connection quality
- Card capacity: memory card information
- Delete a le: is used to delete les. See playing and deletion of les.
- Format: Use to format the memory card. Attention! After formatting the
memory card, the les cannot be restored. Before formatting, save the desired
les to your computer using the USB port.

20
- Default settings: use to restore the factory settings.
- Software version: information about the rmware version
- Sensitivity of the G-sensor: O / High / Medium / Low
GPS Settings
- Permissible excess:
O / + 5 km / h / + 10 km / h / + 15 km / h / + 20 km / h / + 25 km / h / + 30 km / h
-An additional excess is the excess of the speed limit in the area below which the
device does not notify you of speeding.
Example A:
- Restriction on site: 60 km / h
- additional excess: O
In this case, the device will start to warn when the speed of 61 km / h is reached.
Example B:
- Restriction on site: 60 km / h
- additional excess: 10 km / h
In this case, the device will start to warn when the speed of 71 km / h is reached.
- Range of GPS notications:
Auto / 200m / 300m / 400m / 500m / 600m / 700m / 800m / 900m
- Radar notication: On/o
- Warning about the fatigue: O / 1 hour / 2 hour / 3 hours / 4 hours
- LLWS: On / O (indicates a low level of illumination)
- Motion Sensor: O / On
- Parking mode: O / On
- Speed limit (speed below which there will be no alerts): O / 10 km / h.
100 km / h in increments of 10
- RPS posts: O / On
- Mock-up: O / On
- Arrow: O / On
- Alert type: Only Voice / Voice + Display- Stamp of speed up to 100 km / h: On/o
Table of contents
Other Neoline Dashcam manuals

Neoline
Neoline G-TECH X77 User manual

Neoline
Neoline G-Tech X27 User manual

Neoline
Neoline WIDE S61 User manual

Neoline
Neoline X3000 User manual

Neoline
Neoline G-TECH X62 User manual

Neoline
Neoline G-TECH X72 User manual

Neoline
Neoline G-TECH X83 User manual

Neoline
Neoline WIDE S49 User manual

Neoline
Neoline Wide S39 User manual

Neoline
Neoline G-TECH X5x series User manual


