manuals.online logo
Brands
  1. Home
  2. •
  3. Brands
  4. •
  5. Nidec
  6. •
  7. Test Equipment
  8. •
  9. Nidec ST-5100 User manual

Nidec ST-5100 User manual

SEALS USA, Inc.
Instruments Division Tel: (630)924-7138 Email: [email protected]
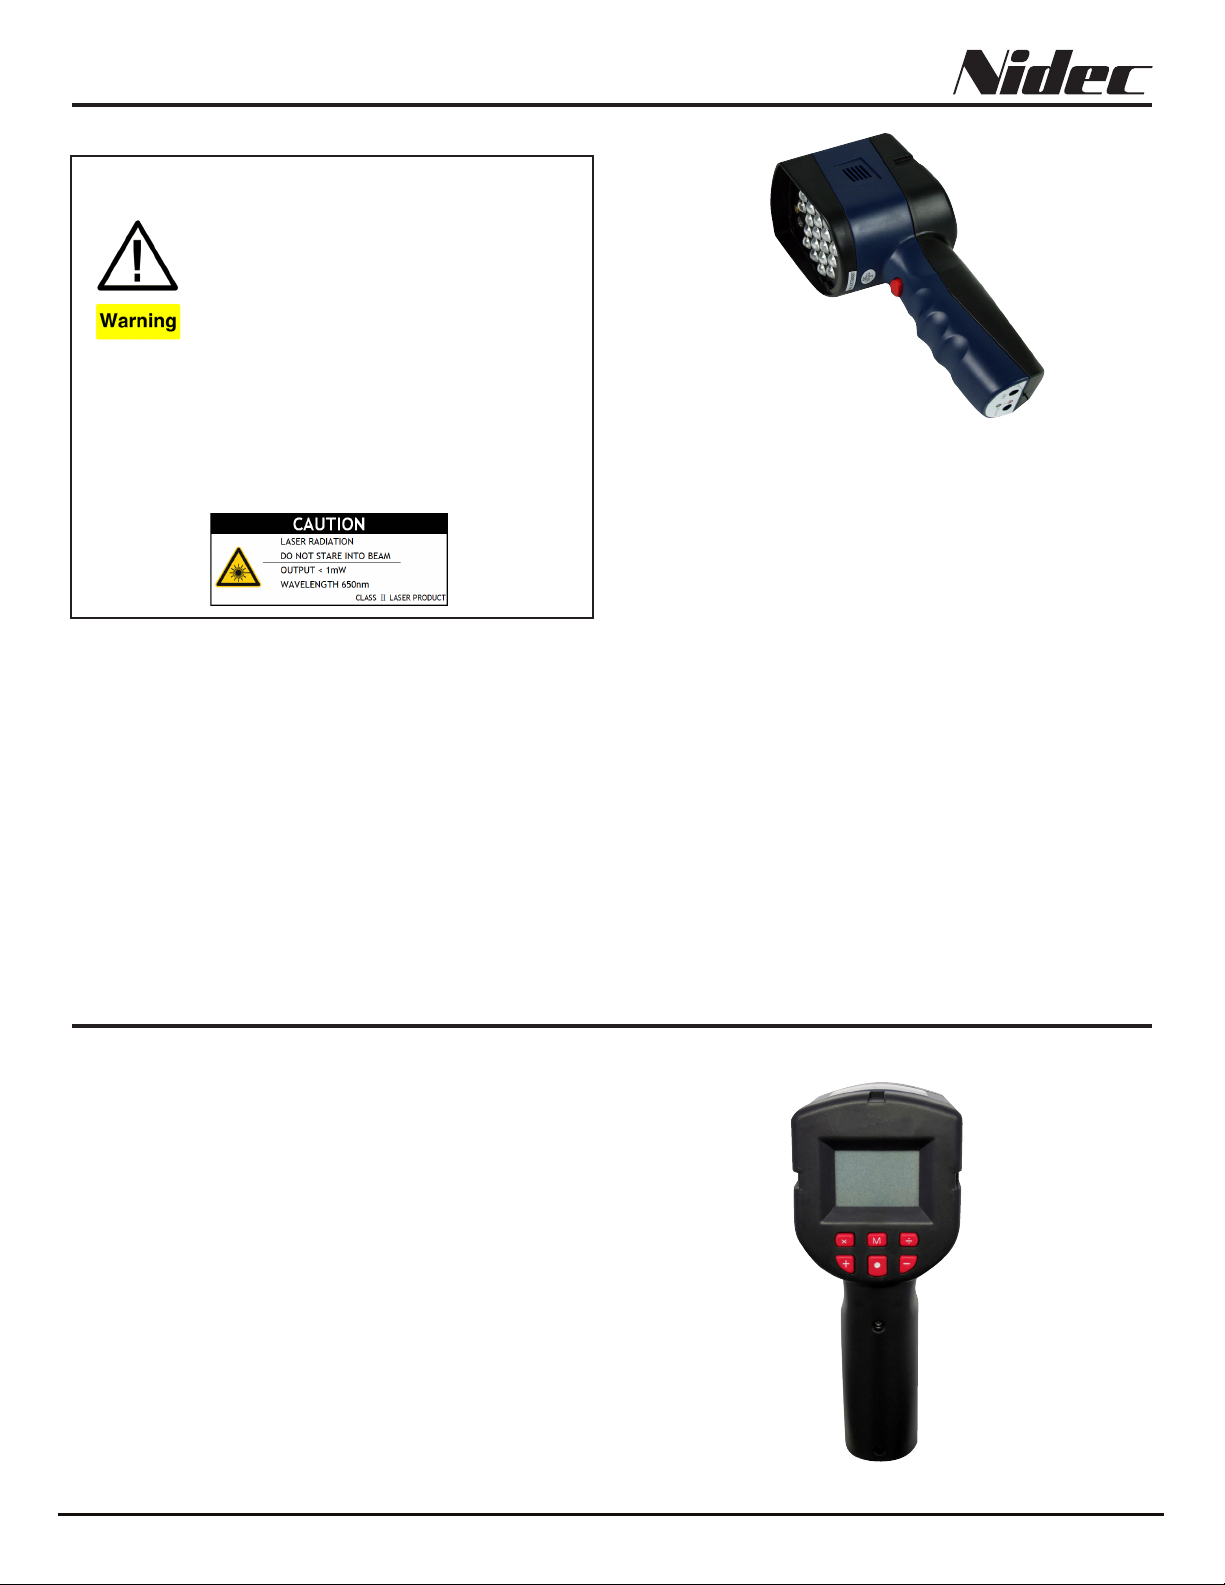
The ST-5100 is a portable, light-weight stroboscope with trigger
light activation that utilizes 21 super bright CREE High Powered
LED lamps. The ST-5100’s LED array provides a bright, stable
strobe light over a wide measurement range with a lifetime far
exceeding xenon-lit stroboscopes. Unique to the ST-5100 is an
auto-speed detection laser that translates speed sensed direct-
ly over to the flash rate of the LED’s simplifying operation. Con-
taining a rechargeable lithium battery, a single charge is able to
last up to a full 5 hours of operation. The ST-5100 is designed for
speed and frequency measurements in motion and vibration anal-
ysis applications. It is ideal for predictive and preventive mainte-
nance applications such as: motors, shafts, roto-gravure printing,
extruders, blow molding, wire lettering and striping, engraving,
pulse jets, water jets, fans, cams, gear teeth, belt inspections,
fuel injectors, vibration analysis, audio speaker analysis, spindle
spinning, cutting blade timing and sharpness, plus many more in
the printing, packaging, textile, automotive, cable, mining, steel,
chemical, optical, medical and shipbuilding industries.
ST-5100 LED Stroboscope
Operation Manual
Use in flammable environments is prohibited. Use in this manner may
result in fire or explosive.
Do not look directly into the LED light Source. This may result in eye
injury.
Do not use or store in the following environments. Direct sunshine
condensation, dust or caustic.
Do not alter, or modify of improperly. Such action may cause damage
and void warranty.
Operate within 0-35°C (32-95°F), 35-85% RH. Use outside of this range
may alter operation of the unit.
Case may become excessively hot when used continuously for more
than 2 hours.
Laser radiation may be harmful to the human eye. Avoid direct exposure
of human eyes to laser light. Eye damage can result.
• Never point the unit at another person.
• Keep out of the reach of children.
• Avoid indirect exposure via reflective materials such as glass and
mirrors.
SPECIFICATIONS
Flash Rate Range: 30 to 120,000 FPM ; 0.5-2000 Hz
Accuracy: 0.01% ±1 digit of F.S. @ 77° F (25°C)
Lux Rating (Approx.): 6000 FPM & 85 Brightness: Distance 8˝
(20 cm) 9500 lx with 7˝ (178 mm) irradiation dia., Distance 20˝
(50 cm) 2275 lx with 11˝ (279 mm) irradiation dia. 1500 FPM &
85 Brightness: Distance 8˝ (20 cm) 4250 lx with 7˝ (178 mm)
irradiation dia., Distance 20˝ (50 cm) 1375 lx with 11˝ (279 mm)
irradiation dia
Lamp Lifetime: Approximately 3~5 years depending on usage.
Display: Backlit LCD
Resolution: 30-120,000 = 0.1 FPM; 0.5~2000 HZ = 0.1 Hz
Flash Duration: 0.1°- 2.5° = 1-100 on display
Power Requirement: 100-240 VAC 50/60Hz
Battery: Lithium DC 12.6V 2600 mAh
Battery Life: Approx. 5 hours depending on settings
External Sensor Input: 12 V Pulse
Sensor Power Supply: 12 V dc up to 200 mA
Input Pulse Width: Over 50 μs
Temperature Limits: 32-95°F (0-35°C)
Humidity Limits: 35 to 85% RH
Enclosure: ABS
Product Weight: 0.62 lb (280 g)
Package Weight: 2.8 lb (1.3 kg)
Dimensions: 9 x 3.4 x 1.6” (228 x 86 x 40 mm)
Approvals: CE
Warranty: 1 year
Included Accessories: AC power adapter, Carrying Case,
Sensor Input Cable
Operation Panel
1. M: Enter the menu screen
2. X: In Internal Mode, the flash rate is multiplied by 2. Make a
long press to perform faster multiplication of the flash rate.
Confirms selection in menus.
3. ÷: In Internal Mode, the flash rate is multiplied by 2. Make a
long press to perform faster multiplication of the flash rate.
Back or return button selection in menus.
4. +: In Internal Mode, increases the flash rate value by single dig-
its. Hold to increase speed. In menu screen, changes selection
to the right.
5. - : In Internal Mode, decreases the flash rate value by single
digits. Hold to increase speed. In menu screen, changes se-
lection to the left.
6. •: In Internal Mode, press to enable adjustment of the bright-
ness level setting. Brgt in bottom right of display will blink in-
dicating it is active for adjustment. Press + or – to adjust up or
down accordingly. Press again to exit out of brightness adjust-
ment.
7. Power Trigger Button: In Internal Mode, press once to activate
or deactivate the light array. Press for 2 seconds to turn on or
off the stroboscope.
Power Trigger Button
on front of handle
Home Display
Automatic Power Off icon appears at top if selection is set for unit
to have 10 minute auto-shut off active.
When charging cable is connected, a lightning icon appears on
the upper right side of the display, indicating that charging is oc-
curring.
Light Icon indicates light array is active when present.
Battery Indication - Indicates remaining battery charge.
The battery can be used for more than 3.5 hours continuously
when the frequency is 3000 FPM or 50Hz.
Menu Function Settings
To select any of the 5 function submenus, Press x to select, ÷ to
go back to home screen.
Brgt: Allows brightness or flash duration adjustment of the light
array. This can also be adjusted from the home display by press-
ing the • button.
Ext: Enables operation via remote sensor. Remote sensor must be
connected via bottom port and included cable to operate.
ShutDown: Activate a 10 minute auto shut off of the unit. If de-
activated, unit only turns off with a 2 second hold of the handle
trigger button.
Unit: Switch between Hz and FPM (flashes per minute).
Laser: Enables system speed to be detected and automatically
transferred over to the flash rate setting. This icon ( ) on the
home screen indicates the laser is detecting motion.
Flash Rate (Frequency Setting) in Internal Mode -
One function of a stroboscope is to provide a “stopped” image
of a rotating target when the flash rate of the stroboscope has
matched the rotational speed of the target object. The strobo-
scope will show a single image when the flash rate is set to a
lesser multiple of the true RPM (1/2,1/3,etc.) When the flash rate
is increased to a higher multiple (2,3,etc.), multiple images will
appear. To find the true RPM of the target object, begin at a higher
than estimated flash rate and reduce the rate to lower values until
only one stationary image appears.
2
Batter capacity is full
The Battery capacity is diminished Near zero
capacity
When battery is empty, the unit will power off
Stopped Image:
Example
True
Rotational Speed
of Target Object
(rpm)
Flash Rate of
Stroboscope
(fpm)
Multiple
of True
Rotational
Speed
Number of
Stopped
Images
900 rpm
3600
2700
1800
900
450
300
4 times
3 times
2 times
1 time
1/2 times
1/3 times
4
3
2
1
1
1
Multiple/Divide by 2 Function - The flash rate can be doubled or
halved by x2 and 1/2 keys on the operation panel.
1. Doubling the flash rate(x2), Press x2 key to multiply the cur-
rent flash rate by a factor 2.
Note: The use of the x2 key will have no effect when multiplica-
tion of the current flash would result in a value that exceeds the
maximum flash rate range. After the flash rate changes, it be-
comes the new value based on the set display resolution. There-
fore, the rate may likely not return to the original frequency, even
if the “1/2” key is pressed.
2. Halving the flash rate(1/2); Press “1/2” key to divide the current
flash rate by a factor of 2.
Note: The use of the 1/2 key will have no effect when the divi-
sion of the current flash rate would result in a value that goes
below the minimum flash rate.
1/3
Automatic
Shutdown
Battery
Charge
Charging
Active
Brightness
Value
Brightness
Display
Light Array
Indication
Flash Duration (Brgt) Settings
The flash duration, “Brgt”, can be set within the range of 0.1°-2.5°
over a 360° period.
1 = 0.1 degree ; 100 = 2.5 degree.
When the flash duration is lengthened, the brightness of the flash
will be increased, however the image of the target object may
appear slightly out of focus. When the flash duration is shortened,
the brightness will be decreased, yet the image of the target ob-
ject will become more focused. To change the flash duration in
either Internal or External modes,
From the home display, press the • key. Once pressed, the Brgt
icon will blink. The flash pulse duration or brightness can now be
modified from 1-100 values.
External Trigger Mode
External trigger mode will allow the flash rate of the ST-4000 stro-
boscope to be controlled by an external signal, such that the flash
rate will automatically increase or decrease when the signal is al-
tered, so that it may remain in unison with the speed of a chang-
ing target.
Connector of External Input (EXT connection on bottom of han-
dle)
External Sensor Input: 12 V Pulse
Sensor Power Supply: 12 V dc up to 200 mA
Input frequency: over 50 μs.
Note: When the external sensor is used, the AC power adapter
must be connected to the unit.
Wiring:
1. Red - +12 V
2. Black - Ground
3. Yellow – Sensor Signal Pulse Input
3
External Sensor
Connection Symbol
SEALS USA, Inc.
Instruments Division Tel: (630)924-7138 Email: [email protected]

This manual suits for next models

1

Other Nidec Test Equipment manuals

Nidec Shimpo DT-315AEB-230V-NIST User manual

Nidec

Nidec Shimpo DT-315AEB-230V-NIST User manual

Nidec DT-366 User manual

Nidec

Nidec DT-366 User manual

Nidec DT-3015P User manual

Nidec

Nidec DT-3015P User manual

Nidec TTC Series User manual

Nidec

Nidec TTC Series User manual

Nidec DT-725 User manual

Nidec

Nidec DT-725 User manual

Nidec DT-3015N User manual

Nidec

Nidec DT-3015N User manual

Nidec Shimpo ST-320BL User manual

Nidec

Nidec Shimpo ST-320BL User manual

Nidec Shimpo 329BL User manual

Nidec

Nidec Shimpo 329BL User manual

Nidec TNC Series User manual

Nidec

Nidec TNC Series User manual

Nidec Shimpo DT-315AEB-NIST User manual

Nidec

Nidec Shimpo DT-315AEB-NIST User manual

Nidec DT-311D User manual

Nidec

Nidec DT-311D User manual

Nidec DT-311J User manual

Nidec

Nidec DT-311J User manual

Nidec Shimpo DT-311J-230V User manual

Nidec

Nidec Shimpo DT-311J-230V User manual

Nidec ST-5000 User manual

Nidec

Nidec ST-5000 User manual

Nidec Shimpo DT-315AEB User manual

Nidec

Nidec Shimpo DT-315AEB User manual

Nidec DT-3011J User manual

Nidec

Nidec DT-3011J User manual

Nidec DT-3011P User manual

Nidec

Nidec DT-3011P User manual

Nidec DT-362 User manual

Nidec

Nidec DT-362 User manual

Popular Test Equipment manuals by other brands

Nima Partners Gluten Sensor quick start guide

Nima Partners

Nima Partners Gluten Sensor quick start guide

Bahco BMVAT1000 instruction manual

Bahco

Bahco BMVAT1000 instruction manual

bonitron M3628UCT Customer Reference Manual

bonitron

bonitron M3628UCT Customer Reference Manual

OXO T BOX G2 User instruction

OXO

OXO T BOX G2 User instruction

Stanwax Laser ILDA Gem Pocket instructions

Stanwax Laser

Stanwax Laser ILDA Gem Pocket instructions

SANBlaze SBExpress-DT4 quick start

SANBlaze

SANBlaze SBExpress-DT4 quick start

Agilent Technologies ACQIRIS CC103 user manual

Agilent Technologies

Agilent Technologies ACQIRIS CC103 user manual

Cypress ModusToolbox manual

Cypress

Cypress ModusToolbox manual

Walter SURFOX owner's manual

Walter

Walter SURFOX owner's manual

Kewtech KT1795 instruction manual

Kewtech

Kewtech KT1795 instruction manual

Viavi ALT-9000 Operation manual

Viavi

Viavi ALT-9000 Operation manual

IKONIX 3145 Operation and service manual

IKONIX

IKONIX 3145 Operation and service manual

Agilent Technologies 16043A Operation and service manual

Agilent Technologies

Agilent Technologies 16043A Operation and service manual

Sealey BT01 instructions

Sealey

Sealey BT01 instructions

Clearaudio double matrix professional SONIC user manual

Clearaudio

Clearaudio double matrix professional SONIC user manual

Fluke Hydra Series II user manual

Fluke

Fluke Hydra Series II user manual

Compliance West HT-2000P instruction manual

Compliance West

Compliance West HT-2000P instruction manual

Keysight Technologies 85051B User's and service guide

Keysight Technologies

Keysight Technologies 85051B User's and service guide

manuals.online logo
manuals.online logoBrands
  • About & Mission
  • Contact us
  • Privacy Policy
  • Terms and Conditions

Copyright 2025 Manuals.Online. All Rights Reserved.