Nitsuko DS01 User manual

Nitsuko DS01 Series Telephone Guide
NITSUKO DS01
TELEPHONE USER’S GUIDE
2003-2004
Version 1.1

Nitsuko DS01 Series Telephone Guide
2003-2004 Version 1 Table of Contents
TABLE OF CONTENTS
PAGES
INTRODUCTION
TELEPHONE FEATURES ……………………………………………………….…
TELEPHONE SERVICES …………………………………………………….…….
VOICE MAIL ……………………………………………………………………….
TELEPHONE FREQUENTLY ASKED QUESTIONS (FAQs) ……………………
ADVANCED FEATURES …………………………………………………………….

Nitsuko DS01 Series Telephone Guide
2003-2004 Version 1
INTRODUCTION
This User’s Guide contains procedures on how to use the voice features available on your Nitsuko
DS01 Telephone and who to contact to obtain information.
These procedures are designed to address all features available on Nitsuko DS01 Telephones,
although your Nitsuko set may not have all of these features assigned.
You can determine which features are available on your Nitsuko DS01 Telephone by the template on
your phone; for example, if “Barge In” is not defined on your telephone template---you do not have
access to that feature.
Some features, however, may still be used even though you do not have a button assigned on your
template.
If you have any questions regarding your Nitsuko DS01 Telephone or any feature please contact
Anthony Mendizabal at (713) 676-9245.

Nitsuko DS01 Series Telephone Guide
2003-2004 Version 1 Telephone Features
Page TF-1
TELEPHONE FEATURES
SPEAKER PHONE
ACTION PROCEDURE
Using the Speaker
Phone to make call 1. Press HF to turn the Speaker Phone on.
•The green Speaker lamp comes on.
•Listen for dial tone.
2. Dial the number.
3. When the called party answers, speak toward front of the set
From a comfortable distance.
To change from
handset to Speaker
Phone
1. While on a call, press HF.
The red speaker lamp comes on.
2. Hang up the handset.
To change from
Speaker Phone to
handset
While on the Speaker Phone, lift the handset.
•The red speaker lamp goes off.
•The handset is automatically connected.
To answer a call Press HF.
The red speaker lamp will come on. You will be connected if the
ringing “Call Appearance” button is selected.
To end a call Press HF.
•The red speaker lamp goes off.
•Call is disconnected.
To adjust the Speaker
Phone loudspeaker
volume
While using the Speaker Phone, press the volume “up” or “down” button
to increase/decrease volume loudspeaker. These buttons are located on
the right side of the dial pad.
KEY LIGHTS
Green – Your phone line
Red – Someone else is on the line

Nitsuko DS01 Series Telephone Guide
2003-2004 Version 1 Telephone Features
REDIAL
ACTION PROCEDURE
To redial the Last
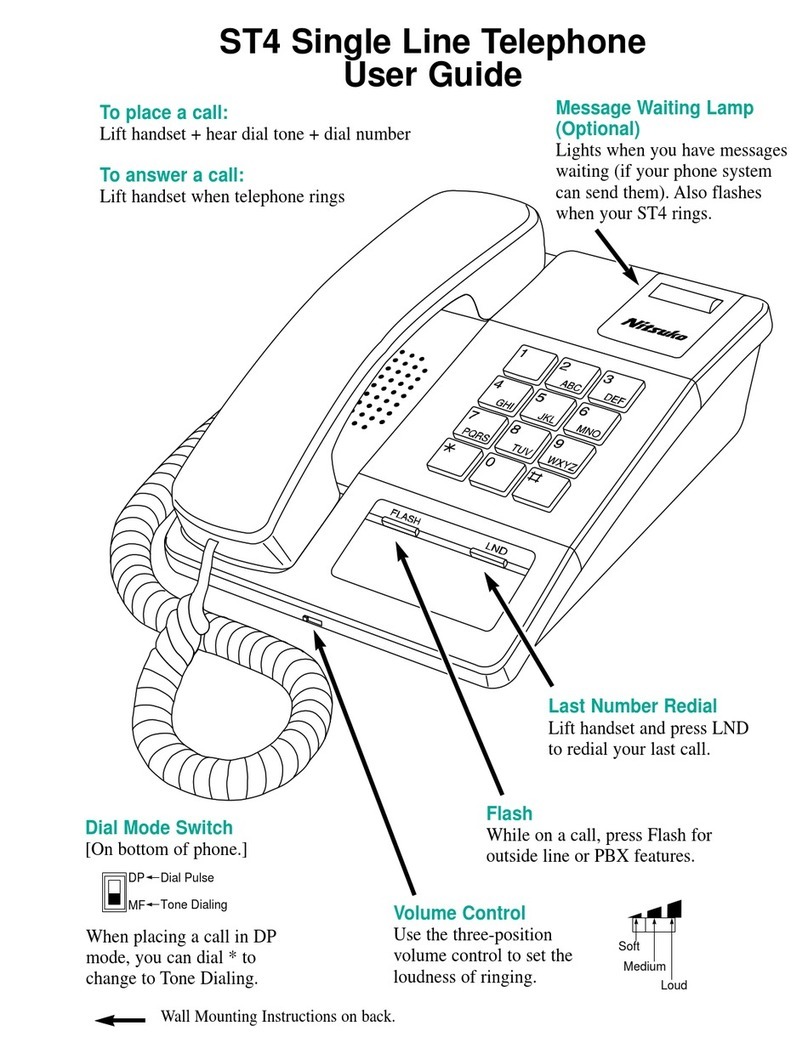
Number Dialed (LND) 1. Lift the handset.
2. Press Dial, and then Press Last.
•Last number dialed is automatically redialed.
•You can redial a number that is up to 24 digits.
DISPLAY
ACTION PROCEDURE
To adjust the display 1. You are off-hook.
2. Press the “Vol Up” or “Vol Dn” buttons located on the right
side of the dial pad until the display brightness is set properly
(should you have a display set).
MUTE
ACTION PROCEDURE
To active mute function
1. Press MIC/DND.
2. Your MIC/DND key light goes on.
3. You can do this any time while on the phone or while your
phone is idle.
SPEED DIALING
ACTION PROCEDURE
To program one-touch keys
(speed dialing)
1. Lift handset.
2. Press DIAL, and then press PGM#.
3. Press the One-Touch Speed Dial key.
4. Dial line number, Press line key.
5. Dial number you want to sore, you can press HOLD to enter a
pause.
6. Hang up.

Nitsuko DS01 Series Telephone Guide
2003-2004 Version 1 Telephone Features
DO NOT DISTURB
ACTION PROCEDURE
To activate “Do Not Disturb”
Option 1. Do not lift handset.
2. Press the DND and select option.
3. To cancel, press the DND.
Do Not Disturb Options:
1 = Blocks your outside calls
2 = Blocks Paging, Intercom Calls, Call Forwards &
Transferred Calls
3 = Blocks All Calls
4 = Blocks Call Forwards
0 = Cancels “Do Not Disturb”

Nitsuko DS01 Series Telephone Guide
2003-2004 Version 1 Telephone Services
TELEPHONE SERVICES
ALL FORWARDING ALL CALLS VIA ACCESS CODE
TO FORWARD ALL CALLS TO ANOTHER DIRECTORY NUMBER
1. Go off-hook.
2. Dial *72.
3. When you receive a second dial tone, dial the Directory Number to which calls are to be
forwarded.
4. You receive a signal beep to alert you that the call forwarding is activated.
TO DEACTIVATE THE CALL FORWARDING ALL CALLS VIA ACCESS CODE
1. Go off-hook.
2. Dial *73.
3. When you receive a signal beep to alert you that the call forwarding has been deactivated.
CALL FORWARDING ALL CALLS VIA PHONE FEATURE
TO FORWARD ALL CALLS TO ANOTHER DIRECTORY NUMBER
1. Call 1 + *3.
2. Dial Call Forwarding condition:
0 = Cancel Forwarding
2 = Busy or not answered
4 = Immediate
6 = No answer
3. Dial Directory Number, or press Voice Mail key.
4. Press SPK to hang up (if you dialed 2 in step 1).
CALL FORWARDING/BUSY/NO ANSWER VIA PHONE FEATURE
1. Call 1 + *2.
2. Dial Call Forwarding condition:
1 = Personal Answering Machine Emulation (then skip to step 4)
2 = Busy or not answered
4 = Immediate
6 = Not answered
7 = Immediate with simultaneous ringing (not for Voice Mail)
0 = Cancel
3. Dial Destination Extension, or press Voice Mail key.
4. Dial Call Forwarding type
2 = All call
3 = Outside calls only
4 = Intercom calls only
5. Press SPK to hang up (if you dialed 2 in step 1).
NOTE: Your DND flashes when Call Forwarding is activated.

Nitsuko DS01 Series Telephone Guide
2003-2004 Version 1 Telephone Services
CALL FORWARDING ALL CALLS VIA PHONE FEATURE
1. Call 1 + *2
2. Dial Call Forwarding condition:
1 = Personal Answering Machine Emulation (then skip to step 4)
2 = Busy or not answered
4 = Immediate
6 = Not answered
7 = Immediate with simultaneous ringing (not for Voice Mail)
0 = Cancel
3. Dial Destination Extension, or press Voice Mail key.
4. Dial Call Forwarding type
2 = All call
3 = Outside calls only
4 = Intercom calls only
5. Hang up (if you dialed 2 in step 1)
NOTE: Your DND flashes when Call Forwarding is activated.
INTERCOM
TO ORIGINATE A DEDICATED INTERCOM CALL
1. Go off-hook.
2. Press EXT. Number marked for the other intercom member.
CALL TRANSFER
TO TRANSFER A CALL
1. You are off-hook and active.
2. Call is put on soft hold.
3. You can dial the DN of a third party; you are now connected to the third party.
4. Be sure to announce the call. The display does not indicate this as a transferred call.
5. Press HOLD and the third party is transferred to the soft held call.
6. Hang up the handset.
TO TRANSFER A CALL VIA PHONE FEATURE
1. You are off-hook and active on CAA1 and no call is held for conference or transfer for that
station.
2. Press HOLD. Call is put on soft hold.
3. You can dial the DN of a third party; you are now connected to the third party (if the
extension is busy or doesn't answer, you can dial another extension number or press the
flashing line button to return to the call).
4. Be sure to announce the call. The display does not indicate this as a transferred call.
5. Hang up the handset.

Nitsuko DS01 Series Telephone Guide
2003-2004 Version 1 Telephone Services
CONFERENCE CALLING
1. You are off-hook and active on a CALL1.
2. Press CONF.
3. The current call is put on soft hold.
4. Place or answer next call.
5. Press CONF.
6. Repeat this step to add more parties.
7. After adding all parties, press CONF again to begin the Conference.
TO END CONFERENCE
Press HF to hang up.
CA = Call Appearance
DN = Directory Number (Telephone Number)

Nitsuko DS01 Series Telephone Guide
2003-2004 Version 1 Voice Mail
VOICE MAIL
Your system may be connected to an NVM-Series Voice Mail with Automated Attendant system.
NVM-Series Voice Mail provides your system with comprehensive voice messaging capability as
well as a sophisticated Automated Attendant. Your NVM-Series provides:
AUTOMATED ATTENDANT
Automated Attendant automatically answers your system’s incoming calls. After listening to a
customized Automated Attendant greeting, callers to your company can dial a system extension or
use Voice Mail.
LEAVING A MESSAGE
When you call a co-worker that doesn’t answer, is busy on the phone or in Do Not Disturb, you can
easily leave them a voice message in their mailbox. There is no need for you to call back later.
CALL FORWARDING TO VOICE MAIL
When you forward your calls to Voice Mail, calls to your phone go to your Voice Mail mailbox.
Your callers then leave you a voice message instead of calling back later. You can enable forwarding
for all calls immediately, for unanswered calls, or for calls to your phone when you are busy.
TRANSFERRING TO VOICE MAIL
You can Transfer a call to your mailbox or a co-worker’s mailbox. After the Transfer goes through,
your caller can leave a message in the mailbox.
CONVERSATION RECORD
While on a call, you can have Voice Mail record your conversation. You just press your uniquely
programmed Conversation Record key or a soft key. Once recorded, Voice Mail stores the
conversation as a new message in your mailbox. After calling your mailbox, you can save, edit or
delete the recorded conversation. (Check with your Communications Manager to see if you have
Conversation Record capability.)

Nitsuko DS01 Series Telephone Guide
2003-2004 Version 1 Voice Mail
CALLING YOUR MAILBOX
TO CALL YOUR MAILBOX
Your Message lamp will flash fast when you have new messages in your mailbox.
1. Press ICM, then Message.
2. Lift handset for privacy.
3. If requested by Voice Mail, enter your security code.
Your Message lamp goes out after you call your mailbox.
LEAVING A MESSAGE
TO LEAVE A MESSAGE IN THE MAILBOX OF AN UNANSWERED EXTENSION
The extension you call can be busy, in Do Not Disturb, or unanswered.
1. The Voice Mail system will prompt you to leave a message.
TRANSFERRING CALLS TO A MAILBOX
TO TRANSFER YOUR ACTIVE CALL TO A MAILBOX
1. Press ICM,and then press Message.
2. Dial the number of the mailbox to receive the Transfer (e.g., 301 for extension 301). This
number can be your mailbox number (if you’re away from your desk) or a co-worker’s
mailbox number.
3. Press MW.
4. Press SPK to hang up.
Voice Mail will prompt your caller to leave a message in the mailbox you selected.
CHECKING YOUR MESSAGES
TO CHECK YOUR MESSAGES
Press ICM, and then press Message.
You will be prompted to enter your security code.

Nitsuko DS01 Series Telephone Guide
2003-2004 Version 1 Frequently Asked Questions
FREQUENTLY ASKED QUESTIONS
HOW DO I TRANSFER CALLS FROM STATION TO STATION?
1. Press ICM.
2. Dial station to receive call or touch the hotline key that has been preset for that station.
HOW DO I TRANSFER CALLS DIRECTLY INTO VOICE MAIL?
1. Press MW.
2. Press the preset hotline key or dial the station you wish to send caller to.
3. Hang up the handset.
HOW DO I CHANGE TIME/DATE ON THE SYSTEM?
Must be programmed by vendor.
WHAT DOES THE FLASH KEY DO?
Press the flash key to allow you to pick up a second caller if you are using Call Waiting.
HOW DO I PROGRAM SPEED DIAL NUMBERS (ONE TOUCH KEYS) NON-LIGHTED?
1. Press ICM + ##.
2. Dial the personal bin number (701-720) or press the preset bin key or press Dial + bin key
(711-720).
3. Press HOLD.
4. Enter the line number (e.g., 1) that you wish the system to use when dialing your stored
number (skip this set if entering ICM codes).
5. Press HOLD again.
6. Enter the number you wish to stored.
7. Press MIC to enter a pause or FLASH to enter a flash?
8. Press HOLD again.
9. Enter the name you desire for entrée to display (refer to dial pad keys for entering names).
10. Press HOLD and repeat steps for another speed dial number or ICM.
11. Press SPK to exit.
HOW DO I MAKE CONFERENCE CALLS? (maximum of seven parties)
1. Place or answer the first call.
2. Press CONF (the current call is put on soft hold).
3. Select an open line.
4. Dial the number of the next party.
5. Press CONF TWICE to connect all parties.

Nitsuko DS01 Series Telephone Guide
2003-2004 Version 1.1 Frequently Asked Questions
HOW DO I ADJUST THE BRIGHTNESS ON THE DISPLAY?
1. You are off-hook.
2. Press the Up or Down Arrow buttons on the Volume Control Feature at the bottom of the set
until the display is set properly.
HOW DO I CHANGE THE NAME ON THE DISPLAY?
Must be programmed by vendor.
HOW DO I ADJUST THE RING VOLUME?
1. Press the UP or DOWN arrows at the bottom of the phones.
2. Adjust the volume while phone is on the book and ringing.
HOW DO I ADJUST THE HANDSET VOLUME?
3. Press the UP or DOWN arrows at the bottom of the phones to adjust the speaker and headset
volume control.
HOW DO I CLEAN LINES THAT SHOW BUSY BUT NO ONE IS ON THEM?
Must be repaired by vendor.
HOW DO I FORWARD MY PHONE?
Forwarding phone number to another station or voice mail
1. Lift handset for privacy.
2. Dial *72.
3. When you receive a dial tone, dial the directory number to which calls are to be forwarded.
4. You receive a signal beep to alert you that the call forwarding is activated.
5. Hang up.
To deactivate call forwarding
1. Lift handset for privacy.
2. Dial *73.
3. You receive a signal beep to alert you that the call forwarding is activated.
WHAT IS A STATION?
A “station” or “extension” is assigned to a telephone set and used by your system to communicate
with other stations or C.O. lines (for outside calling). Programming for a station is stored in your
phone system.

Nitsuko Telephone Guide
2003-2004 Version 1 Frequently Asked Questions
FREQUENTLY ASKED QUESTIONS – VOICE MAIL
HOW DO I MAKE CHANGES IN MY VOICE MAIL SUCH AS SECURITY CODE, GREETING,
NOTIFICATION AND OTHER ITEMS INVOLVED WITH MY MAILBOX?
1. Pick up the handset.
2. Press VM.
3. Listen to prompts.
4. Follow prompts until desired feature is mentioned.
5. Follow the instructions given.

Nitsuko Telephone Guide
2003-2004 Version 1 Advanced Features
ADVANCED FEATURES
ANSWERING YOUR OWN MESSAGE WAITING
This feature is for the user to respond to a message left by another co-worker.
1. Lift the handset (optional).
2. Press ICM, then Message. To cancel all your messages without returning them, dial ICM#*.
BACKGROUND MUSIC BACKGROUND (REQUIRES TECHNICIAN)
Music sends music from an FM receiver, tape deck or CD player your company provides to the
speaker in your telephone. This helps give you a pleasant working environment. The background
music plays whenever your phone is idle.
BARGE IN (REQUIRES TECHNICIAN)
“Barge In” permits you to break into a co-worker's established call. Use “Barge In” when you have
to get a message through right away (such as in an emergency). “Barge In” sets up a three-way call
between you, your co-worker and their caller.
CALLER ID (REQUIRES TECHNICIAN)
“Caller ID” allows a display keyset to show an incoming caller’s telephone number (up to 12 digits)
and optional name. The Caller ID information can be displayed wither before or after answering a
call.
HOLDING YOUR CALLS
This feature allows you to place a call on hold.
Do not hang up!
1. Press HOLD (this puts your outside call on system hold. Your co-worker can take the call
off hold.
2. For Exclusive hold, press HOLD again. Intercom calls automatically go on exclusive hold
when you press HOLD.

Nitsuko DS01 Series Telephone Guide
2003-2004 Version 1.1 Advanced Features
HOTLINE (REQUIRES TECHNICIAN)
A hotline key is a type of Programmable Function Key that gives you one-button calling and
Transfer to the co-worker assigned as your Hotline partner. You can have multiple Hotline keys on
your phone, each set up for a different Hotline partner. Your Hotline keys also show you the status
of your partners’ extensions.
MESSAGE WAITING
This feature allows you to place a signal on the co-worker’s phone letting them know someone is
waiting to talk to them.
1. Do not hang up if there is no answer.
2. Press MSG. The MSG key on your co-worker’s phone flashes fast. If you have Voice Mail, this
will call your co-worker’s mailbox.
PAGING-EXTERNAL/INTERNAL (REQUIRES TECHNICIAN)
EXTERNAL PAGING
If you have your own external speaker system installed, you may be able to use it for External
Paging. This is particularly helpful in large or noisy areas where the Internal Paging speakers in the
telephones are not loud enough. Your system can have All Call External Paging and up to eight
zones of External Zone Paging.
INTERNAL PAGING
Need to locate a co-worker or make an announcement? Use Internal Paging. Your system can have
All Call Internal Paging and, depending on your system, up to 64 zones of Internal Paging. When
you make an All Call Paging announcement, your voice broadcasts to all extensions set to receive
All Call Paging. When you make a Zone Paging announcement, your voice broadcasts to all the idle
extensions in the zone you called.
PARK A CALL IN ORBIT
This feature is for when you have to place a call on hold allowing any one of a certain group to
answer it.
1. Do not hang up.
2. Press ICM.
3. Dial the park orbit number. To park a call in the System Park Orbit, dial orbit number (60-
69). To park a call at a co-worker’s extension (Called Personal park) dial *and your co-
worker’s extension number.
4. Intercom your co-worker to pick up the call.
5. Hang up the handset.

Nitsuko DS01 Series Telephone Guide
2003-2004 Version 1.1 Advanced Features
PICK UP A CALL YOUR CO-WORKER PARKED FOR YOU
This feature is for when you need to retrieve or pick up a call that was parked by another co-worker..
1. Lift handset for privacy (optional).
2. Press ICM.
3. Dial the park orbit number. Your choices are system orbits 60-69 or * and the Personal Park
Orbit number.
PRIME LINE SELECTION (REQUIRES TECHNICIAN)
Prime Line Preference allows you to place a call by just lifting the handset. You do not have to press
a line key, loop key or the ICM key first. Check with your Communications manager to find out if
you have Prime Line Preference, and which key on your phone is your Prime Line key.
RINGING LINE PREFERENCE (REQUIRES TECHNICIAN)
Ringing Line Preference lets you answer a ringing call just by lifting the handset. If you primarily
answer calls, Ringing Line Preference ensures that your incoming calls have priority. Your
Communications Manager can tell you if you have Ringing Line Preference.
RETRIEVE A CALL FROM HOLD
This feature allows you to pick up a call that was placed on hold either by your or a co-worker.
1. Lift handset for privacy (optional).
2. If the call was on a line key, press the flashing line key. If the call was NOT on a line key,
press HOLD. If a co-worker placed the outside all on hold and you don’t have a line key for
it. Press ICM * and the line number (e.g., 801 or your co-worker’s extension number.
REROUTE YOUR CALLS
This feature allows you to transfer a call to another co-worker or to a call group, this is “parking” a
call.
Press ICM and dial your co-worker’s extension number. To transfer the call to Voice Mail. Press
MSG before dialing your co-worker. You can optionally press a DSS hotline or Call Coverage key.

Nitsuko DS01 Series Telephone Guide
2003-2004 Version 1.1 Advanced Features
SAVE YOUR CALL FOR QUICK DIAL LATER ON
This feature is for when you need to be calling a certain party or co-worker again after calling
someone. It is similar to last number redial.
1. Do not hang up.
2. Press DIAL, and then press SAVE.
REDIAL YOUR SAVED NUMBER
1. Lift handset (optional).
2. Press DIAL and then press SAVE. If you hear a busy tone, press an idle line key to have
your call dial out automatically.
TIME AND DATE
This feature allows you to change correct or alter the time and date for the system that will be shown
on a display keyset. Once this is done ALL display sets will show the same time, it is a system-wide
set-up, not individual.
1. Press PGM #.
2. Press TD (83).
3. Press the month using the dial pad (e.g., 01 = January), or press PGM # to advance to next
screen.
4. Enter the date using the dial pad (e.g., 01 = the first of the month), or press PGM # to
advance to next screen.
5. Enter the two-digit year using the dial pad (e.g., 01=year 2001), or press PGM # to advance
to next screen.
6. Enter the hour (24-hour clock time) using the dial pad (e.g., 00, 01, 02….60), or press SAVE
to exit if all changes have been made.
VOICE ANNOUNCE
This feature enables you to have your incoming co-worker calls made by extension either give you a
tone to alert you to their calling or allow the co-worker to start talking right away to you.
1. Press PGM #.
2. Press VA (82).
3. Press Yfor yes or Nfor no.
4. Press Save to exit.

Nitsuko DS01 Series Telephone Guide
2003-2004 Version 1.1 Advanced Features
WHISPER PAGE
This feature allows you to speak to a co-worker that is already on their phone without the call they
are talking to be interrupted or know that someone else is talking to them.
1. Press PGM #.
2. Press VO (82).
3. Press Yfor yes or Nfor no.
4. Press Save to exit.
USE WHISPER PAGE ONCE YOU HAVE SET IT UP
1. Pick up the handset.
2. Press ICM and dial the extension that you want.
3. Dial 1when you hear a busy tone and start to talk. The co-worker you called will be the only
one to hear to you, NOT the person they are talking to.
TO ANSWER WHISPER PAGE
Press and hold down MIC while responding and release when finished with response to hear the
person that paged you again. The outside caller will not hear any of this.
CLASS OF SERVICE (REQUIRES TECHNICIAN)
This feature is to establish the group or level of accessing certain items such as toll restriction,
ringing groups, pick-up groups and external paging. This is not a user feature and is set up upon
initial programming.
CALL WAITING/CAMP ON (REQUIRES TECHNICIAN)
This feature allows the caller to handle two calls on the same line. The ability for this first needs to
be set up on the line by Southwestern Bell and then activated by the vendor upon installation.
While conducting the original call, press the flash key to switch to and incoming call. A beeping
signal will be heard to let you know there is a second call coming in. When finished you may press
the flash key again to re-connect to the original caller.
DELAY RINGING (REQUIRES TECHNICIAN)
This feature is for having a line ring on your phone that is not programmed to ring as soon as the call
comes in (i.e., a line is ringing in another department and you do not wish to let the person not get an
answer. After a designated amount of rings, the caller will be rerouted to another phone that will
then start to ring and can be answered.)

Nitsuko DS01 Series Telephone Guide
2003-2004 Version 1.1 Advanced Features
HEADSET (REQUIRES TECHNICIAN)
An addition to your keyset may be added to give you the ability to move about your work area while
still conducting business on the phone. Depending on the level or style of your headset, usage will
vary. There are many stages of headset use and all will require a technician.
1. The basic head set allows hands-free access at all times to call or make calls. When a call comes
in, press the appropriate key and answer.
2. The next level of headset accessories is to add-on an auto-answer device. When this is installed,
your calls will be answered without you pressing any keys.
3. The last level of headset accessories is to add a remote unit. This will enable the user to move
about the room and still be able to handle all calls.
EXCLUSIVE HOLD
This feature allows the user to place a call on two different types of hold for better privacy in not
allowing another user to pick up your call.
Press HOLD twice. This will place the call on hold and only be able to be re-accessed by the user
that placed in there. All other phones will show the line as being active while your keyset displays a
flashing line. This way you know what line you placed on “exclusive hold.”
OFF-HOOK SIGNALING (REQUIRES TECHNICIAN)
This feature allows a caller to alert another user while that user is currently using their keyset.
PROGRAMMABLE FUNCTION KEYS (REQUIRES TECHNICIAN)
Certain keys on your keyset may be preprogrammed for one-touch access to lines, speed dialing or
other extensions.
Other manuals for DS01
1
Table of contents
Other Nitsuko Telephone manuals

Nitsuko
Nitsuko DS2000 User manual

Nitsuko
Nitsuko DS2000 User manual

Nitsuko
Nitsuko Portrait308 User manual

Nitsuko
Nitsuko Multibutton Telephone Owner's manual

Nitsuko
Nitsuko Portrait 308 User manual

Nitsuko
Nitsuko ST4 User manual

Nitsuko
Nitsuko Digital System DS Service manual

Nitsuko
Nitsuko ONYX Owner's manual

Nitsuko
Nitsuko Digital System DS User manual

Nitsuko
Nitsuko FP-1000 User manual