Nitsuko Portrait 308 User manual

82400MBG04
Multibutton Telephone
Quick Reference Guide
PORTMBG4.QXD 7/9/98 4:35 PM Page 12

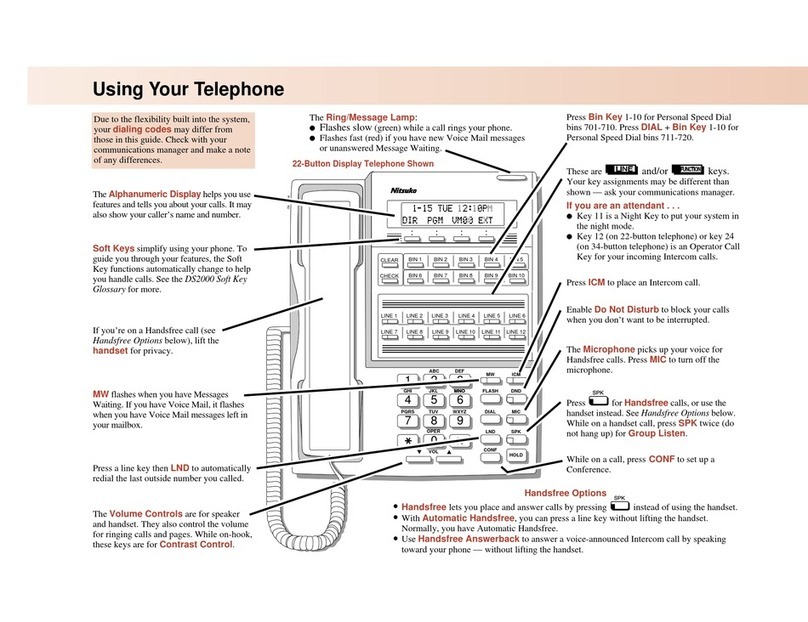
Use Microphone Mute to turn off the
Handsfree microphone.
Use the VOLUME Controls to adjust the volume of
ringing, Paging, Background Music (824 System
only), Handsfree announcements or your handset.
Display phones can also use this to control the contrast
of their LED display.
Programmable Keys have two functions:
•Just press the key and keys 1-10 are DSS keys.
•Keys 1-10 can also be One-Touch keys (for
Personal Speed Dial, Save or Selectable Display
Message keys) by pressing TRFR or a line key.
Refer to the specific feature for proper procedure.
The lights in the keys help you
use your features and tell you
about your call.
Using Your Telephone
82400 - 16
OR
CO + One Touch Key = Dial "Saved"
or Personal Speed Dial Number
TRFR + One Touch Key = Send
Selectable Display Message
DSS Key
M
U
T
E
IN
T
E
R
C
O
M
CA
L
L
I
N
C
O
M
I
N
G
C
A
L
L
82400 - 4
LND FTR
Q_Z
PRS
GHI
ABC
TUV
JKL
:/-
DEF DC
MON MW
FLASH
DND/CONF
MIC
VOL.
ICM
TRFR
SPK
HOLD
WXY
MNO
1
7
4
2
8
5
0
3
9
6
M
E
S
S
A
G
E
W
AI
T
I
N
G
MIC
R
O
P
H
O
N
E
The Alphanumeric Display helps
you use features and tells you about
your calls.
Use the DC key when dialing either
system or personal Speed Dial numbers.
PORTMBG4.QXD 7/9/98 4:35 PM Page 1

The MON flash rate
indicates if the phone is
monitoring or being
monitored with the Room
Monitor feature.
Press LND to automatically redial the last
number you called.
Press the Speaker to use Handsfree
instead of the handset.
Use Intercom to call co-workers.
You can place an Intercom or outside call on
Hold. (Note: With Intercom calls, do not hang
up the handset after placing the call on Hold.)
Use the CLEAR key to remove the data
shown in the second row of the display.
Press CHECK to display the function of any
programmable key or One-Touch speed dial
key you press.
Use Do Not Disturb to block calls and
page announcements on your extension.
This key also lets you set up a
Conference with your co-workers.
Transfer allows you to pass an outside call to a
co-worker.
Message Waiting flashes when a message is left
- either by you to a co-worker or from a co-worker
to you.
Line Keys give you access to incoming
and outgoing calls or can be programmed
as feature keys.
Flash allows you to access certain features of
your PBX or telephone company.
PORTMBG4.QXD 7/9/98 4:35 PM Page 2

Placing an Outside Call . . .
1. Lift handset.
•This step may not be required if Single
Step Access is enabled.
2. Press and dial outside number.
•You may also have line group (loop)
keys on your phone.
•If your system is behind a PBX, you
may have to dial 9 before your number.
OR
1. (Optional) Lift handset.
•This step may not be required if Single
Step Access is enabled.
2. Press + + the outside line
number (e.g. 01).
Calling a Co-Worker . . .
1. (Optional) Lift handset.
•This step may not be required if Single
Step Access is enabled.
•For one-touch calling, press a DSS key
instead of going on to step 2.
2. Press .
3. Dial your co-worker’s extension number.
•If you hear ringing, wait for an answer.
If you hear a beep, begin speaking.
•You may also be able to dial a co-
worker’s Hunt Group.
•To Page, dial 80 for All Call, 81-84 for
internal zones, or 85-87 for external
zones (308 System uses only 85 for
external zone paging).
•For your Voice Mailbox, press
SPK+VM Key (see One-Touch Keys).
4. (Optional) Dial to force the call to
ring your co-worker.
Q Z
ICM
Dial using the
Intercom:
WXY
9
ICM
Dial codes for outside
lines:
Press a line key for
quick access:
Placing Calls
PORTMBG4.QXD 7/9/98 4:35 PM Page 3

If your call doesn’t go through . . .
Camp On and Callback
1. For Intercom calls, dial to Camp On
(wait without hanging up).
•When the called party hangs up, the
call rings you back.
OR
1. For Intercom calls, dial and hang up
to leave a Callback for an extension.
For Outside calls, press and dial a
Queue Group number (e.g., 1-6) if all
lines busy. Hang up.
2. Lift handset or press when the sys-
tem calls you back.
3. (Outside calls only) Place your call again.
To cancel your Callback (ICM calls only):
1. Lift handset and hang up.
Message Waiting
1. After placing an ICM call, do not hang up
if you get no answer or a busy signal.
2. Press .
•MW on your co-worker’s phone flashes
fast. Your MW LED has a double wink.
•With voice mail, press 3 instead to leave
a message in the co-worker’s mailbox.
3. Hang up.
OR
3. To leave a Selectable Display Message,
press *, the message number (e.g., 00-49)
and *.
4. Hang up.
:/-
0
Leave a Message
Waiting so your co-
worker can call you
back:
When you hear system
busy, use Camp On or
Callback:
PORTMBG4.QXD 7/9/98 4:35 PM Page 4

1. Lift handset and press + .
•Display Phones:
To cancel all your messages without
returning them, press FTR + CLEAR.
To view your messages, press CHECK
+ * (To scroll messages, *=forward,
#=backward). Press ICM to call the
extension shown on the display.
•To listen to voice mail messages, press SPK
+voice mail key (see One-Touch Keys).
Answering Outside Calls . . .
1. Lift handset or press .
•Press line key if not connected to call.
•Some line keys may be programmed as
a group key.
•To view Caller ID, before answering and
without lifting the handset, press the line
key (If single step access is enabled, press
FLASH before pressing the line key.).
Answering Intercom Calls . . .
1. Speak toward your phone.
•The mic in your phone picks up your voice.
You can lift the handset for privacy.
OR 1. Press the flashing key.
•The mic in your phone picks up your voice.
You can lift the handset for privacy.
Picking up calls not ringing your phone . . .
1. Lift handset.
2. Press or dial .
1. Lift handset (Do not press SPK).
2. Dial your co-worker’s extension or press
if unsure of the extension ringing.
When a call is ringing a
co-worker’s phone:
MNO
6
WXY
9
ICM
If a call is ringing
Paging after hours:
ICM
Listen for one ring and
look for slowly flashing
ICM key:
Listen for one short
beep:
Listen for one ring and
look for a flashing line
key:
ICM
To answer your own
Message Waiting:
Answering Calls
PORTMBG4.QXD 7/9/98 4:35 PM Page 5

Handling Your Calls
Have a telephone meeting (Conference) . . .
1. Set up your first call and press .
2. Place or answer your second call.
Internal parties must lift the handset or
press the SPK key when called.
3. Press again.
Your call can wait at your phone . . .
Hold
1. Do not hang up. Press once for
System Hold or twice for Exclusive Hold.
•Exclusive Hold means your co-workers
can not take the call off Hold.
•ICM calls will go on Exclusive Hold
when you press HOLD (Your co-worker
must lift the handset or press SPK to
allow you to place the call on Hold).
•Do not hang up handset for ICM calls.
1. Lift handset.
2. Press flashing .
OR
2. Press if the call was an ICM call.
Reroute your calls
Transfer
1. Press and dial your co-worker’s
extension number.
•You can optionally press a DSS key after
pressing the ICM key.
•To transfer the call to voice mail, press
ICM + extension number + 3 + TRFR.
2. (Optional) Announce call.
3. Press key and hang up.
TRFR
ICM
Send (Transfer) your
call to a co-worker:
ICM
Easily retrieve a call
from Hold:
Use Hold instead of
leaving the handset
off-hook:
DND/CONF
DND/CONF
Use Conference to
have a 3-way tele-
phone meeting:
PORTMBG4.QXD 7/9/98 4:35 PM Page 8

Park a call in orbit
1. Do not hang up.
2. Press a Park key.
3. Page your co-worker to pick up the call.
•For Paging, press ICM and dial 80 for
All Call, 81-84 for internal zones, 85-87
for external zones (308 System uses
only 85 for external zone paging).
4. Hang up.
1. Lift handset.
2. Press the Park key.
Forward your calls to a co-worker . . .
1. Press + .
2. Dial extension to receive your calls.
To transfer to voice mail, dial the voice
mail’s extension number.
3. Dial one of the following:
•0 to forward all calls.
•1 to forward busy calls.
•2 to forward unanswered calls.
•3 to forward unanswered and/or busy
calls.
4. Press to hang up.
•TRFR flashes slowly.
•To cancel forwarding, press SPK + TRFR
+ TRFR + SPK.
Automatically redial calls . . .
Last Number Redial
1. (Optional) Lift handset.
2. Press a line key.
3. Press .
Quickly redial your
last outside call:
TRFR
While at your desk,
forward your calls to a
co-worker:
To pick up a call a co-
worker parked for you:
Park a call in orbit so
a co-worker can
pick it up:
PORTMBG4.QXD 7/9/98 4:35 PM Page 9

Quickly dial co-workers and outside calls . . .
Direct Station Selection (DSS)
1. Lift handset.
2. Press the One Touch DSS key (1-10) for
co-worker.
1. Press + + .
2. Press the One Touch DSS key (1-10) you want
to program.
3. Dial extension number to be assigned.
Speed Dial
1. Lift handset.
2. Press + .
3. Press a One-Touch Speed Dial key.
4. Dial number to be stored (18 digits max.).
•Pressing TRFR=pause, FLASH=Flash
and CONF=Stop.
•Press CLEAR to reenter phone number.
5. Hang up.
1. Lift handset and press a line key.
2. Press One-Touch Speed Dial key.
1. Lift handset.
2. Press and .
3. Dial a Speed Dial number (00-99).
4. Dial number to be stored (18 digits max.).
5. Hang up.
1. Lift handset and press a line key.
2. Press and dial a Speed Dial number.
DC
To dial a System
Speed Dial number:
DC
Store a System Speed
Dial number:
To dial your stored
Speed Dial number:
DC
Store up to 10 outside
numbers in your own
Personal Speed Dial:
DC
Program your own
DSS keys:
Save time calling co-
workers with Direct
Station Selection:
Placing Calls Quickly
PORTMBG4.QXD 7/9/98 4:35 PM Page 10

Identify lines, extensions, Speed Dial #’s . . .
Numbers: Press desired number on the dial pad.
Letters: Determine letter’s position on the dial pad key
(e.g., dial pad key #2 - A=position 1, B=position 2, C=
position 3). Press One-Touch key for character required.
One-Touch key 1=position 1, One-Touch key 2=position 2
One-Touch key 3=position 3, One-Touch key 4=space,
One-Touch key 5=delete a character, One-Touch key 6=
delete all characters.
*=shifts cursor to the left, #=shifts cursor to the right.
Press the dial pad keys until all letters are entered (8 digits
maximum).
1. Press twice + CO key to name + *.
2. Input the letters/numbers (see above).
3. Press next CO key to program + *.
OR
3. Press CO key + CLEAR to exit.
1. Press twice + + extension to
name + *.
2. Input the letters/numbers (see above).
3. Press + next extension to program.
OR
3. Press + CLEAR to exit.
1. Press twice + + Speed Dial
number to name + *.
2. Input the letters/numbers (see above).
3. Press + next Speed Dial number.
OR
3. Press + CLEAR to exit.
DC
Store a name with a
System Speed Dial
number:
ICM
ICM
ICMDC
Store a name with an
extension number:
DC
Store a name with a
line number:
Storing a name (from
station #10 only) for
any line, extension, or
Speed Dial number:
PORTMBG4.QXD 7/9/98 4:35 PM Page 11

Tones you may hear . . .
Press DND. If Level 3 programmed: Press DND once to
block outside and ICM calls; press DND twice to block
just outside calls.
The programmed level determines the types of calls
blocked:
Level 1 blocks outside calls, allows ICM calls
Level 2 blocks outside and ICM calls
Level 3 blocks outside and ICM or just outside calls
Do Not Disturb:
To activate or cancel: From extension to be monitored: Lift
handset + FTR + FLASH + Hang up + From monitoring
extension: FTR + FLASH.
Room Monitor:
Set up with three or more parties: Lift handset + ICM +
Dial page zone (308 System uses 80-85, 824 System uses
80-87) + Announce parties to press CONF + Press CONF.
To join: Lift handset + Press CONF.
OR
Set up with one or two parties: Lift handset + ICM + Page
zone + Announce parties to dial same page zone + #.
To join: Dial announced code.
Meet Me Conference:
Place outside call + FTR + 1 + Hang up + Lift handset
when call goes through.
To cancel: Lift handset.
Repeat Redial:
Quick Reference for Other Features
Seize CO line + * + Account Code + * + Telephone
number.
Account Code:
(Display Phone Only) To set: SPK + FTR + 50 + 1 or 2 +
Alarm time (24 hour clock) + * + SPK.
To stop alarm: CLEAR.
To cancel alarm: SPK+ FTR + 50 + 1 or 2 + * + SPK.
Alarm Clock:
This means an ICM call is waiting to be answered. Hang
up to receive call or send Selectable Display Message
(TRFR + message number 1, 2, or 3).
This means you made a mistake in placing a call or using a
feature. Hang up and start over.
Fast busy or warble
tone anytime:
One ring during a call:
SPK + FTR + CLEAR + 4 digits for year (e.g. 1995) + * +
2 digits for month (Jan=01, Feb=02, etc.) + 2 digits for date
(01-31) + * + 1 digit for day (Sun=0, Mon=1, etc.) + * + 4
digits for time (24-hour clock) + * + SPK.
Time/Date Setting:
PORTMBG4.QXD 7/9/98 4:35 PM Page 6

Part No. 82400MBG04
Issue 1-0 June 1998
Printed in U.S.A. (2095)
Nitsuko America, Telecom Division
4 Forest Parkway, Shelton, CT 06484
TEL: 203-926-5400 FAX: 203-929-0535
Programming Function Keys
SPK + DC + # + One-Touch Key + Extension
number (Door Box extension accepted) + SPK
DSS:
SPK + DC + * + One-Touch Key + Phone number
+ SPK
Personal Speed Dial:
CHECK + FTR + Message number (00-49) + * +
edit message if needed + CHECK + One-Touch
key (#1 or #2 only) + * + CLEAR
Selectable Display
Message:
Programming One-Touch Keys
SPK key + FTR key + 4 + One-Touch or
CO key + feature number + * + SPK key.
SPK key + FTR key + 4 + One-Touch or
CO key + 00 + * + SPK key.
Delete Stored Feature:
Store Under One-
Touch or CO Key:
Park/Hold Retrieve11 Record (CO key only)22Directory Dial (ICM)10 Clear Temp Memory21Directory Dial (CO)09 Edit Temp Memory20Repeat Dial (Hurry up)08 Search Caller ID name19Repeat Dial07 Search Caller ID no.18Recall Line Display06 Add to Caller ID data17Monitored05 Edit Caller ID table16Monitor04 Store Caller ID in table15Day/Night Mode03 Loop Key14Timer02 Call Forward (DISA)13Alarm Clock01 Walking COS Access12Undefine Key00
Feature
Feature
NumberFeature
Feature
Number
SPK + DC + * + One-Touch Key + FTR + # +
SPK
Save:
SPK + DC + # + One-Touch Key + 98 + SPK
Voice Mail:
PORTMBG4.QXD 7/9/98 4:35 PM Page 7
Other manuals for Portrait 308
1
This manual suits for next models
1
Table of contents
Other Nitsuko Telephone manuals

Nitsuko
Nitsuko Multibutton Telephone Owner's manual

Nitsuko
Nitsuko Portrait 308 User manual

Nitsuko
Nitsuko DS2000 Owner's manual

Nitsuko
Nitsuko Digital System DS Service manual

Nitsuko
Nitsuko DS01 User manual

Nitsuko
Nitsuko Portrait308 User manual

Nitsuko
Nitsuko ONYX VSi Owner's manual

Nitsuko
Nitsuko DS2000 User manual

Nitsuko
Nitsuko ST4 User manual

Nitsuko
Nitsuko DS2000 User manual