4 Forest Parkway
Shelton, CT 06484
TEL: 203-926-5400 FAX: 203-929-0535
Your call can wait at your phone . . .
Hold
1. Do not hang up + .
•Your co-workers can retrieve your
System Hold calls. To place the call on
Exclusive Hold, press HOLD twice.
•Intercom calls automatically go on
Exclusive Hold when you press HOLD.
1. or lift handset.
2. Press flashing , OR
2. if the call was not on a line/loop key
(or was an Intercom call).
•You may be able to press ICM +*4 +
line number (e.g., 01) to pick up a call
on Hold at a co-worker’s phone.
Send the call you’re on to a co-worker . . .
Transfer
1. + Dial your co-worker’s extension.
•To transfer the call to Voice Mail, press
MW after dialing your co-worker.
OR
1. (Hotline or Call Coverage).
Park a call in orbit
1. + + System Park Orbit (60-69).
•If you hear busy, press ICM and try
another orbit.
•To Page, press ICM, dial * 1 and the
zone number (1-7, 0 for all call).
2. Hang up.
Park your current call
in a system orbit so
your co-workers can
pick it up:
Send (Transfer) your
current call to a
co-worker:
Easily retrieve a call
from Hold:
Use System Hold
instead of leaving the
handset off-hook:
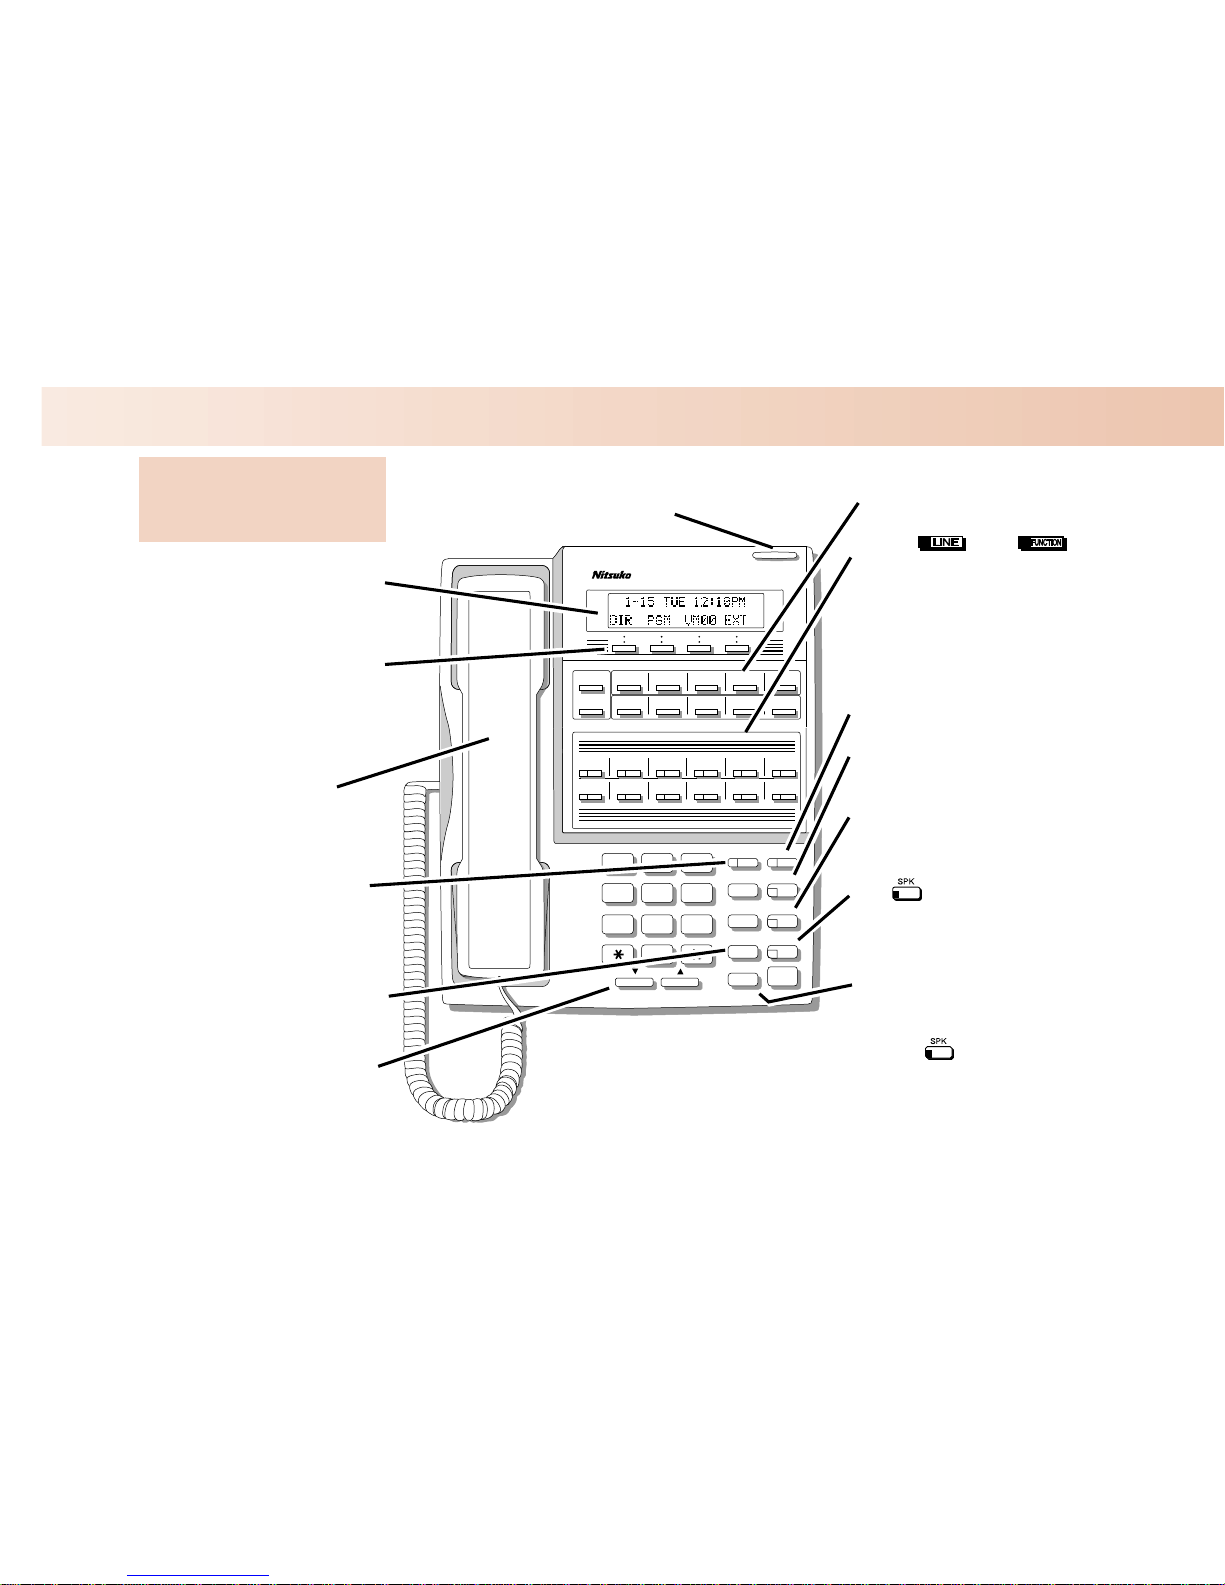
Handling Your Calls
165 Matheson Blvd. E., Unit #4-6
Mississauga, Ontario L4Z 3K2
TEL: 905-507-2888 FAX: 905-507-2971
User Programmable Features
To program a feature, press
#
and the feature’s code. For example, to enable incoming Paging, press
#
and dial
V
P
Y
,
then
SPK
to hang up. The underlined codes (e.g., #RC) are for systems prior to 02.00.00.
Feature Mnemonic Operation
DSS #BLF #BLF + Press DSS key + HOLD + Enter extension +VOL Up + Pro-
gram another key or SPK to exit.
Headset #HS #HS +Yto enable or Nto disable + SPK to exit
Hotline #HL #HL + Press flashing Hotline key + Enter extension for new Hotline
partner + Program another Hotline key or SPK to exit.
Off Hook Signaling #OHS #OHS + Select mode (C=Outside line, D=DSS, I=ICM) + Select
option (see below) + SPK to exit.
Outside line options:
C
=Camp On tone,
O
=Off Hook Ringing,
0
= None
Intercom options: C=Camp On, O=Off Hook Ringing,V=Voice
Over, 0= None
DSS Options: C=Camp On, O=Off Hook Ringing, 0= None
Paging (Incoming) #VP #VP +Yto enable or Nto disable + SPK to exit.
Prime Line Assignment #PLA #PLA + Press one of your flashing programmable keys or ICM +
SPK to exit.
Programmable Function
Key Assignments #KP #KP + Press key you want to program + HOLD + ICM + PressVOL
Up orVOL Down to select key option + HOLD + enter any addi-
tional data (if required) + Press VOL Up orVOL Down to select
another key to program, or SPK to exit.
Programmable Function
Key Ringing #RAC
#RC Call Coverage Keys: #RAC + Call Coverage Key repeatedly to select
ringing mode + SPK to exit.
Call Coverage Keys flash as follows: Lamp only=On red, Immediate
ring=On green, Delay ring=Fast flash green.
#RAL
#RL Outside Line Keys: #RAL + Line Key repeatedly to select ringing
mode + SPK to exit.
Line keys flash as follows: Lamp only=On red, Immediate ring=On
green, Delay ring=Fast flash green, Night ring=Slow flash green.
#RAP
#RG Group Call Pickup Keys: #RAP + Group Call Pickup Key repeatedly
to select ringing mode + SPK to exit.
Group Call Pickup Keys flash as follows: Lamp only=On red, Imme-
diate ring=On green, Delay ring=Fast flash green.
Ringing Line Preference #RLP #RLP +Yto enable or Nto disable + SPK to exit.
Speed Dial, Personal #SP #SP + Press bin key (for bins 701-710) or DIAL then bin key (for
bins 711-720) + HOLD + Enter outside line (e.g., 1), line group (e.g.,
90), or ICM for Intercom feature + HOLD + Number to store +
HOLD + Name + HOLD + Press another bin key or SPK to exit.
Speed Dial, System #SP #SP + Dial System Speed Dial bin number (e.g., 200) + HOLD +
Enter outside line (e.g., 1), line group (e.g., 90), or ICM for Intercom
feature + HOLD + Number to store + HOLD + Name + HOLD +
Press another bin key or SPK to exit.
Time and Date #TD #TD + Enter time in 24-hour clock using hours (2 digits), minutes (2
digits) and seconds (2 digits) + HOLD + Enter date using month (2
digits), day (2 digits) and year (4 digits) + HOLD + SPK to exit.
Voice Announce (for your
incoming Intercom calls) #VA
#IV, #IR #VA +Vfor voice announce or Rfor ring + SPK to exit.