Nitta SOFTmatics GR20QA-V3A User manual
RP-M05-02
Gripper GR20QA-V3A / GR20QA-DKA / GR20QA-BMA
Interface INT20QA
Please read this instruction manual before using the product. After reading the manual, keep it for your future reference.
Introduction
This instruction manual (hereinafter called "the Manual") addresses the personnel and operators
who will introduce and install SOFTmaticsTM with regard to handling methods, operating
procedures, and precautions. Please read the Manual before using SOFTmaticsTM for safer use.
After reading the Manual, keep it for future reference.
Symbols used in the Manual
For the safe use of SOFTmaticsTM, the following symbols are used to display precautions. Please
read the Manual, observe the terms mentioned, and understand the criteria presented.
Precautions
♦Functions and Performance
Warning : Before using the interface + gripper (hand), ensure the conditions of use as set
forth are satisfied.
Warning : When the product is handled, conduct sufficient tests and analyses according
to the decisions made by your company's designers who have sufficient knowledge and
experience of installation of equipment, devices, and systems, and by your company's
personnel who determine specifications. All responsibility lies with your company's
designers or personnel who have made the decisions regarding the performance and
safety of your company's equipment and devices, and the system for installing the
product.
♦Storage
Caution : The product should only be stored in a place where there is no dirt or dust. If
dirt or dust adheres to the product, it will enter the inside of the product and its
peripherals, which may cause malfunction of the product.
Caution : Avoid direct sunlight and store in a dry area at or below 45 °C.
♦Installation and Usage
Warning : Do not use the product in applications, conditions of use, operating
environments, or handling methods other than those described in the Manual.
Warning : Do not use in facilities where people’s lives or assets could be affected, such as
nuclear power generation, aircraft, railways, marine vessels, vehicles, medical equipment,
and any other equipment.
Warning : Do not use in public facilities, such as electricity, gas, water, and other public
utilities.
Warning : Do not use the product at facilities that could affect people’s lives or assets,
and in cases where a high level of consideration and attention are required for safety.
Warning : Install in accordance with the installation instructions and precautions
described in the Manual.
Warning : Without safety confirmation, never install or remove the product into/from any
equipment, device, or system.
Warning : Do not use the product in a place where excessive vibration and shock may
occur to it. Doing so can cause accidents and damage.
Warning : Do not use any products which have been given secondary processing, or have
been disassembled or modified by a third party other than our company and our certified
plants.
Caution : Do not connect when the interface side is in a state of vacuum. Doing so can
cause accidents and damage.
Caution : Connect the interface and gripper in a straight alignment to avoid any accidents
and damage.
Caution : Do not detach when the inside of the hand is in a state of vacuum. Doing so
can cause accidents and damage.
Caution : Do not use the tube(s) in a state of excessive bending and/or in a state where
excessive pull force is applied. Doing so can cause accidents and damage.
Caution : At the time of shipping, the product is uncleaned.
Caution : Do not have the gripper-body contact anything except workpieces. Continuing
such a contact causes abrasion of the gripper-body and generates foreign objects.
♦Maintenance and Inspection
Warning : Use the product following the conditions of use specified in the Manual, so as
to avoid any damage to the product.
Warning : Contact us if the product is to be used in an environment or under conditions
other than those described in the specifications.
C aution : Use only water, synthetic detergent or ethanol-base cleaner to clean the
product. Use of any other cleaning substance can cause deterioration of parts.
Caution : Never immerse the product in hypochlorous acid or clean with hypochlorous
acid, so as to avoid any damage to parts.
Caution : Do not immerse the product in a cleaning fluid. Doing so can cause damage to
the product.
Caution : Should the product be unused, insert items such as blank plugs into push-to-
connect fittings to prevent water and foreign objects from getting inside the product, so
as to avoid malfunction of the pneumatic equipment.
Caution : Wipe the product and dry it completely with equipment such as an air blower
after cleaning, so as to avoid corrosion of metal.
Caution : Any extended period of usage or storage of the product should not be in wet
conditions, so as to avoid corrosion of metal.
Caution : Make sure that the product is free from surface damage, corrosion, wear, and/or
other irregularities after cleaning and before using the product.
Caution : Adjustment of air pressure may be required due to the nature of the product.
Check operation status before using the product.
Caution : Alternations to the layout specifications affect the speed of operation of the
product.
♦Handling of Used Products
Warning : Contact us if you experience any problems with the product.
Structural Drawings/Product Structure
♦Components
No
Item
Part
Material
1
Gripper
Assembly-body
A5052
2
Interface
Coupler-body
A5052
3
Sleeve
A5052
4
Ball
SUS440
5
Sleeve-spring
SUS304
6
Snap-ring
SUS304
♦Consumable parts
No
Item
Part
Material
1
Gripper
Gripper-body
Urethane resins*1
2
Guard-plate
Nylon resins*1
3
Metal-bundling
SUS304
4
Interface
U-packer
EPDM*1
*1 Meets the requirements for the standards of the Japanese Food Sanitation Law (Ministry
of Health and Welfare Notification No.370, 1959)(as of March 2020).
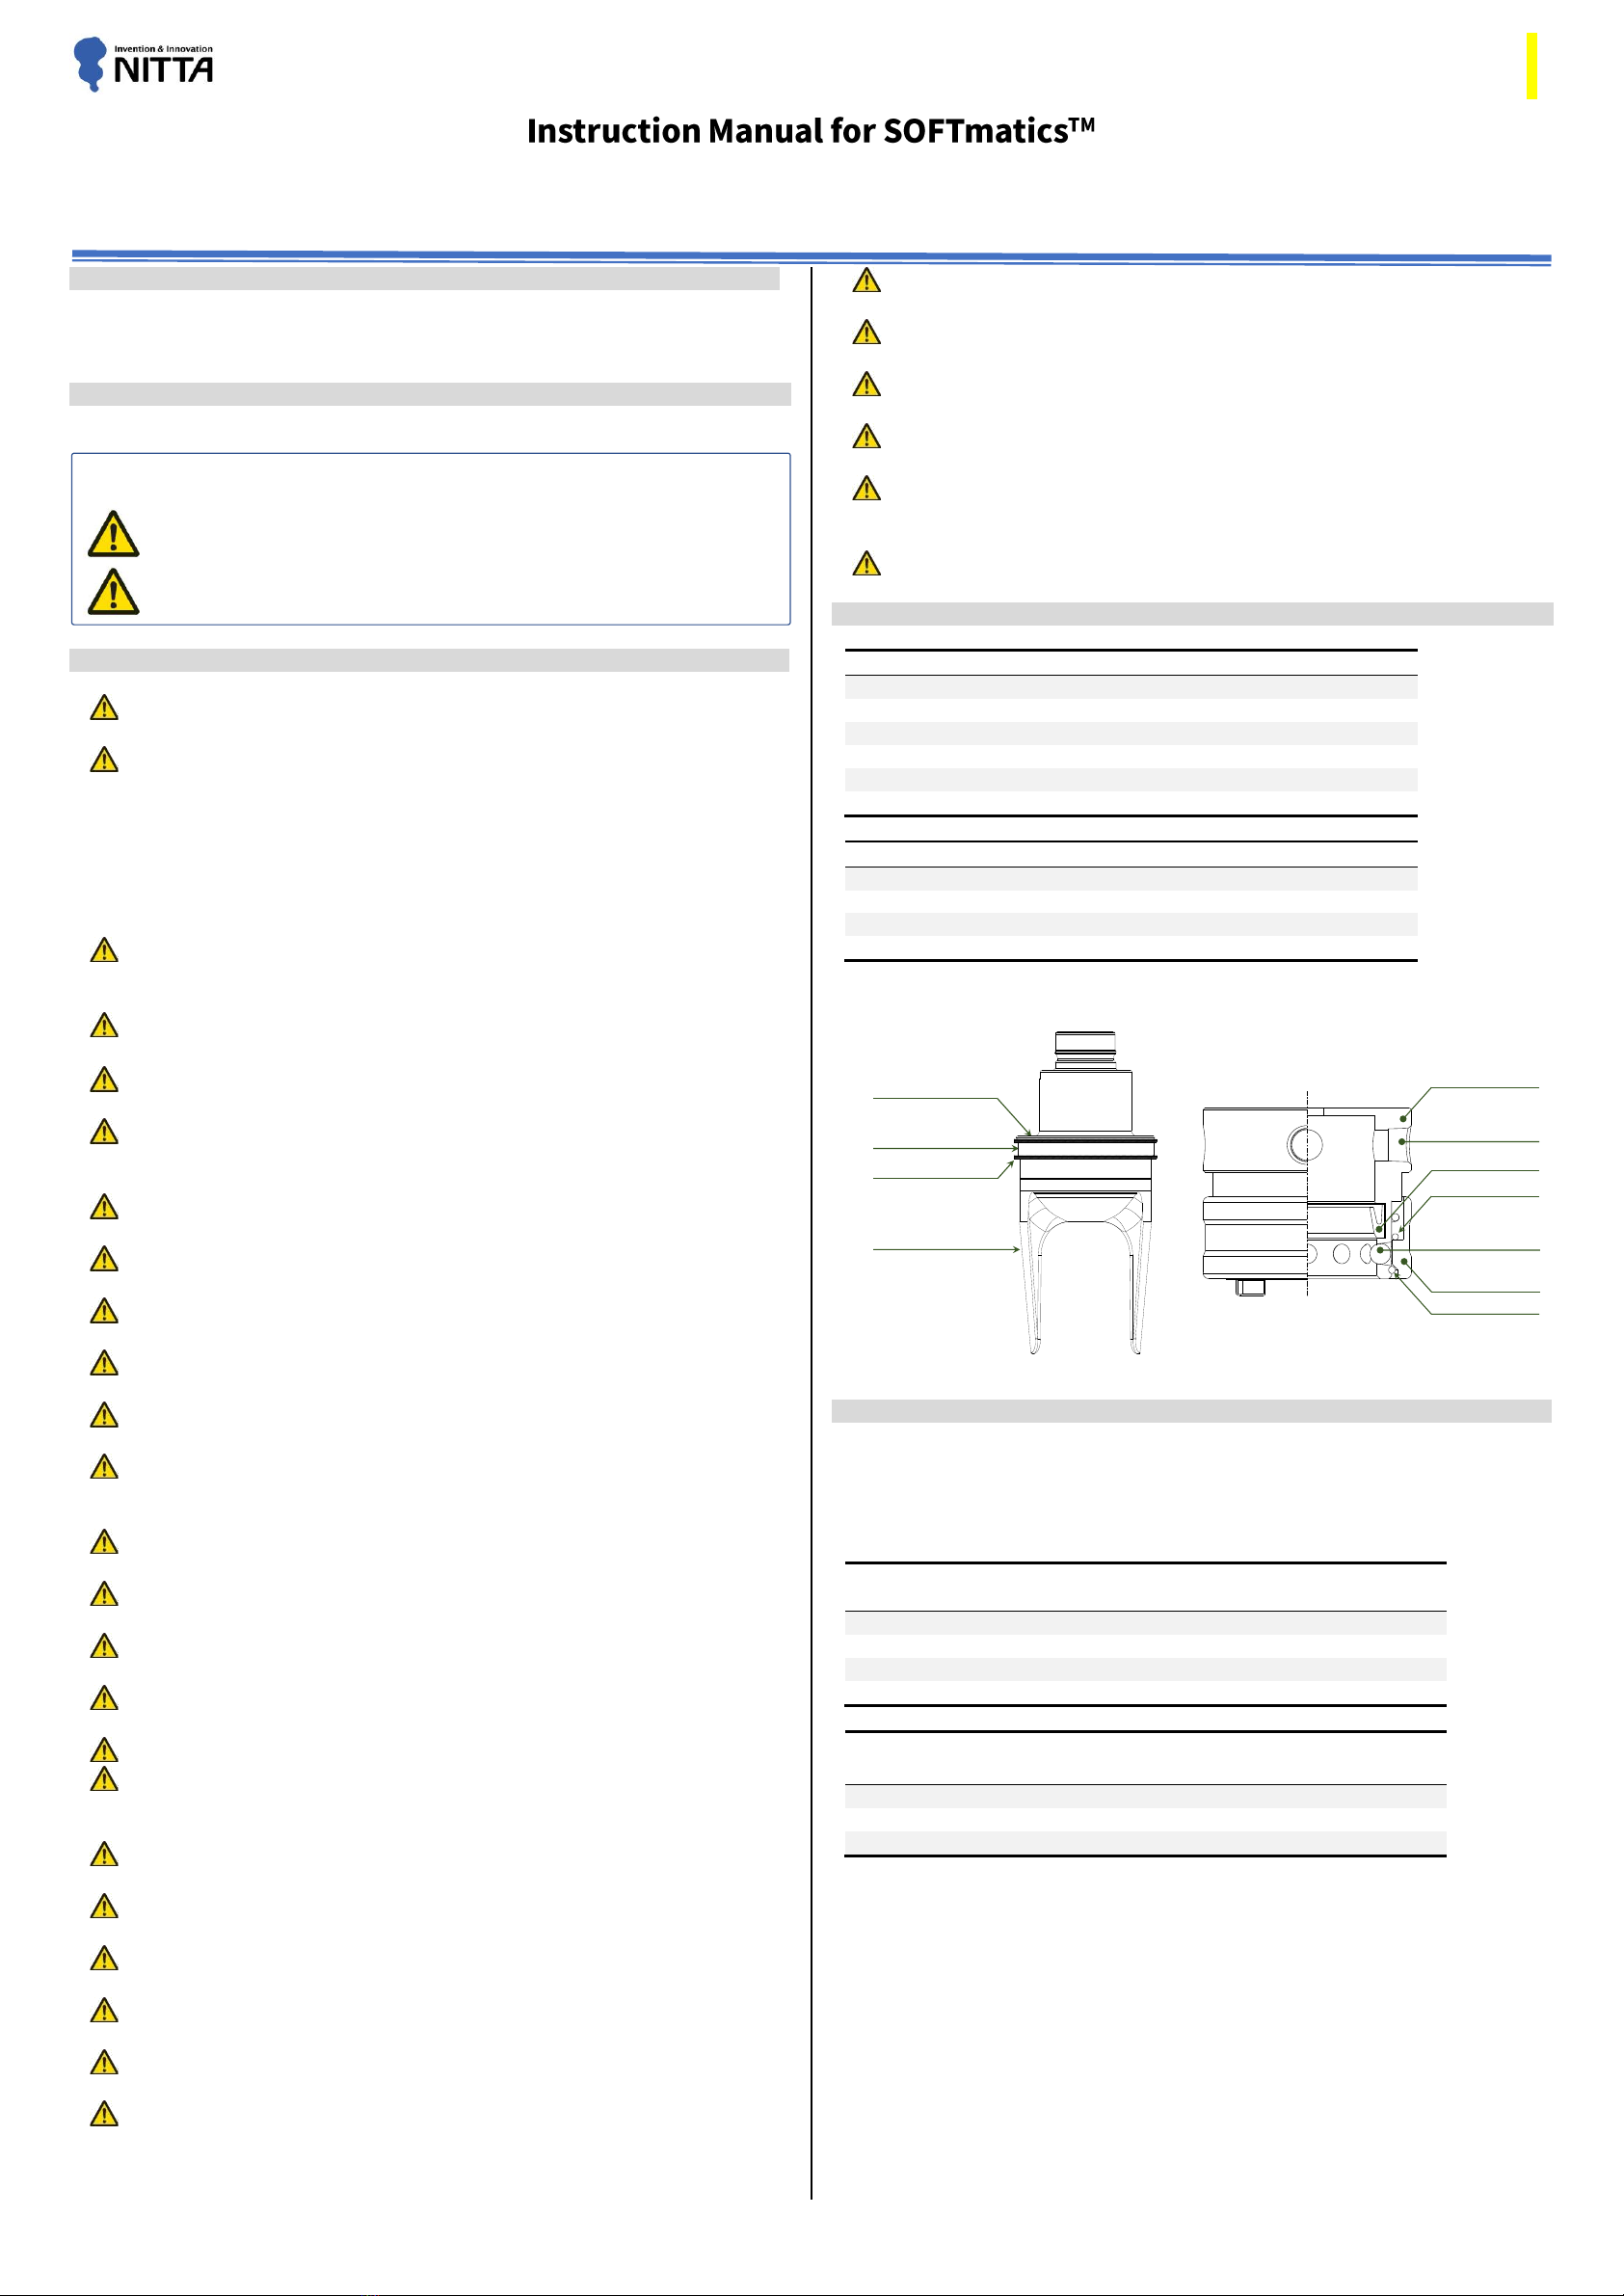
♦Structural Drawings
Gripper
Interface
Specifications/Performance
♦Conditions for use
Ambient temperature
:5 to 45 °C
Working fluid
:Air
Chemical resistance
:Usable...Water (95 °C), synthetic detergent, ethanol-base cleaner
Do not use...Hypochlorous acid
Model
Rated pressure
/ MPa
Weight
/ g
GR20QA-V3A
-0.03 ~ 0.00
781
GR20QA-DKA
-0.06 ~ 0.00
432
GR20QA-BMA
-0.08 ~ 0.00
230
INT20QA
-0.08 ~ 0.00
154
♦Performance
Model
Weight capacity*2
/ g
Workpiece size*3
/ mm
GR20QA-V3A
4590 (at -0.03 MPa)
ф140×35 ~ ф60×10
GR20QA-DKA
730 (at -0.04 MPa)
ф40×45 ~ ф20×10
GR20QA-BMA
250 (at -0.04 MPa)
ф40×45 ~ ф20×10
*2 Actual values vary depending on workpieces (reference values).
*3 In the case of a workpiece being of rigid cylindrical shape (diameter×height).
Warning
Symbols
Classification
Signals
Criteria
Any failure to observe this warning or any mishandling of the product
could result in death or severe injury.
Caution Any failure to observe this caution and any mishandling of the product
could cause injury to persons and material damage.
Guard-plate
Assembly-body
Gripper-body
Metal-bundling
U-Packer
Snap-ring
Coupler-body
Sleeve
Sleeve-Spring
Ball
Piping port
(Rc1/8) 4 places

RP-M05-02
Operating Mechanisms
Before operating the product, ensure the conditions of use specified in the Manual are satisfied.
-By decompressing the inside of the hand, the gripper-body will change to a closed shape for
gripping.
-By recompressing the inside of the hand (atmospheric relief), the gripper-body will change to
an open shape for releasing a workpiece.
-The state of the gripper can be controlled by adjusting the air pressure inside the hand within
the terms of the conditions of use.
Instructions for Mounting and Demounting the Product from a Robot.
Follow the instructions below for mounting the product on a robot and demounting the product.
Caution : Mount and demount the product on/from a robot which is in a stable and
suitable position after stopping the robot safely.
<Items to prepare>
The following items are needed on every robot.
-Interface 1
-Seal washer 1 ... For mounting Adapter plate and Interface
-M8 cap bolt 1 ... For mounting Adapter plate and Interface
-Positioning pin 1 ... For positioning Adapter plate and Interface
-Adapter-plate Optional ... Prepare if necessary for installation
Following the figure below, mount an interface onto the adapter-plate which has already been
mounted on the robot. The layout below is an example (the configuration of the adapter-plate
in the figure is an example for reference).
Caution : Prepare M8 screws (female) for the adapter-plate for securing the interface.
Caution : Use a seal washer (e.g. Model: SGSWF8) to secure the vacuum degree inside
the hand.
Attachment and Detachment of Interface and Gripper
♦Upon the connection of the interface and gripper
(1)Recompress the air pressure on the interface side (on the robot or equipment) to the
atmospheric air pressure level.
(2)Remove any foreign objects in the connection.
(3)Insert the gripper while pulling the sleeve of the interface.
(4)Align for positioning, press down to the position where the sleeve returns to and manages
complete connection.
Caution : Do not connect a gripper when the interface side is in a state of vacuum.
Caution : Connect the interface and gripper in a straight alignment.
♦Detachment of interface and gripper
(1)Return the air pressure inside the hand to the atmospheric air pressure level.
(2)Pull the gripper in the parting direction while pulling the sleeve.
Caution : Lubricate the U-Packer inside the interface when attachment and detachment
are difficult. Recommended lubricating grease : MOLYKOTE® HP-500 Grease (DuPont
Toray Specialty Materials K.K.)
Caution : Do not make a detachment when the inside of the hand is in a state of vacuum.
Doing so can lead to accidents and damage.
Caution : To avoid any injury, be careful of the protrusion when attaching and detaching.
Example of layout
Caution : Connect a pneumatics fitting to the port (Rc1/8 thread) of the interface, and
cover the ports that are not used with items such as blank plugs.
Replacement of Consumable Parts
Long-time usage may cause the deterioration of consumable parts in the gripper and interface.
Our company offers the replacement of consumable parts (fee required). Please use the contact
information below to make such a request.
Warranty
♦Warranty Period
-The warranty period is limited to six months from the date of acceptance of the first product
delivered or until the total number of operations reaches 3,000,000 times (in accordance with
standard conditions established by our company), whichever comes first.
♦Warranty Coverage
-Should the product malfunction and/or fail during the abovementioned warranty period, our
company will provide a replacement product or repair the product free of charge, provided
that the product has been used correctly in accordance with the conditions and statements of
precaution, which include conditions for use and handling procedures, set forth in the Manual.
-The warranty does not cover any damage incurred by the user (examples: equipment
malfunction/damage, opportunity loss, profit loss, secondary damage resulting from the
suspension of line operation due to system failure, mixing of foreign items due to product
damage) as a result of a malfunction of the product.
-The warranty does not cover any physical damage to the employees of the user company or
other concerned people that may result due to a cause arising from the product.
(1) Malfunction arising from any reasons unpredictable due to our level of science and
technology before shipment.
(2) Malfunction arising from fire, earthquake, flood, other disasters, voltage error, or other
reasons for which our company bears no responsibility.
♦Acceptable Usage
-The product is not intended to be used outdoors or under conditions or environments not
specified in the equivalent instruction manual, etc., and is therefore not acceptable. However,
exemption is possible, at the sole risk of the user company, when the user company has
consulted with our company in advance, has acknowledged ratings and performance after
ensuring the specifications of the product, and has adopted necessary safety measures. Further,
even in such cases, the coverage of the warranty is the same as above.
♦Changes to Specifications
-The name, specifications, appearance, accessories, and others described in the Manual are
subject to change without notice for improvement and for other reasons.
For inquiries
♦About SOFTmaticsTM
For more details, please use the contact form on our website, or contact us at the addresses
below.
♦About the catalogue
The catalogue can be downloaded from the homepage of our company.
Nitta Moore Div. Industrial Products Sales Dept. Mechatronics Systems Sales Sec.
Head Office
4-4-26 Sakuragawa, Naniwa-ku, Osaka, Osaka 556-0022
TEL: +81 6-6563-1273 FAX: +81 6-6563-1274
Tokyo Branch
8-2-1 Ginza, Chuo-ku, Tokyo 104-0061
TEL: +81 3-6744-2708 FAX: +81 3-6744-2709
Nagoya Branch
1-17-23 Meieki-minami Nakamura-ku, Nagoya, Aichi 450-0003
TEL: +81 52-589-1310 FAX: +81 52-586-5707
No reproduction of figures, pictures, and text used in the Manual is permitted.
Copyright© 2022 NITTA CORPORATION.
All rights reserved.
Grippng forceGrippng force
Decompression
Decompression
Recompression
OPEN CLOSED
M8 cap bolt
Seal washer
Interface
Positioning pin
Adapter-plate
Sleeve
Interface
NGOK
Sleeve
Gripper
1
2
U-Packer
Protrusion
Examples of models for vacuum ejectors
VSC
-H15-10A10S (CKD Corporation)
VHH15
-1002 (Nihon Pisco Co., Ltd)
CV
-15LS (COMVUM Ltd.)
Vacuum ejector
2-port solenoid valves
Air supply
Fitting
Vacuum gauge
SOFTmaticsTM
Regulator
This manual suits for next models
3
Other Nitta Industrial Equipment manuals

Nitta
Nitta SEB User manual

Nitta
Nitta NITTAOMEGA type M165-K User manual

Nitta
Nitta FP-200 User manual

Nitta
Nitta NPS-1205C User manual

Nitta
Nitta SOFTmatics User manual

Nitta
Nitta PolySprint FP70-10-50 User manual

Nitta
Nitta CFTG-60FS-4.5 User manual

Nitta
Nitta Carryflex CFTG-60SG-30 User manual

Nitta
Nitta FP-200T User manual
Popular Industrial Equipment manuals by other brands

Viessmann
Viessmann vitotronic 200-h operating instructions

WPG
WPG MRT4 Series operating instructions

3M
3M Attest 390 Operator's manual

Nidec
Nidec LEROY-SOMER LSA 43.3 IC7 L7 Installation and Maintenance

Ricoh
Ricoh Bridge Unit BU5010 Field service manual

Mitsubishi Electric
Mitsubishi Electric NF250-SEV instruction manual


