NSK Ti-Max nano65LS User manual


1
ENGLISH
CAUTION 23mm
1. User and Intended Use
User : Qualified Professionals
Intended Use : Dental Treatment / Dental Prosthetics (Cutting, Polishing)
This handpiece can ONLY be connected to E type motors in accordance with ISO 3964 with a motor insert length of 23mm or
less.

2
CAUTION
Class
CAUTION
NOTICE
Degree of Risk
Hazard that could result in light or moderate injury or damage to the device if the safety instructions are not
correctly followed.
General product specification information highlighted to avoid product malfunction and performance reduction.
2. Precautions for handling and operation
• Please read these precautions carefully and use only as intended or instructed.
• Safety instructions are intended to avoid potential hazards that could result in personal injury or damage to the device. Safety instructions are
classified as follows in accordance with the seriousness of the risk.
• Read this Operation Manual before use to fully understand the product functions and file for future reference.
• When operating the product always consider the safety of the patient.
• This product does not consider patient’s age (except infants), gender, weight or nationality.

3
ENGLISH GERMAN FRENCH SPANISH ITALIAN
• This product does not consider operator’s age (mature person), height, weight, gender, or nationality.
• Users are responsible for the operational control, maintenance and continual inspection of this product.
• Do not attempt to disassemble the product nor tamper with the mechanism except as recommend by NSK in this Operation Manual.
• Do not allow any impact on to the product. Do not drop the product.
• Operators and all others in the area must wear eye protection and a mask when operating this handpiece.
• Should the product function abnormally, cease operation immediately and contact your Authorized NSK Dealer.
• Do not use high acid water or sterilizing solutions to wipe, immerse or clean the product.
• The products are delivered in a non-sterile condition and must be autoclaved prior to use.
• Perform regular function and maintenance checks.
• If the product is not used for a long period check it is functioning correctly before using on a patient.
• To avoid clinical downtime it is recommended that a spare be kept on hand in case of a breakdown during surgery.

4
nano handpiece Motor
CAUTION
• Disconnect the handpiece only after the motor has completely stopped rotating.
• This handpiece can ONLY be connected to E type motors in accordance with ISO 3964 with a motor insert length of 23mm or
less.
23mm
3. Connection & Disconnection of the Handpiece and Motor
3-1 Connection
1) Connect the handpiece direct to the motor and twist the handpiece until it locks into position with a
clicking sound.
2) Make sure the handpiece is firmly connected to the motor.
3-2 Disconnection
Hold the motor and the handpiece separately and disconnect with care. Fig. 1

5
ENGLISH GERMAN FRENCH SPANISH ITALIAN
Fig. 2
Chuck Open Chuck Close
Open
Close
4. Insertion & Removal of the Bur
4-1 HP Bur
4-1-1 To Insert the Bur
1) Turn the Bur Lock Ring in the direction of the " " mark until it clicks. (Fig.2)
2) Insert the bur fully into the chuck then turn the Bur Lock Ring in the direction of the mark " " until it
clicks.
3) Test that the bur is secure by gently pulling and pushing the bur.
4-1-2 To Remove the Bur
Turn the Bur Lock Ring in the direction of the " " mark until it clicks then remove the bur.

6
Bur Stopper
Bur Stopper Puller
4-2 CA Bur
4-2-1 To Insert the Bur
1) Turn the Bur Lock Ring in the direction of the " " mark until it clicks.
2) Insert the attached Bur Stopper fully into the chuck. (Fig.3)
3) Insert the Bur fully into the chuck until it stops.
4) Turn the Bur Lock Ring in the direction of the " " mark until it clicks.
4-2-2 To Remove the Bur
Turn the Bur Lock Ring in the direction of the " " mark until it clicks then remove the bur.
4-2-3 To Remove the Bur Stopper
Remove the bur then insert the attached Bur Stopper Puller into the chuck. Pull out the Bur Stopper by
hooking it at the slit of the Bur Stopper. (Fig. 4)
Fig. 3
Fig. 4

7
ENGLISH GERMAN FRENCH SPANISH ITALIAN
CAUTION
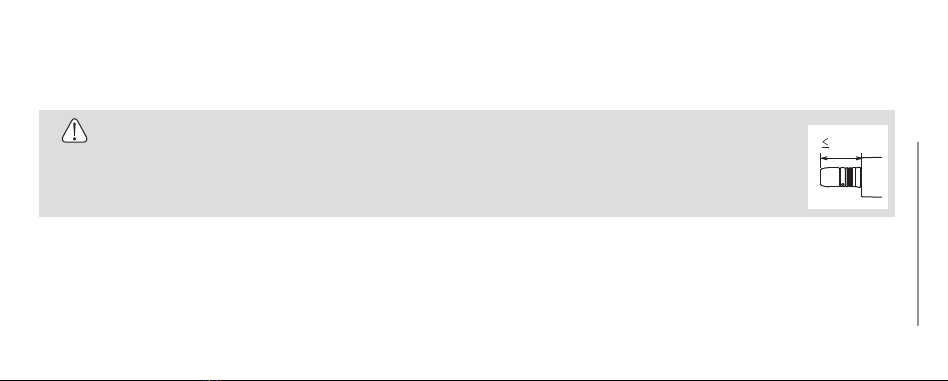
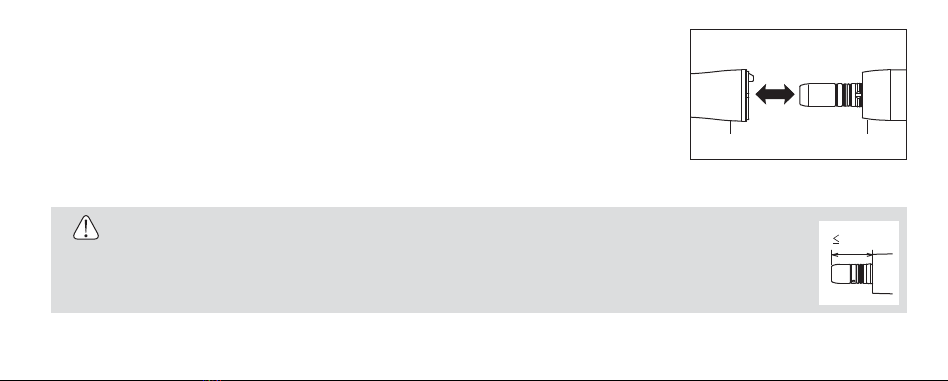
• Make sure to align the " " mark with " " mark. If those marks are not completely aligned, it may cause handpiece overheating or patient
burn injuries.
• Always insert the bur fully into the chuck. Insufficient insertion of the bur could cause premature failure of the bearing.
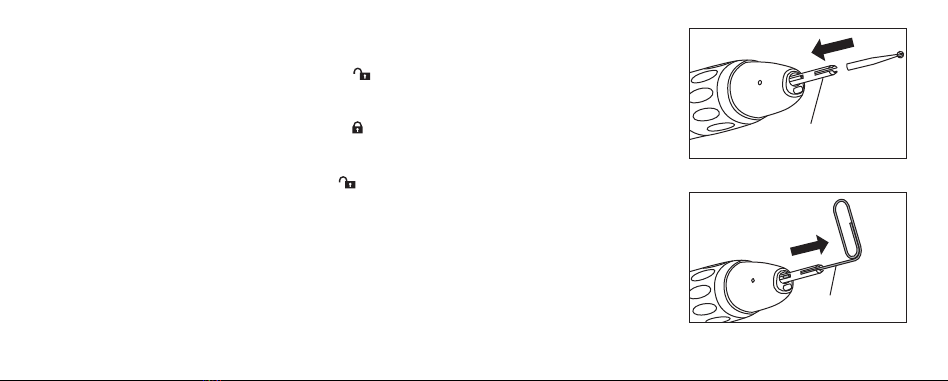
• Remove the bur only after the handpiece has completely stopped rotating.
• Do not rotate the handpiece when the Bur Lock Ring is turned to " " (OPEN) position or a bur is not inserted.
• Always keep the bur shank clean. Entry of debris into the chuck, via the bur shank, could cause bur rotation slip and also prevent the bur from
being securely located in the chuck.
• Do not exceed the bur speed recommended by the bur manufacturer.
• Do not exceed maximum bur length recommended by the handpiece manufacturer.
• Do not apply excess pressure to the bur as it may break or bend or become difficult to remove.
• DO NOT use burs with problems listed below as the bur may break or disengage from the chuck.
- Bent, deformed, anisomerous (worn), rusted, broken, deficient bur.
- Bur which is cracked on the edge or axis.
- Non-ISO standard, or tampered bur

8
• If the chuck is left closed for an extended period without a bur inserted, it could become difficult to insert the bur.
• Be sure to insert the Bur Stopper in the chuck before inserting a CA Bur. Once trapped in the chuck without the Bur Stopper, the bur will be
difficult to remove.
• Do not use a HP Bur in combination with the Bur Stopper as the bur will not be fully secured and may disengage from the chuck, causing an
injury.
• Do not use Short Shank CA burs as the bur will not be fully secured and may disengage from the chuck, causing an injury.
5. Check before treatment
Check for handpiece vibration, noise and overheating. If any abnormalities are found do not use the handpiece and contact your Authorized NSK Dealer.

9
ENGLISH GERMAN FRENCH SPANISH ITALIAN
CAUTION
• After washing with Thermo-Disinfector and prior to lubrication, dry the product until all internal moisture is thoroughly removed.
Thermo-Disinfector moisture remaining inside the product could reduce the effect of lubrication and could cause corrosion inside of the
product.
• To clean the product never use any solvent such as benzine or thinner.
6. Maintenance
After each patient maintain the product as follows.
6-1 Cleaning (Handpiece)
1) Remove dirt and debris from the product. Do not use a wire brush.
2) Wipe clean with alcohol-immersed cotton swab or cloth.
This icon denotes that the product can be washed via Thermo Disinfector.
Refer to the Thermo-Disinfector manual.

10
Handpiece
E-Type Spray Nozzle
Glass Rod Optic
Cotton Swab
CAUTION
Do not use a sharp tool to clean the Glass Rod. It could damage the glass and reduce the light
transmission.
6-2 Cleaning (Optic)
Wipe clean the Glass Rod tip with an alcohol-immersed cotton swab. Remove all debris and oil. (Fig.5)
6-3 Lubrication
NSK PANA SPRAY Plus
Apply NSK PANA SPRAY Plus every time after each use and/or before autoclaving.
1) Remove the bur from the handpiece.
2) Insert the Spray Nozzle into the Spray Port nozzle on the can.
3) Insert the Spray Nozzle in rear of the handpiece. Hold the handpiece and spray for approximately 2-3
seconds. Apply lubricant until it expels from the handpiece head for at least 2 seconds. (Fig.6)
Fig. 5
Fig. 6

11
ENGLISH GERMAN FRENCH SPANISH ITALIAN
CAUTION
• When applying spray be sure to hold the handpiece firmly to prevent the handpiece from slipping out of the hand due to the spray pressure.
• Hold the spray can upright.
NSK Care3 Plus
When using NSK Care3 Plus automatic handpiece cleaning and lubrication system, refer to the Care3 System instructions.
6-4 Sterilization
Sterilize the product by autoclave sterilization. Remove the bur after each patient and sterilize as noted below.
1) Insert into an autoclave pouch. Seal the pouch.
2) Autoclavable under the conditions below.
Autoclave for more than 20 min. at 121°C, or 15 min. at 132°C, or 3 min. at 134°C.
3) The handpiece should remain in the autoclave pouch until required for use.

12
CAUTION
NOTICE
• Do not autoclave the product with other instruments even when it is in a pouch. This is to prevent possible discoloration and damage to the
product from chemical residue on other instruments.
• Keep the product in suitable atmospheric pressure, temperature, humidity, ventilation, and sunlight. The air should be free from dust, salt and
sulphur.
• Immediately after use, the product should be cleaned, lubricated and sterilized. If blood remains on the external or internal surfaces it can
become clotted and cause rust.
• Do not heat or cool the product too quickly. Rapid change in temperature could cause damage to the product.
• If the sterilizer chamber temperature may exceed 135°C during the dry cycle then delete the dry cycle.
• Autoclave sterilization is recommended for the product. The validity of other sterilization methods is not confirmed.
• Do not touch the product immediately after autoclaving as it will be very hot and must remain in a sterile condition.
NSK recommends Class B sterilizers as stated in EN13060.

13
ENGLISH GERMAN FRENCH SPANISH ITALIAN
7. Periodical Maintenance Checks
Perform periodical maintenance checks every three months, referring to the check sheet below. If any abnormalities are found, contact your Authorized
NSK Dealer.
8. Symbol
This product is Autoclavable up to Max.135°C.
This product can be washed via Thermo Disinfector.
Conforms to CE European Directive of “Medical device directive 93/42/EEC.”
Manufacturer.
Authorized representative in the European community.
Points to check
Rotation
Coolant Water
Details
Rotate the handpiece and check for abnormalities such as abnormal rotation, vibration, noise, and overheating.
Operate the handpiece and check that the coolant water is flowing through the spray port.

14
9. Warranty
*Attached item
NSK products are warranted against manufacturing errors and defects in materials. NSK reserves the right to analyze and determine the cause of any
problem. Warranty is voided should the product be not used correctly or for the intended purpose or has been tampered with by unqualified personnel
or has had non NSK parts installed. Replacement parts are available for seven years beyond discontinuation of the model.
11. Disposing product
In order to avoid the health risks of operators handling the disposal of medical equipment, as well as the risks of environmental contamination caused
thereof, a surgeon or a dentist is required to confirm the equipment is sterile. Ask specialist firms who are licensed to dispose of specially controlled
industrial wastes, to dispose the product for you.
10. Spare Parts List
Model
E-Type Spray Nozzle*
Bur Stopper*
Bur Stopper Puller*
Order Code
Z019090
H273124
H273701

15
ENGLISH GERMAN FRENCH SPANISH ITALIAN
12. Specifications
Model
Max. Rotation Speed (Motor)
Max. Rotation Speed (Handpiece)
Gear Ratio
Bur Type
Chucking Length
Max. Bur Length
Max. Working Part Diameter
Optic
Water Spray Type
Water Consumption
Chip Air Consumption
Use Environment
Transportation and Store
Environment
nano65LS
40,000 min-1
40,000 min-1
1:1 Direct Drive
ISO 1797-1 Type1 ø2.35mm CA Bur
ISO 1797-1 Type2 ø2.35mm HP Bur
29.4mm (HP Bur)
44.5mm (HP Bur)
ø4mm
Glass Rod
Internal Spray
Min. 50mL/min (0.2MPa)
Min. 1.5L/min (0.2MPa)
Temperature: 10 - 35°C (No Condendation), Humidity: 30 - 75%, Atmospheric Pressure: 700 - 1,060hPa
Temperature: -10 - 50°C, Humidity: 10 - 85%, Atmospheric Pressure: 500 - 1,060hPa

17
DEUTSCH
23mm
VORSICHT
1. Benutzer und Verwendungszweck
Benutzer : Qualifiziertes Fachpersonal
Verwendungszweck : Zahnmedizinische Behandlung / Zahnprothese (schneiden, polieren)
Dieses Instrument kann AUSSCHLIESSLICH auf Typ E Motoren (gem. ISO 3964) betrieben werden, deren Motoraufnahme eine
Länge von 23mm oder weniger aufweist.

18
VORSICHT
KLASSE
VORSICHT
HINWEIS
Ausmaß und Schwere der Gefährdung oder Schädigung
Ein mögliches Risiko, das zu leichten bis mittleren Personen- oder Sachschäden führen kann, wenn die
Sicherheitshinweise nicht beachtet werden.
Allgemeine Produktinformationen, die besonders hervorgehoben werden, um Störungen oder Leistungsminderungen
zu vermeiden.
2. Sicherheitsanweisungen für die Handhabung und Bedienung
• Lesen Sie bitte diese Sicherheitsanweisungen aufmerksam durch und benutzen Sie das Gerät ausschließlich gemäß seines bestimmungsgemäßen
Gebrauchs und entsprechend der Anweisungen.
• Die Sicherheitsanweisungen sind dafür vorgesehen, mögliche Gefahren zu verhindern, die Körperverletzungen oder Beschädigungen am Gerät
verursachen können. Die Sicherheitsanweisungen werden gemäß der Schwere des Risikos wie folgt klassifiziert.
• Lesen Sie diese Betriebsanleitung vor dem Gebrauch sorgfältig durch und machen Sie sich mit allen Bedienungsfunktionen vertraut. Bewahren
Sie die Betriebsanleitung so auf, dass sie für die zukünftige Verwendung leicht auffindbar ist.
• Berücksichtigen Sie beim Betrieb des Produkts immer die Sicherheit des Patienten.

19
ENGLISCH DEUTSCH FRANZÖSISCH SPANISCH ITALIENISCH
• Dieses Produkt kann für alle Patienten verwendet werden, unabhängig von Alter, Geschlecht oder körperlicher Verfassung.
• Dieses Produkt kann von jeder Person verwendet werden, unabhängig von Alter, Geschlecht oder körperlicher Verfassung.
• Der Benutzer ist für die Funktionsprüfung, Wartung und ständige Überprüfung dieses Produkts verantwortlich.
• Versuchen Sie nicht, das Produkt auseinander zu bauen, und nehmen Sie keine Änderungen am Mechanismus vor, es sei denn, dies wird von
NSK in diesem Handbuch empfohlen.
• Schützen Sie das Produkt vor Stößen. Lassen Sie das Produkt nicht fallen.
• Bediener und alle anderen Personen in der Umgebung müssen während der Benutzung dieses Handstücks einen Augenschutz tragen.
• Sollte das Produkt nicht einwandfrei funktionieren, stellen Sie den Einsatz sofort ein und nehmen Sie Kontakt mit Ihrem NSK-Fachhändler auf.
• Benutzen Sie kein Wasser mit hohem Säuregehalt oder Sterilisationslösungen zum Abwischen, Eintauchen oder Reinigen des Produkts. Legen
Sie das Produkt nicht in solche ein.
• Die Produkte werden im unsterilen Zustand ausgeliefert und müssen vor dem Gebrauch autoklaviert werden.
• Führen Sie in regelmäßigen Abständen Funktionsprüfungen und Wartungen durch.
• Wenn das Produkt längere Zeit nicht benutzt wurde, müssen Sie zunächst prüfen, ob es einwandfrei funktioniert, bevor Sie es am Patienten
anwenden.
• Es wird empfohlen, ein Reservegerät für den Fall eines Ausfalls während einer Operation verfügbar zu haben.

20
nano handstück Motor
23mm
VORSICHT
3. Verbinden & Abtrennen des Handstücks und Motors
3-1 Montage
1) Das Handstück direkt an den Motor anschließen und drehen, bis es hörbar einrastet.
2) Stellen Sie sicher, dass das Handstück fest mit dem Motor verbunden ist.
3-2 Demontage
Halten Sie den Motor und das Handstück mit je einer Hand und ziehen Sie sie gerade voneinander ab.
• Entfernen Sie das Handstück erst, wenn der Motor vollständig zum Stillstand gekommen ist.
• Dieses Instrument kann AUSSCHLIESSLICH auf Typ E Motoren (gem. ISO 3964) betrieben werden, deren Motoraufnahme eine
Länge von 23mm oder weniger aufweist.
Abb. 1
Table of contents
Languages:
Other NSK Dental Equipment manuals

NSK
NSK EX-5B User manual

NSK
NSK S-Max M15L User manual

NSK
NSK Ti-Max X65L User manual

NSK
NSK Ti-Max Nano Series User manual

NSK
NSK Ti-Max NLX nano User manual

NSK
NSK Prophy-Mate neo User manual

NSK
NSK FX15 User manual

NSK
NSK FPB Series User manual

NSK
NSK Ti-Max Z Series User manual

NSK
NSK ENDO-MATE DT2 User manual