MODE D’EMPLOI
FRANÇAIS
Pièce à main à turbine grande vitesse
AVERTISSEMENT
· Lorsque vous utilisez la pièce à main, veillez à toujours vous assurer de la sécurité du patient.
· Ne dépassez pas la longueur maximum.
· Vérifiez la vibration, le bruit et la surchauffe à l’extérieur de la cavité buccale du patient avant d’utiliser l’appareil.
En cas d’anomalies, arrêtez immédiatement d’utiliser la pièce à main et contactez votre revendeur.
· Si la pièce à main ne fonctionne pas correctement, arrêtez immédiatement de l’utiliser et renvoyez-la à un
distributeur pour réparation.
· Si vous appuyez sur le bouton-poussoir pendant que la pièce à main tourne, celle-ci risque de chauffer.
Lorsque vous utilisez l’appareil, veillez à ce que le tissu de la joue reste LOIN du bouton-poussoir de la pièce à
main. Un contact avec le tissu de la joue pourrait en effet entraîner l’enclenchement du bouton-poussoir et
brûler le patient.
· N‘exercez pas de pression excessive sur la fraise. Si la fraise venait à se détacher dans la cavité buccale du
patient, ce dernier pourrait l’avaler accidentellement ou se blesser.
· Veillez à ce que la pièce à main ne soit soumise à aucun impact. Ne faites pas tomber la pièce à main.
· Vous vous référez le raccord de manuel avant vous relies.
· Ne démontez pas la pièce à main ou son mécanisme, sauf si NSK le recommande explicitement dans le
présent manuel d'utilisation.
· N’essayez pas de réparer ou de démonter la cartouche. Le bon fonctionnement de la pièce à main pourrait en
être altéré (bruit anormal ou vibrations anormales). Dommages, pannes ou accidents ne sont pas couverts par
notre garantie.
· Ne fixez pas les yeux sur l’écran LED. (pico BLED, pico WLED)
· En cas d’anomalies (clignotement, pas de lumière, sombre) au niveau de l’écran LED, arrêtez d'utiliser le
produit et contactez immédiatement votre revendeur agréé. (pico BLED, pico WLED)
· Ce produit est catalogué comme produit LED de Classe 1. (pico BLED, pico WLED)
· Utilisez une source d’alimentation répondant aux spécifications ci-après. (pico BLED, pico WLED)
1. L’alimentation électrique de la source d’alimentation est inférieure à 15 W en conditions normes de service
comme de défaillance unique.
2. La source d’alimentation est alimentée par un circuit SELV.
3. La tension de sortie de la source d’alimentation se situe dans la plage recommandée par le fabricant de ce
produit.
AVERTISSEMENT
N’utilisez que de l’eau propre pour entretenir le système clean
head.
AVERTISSEMENT
· Insérez la fraise dans la griffe jusqu’à ce qu’elle soit correctement fixée.
· N’utilisez pas de fraise au carbure lorsque la couronne est ôtée. Ceci pourrait engendrer un
dysfonctionnement.
· N’appliquez pas trop de pression sur la fraise. Cela pourrait casser ou fléchir la fraise. (Veillez à irriguer
l’eau. La coupe devrait être un toucher léger.)
· Utilisez des fraises plus longues que les longueurs recommandées par NSK.
· N’utilisez pas de fraises endommagées, courbées ou non concentriques. De telles fraises pourraient
endommager la pièce à main.
· Ne dépassez pas la vitesse de fraisage recommandée par le fabricant de la fraise.
· Veillez à ce que le mandrin de la fraise soit toujours propre. L’introduction de débris dans la griffe par le
biais du mandrin risque de provoquer une mauvaise rotation et d’empêcher le bon verrouillage de la fraise
dans la griffe.
2. Montage/démontage de la fraise
2-1 Insertion de la fraise
1) Insérez la fraise jusqu’à ce qu’elle bute.( )
2) Appuyez sur le bouton-poussoir.( )
3) Insérez la fraise davantage dans la griffe jusqu’à
ce qu’elle bute.( )
4) Relâchez le bouton.
2-2 Démontage de la fraise
Appuyez sur le bouton-poussoir et retirez la fraise.( )
Des modèles sont écrits dessus comme suit;
S-Max pico = pico, S-Max pico KL = pico KL, S-Max pico SL = pico SL, S-Max pico BLED = pico BLED,
S-Max pico WLED = pico WLED, S-Max pico WHL = pico WHL, S-Max pico MWL = pico MWL, S-Max pico STL = pico STL
KaVo®et MULTIflex®sont des maques déposées de la société Kaltenbach & Voigt GmbH, Allemagne. Sirona®est une maque déposée par la société Sirona Dental Systems GmbH, Allemange.
W&H®et Roto Quick®sont des marques déposées de la société W&H Dentalwerk Bürmoos GmbH, Autriche. Bien-Air®et Unifix®sont des marques déposées de la société Bien-Air Dental S.A. Suisse.
1. Caractéristiques
Utilisation : Cette pièce à main est uniquement conçue pour un usage dentaire clinique professionnel.
3. Maintenances
3-1 Nettoyage (Système Clean-Head)
1) Eliminez les débris présents au niveau des orifices avec une
brosse. N’utilisez pas de brosse métallique. (Fig.2)
2) Remplissez la moitié d’une tasse d’eau propre.
3) Faites tourner la pièce à main et immergez-en la moitié de la
tête. (Fig.3)
4) Faites tourner et arrêtez la pièce à main par intervalles de 2
à 3 secondes. (Environ 3 fois)
5) Le système clean head permet de nettoyer l’orifice clean
head.
6) Arrêtez la pièce à main et essuyez-la en frottant. Si la saleté
résiste, retirez la cartouche et nettoyez à l’aide d’une brosse.
7) Lubrifiez (3-6 Lubrification) et Stérilisez (3-7 Stérilisation).
3-2 Nettoyage (Pièce à main avec fil de nettoyage)
Si l’embout du spray est obstrué ou si le spray n’est pas expulsé équitablement des trois ports,
nettoyez ces derniers comme suit :
1) Ôtez la fraise de la griffe.
2) Retirez le fil de nettoyage de l’arrière du porte-balai. Insérez
avec précaution le fil dans l’embout du spray. Ne forcez pas
le fil dans le port.Un port endommagé ou déplacé pourrait
modifier la trajectoire du spray ou l’éloigner de la fraise, et
réduire ainsi l’efficacité du refroidissement.
3) Après utilisation, nettoyez le fil de nettoyage. Replacez le
porte-balais avec l’extrémité pointue du fil vers l’intérieur.
3-3 Nettoyage (Pièce à main)
Cette pièce à main peut être lavée avec un thermodésinfecteur.
Éliminez la saleté et les débris situés sur la pièce à main et nettoyez-la avec un coton-tige ou un tissu
imbibé d’alcool. N’utilisez pas de brosse métallique.
Référez-vous au manuel du thermodésinfecteur pour l’utilisation de ce dernier.
AVERTISSEMENT
Ne pas utiliser d’outil pointu pour nettoyer le barreau de quartz.
Cela pourrait l’endommager et réduire la transmission lumineuse.
Si la luminosité baisse, contacter le revendeur NSK.
AVERTISSEMENT
· Bien maintenir l’instrument pour éviter que celui-ci ne s’échappe pendant la lubrification.
· Vaporisez du lubrifiant jusqu’à ce qu’il en ressorte de la tête de la pièce à main.
· Tenir la bouteille de PANA SPRAY Plus/PANA SPRAY en position verticale.
· Répétez la lubrification jusqu’à ce que l’instrument soit propre et ne présente plus aucun débris. Si du
sang reste sur le contre-angle, il peut se coaguler et former de la rouille. Cela peut engendrer des
dysfonctionnements tels qu’une panne au niveau de la rotation ou du couple.
AVERTISSEMENT
· Ne stérilisez pas la pièce à main en autoclave (même dans un sac) avec d’autres instruments dont les
résidus de produits chimiques n’auraient pas été suffisamment nettoyés. Ceci a pour but d’éviter la
décoloration et/ou l’endommagement du revêtement de la pièce à main.
· Ne lavez, ne trempez ou n’essuyez pas la pièce à main avec/dans des solutions pouvant entraîner une
oxydation.
AVERTISSEMENT
· Veillez à ce que le joint soit retiré lorsque vous enlevez la cartouche. Le joint pourrait rester dans la tête
lorsque vous enlevez la cartouche. S’il reste un joint, la nouvelle cartouche ne pourra pas être insérée
correctement.
· N’utilisez que des cartouches NSK originales. Si vous utilisez vos cartouches, il se peut que les
spécifications ne soient pas respectées et la garantie sera annulée.
· Le filetage du couvercle est très fin. Pour éviter de l’endommager, commencer par revisser le capuchon
manuellement, puis terminer avec la clé de couvercle.
· S’assurer que les 2 joints (Fig.6) soient correctement positionnés sur le rotor.
AVERTISSEMENT
· Ne démontez pas l’anneau, sauf pour le remplacement du joint.
· Assurez-vous que l’Anneau conique est fermement serré. Si l’Anneau conique est desserré, il y a un risque
de fuite d’eau et d’air.
AVERTISSEMENT
Assurez-vous que l’anneau conique est fermement serré. Si l’anneau conique est desserré, il y a un
risque de fuite d’eau et d’air.
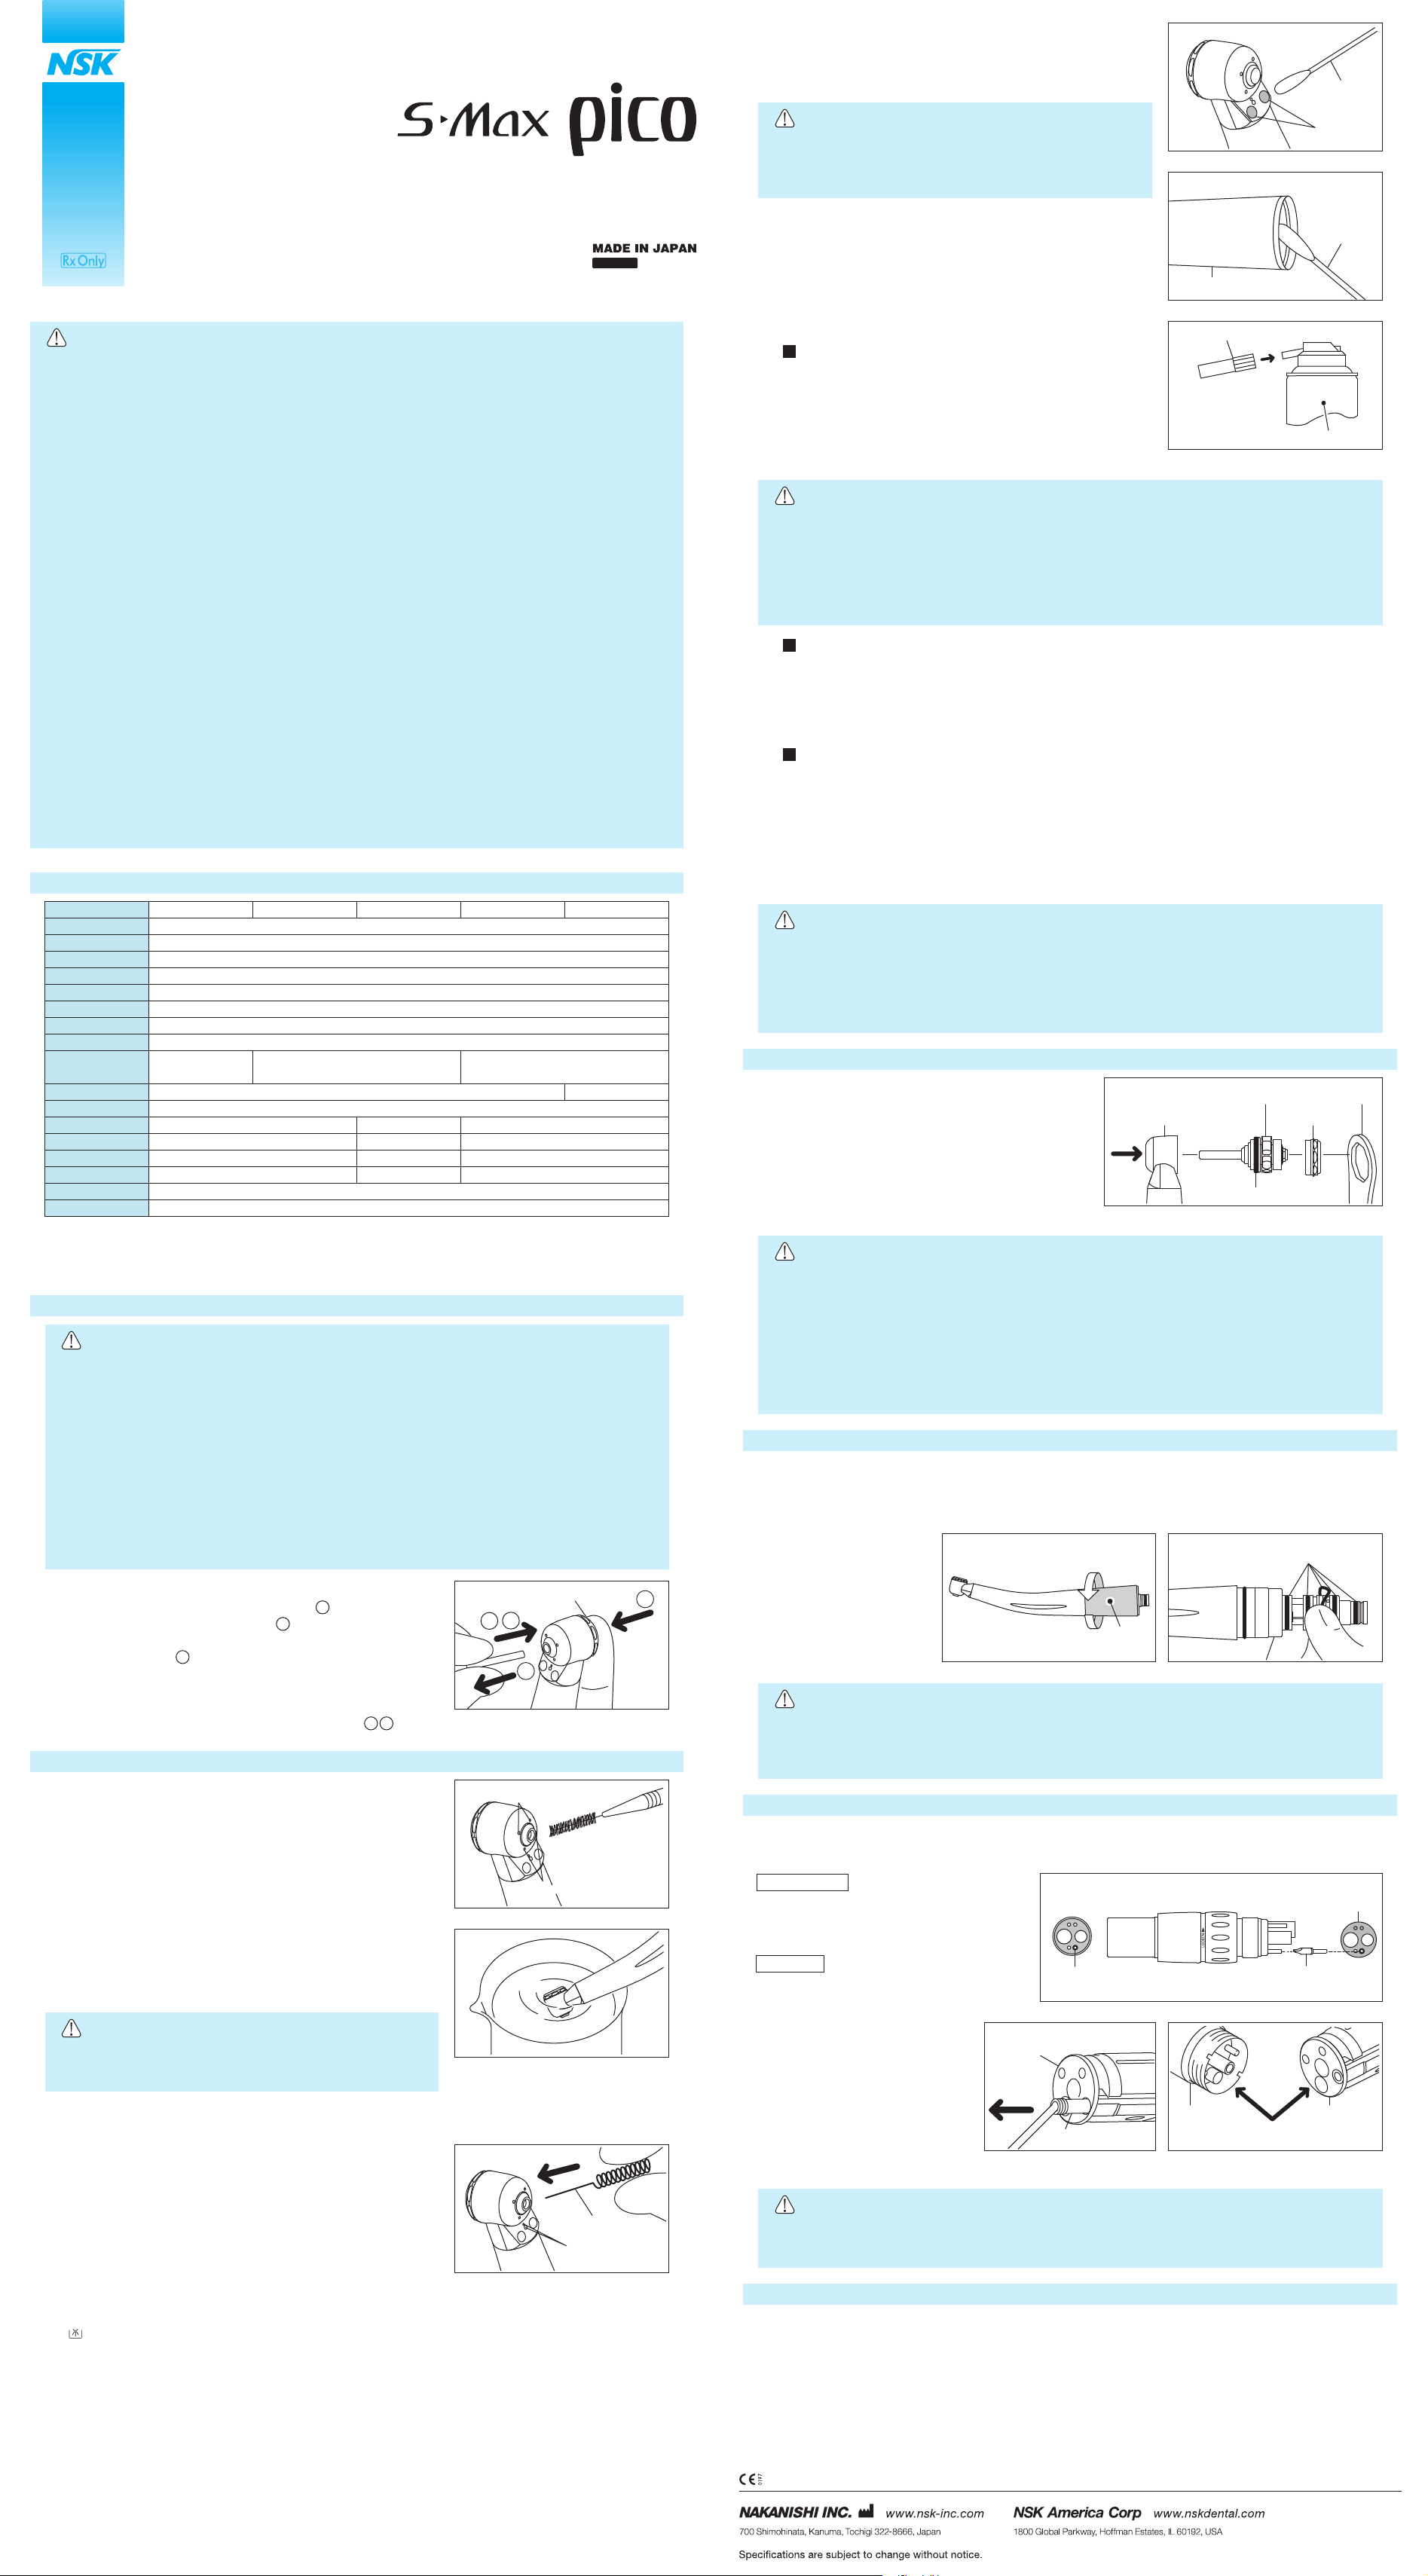
6. Valve anti-retour
Une valve de non-retour est intégrée dans le joint du raccord et empêche la rétraction de l’eau à la tête de
la turbine pour éviter l’introduction des fluides oraux dans l’arrivée d’eau.
Couplage NSK
Pour remplacer la valve, enlevez le joint final.
Tirez et enlevez la conduite d’eau et
remplacez la valve anti-retour. (Fig. 11)
7. Elimination du produit
Consultez votre revendeur pour en savoir plus sur l’elimination de l’appareil.
pico BLED
1) Ôtez la pièce à main du couplage et
desserrez l’anneau conique pour le
retirer.(Fig. 9)
2) Enlevez la valve anti-retour Retirez
l’ancienne valve anti-retour avec
un fin bâton. (Fig. 12)
3) Insérez la nouvelle valve anti-retour
correctement.
4) Insérez le joint dans la pièce à
main. Assurez-vous que la broche
et le joint sont serrés. (Fig. 13)
5) Serrez l’anneau conique fermement.
5. Remplacement des joints (pico)
Remplacez les joints si de l’eau est présente dans la ligne d’air d’échappement. C’est un signe de fuite
d’eau possible dans le couplage. Changez TOUJOURS le jeu complet de joints.
1) Desserrez et enlevez l’Anneau conique à l’arrière de la pièce à main. (Fig.9)
2) Ôtez gentiment chaque joint à l’aide de votre pouce. (Fig.10)
3) Insérez le jeu complet de
nouveaux joints dans les
bonnes rainures.
4) Replacez et serrez
fermement l’anneau
conique.
*Jeu de joints PTL :
Code de commande
Y900580
4. Remplacement de la cartouche
3-4 Nettoyage (Lumière)
Nettoyez les extrémités d’entrée et de sortie (Fig.5) du barreau
de quartz avec un coton-tige imbibe d’alcool. Eliminez tous les
débris et l’huile.
3-5 Nettoyage (Arriere de la turbine) (pico STL)
Essuyer toutes les surfaces internes de l’arrière de la turbine
avec un coton-tige imbibé d’alcool.
3-6 Lubrification
Utiliser du PANA SPRAY Plus/PANA SPRAY ou le Care3 Plus
après chaque utilisation et avant chaque passage en autoclave.
PANA SPRAY Plus
1) Fixer l’embout sur le PANA SPRAY Plus/PANA SPRAY.
2) Secouez vigoureusement pour mélanger le lubrifiant et le
propulseur.
3) Insérer le bec du pulvérisateur à l'arrière de a pièce à main et
effectuer une pulvérisation pendant environ 2 secondes
jusqu'à ce que l’huile soit expulsée de la pièce à main.
3-7 Stérilisation
La stérilisation par autoclave est recommandée. La stérilisation est nécessaire avant la première
utilisation et après chaque patient, comme indiqué ci-dessous.
Procédure d’autoclave
1) Éliminez la saleté et les débris situés sur la pièce à main et nettoyez-la avec un coton-tige ou un
tissu imbibé d’alcool. N’utilisez pas de brosse métallique.
2) Lubrifiez avec le PANA SPRAY Plus/PANA SPRAY/Care3 Plus. Cf. 3-6 Lubrification.
3) Insérez la pièce à main dans un sac pour autoclave. Scellez le sac.
4) Stérilisez en autoclave à 135 ˚C max.
(ex. Autoclave pendant 20 min. à 121 ˚C ou pendant 15 min. à 132 ˚C.)
5) Conservez la pièce à main dans son sachet de stérilisation jusqu’à son utilisation.
*
Stérilisation à 121 °C pendant plus de 15 minutes recommandée par les normes EN13060 et EN ISO17665-1.
Système automatique de nettoyage et de lubrification pour instruments NSK
Pour l'utilisation du système automatique de nettoyage et de lubrification pour instruments NSK,
se référer aux instructions relatives au système.
Lire ce mode d’emploi attentivement
avant toute utilisation et le garder à
proximité pour d’éventuelles consultations.
Conduite d’eau Valve anti-retour
Joint
Joint
Valve anti-retour
Desserrez
Anneau
conique
S-Max pico
2
3
1
1
2
3
2 4
4
Orifice Clean Head
Fil de nettoyage
Trou de jet
Coton-tige
Barreau
de quartz
PANA SPRAY Plus/PANA SPRAY
Embout de Spray
Joint
Pièce à main Joint
Alignez
Orifice Clean Head
Pièce à main
Orifice Clean Head
Coton-tige
Bouton-poussoir
La directive UE 93/42/CEE a été respectée pour la conception et la production de cet appareil médical.
Modèle
Type de tête
Vitesse de rotation
Type spray
Type de griffe
Fraise
Longueur max. de la fraise
Longueur de serrage
de la fraise
Diamètre max. de la fraise
Arrivée d’air
Consommation d’air
Dimension de la tête x hauteur
Lumière
Voltage
Voltage actif
Consommation courant
Environnement d’utilisation
Environnement de
stockage et transport
pico
0,20MPa (2,0 kgf/cm2)~
0,25MPa (2,5 kgf/cm2)
0,25MPa (2,5 kgf/cm2)~
0,30MPa (3,0 kgf/cm2)
0,20MPa (2,0 kgf/cm2)~
0,25MPa (2,5 kgf/cm2)
Mini
380.000 ~ 450.000 min-1
Simple spray
Griffe à bouton poussoir
ISO1797-1 Type3 Ø1,59~1,60mm Fraise à mandrin court/Fraise à mandrin super court
18,5 mm
8,0 mm
Ø 2,0 mm
pico KL / pico SL
45 ± 5 NL/min
Barreau de quartz
-
-
-
LED blanche
CA/DC 3,3 ± 0,05 V
3,0 - 4,0 V
0,38 A Typique (3,3V)
Barreau de quartz
-
-
-
Température : 0 – 40 degrés, Humidité : 30 - 75% HR, Pression atmosphérique : 700 - 1.060hPa
Température : -10 – 50 degrés, Humidité : 10 - 85% RH, Pression atmosphérique : 500 - 1.060hPa
Ø 8,6 mm x 9,0 mm
40 ± 5 NL/min
pico BLED / pico WLED
pico WHL/pico MWL
pico STL
Fig. 1
Fig. 2
Fig. 3
Fig. 4
Fig. 5
Fig. 6
Fig. 7
Fig. 11
Fig. 10
Fig. 13Fig. 12
Fig. 9
CléCartouche
Bouchon de têteTête
Joint
Relevez
1) Insérez une fausse fraise dans la griffe.
2) Dévissez le bouchon de tête en le tournant dans le
sens inverse des aiguilles d’une montre et enlevez-le.
3) Relevez la fausse fraise pour retirer la cartouche.
4) Nettoyez l’intérieur de revêtement de la tête.
5) Insérez la nouvelle cartouche.
6) Remplacez le bouchon de tête et vissez-le fermement.
*SX-PU03: Code de commande P1140200 Fig. 8


