manuals.online logo
Brands
  1. Home
  2. •
  3. Brands
  4. •
  5. OAKWORKS
  6. •
  7. Massager
  8. •
  9. OAKWORKS PORTAL LIGHT User manual

OAKWORKS PORTAL LIGHT User manual

R
Phone: 717.235.6807 www.oakworks.com
USA
ASSEMBLED BY
HAND IN THE
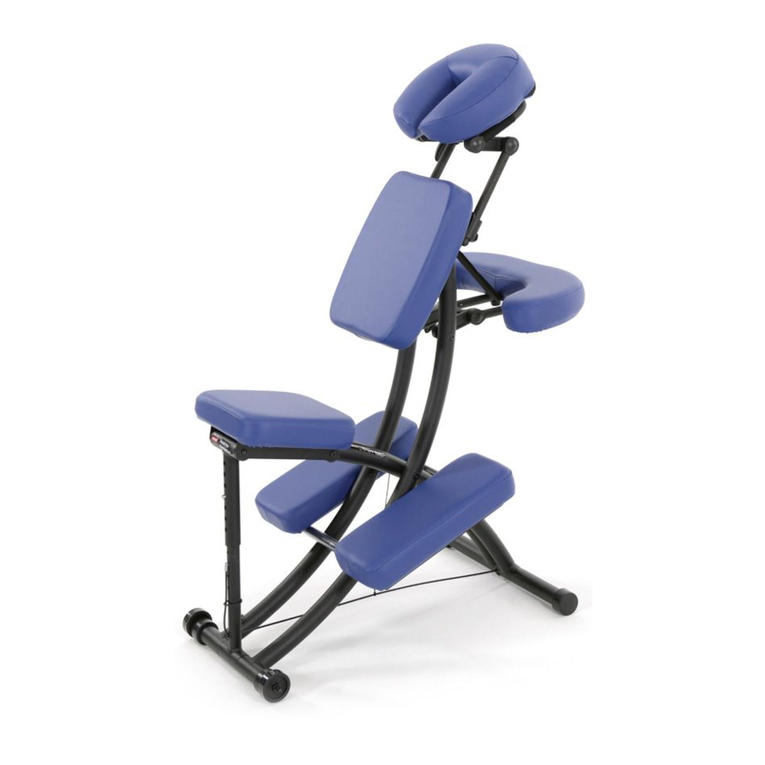
PORTAL LIGHT
by OAKWORKS®
OWNER’S MANUAL
1. Have your client stand on the side of the chair and grasp the
chair frame just above the chest pad for support.
2. Have the client straddle the seat and place their far knee on the
knee pad.
3. Your client can then gradually begin to sit down. Once seated,
the client can put their other knee on the knee pad.
4. You can then make the adjustments to the face and arm rests
for proper client comfort and positioning.
1. Holding folded chair as shown, move the horizontal bar down
& insert the bar into locking arm. (photo 1 & 2)
2. Wrap Velcro®around inserted bar to insure locking. (photo 3)
3. Loosen face rest knobs and insert face rest platform arms into the
tubes on the back of the chest pad plate. (see photos 4 & 5)
SETTING UP YOUR MASSAGE CHAIR
page 1
OWNER’S MANUAL
PORTAL LIGHT by OAKWORKS®
1) Move horizontal
bar down
HELPING YOUR CLIENT ONTO THE CHAIR
2. Adjustment for optimal client comfort
A. Release the CamLocks and knobs on the face rest (photo 4 & 6)
B. Have your client lean forward into the chest pad, letting
the chair support their weight.
C. Ask your client to hold onto the face rest and to pull the
face rest toward them until their forehead rests comfortably
on the pad.
D. Lock the CamLocks and tighten the knobs securely.
Do not over tighten the knobs - too much force may
cause stripping.
FACE REST ADJUSTMENTS FOR OPTIMAL CLIENT COMFORT
1. General Adjustment Information
A. Oakworks QuickLock™ face rest has virtually unlimited
positioning options. Vertical adjustment is achieved by
loosening the knobs, raising or lowering the face rest & then
tightening the knobs (photo 4 & 5). Angle adjustments are
achieved by unlocking the CamLocks & moving the face
rest. (figure 6 & 7)
B. The locking cams on the face rest can be easily reversed
to the other side of the chair if desired. Loosen the knobs,
remove the face rest, reverse the rods & re-insert into the
tubes. Tighten the knobs. (photo 4 & 5)
2) Insert bar into arm
3) WrapVelcro®to secure
6) CamLock™ 7) Face rest positioning
4) Face rest knob 5) Vertical adjustments
Face rest
CamLocks
Arm rest
Arm rest
buckle & strap
Horizontal bar
& locking arm
Chest Pad
Seat
Knee
Pads
Face rest
knobs
Personal item
storage shelf
page 2
1. You will need to lift or lower the arm rest until your client’s
forearms rest comfortably on the pad and his/her shoulders
are relaxed.
2. To lower the arm rest, lift the buckle and extend the strap.
(photo 8)
3. To raise the arm rest, pull on the strap. (photo 9)
ARM REST ADJUSTMENTS
• Note: The arm rest is designed to support the weight of your
client’s forearms. Do not allow your clients to push against the
arm rest to lift themselves out of the chair. The arm rest will
not support your client’s full weight.
1. Unlock Velcro®from around the inserted bar and remove bar from
locking arm. (photo 13 & 14)
2. Raise pivot section and push up on arm rest. (photo 15).
Tighten arm rest strap.
3. Remove face rest crescent, loosen the face rest knobs & CamLocks,
raise the face rest & fold forward over chest pad. Replace crescent.
Tighten knobs and CamLocks. (photo 16)
FOLDING YOUR MASSAGE CHAIR
8) Lengthen Strap 9) Tighten Strap
15) Fold up the chair
14) Remove Bar
13) Unwrap Velcro®
17) D-Ring
16) Fold head rest
Your Portal Light will arrive with the seat height at the standard
position. If you prefer the have the seat lower or higher, simply
adjust as follows:
1. Locate angled adjustment block under the seat support, lift seat
slightly, pull to separate the block from theVelcro®. (photo 10)
2. To lower the seat, move the angled adjustment block back
towards the seat area (thin side of adjustment block). (photo 11)
3. To raise the seat, move the angled adjustment block away from
the seat area (thick side of adjustment block). (photo 12)
4. Push block against seat support to re-attach to the Velcro®.
SEAT HEIGHT ADJUSTMENT
11) To lower the seat
12) To raise the seat
10) Angle adjustment
block
1. To carry your chair with the carry strap,
First, fold the chair as instructed above.
Attach the carry strap to the D-Rings on
the frame of the chair. (photo 17)
2. Lift the chair by holding onto one of the
main frame tubes & place the strap on
your shoulder. (photo 18)
CARRYING YOUR CHAIR WITH STRAP
18) Carry position
Part Number MMMNPP0002-EN
Revision: A
Revision date: 04/24/2015
Edition 1 - October, 2010
Edition2 - June, 2011
Printed in English
Printed in USA
Oakworks®Inc.
923 East Wellspring Road
New Freedom, PA 17349
Phone: 717-235-6807
FAX: 717-235-6798
www.oakworks.com
R
PORTAL LIGHT
by OAKWORKS®
CLEANING & MAINTENANCE
CLEAN your upholstered items when needed using a
mild solution of 4:1 diluted non-alcohol cleaner such as
Formula 409®, Fantastik®, or Green Windex®
DISINFECT your fabric with Protex, MadaCide,
MadaWipe, Accell TB, Virox®(Canada), or a diluted
1/10 bleach solution. Dry immediately after cleaning to
remove excess cleaning solution.
DO NOT use citrus based cleaners or other strong cleaners,
such as alcohol, acetone, higher concentrations of bleach
or other products that contain high concentrations of
these substances.
DO NOT expose the fabric to temperatures below
32°F/0°C or above 95°F/35°C.
DO NOT expose the fabric to direct sunlight, adhesives,
liquids, or abrasive materials.
FAILURE TO FOLLOW RECOMMENDATIONS
WILL VOID THE WARRANTY ON THE FABRIC.
CAUTION
MAXIMUM WORKING LOAD RATING
300 LBS. (136 KG)

Other OAKWORKS Massager manuals

OAKWORKS Marina User manual

OAKWORKS

OAKWORKS Marina User manual

OAKWORKS Portal Pro User manual

OAKWORKS

OAKWORKS Portal Pro User manual

OAKWORKS SISSEL Portal Pro User manual

OAKWORKS

OAKWORKS SISSEL Portal Pro User manual

OAKWORKS PerformaLift Series User manual

OAKWORKS

OAKWORKS PerformaLift Series User manual

OAKWORKS Antigua User manual

OAKWORKS

OAKWORKS Antigua User manual

OAKWORKS ButterflyCushion User manual

OAKWORKS

OAKWORKS ButterflyCushion User manual

OAKWORKS Clodaghl User manual

OAKWORKS

OAKWORKS Clodaghl User manual

OAKWORKS PORTAL LIGHT User manual

OAKWORKS

OAKWORKS PORTAL LIGHT User manual

OAKWORKS PORTAL PRO User manual

OAKWORKS

OAKWORKS PORTAL PRO User manual

OAKWORKS Celesta Gemini CLODAGH User manual

OAKWORKS

OAKWORKS Celesta Gemini CLODAGH User manual

Popular Massager manuals by other brands

Medisana HM 886 instruction manual

Medisana

Medisana HM 886 instruction manual

lifelong #InstaRelief Instruction manual & warranty card

lifelong

lifelong #InstaRelief Instruction manual & warranty card

Panasonic EP1005 - MASSAGE LOUNGER operating instructions

Panasonic

Panasonic EP1005 - MASSAGE LOUNGER operating instructions

Graham Field intensa IN601 Series Assembly and operating instructions

Graham Field

Graham Field intensa IN601 Series Assembly and operating instructions

Panasonic EP-MS41 operating instructions

Panasonic

Panasonic EP-MS41 operating instructions

GESS VELVET user manual

GESS

GESS VELVET user manual

Conair Obus Forme HMC1 Instruction booklet

Conair

Conair Obus Forme HMC1 Instruction booklet

Brookstone Renew 3D manual

Brookstone

Brookstone Renew 3D manual

iRest A380 Service manual

iRest

iRest A380 Service manual

Therabody Recovery Air PRO manual

Therabody

Therabody Recovery Air PRO manual

Comfier CF-4905 user manual

Comfier

Comfier CF-4905 user manual

Jay Lite owner's manual

Jay

Jay Lite owner's manual

Beurer FWM 50 Instructions for use

Beurer

Beurer FWM 50 Instructions for use

mychway BEMT-002 instruction manual

mychway

mychway BEMT-002 instruction manual

Wagan 9989 user manual

Wagan

Wagan 9989 user manual

Nuga NM-5000P user manual

Nuga

Nuga NM-5000P user manual

HoMedics Shiatsu+ SBM-300H Instruction manual and warranty

HoMedics

HoMedics Shiatsu+ SBM-300H Instruction manual and warranty

BRIGHT 018621 operating instructions

BRIGHT

BRIGHT 018621 operating instructions

manuals.online logo
manuals.online logoBrands
  • About & Mission
  • Contact us
  • Privacy Policy
  • Terms and Conditions

Copyright 2025 Manuals.Online. All Rights Reserved.