manuals.online logo
Brands
  1. Home
  2. •
  3. Brands
  4. •
  5. OfficeSource
  6. •
  7. Indoor Furnishing
  8. •
  9. OfficeSource PB21266 User manual

OfficeSource PB21266 User manual

®
®www.ocesourcefurniture.com
PB21266
ASSEMBLY INSTRUCTIONS
BORDERS
Assembly Instructions
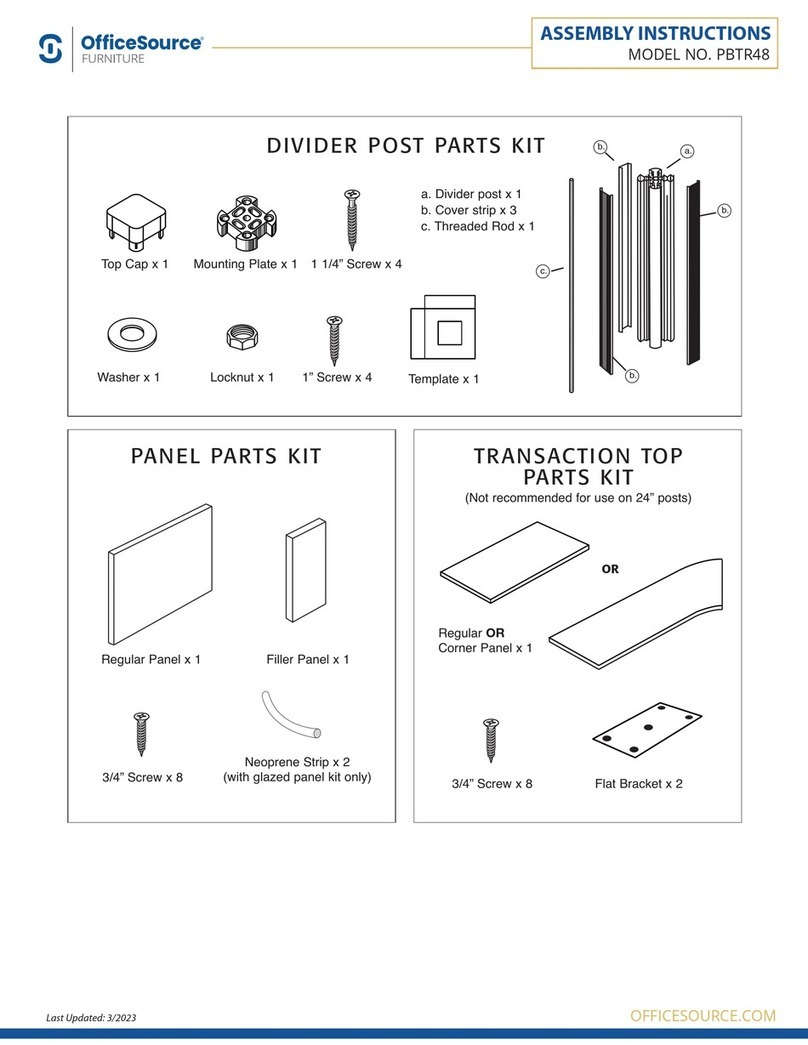
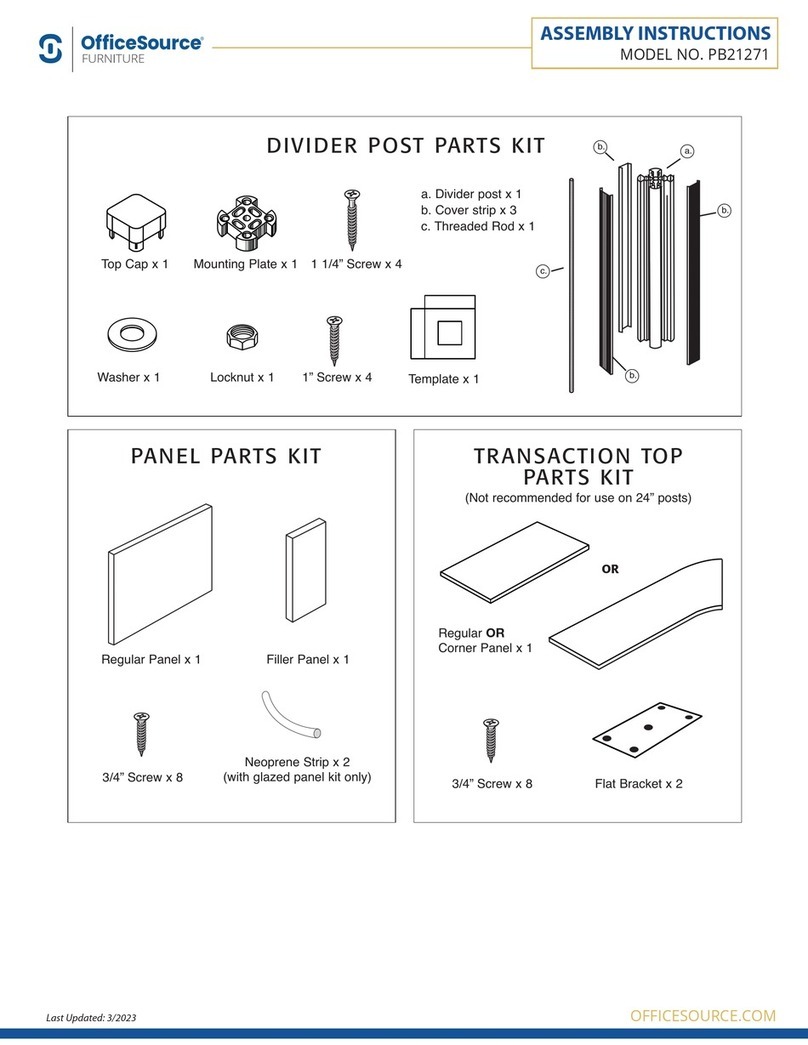
Thank you for purchasing Borders desk mounted partition system. Before you begin assembly, please check that
you have all the parts listed below for the appropriate kit purchased. If you do not, please contact the dealer that
sold you this product.
a.
b.
c.
b.
b.
Regular OR
Corner Panel x 1
PANEL PARTS KIT TRANSACTION TOP
PARTS KIT
(Not recommended for use on 24” posts)
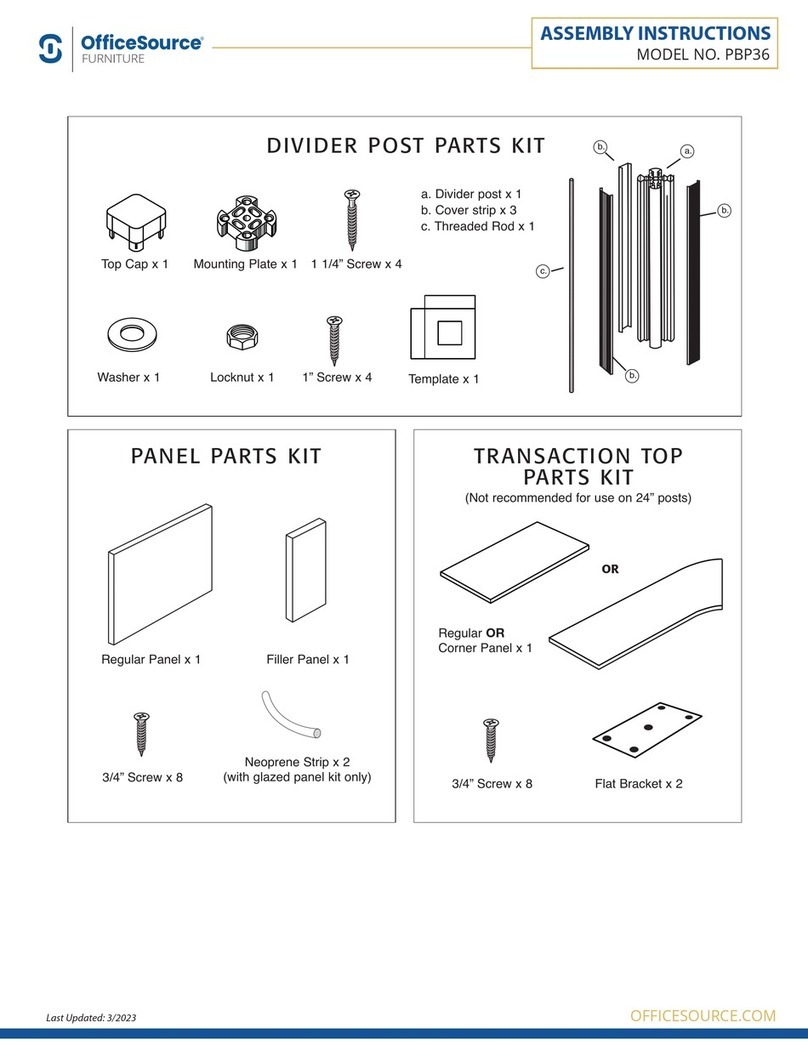
DIVIDER POST PARTS KIT
Top Cap x 1 Mounting Plate x 1 1 1/4” Screw x 4
Template x 1
Washer x 1 Locknut x 1 1” Screw x 4
a. Divider post x 1
b. Cover strip x 3
c. Threaded Rod x 1
Regular Panel x 1
3/4” Screw x 8 3/4” Screw x 8
Filler Panel x 1
Neoprene Strip x 2
(with glazed panel kit only) Flat Bracket x 2
OR
MODEL NO. PB21266
OFFICESOURCE.COM
ASSEMBLY INSTRUCTIONS
Last Updated: 3/2023
®
®www.ocesourcefurniture.com
PB21266
ASSEMBLY INSTRUCTIONS
1.4 Install the mounting plate that is to
be fixed at the other end of the work
surface by following steps 1.1 to 1.3
above.
1.5 Temporarily position a panel between
the two mounting plates. Adjust
mounting plates so that a gap of
approximately 1/16” or 2mm is
between the panel and the plate.
1/16”
or 2.0 mm gap
1.4
1.5
1.7 After all the mounting plates have been properly aligned, including having the panels temporarily
positioned as per instruction 1.5, then install the remaining 3 - 1” screws in each mounting plate as
shown, followed by the 4 - 1 1/4” in the four outside corners of the plate.
1.6 1.7
1.6 Install all the remaining mounting
plates that will be on your work surfaces
following the above instructions. Remember
when aligning the mounting plates use only
the one short screw and do not tighten.
Filler Panel
Regular Panel
STEP 1. ATTACH MOUNTING PLATE
1.1 Fold sides of template downward and
position template tight against work
surface corner.
1.2 Expose double sided tape and
position mounting plate inside the
template opening.
1.3 Remove the template and install the
short 1” screw into one of the
inside holes. Do not tighten.
DO NOT INSTALL ANY OTHER SCREWS
1.1
1.2
1.3
MODEL NO. PB21266
OFFICESOURCE.COM
ASSEMBLY INSTRUCTIONS
Last Updated: 3/2023
MODEL NO. PB21266
OFFICESOURCE.COM
ASSEMBLY INSTRUCTIONS
Last Updated: 3/2023
®
®www.ocesourcefurniture.com
PB21266
ASSEMBLY INSTRUCTIONS
STEP 3. SLIDE PANELS INTO PLACE
STEP 4. ATTACHING TRANSACTION TOPS
3.1 Insert a 3/4” screw into threaded hole in each
corner of the panel. Once all the way in,
back out each screw 2 turns.
3.2 Slide panels into place, making sure that
exposed screw head slides down appropiate
channel on post.
3.3 If using glazed panel, in addition to the four
screws, (not required on fabric panels) secure
panel by inserting Neoprene strips between
panel and post (Neoprene strips are provided
with the panel).
3.4 Ensure cover strips on the post are propery
placed. Note. If using transaction tops,
proceed to Step 4
3.5 Tighten locking nut. Place caps on top of divider post.
3/4” Screw
3.1
3.2
Note: All transaction tops come with necessary connecting hardware
4.1 Remove nut and washer. Slide connecting bracket onto threaded rod and divider post.
4.2 Fasten connecting bracket to divider post by tightening locking nut.
4.3 Align connecting brackets
with recessed cut outs on
underside of transaction tops.
4.4 Attach flat brackets to under
side of adjoining transaction
tops with 4 wood screws
provided. 4.1
4.2
4.3
4.4
Underside of
transaction top
STEP 2. MOUNT DIVIDER POST
2.1 Place divider post over mounting plate.
2.2 Screw threaded rod through divider
post and into mounting plate.
2.3 Place washer then nut on rod and
finger tighten only.
2.3
2.1 2.2
MODEL NO. PB21266
OFFICESOURCE.COM
ASSEMBLY INSTRUCTIONS
Last Updated: 3/2023
®
®www.ocesourcefurniture.com
PB21266
ASSEMBLY INSTRUCTIONS
STEP 5. STACKING ON PANELS
Note: When using 2 stacked 12” panels, 24” high posts must be used.
5.1 Attach first level of panels as described in Step 3. Insert 2nd level of panels between 24” high posts in
same fashion.
5.2 Tighten locking nut on the threaded rod and place caps on top of divider post.
USER
SIDE
5.1
5.2
5.1
STACKED
INCORRECTLY
STACKED
PROPERLY
3/4” Screw
TOP CAP
Please ensure panels are stacked properly - rails should fit in channels .

Other OfficeSource Indoor Furnishing manuals
OfficeSource PLT131T User manual

OfficeSource

OfficeSource PLT131T User manual

OfficeSource EVH100BGG User manual

OfficeSource

OfficeSource EVH100BGG User manual

OfficeSource 200HMFBK Quick reference guide

OfficeSource

OfficeSource 200HMFBK Quick reference guide

OfficeSource RCN3222WB User manual

OfficeSource

OfficeSource RCN3222WB User manual

OfficeSource EVT8AGG User manual

OfficeSource

OfficeSource EVT8AGG User manual

OfficeSource PL231 User manual

OfficeSource

OfficeSource PL231 User manual

OfficeSource PBTR71 User manual

OfficeSource

OfficeSource PBTR71 User manual

OfficeSource PL178L User manual

OfficeSource

OfficeSource PL178L User manual

OfficeSource PL155 User manual

OfficeSource

OfficeSource PL155 User manual

OfficeSource PLT147T User manual

OfficeSource

OfficeSource PLT147T User manual

OfficeSource OSXC2009DV User manual

OfficeSource

OfficeSource OSXC2009DV User manual

OfficeSource PL169DELTT User manual

OfficeSource

OfficeSource PL169DELTT User manual

OfficeSource PB21271 User manual

OfficeSource

OfficeSource PB21271 User manual

OfficeSource PB21271ACR User manual

OfficeSource

OfficeSource PB21271ACR User manual

OfficeSource CPSOHP User manual

OfficeSource

OfficeSource CPSOHP User manual

OfficeSource OSXD2001CW User manual

OfficeSource

OfficeSource OSXD2001CW User manual

OfficeSource PL231T User manual

OfficeSource

OfficeSource PL231T User manual

OfficeSource PL2013 User manual

OfficeSource

OfficeSource PL2013 User manual

OfficeSource PL216 User manual

OfficeSource

OfficeSource PL216 User manual

OfficeSource PL102 User manual

OfficeSource

OfficeSource PL102 User manual

OfficeSource PL9997 User manual

OfficeSource

OfficeSource PL9997 User manual

OfficeSource 300HL Quick reference guide
OfficeSource

OfficeSource 300HL Quick reference guide

OfficeSource Orion OSTW8002 Quick reference guide

OfficeSource

OfficeSource Orion OSTW8002 Quick reference guide

OfficeSource PLTULEG2485H User manual

OfficeSource

OfficeSource PLTULEG2485H User manual

Popular Indoor Furnishing manuals by other brands

Vinsetto MINI Assembly instructions

Vinsetto

Vinsetto MINI Assembly instructions

Bestar 40170-1117 Assembly instructions

Bestar

Bestar 40170-1117 Assembly instructions

Bedcolab HARMONY FLUSH OVERLAY CASEWORK Operation and maintenance manual

Bedcolab

Bedcolab HARMONY FLUSH OVERLAY CASEWORK Operation and maintenance manual

CB2 drommen Assembly manual

CB2

CB2 drommen Assembly manual

VINNOVA Alistair 789084 manual

VINNOVA

VINNOVA Alistair 789084 manual

BUT ARTDECO-120 Assembly instructions

BUT

BUT ARTDECO-120 Assembly instructions

Wren Kitchens 1000 Base Shallow Assembly guide

Wren Kitchens

Wren Kitchens 1000 Base Shallow Assembly guide

Kvik H923 Assembly instruction

Kvik

Kvik H923 Assembly instruction

BE box maxi manual

BE

BE box maxi manual

Rauch M1769 Assembly instructions

Rauch

Rauch M1769 Assembly instructions

Wayfair Hall Tree Product instructions

Wayfair

Wayfair Hall Tree Product instructions

Bestar 93626-1139 manual

Bestar

Bestar 93626-1139 manual

FourStar 11226136A Assembly instructions

FourStar

FourStar 11226136A Assembly instructions

Safavieh Furniture Brogen FOX2527 manual

Safavieh Furniture

Safavieh Furniture Brogen FOX2527 manual

Universal Furniture 192380 instruction sheet

Universal Furniture

Universal Furniture 192380 instruction sheet

Finch FUBC10045A Product Guide and Assembly Instructions

Finch

Finch FUBC10045A Product Guide and Assembly Instructions

FROST SIGNATURE CROSSWAY FITTING INSTRUCTION

FROST

FROST SIGNATURE CROSSWAY FITTING INSTRUCTION

HJH office 673951 Aassembly Instructions

HJH office

HJH office 673951 Aassembly Instructions

manuals.online logo
manuals.online logoBrands
  • About & Mission
  • Contact us
  • Privacy Policy
  • Terms and Conditions

Copyright 2025 Manuals.Online. All Rights Reserved.