Oki 6300FB User manual

User’s guide
ML6300FB
ML6300

Perface > 2
Preface
Every effort has been made to ensure that the information in this document is
complete, accurate, and up-to-date. The manufacturer assumes no responsibility
for the results of errors beyond its control. The manufacturer also cannot guaran-
tee that changes in software and equipment made by other manufacturers and
referred to in this guide will not affect the applicability of the information in it. Men-
tion of software products manufactured by other companies does not necessarily
constitute endorsement by the manufacturer.
While all reasonable efforts have been made to make this document as accurate
and helpful as possible, we make no warranty of any kind, expressed or implied,
as to the accuracy or completeness of the information contained herein.
The most up-to-date drivers and manuals are available from the Oki Printing Solu-
tions web site:
http://www.okiprintingsolutions.com
Copyright © 2008 All rights reserved.
Oki and Microline are registered trademarks of Oki Electric Industry Company, Ltd.
ENERGY STAR is a trademark of the United States Environmental Protection
Agency.
Microsoft, MS-DOS and Windows are registered trademarks of Microsoft Corpora-
tion.
Other product names and brand names are registered trademarks or trademarks
of their proprietors.
As an ENERGY STAR Program Participant, the manufacturer has
determined that this product meets the ENERGY STAR guidelines
for energy efficiency.
This product complies with the requirements of the Council Direc-
tives 89/336/EEC (EMC) and 73/23/EEC (LVD) as amended where
applicable on the approximation of the laws of the member states
relating to electromagnetic compatibility and low voltage.

Perface > 3
Contents
Preface .............................................................................................2
Contents...........................................................................................3
Notes, cautions and warnings .......................................................5
Introduction .....................................................................................6
About this guide...........................................................................6
On-line usage ........................................................................7
Printing pages........................................................................8
Getting started.................................................................................9
Retaining packing materials ........................................................9
Identifying component parts ........................................................9
Front view...............................................................................9
Rear view.............................................................................11
Locating your printer..................................................................12
Powering on your printer............................................................13
Producing a test print.................................................................14
Connecting to a computer............................................................15
Interconnecting printer and computer........................................15
Interfaces .............................................................................15
Interconnection ....................................................................16
Installing the printer driver .........................................................16
Printing a test page....................................................................16
Printing from a computer .............................................................17
Paper handling ..............................................................................18
Loading cut sheet paper............................................................18
Ejecting cut sheet paper............................................................20
Loading continuous forms .........................................................20
Setting up continuous forms ................................................20
Feeding continuous forms....................................................21
Tearing off continuous forms .....................................................24
Aligning the tear-off perforations..........................................24
Removing continuous forms ......................................................25
Setting the Paper Thickness lever .............................................26

Perface > 4
Operating instructions..................................................................28
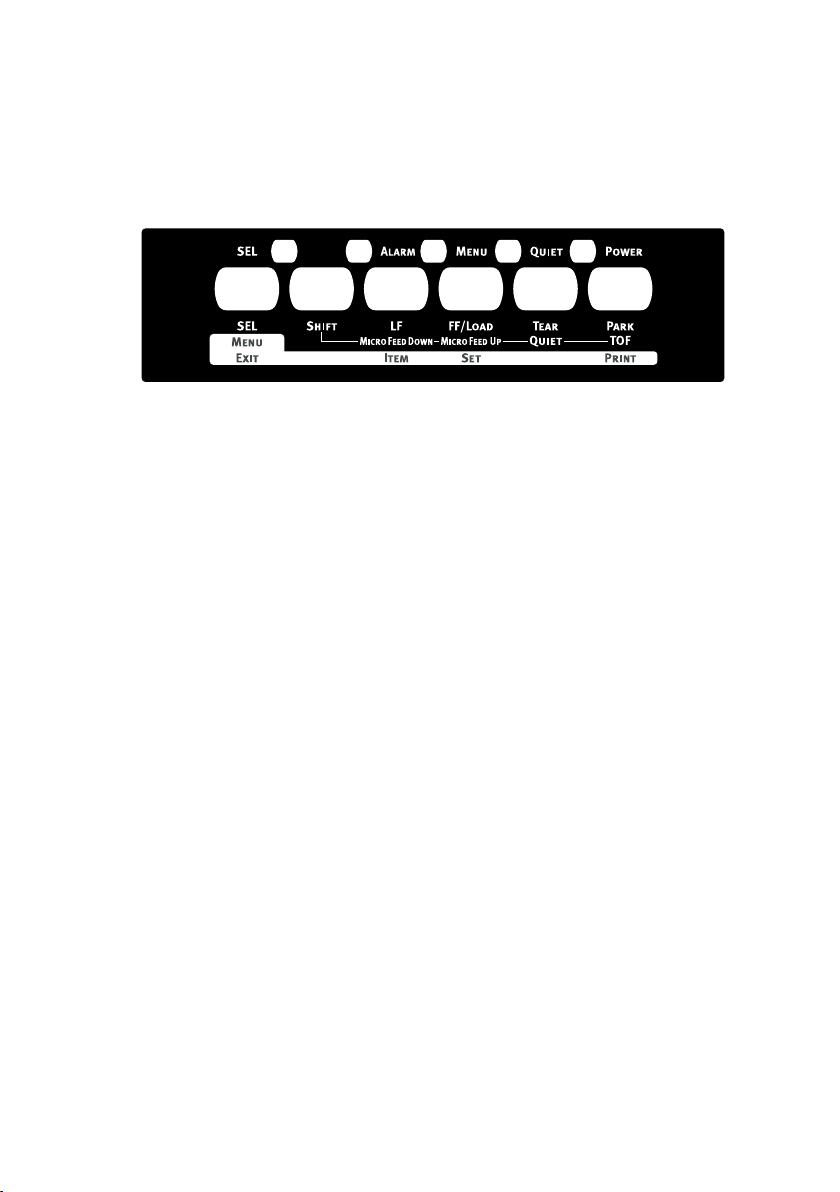
Control panel .............................................................................28
Indicators...................................................................................29
Button switches .........................................................................30
Setting menu values ..................................................................32
Confirming current settings..................................................32
Menu setting ........................................................................33
Menu items and settings......................................................33
Initialising menu settings......................................................40
Adjusting TOF position ..............................................................41
Quick printer settings.................................................................42
Printer impact mode.............................................................42
Normal speed printing..........................................................42
Quiet printing .......................................................................42
Emphasis printing ................................................................42
Troubleshooting ............................................................................44
Clearing paper jams ..................................................................44
Cut sheet paper jammed in printer ......................................44
Continuous forms jammed in printer....................................46
Responding to alarm conditions ................................................47
Responding to general problems...............................................48
Cleaning your printer....................................................................54
Printer exterior...........................................................................54
Printer interior............................................................................54
Consumables and accessories....................................................56
Consumables.............................................................................56
Changing a ribbon cartridge ................................................56
Accessories ...............................................................................61
Specifications................................................................................62
Appendix-A Unpacking...............................................................65
Appendix-B Remove the shipping retainer (stopper)..............66
Appendix-C Installing the table .................................................68
Index...............................................................................................69
Oki Printing Solutions contact details ........................................70

Notes, cautions and warnings > 5
Notes, cautions and warnings
NOTE
A note provides additional information to supplement the main text.
CAUTION!
A caution provides additional information which, if ignored, may
result in equipment malfunction or damage.
WARNING!
A warning provides additional information which, if ignored, may
result in a risk of personal injury.
WARNING!
Operations of this equipment are not warranted when the
equipment is connected to UPS (Uninterruptible Power Supply)
and/or inverter.
Doing so may result in damage of this equipment.
Do not use UPS and/or inverter.

Introduction > 6
Introduction
Congratulations on purchasing this Oki Printing Solutions printer!
The ML6300FB is designed to provide highly reliable letter quality printing
and high resolution graphics for the desktop/office printing environment.
It combines state-of-the-art, 24-pin, serial impact dot matrix printing
technology with advanced materials and superior construction to provide
high performance and versatility in a desktop sized unit. Careful attention
to ergonomics and application needs provides user friendly operation for
operators of varying technical capabilities.
About this guide
NOTE
Images used in this manual may include optional features that your
printer does not have installed.
This manual is your user's guide (check the web site, www.okiprintingso-
lutions.com, for the most up-to-date version) for your printer and forms
part of the overall user support listed below:
>Installation Safety booklet: provides information as to safe use
of the printer.
This is a paper document that is packaged with the printer and
should be read before setting up your printer.
>Set-up guide: to describe how to unpack, connect and turn on
your printer.
This is a paper document that is packaged with the printer.
>This User's Guide: to help you to become familiar with your
printer and make the best use of its many features. Also included
are guidelines for troubleshooting and maintenance to ensure that
it performs at its best. Additionally, information is provided for add-
ing optional accessories as your printing needs evolve.
This is an electronic document stored on the manuals CD.
>Technical Reference Guide: to provide detailed technical infor-
mation for programmers and more technical users.

Introduction > 7
This is an electronic document available on the web site www.
okiprintingsolutions.com.
>Network Configuration Guide: to provide detailed technical
information for network administrators to configure the optional ac-
cessory network interface.
This is an electronic document stored on the CD that accompa-
nies the network interface card optional accessory.
>Installation Guides: accompany consumable items and optional
accessories to describe how to install them.
These are paper documents that are packaged with the consum-
ables and optional accessories.
>On-line Help: on-line information accessible from the printer driver
and utility software.
On-line usage
This guide is intended to be read on screen using an Adobe Acrobat
Reader. Use the navigation and viewing tools provided in Acrobat.
You can access specific information in two ways:
>In the list of bookmarks down the left hand side of your screen,
click on the topic of interest to jump to the required topic. (If the
bookmarks are not available, use the "Contents" on page 3.)
>In the list of bookmarks, click on Index to jump to the Index. (If the
bookmarks are not available, use the "Contents" on page 3.) Find
the term of interest in the alphabetically arranged index and click
on the associated page number to jump to the page containing the
term.

Introduction > 8
Printing pages
The whole manual, individual pages, or sections may be printed. The
procedure is:
1. From the toolbar, select [File], then [Print] (or press the Ctrl + P
keys).
2. Choose which pages you wish to print:
(a) [All pages], (1), for the entire manual.
(b) [Current page], (2), for the page at which you are looking.
(c) [Pages from] and [to], (3), for the range of pages you
specify by entering their page numbers.
3. Click on [OK].
1
2
3

Getting started > 9
Getting started
WARNING!
If you have not already done so, familiarise yourself with the
content of the Installation Safety booklet supplied with your printer.
Retaining packing materials
After setting up your printer according to the instructions in the Set-up
Guide, retain your packing materials and container in case you ever need
to ship or transport your printer.
Identifying component parts
The main parts of your printer are identified and briefly explained below.
Front view
1. Print Head: prints the characters on the paper.
1
2
3
4
5
6
7
8
9
10

Getting started > 10
2. Top Cover: open and close for access, for example when changing
a ribbon cartridge. Keep closed for noise reduction.
3. Control Panel: contains button switches and indicators (described
in detail later) that allow you to operate the printer.
4. Power Switch: to turn the printer power ON/OFF.
5. Platen Knob: turn to move or eject the paper.
6. Paper Tray: to hold cut sheet paper for use by the printer (one
sheet at a time).
7. Paper Guide: can be adjusted as required to locate the left edge
of cut sheet paper.
8. Paper Type Lever: set according to the type of paper used - cut
sheet or continuous forms.
9. Paper Thickness Lever: set according to the thickness of the pa-
per. There is also a setting to facilitate ribbon replacement.
10. Ribbon Cartridge: holds the printer ribbon.

Getting started > 11
Rear view
1. Optional connector position: connect to optional accessory serial
interface card or 100BASE-TX/10BASE-T network card.
2. USB connector: connect to USB interface cable.
3. Parallel connector: connect to parallel interface connector.
4. Pin Tractor: to load and feed continuous forms.
5. Power connector: connect to printer power cable.
12
3
4
5

Getting started > 12
Locating your printer
>Select a firm, solid surface on which to site your printer.
>Allow enough space around your printer (e.g. at least 60 cm from
any wall) for easy access to the Platen Knob and the various pa-
per feed paths.
>=60 cm
75 cm
>Make sure a grounded power outlet is available nearby.

Getting started > 13
Powering on your printer
1. Ensure that your printer Power Switch is set to OFF.
2. Connect the power cable connector (1) to the power connector (2)
on the printer.
3. Connect the power cable to a 220/240 V AC power outlet and
switch on the outlet power.
4. Turn the printer Power Switch to ON.
5. Check that the POWER indicator on the control panel illuminates.
1
2

Getting started > 14
Producing atest print
To check that your printer is operational, produce a test print on a sheet
of 80 gsm A4 paper (for example) as follows:
CAUTION!
Allow at least 5 seconds between turning the printer ON after
turning it OFF. A shorter time interval between turning ON/OFF
operations may cause printer power failure.
Do not turn the printer OFF while it is printing as this may result
in damage to the print head.
1. Turn the printer Power Switch to OFF.
2. Set the Paper Type Lever to cut sheet and set the Paper Thick-
ness Lever to position 1.
3. Press and hold the LF button and turn the Power Switch to ON.
4. With the long side of the paper against the paper guide, insert the
paper carefully into the printer. The printer will automatically grip
the paper and start the test print.
NOTE
If required, you can pause the test print by pressing the SEL button
and then resume the test print by again pressing the SEL button.
5. When the test print has completed, the paper is automatically
ejected.
NOTE
If you want to abort the test print for any reason, press the SEL but-
ton followed by the PARK button to eject the paper and then turn the
printer Power Switch to OFF.

Connecting to a computer > 15
Connecting to acomputer
In this section you will interconnect your printer and computer, install the
printer driver in your computer and print a test page.
Interconnecting printer and computer
Interfaces
Your printer is equipped with two data interfaces:
CAUTION!
Do not use both parallel and USB printing together.
>Parallel: for direct connection to a PC. This port requires a bi-
directional (IEEE 1284 compliant) parallel cable.
>USB: for connection to a PC running Windows 98 or above. This
port requires a shielded cable less than 5m long conforming to
USB version 2.0.
NOTE
Interface cables are not supplied with your printer.
The following interfaces are available as optional accessories and are
described in their accompanying installation documentation:
>RS232 Serial interface
>100BASE-TX/10BASE-T network connection
NOTE
Refer to the Network Configuration Guide for setting up the network
connection.
It is not recommended that you use either the parallel or USB port
when the RS-232C or OkiLAN 7120e option is installed in this product.

Connecting to a computer > 16
Interconnection
1. Ensure that both printer and computer are turned OFF.
2. Connect the required interface cable, USB (1) or parallel (2), to
the printer and then to the computer (3).
3. Turn ON the printer and then turn ON the computer.
Installing the printer driver
Insert the Drivers CD into your computer and follow the on-screen in-
structions to install the printer driver for use with your printer.
Printing atest page
As an example, using Windows XP:
1. Use Start > Printers and Faxes to show the Printers and Faxes
window.
2. Highlight the driver for your printer.
3. Use File > Properties to show the Properties window.
4. On the General tab, click the Print Test Page button.
5. Ensure that a test page has printed, verifying your printer - com-
puter setup.
2
2
1
1
3
3

Printing from a computer > 17
Printing from acomputer
When printing to your printer from, for example, a Windows application
on your computer, make your printing selections from the driver windows
that appear on screen. These driver windows have been designed to be
easy to use and intuitive while supplementary on-line help is available by
clicking each window Help button.

Paper handling > 18
Paper handling
This section describes how to use cut sheet paper and continuous forms
in your printer.
Loading cut sheet paper
1. Ensure that the printer is turned ON.
NOTE
If there are any continuous forms in the printer, eject them as
described in "Removing continuous forms" on page 25.
2. Ensure that the Pin Tractor covers (1) are closed to avoid the pos-
sibility of paper jams.
3. Ensure the Paper Type Lever (1) is set to Cut Sheet .
1
1

Paper handling > 19
4. Set the left margin of the paper by adjusting the Paper Guide (1)
along the scale (2) relative to the start of printed line marker arrow
(3).
5. Adjust the Paper Thickness Lever (4) to suit the paper. See "Set-
ting the Paper Thickness lever" on page 26.
NOTE
If the Paper Thickness Lever setting does not match the paper being
used, paper feeding and printing may not work properly.
6. With the printing side upwards and the left edge aligned with the
Paper Guide (1), carefully insert the paper on the Paper Tray (2)
into the printer until it is gripped.
1
2
3
4
1
2

Paper handling > 20
NOTE
Ensure that the paper is accurately aligned along the Paper Guide to
avoid the possibility of skew printing.
When printing an envelope, do not fold up the flap. A flap aligned along
the Paper Guide can lead to skew printing.
Ejecting cut sheet paper
When the printer reaches the end of the cut sheet page it automatically
ejects the page. If required, add another sheet for the printer to continue
printing from where it left off.
To eject a cut sheet left in the printer, carry out the following:
1. Press the SEL button to put the printer off-line.
2. Press the PARK button and the paper is ejected to the Paper Tray.
NOTE
Paper longer than A4 length (297 mm) may overlap and possibly fall
off the Paper Tray.
Loading continuous forms
Setting up continuous forms
To avoid paper feeding problems, carry out the following:
1. Check your printer is on a surface approximately 75 cm above the
floor.
>=60 cm
75 cm
<=3 cm
Table of contents
Other Oki Printer manuals