Oki B 4350N Use and care manual


Every effort has been made to ensure that the information in this
document is complete, accurate, and up-to-date. The manufacturer
assumes no responsibility for the results of errors beyond its control.
The manufacturer also cannot guarantee that changes in software
and equipment made by other manufacturers and referred to in this
manual will not affect the applicability of the information in it. Mention
of software products manufactured by other companies does not
necessarily constitute endorsement by the manufacturer.
The most up-to-date information is available from the Oki Data web
site http://my.okidata.com.
Copyright © 2004. All rights reserved.
Oki is a registered trademark of Oki Electric Industry Company Ltd.
ENERGY STAR is a registered trademark of the United States Environmental Protection
Agency.
Microsoft and Windows are registered trademarks of Microsoft Corporation.
Apple, Macintosh and Mac OS are registered trademarks of Apple Computers Inc.
Other product names and brand names are registered trademarks or trademarks
of their proprietors.
Note
The screen shots in this manual are generic. When you see
XXX1, XXX2, etc., in a screen, they represent a specific model
number which will vary depending on which models are being
used in your system.
For example:
Fig01_oem_v11.tif
59363201 Rev. 1.2

Contents
- 3 -
Introduction. . . . . . . . . . . . . . . . . . . . . . . . . . . . . . . . . . . . . . . . . . . . . . . .4
Overview . . . . . . . . . . . . . . . . . . . . . . . . . . . . . . . . . . . . . . . . . . . . . . . . . .6
Operating System Requirements . . . . . . . . . . . . . . . . . . . . . . . . . . . . . .7
Server (Windows Only). . . . . . . . . . . . . . . . . . . . . . . . . . . . . . . . . . . . . .7
Client Computers (Windows or Macintosh) . . . . . . . . . . . . . . . . . . . . . .7
Installation . . . . . . . . . . . . . . . . . . . . . . . . . . . . . . . . . . . . . . . . . . . . . . . .8
Installing the Print Job Accounting Server Software . . . . . . . . . . . . . . .8
Installing the Print Job Accounting Client Software . . . . . . . . . . . . . .8
Server Software Capabilities. . . . . . . . . . . . . . . . . . . . . . . . . . . . . . . . 12
User Name Versus Account ID . . . . . . . . . . . . . . . . . . . . . . . . . . . . . . .13
User Name . . . . . . . . . . . . . . . . . . . . . . . . . . . . . . . . . . . . . . . . . . . . . . .13
Account ID . . . . . . . . . . . . . . . . . . . . . . . . . . . . . . . . . . . . . . . . . . . . . .13
Server Software . . . . . . . . . . . . . . . . . . . . . . . . . . . . . . . . . . . . . . . . . . .15
Starting the Server Software . . . . . . . . . . . . . . . . . . . . . . . . . . . . . . . . .15
Server Software Pull-Down Menus . . . . . . . . . . . . . . . . . . . . . . . . . . .16
Setting Up Automatic Email . . . . . . . . . . . . . . . . . . . . . . . . . . . . . . . . .19
Defining Printer Groups . . . . . . . . . . . . . . . . . . . . . . . . . . . . . . . . . . . .20
Registering Printers . . . . . . . . . . . . . . . . . . . . . . . . . . . . . . . . . . . . . . . .22
Changing Settings for a Registered Printer . . . . . . . . . . . . . . . . . . . . . .36
Setting Up Account IDs. . . . . . . . . . . . . . . . . . . . . . . . . . . . . . . . . . . . .37
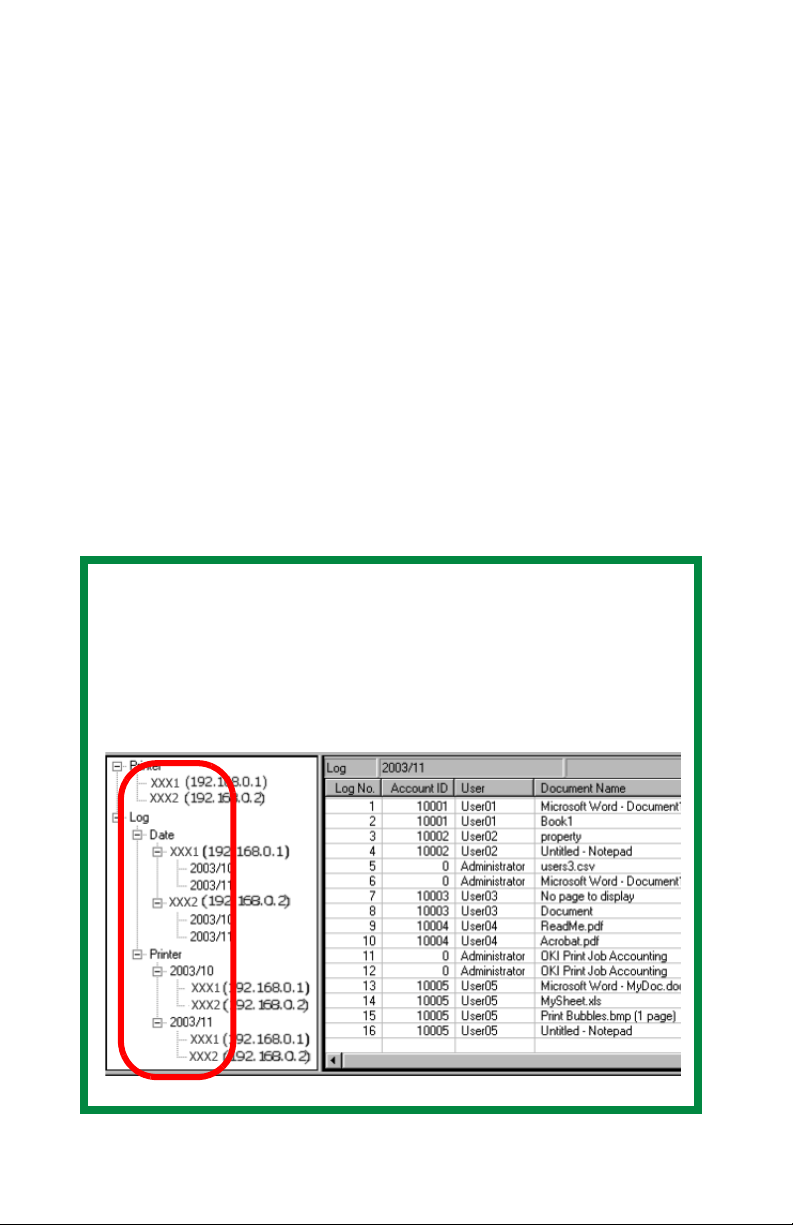
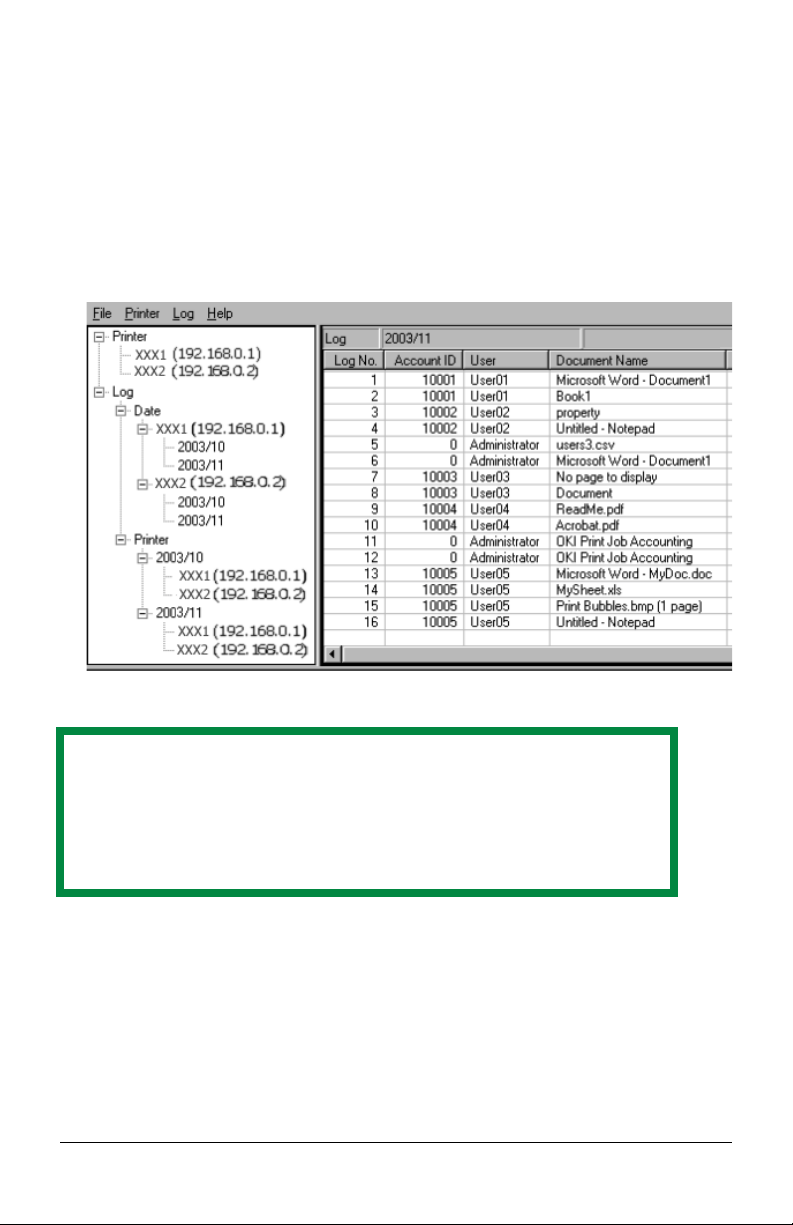
Print Logs . . . . . . . . . . . . . . . . . . . . . . . . . . . . . . . . . . . . . . . . . . . . . . .50
Client Software . . . . . . . . . . . . . . . . . . . . . . . . . . . . . . . . . . . . . . . . . . . 61
Starting the Client Software . . . . . . . . . . . . . . . . . . . . . . . . . . . . . . . . .61
Setting the User Name and Account ID . . . . . . . . . . . . . . . . . . . . . . . .61
Checking the Status of Printers . . . . . . . . . . . . . . . . . . . . . . . . . . . . . 63
Troubleshooting . . . . . . . . . . . . . . . . . . . . . . . . . . . . . . . . . . . . . . . . . . 69
Known Problems / Solutions. . . . . . . . . . . . . . . . . . . . . . . . . . . . . . . . 70
Uninstalling Print Job Accounting . . . . . . . . . . . . . . . . . . . . . . . . . . . 71

Introduction - 4 -
Print Job Accounting Utility
Introduction
The Print Job Accounting software, designed specifically for OKI printers
in a network environment, provides job accounting features that allow you
to track printer usage, calculate printing costs, and specify access
available to each client (user).
Note
The screen shots in this User's Guide are generic. When you see
XXX1, XXX2, etc., in a screen, they represent a specific model
number which will vary depending on which models are being
used in your system.
Fig01_oem_v11.tif

- 5 - Introduction
With Print Job Accounting, you can
•Control costs by limiting access to color printing for specific clients.
•Plan equipment allocation by monitoring exactly how much each client
prints.
•Set up billing for individual clients based on their recorded usage.
Note
This software saves acquired log data on the printer’s Hard Disk
Drive (optional on some models). If the printerdoes not have the
Hard Disk Drive, the acquired logs are saved to the Flash
memory.
The Flash memory is relatively limited as to how much
information can be stored on it.
The Hard Disk Drive has much greater memory capacity.
Therefore, we highly recommend that your printer be equipped
with a Hard Disk Drive for use with the Print Job Accounting
software.

Overview - 6 -
Overview
Sample Network Diagram
The Print Job Accounting utility requires
Server computer using an appropriate Windows operating system.
Client computers using Windows and/or Macintosh operating
systems.
Connection to the printer(s) to be managed; either a direct
connection (USB or Parallel) to the server, or a network TCP/IP
connection.
Note
Print Job Accounting does not operate in NetBEUI or NetWare
environments.
Server:
Windows XP,
2000, or NT 4.0
(SP6 or later)
Client PCs:
Windows XP,
2000, Me, 98,
95, NT 4.0
(SP6 or later)
Client Macs:
Macintosh
OS 8.x or 9.x
Printer(s)
JA_Overview.jpg

- 7 - Operating System Requirements
Operating System Requirements
Server (Windows Only)
The Print Job Accounting server software can be run under any of the
following Windows operating systems, with the latest Service Pack
installed.
•Windows XP
•Windows 2000
•Windows NT 4.0 (Service Pack 6 or later)
Client Computers (Windows or Macintosh)
The Print Job Accounting Client software can run under any of the
following operating systems:
Windows
•XP
•2000
•Me
•98
•95
•NT4.0 (Service Pack 6 or later)
Macintosh (LaserWriter 8.7 required)
•OS 9.1+
•OS 10.2
•OS 10.3

Installation - 8 -
Installation
Installing the Print Job Accounting Server
Software
1. Place the driver CD supplied with your printer in the CD-ROM drive on
the Server computer and wait for the Menu Installer to open.
If the CD does not AutoPlay, click Start →Run →Browse. Browse
to your CD-ROM drive and double-click Install.exe, then click OK.
2. Click Next to accept the terms in the license agreement.
3. Select the language.
4. Click Network Software →Administration Tools →Job
Accounting →Server and follow the on-screen instructions.
5. If you want to create log reports using Excel, install the report tools.
Click Report Tools and follow the on-screen instructions.
Installing the Print Job Accounting Client
Software
Windows Client Computers
1. Place the driver CD supplied with your printer in the CD-ROM drive
and wait for the Menu Installer to open.
If the CD does not AutoPlay, click Start →Run →Browse.
Browse to your CD-ROM drive and double-click Install.exe, then
click OK.
2. Click Next to accept the terms in the license agreement.
3. Select the language.
Note
The printer driver(s) must also be installed on the Client
computers.
Cdhand.jpg

- 9 - Installation
4. Click Network Software →Administration Tools →Job
Accounting →Client and follow the on-screen instructions.
5. When the installation finishes, the following window appears. See
“Client Software” on page 61 for more information.
Macintosh Client Computers
Mac OS 9.1+
Normally, the Oki Job Accounting software is automatically installed
when you install the OS 9.1+ printer driver.
To activate the Job Accounting Client software once it is installed:
1. Select Print Desktop... on the File menu.
2. Ensure that your printer model is selected, then click General and
select Plug-in Preferences.
3. Open the Print Time Filters menu, then check Print Time Filters,
JobType and JobAccounting.
4. Click Save Settings, then click OK.
5. Click Cancel.
Note
Job Accounting cannot be used on Macintosh OS 10.1x
systems.
JA_PrintJobAccountingClient.bmp

Installation - 10 -
Mac OS 10.2
To install the Job Accounting Client software, see your printer’s
software installation guide.
To activate the Job Acccounting Client software once it is installed:
1. Before starting, have the Job Accounting ID assigned for you by
your System Administrator handy.
2. Click Go →Applications.
3. Double click the OKIDATA folder.
4. Double click the Print Job Accounting icon.
5. Click New, then enter your LoginName, UserName and
JobAccountingID (as established by the System Administrator)
and click Save..
6. Click Save.
Mac OS 10.3
To install the Job Accounting Client software, see your printer’s
software installation guide.
To activate the Job Acccounting Client software once it is installed:
1. Before starting, have the Job Accounting ID assigned for you by
your System Administrator handy.
MacOS10.2A
ND3_JA_ID.
pdf
MacOS10.2AND3
_JA_Setup.pdf

- 11 - Installation
2. Click Go →Applications →OKIDATA →Print Job
Accounting.
3. Double click the Print Job Accounting icon.
4. Click New, then enter your LoginName, UserName and
JobAccountingID (as established by the System Administrator)
and click Save..
5. Click Save.
MacOS10.
3_JA_Clie
ntInstall.pd
f
MacOS10.2A
ND3_JA_ID.
pdf
MacOS10.2AND3
_JA_Setup.pdf

Installation - 12 -
Server Software Capabilities
Use the Print Job Accounting server software
•to register printers and clients
•to set print limits
•to set up automatic generation of print logs.
•to set up automatic email of log reports to the Administrator
For Each Client, You Can
•Enable/disable print or color print.
•Set upper limits for items such as printed pages.
•Log selected items, including:
–Date
– User Name
– Printer Name
– Document Name
– Number of Printed Pages broken down by color versus monochrome
– Paper Size
– Simplex or Duplex Printing
–etc.
•Set up an account, allowing printing only within the limits set.
For Each Printer, You Can
•Set fees by sheets, paper sizes, and so forth.
•Set (all) print enabled/disabled or color print enabled/disabled.
•Set upper limits for items such as printed pages.
•Set up an account, allowing printing only within the limits set.
•Set up Group(s) in which to include the printer
Note
The information on document names cannot be acquired
while printing from some Windows applications or from a
Macintosh.

- 13 - User Name Versus Account ID
For Print Logs, You Can
•Export print logs as comma-separated value (.csv) files, which can be
imported into many commercially available spreadsheet programs.
•Automatically email print logs to the Administrator monthly on a
selected day.
•Customize items to be included in the log, setting them either manually
(see page 50) or using one of the multiple Microsoft®Excel spread
sheet macros provided (see page 54).
•Acquire a print log for print jobs sent from a client directly to a printer,
bypassing the print server.
•Accurately record printed pages through print logs even when a client
has cancelled his/her print jobs or paper jams have occurred.
User Name Versus Account ID
User Name
The User Name is displayed whenever print logs are displayed, and its
sole purpose is to make it easy to see who has been printing.
The User Name is assigned when creating an Account ID (see page 37).
It may be set up to represent an individual client or a group of clients, and
is associated with the Account ID number.
TheUser Namedoes notnecessarilyneedtobethe sameasthe Windows
Login User Name.
Account ID
The Account ID is the number Print Job Accounting actually uses to
identify clients. Account ID values of 1 through 1879048191 can be
assigned. Clients who do not have their own Account ID will be recognized
as Unregistered ID(0).
Normally an Account ID is assigned to each individual client. If the same
AccountID isassignedtodifferent clients,allthe print jobsthey havemade
will be added up as the same client when the System totals up.
Account IDs must be set for each individual registered printer connected
to the Server. The same Account ID can be set up for more than one
printer, with different limits set for each printer. Therefore, you can set
particular clients to have access only to certain printers.

User Name Versus Account ID - 14 -
Examples of Account ID Scenarios:
To Permit Only Some Clients to Print:
In this case, you need notnecessarily assign an Account ID to each and
every client. You assign one only to those clients who are permitted to
print. All other clients will be recognized as Unregistered ID(0) and all
you have to do is to inhibit printing by Unregistered ID clients.
To Permit Only Some Clients to Print in Color:
You can prevent any Unregistered ID clients from printing in color, in the
same way as above.
To Set Print Limits and Collect Print Logs by Department:
In this case, you need notnecessarily assign an Account ID to each and
every client. All you have to do is to assign an Account ID to each
department and specify the Group Name in place of User Name.
To Set Print Limits and Collect Print Logs for Each Client:
Here, you need to assign an Account ID to each individual client. Be
sure that you do not to assign the same Account ID to more than one.
client.
Note
All Account IDs must be set in the Server computer for each of
the Client computers that will be allowed to print to a specific
printer.

- 15 - Server Software
Server Software
Starting the Server Software
Click Start →Programs →Okidata →Print Job
Accounting →Print Job Accounting.
The following window appears:
Important!
Thefirst timeyou openthe Serversoftware,thefollowingwindow
appears. Make a note of the Server ID for future use. You can
also find it by clicking Help →Server ID … from the main Job
Accounting Window.
JA_ServerID.bmp
JA_OpeningScreen.bmp

Server Software - 16 -
Server Software Pull-Down Menus
File Menu
Printer Menu
Entry Function
Exit Close the application.
Entry Function
Add a Printer Register a new printer.
Manages multiple
printers as a group
…
Set up multiple registered printers as a group.
Delete a Printer/
Printer Groupa
a. Before running, select the subject printer from the “Printer Tree” on the
left side of the window.
Delete a registered printer or group of printers.
Change a Printer
Group Add or delete registered printers from a group.
Start/End LogaStart/end the process of acquiring information for
logs from the printer at the set interval time.
Acquire a LogaAcquire a print log saved in the printer.b
b. SelectLog Menu →Refresh Display to updatethe informationonthe
log pane after having run this menu.
Setting the TimeaSet the present time in the printer.c
c. If the printer has been switched on and off, the correcttime will not set in
the printer until the next time printer logs are acquired. You need only do
this if the printer has been switched on and off in between acquisition of
logs.
Define Fees … Set up and select fees.
Properties … Set the printer properties.
JA_ServerMenus.bmp

- 17 - Server Software
Log Menu
Entry Function
Display Logsa
a. Beforerunning,selectthe subject itemfromthe “Log Tree”on theleftside
of the window. If you select “Log,” all items will be subject to displaying/
exporting. If you select one printer, only that printer will be subject to
displaying.
Change the display from Total to Logs.
Display TotalaChange the display to
• Total per Printer
• Account ID or
•Month
Export Report
LogsaExport the required fields for the report macro in a
.csv file.
Export LogsaExport the log as a .csv file.
Export TotalaExport totals as a .csv file, by
•Printer
• Account ID, or
•Month
Delete the logaDelete the selected log
Display Details Switches back and forth between displaying only
the default items in the log and displaying the
entire detailed list of items in the log.b
b. Select Log Menu →Refresh Display to update the information on the
log pane after having run this menu.
Display/Export
Item Settings Select the items to be shown or exported as part of
Log or Total display (see page 50 for more
information).b
Refresh Display Refresh the display.

Server Software - 18 -
Option Menu
Help Menu
Entry Function
Setup … Set up:
•mailserver
• email address for Sender
• email address for Administrator
• where you wish to store logs
• closing date for logs (select the day of the month
which determines when logs are considered
previous month logs as opposed to current
month logs).
Entry Function
Server ID … Display Server ID.
Help … Display the Help Topics window with tabs
• Contents
• Index
•Find
Version Info … Display version information.

- 19 - Server Software
Setting Up Automatic Email
To set up monthly automatic email of selected print log data to the
administrator, open the Job Accounting software, then:
1. Click Option →Setup.
The following window appears:
2. Set up the general information on the Mail Setup tab, including the
mail server, when an email is to be sent, and the header and footer text
to be included with the email.
3. On the Mail Address tab, enter a name and email address for the
sender, and the name and email address for the administrator to
receive the emails.
JA_Email_Setup.bmp

Server Software - 20 -
4. On the Log Storing Folder tab, enter the path where the automatically
exported logs are to be stored.
5. On the Change the closing date tab, enter the day of the month on
which logs are to be closed. Log reports will automatically be emailed
to the administrator on the day after this.
6. Click OK.
Defining Printer Groups
If you wish to create groups of printers:
1. From the main Job Accounting window, click Printer →Manages
multiple printers as a group …
The following window appears:
JA_AddGroup1.bmp
Other manuals for B 4350N
2
Table of contents
Other Oki Printer manuals