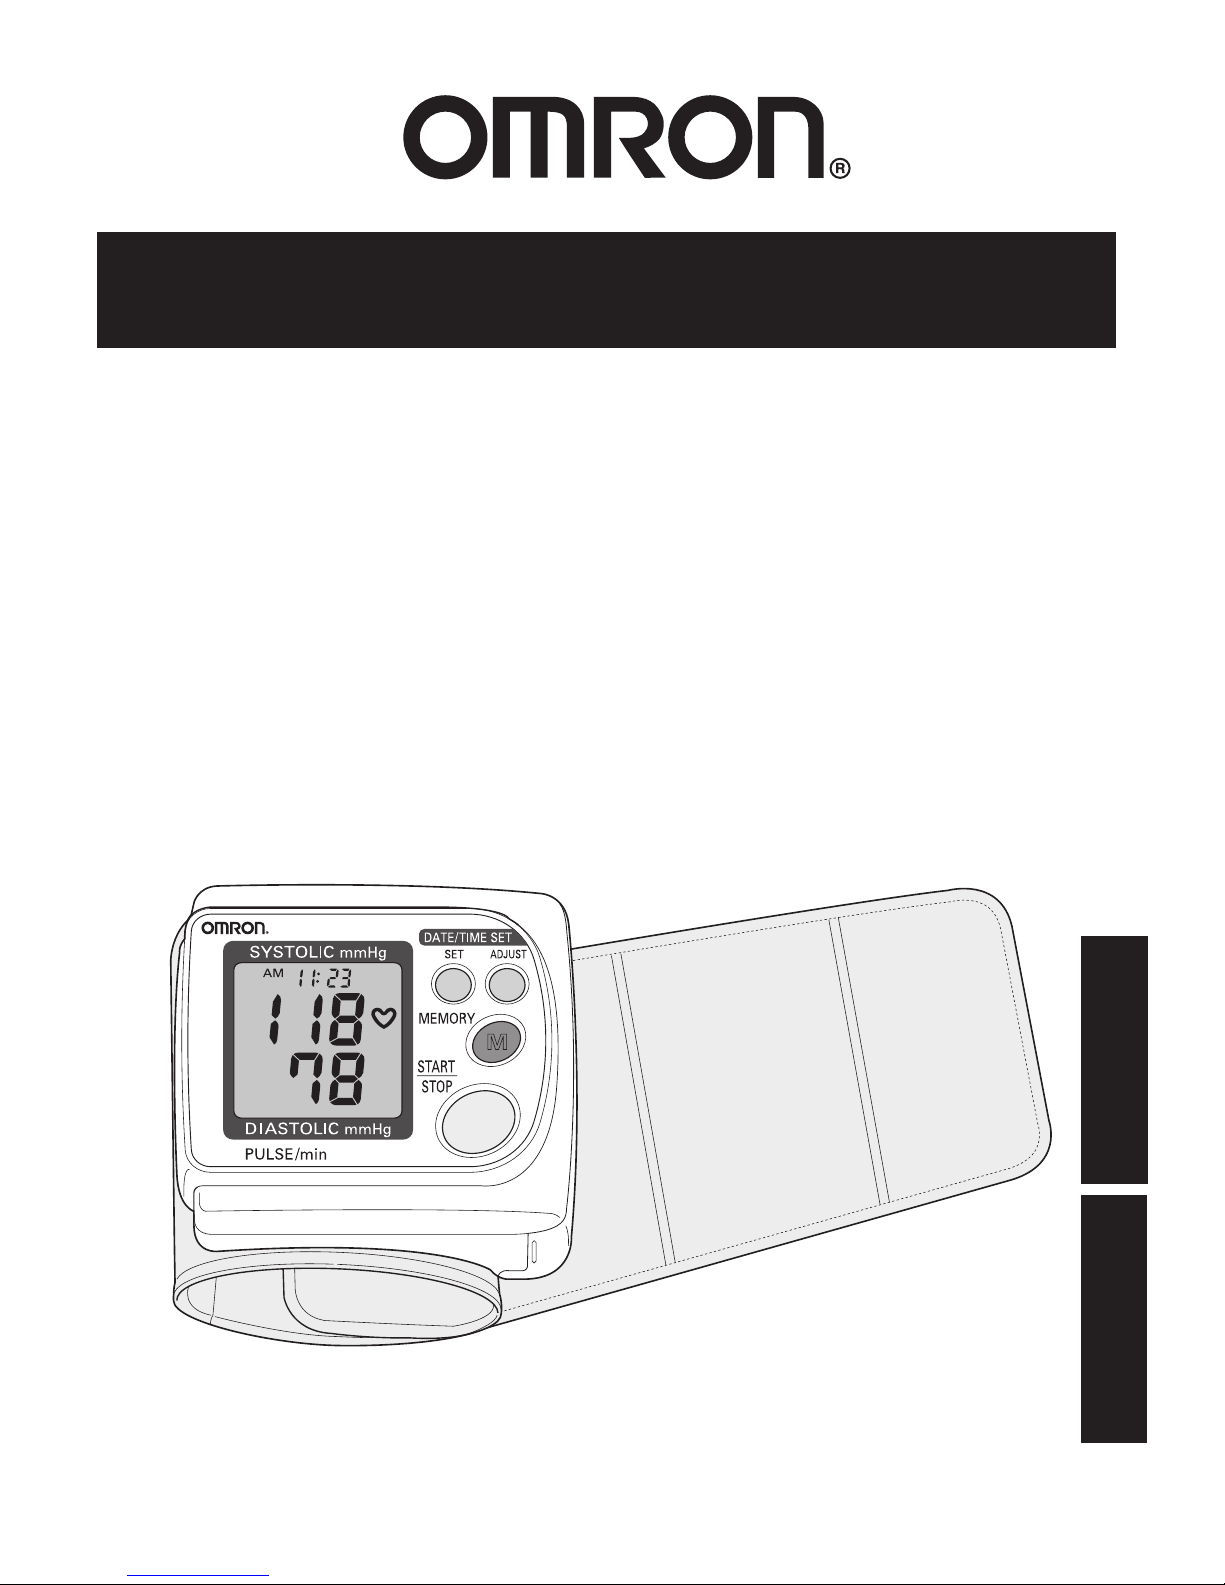
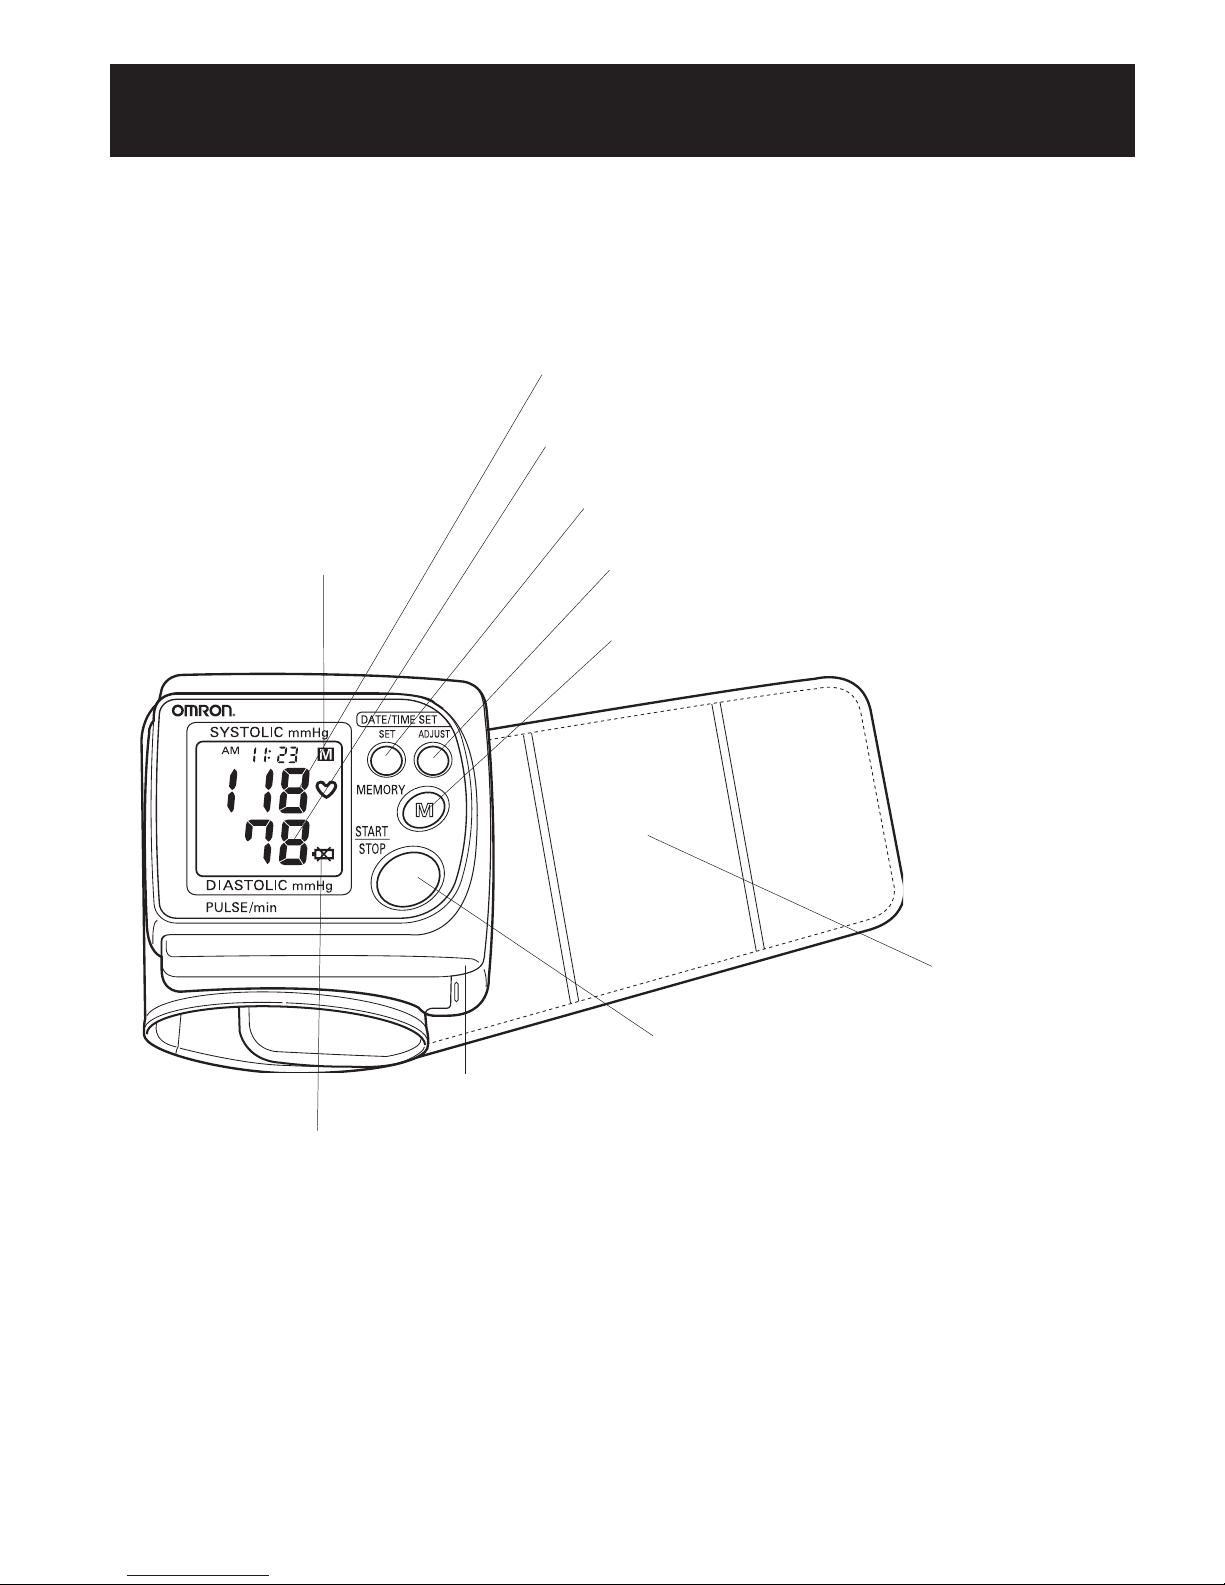
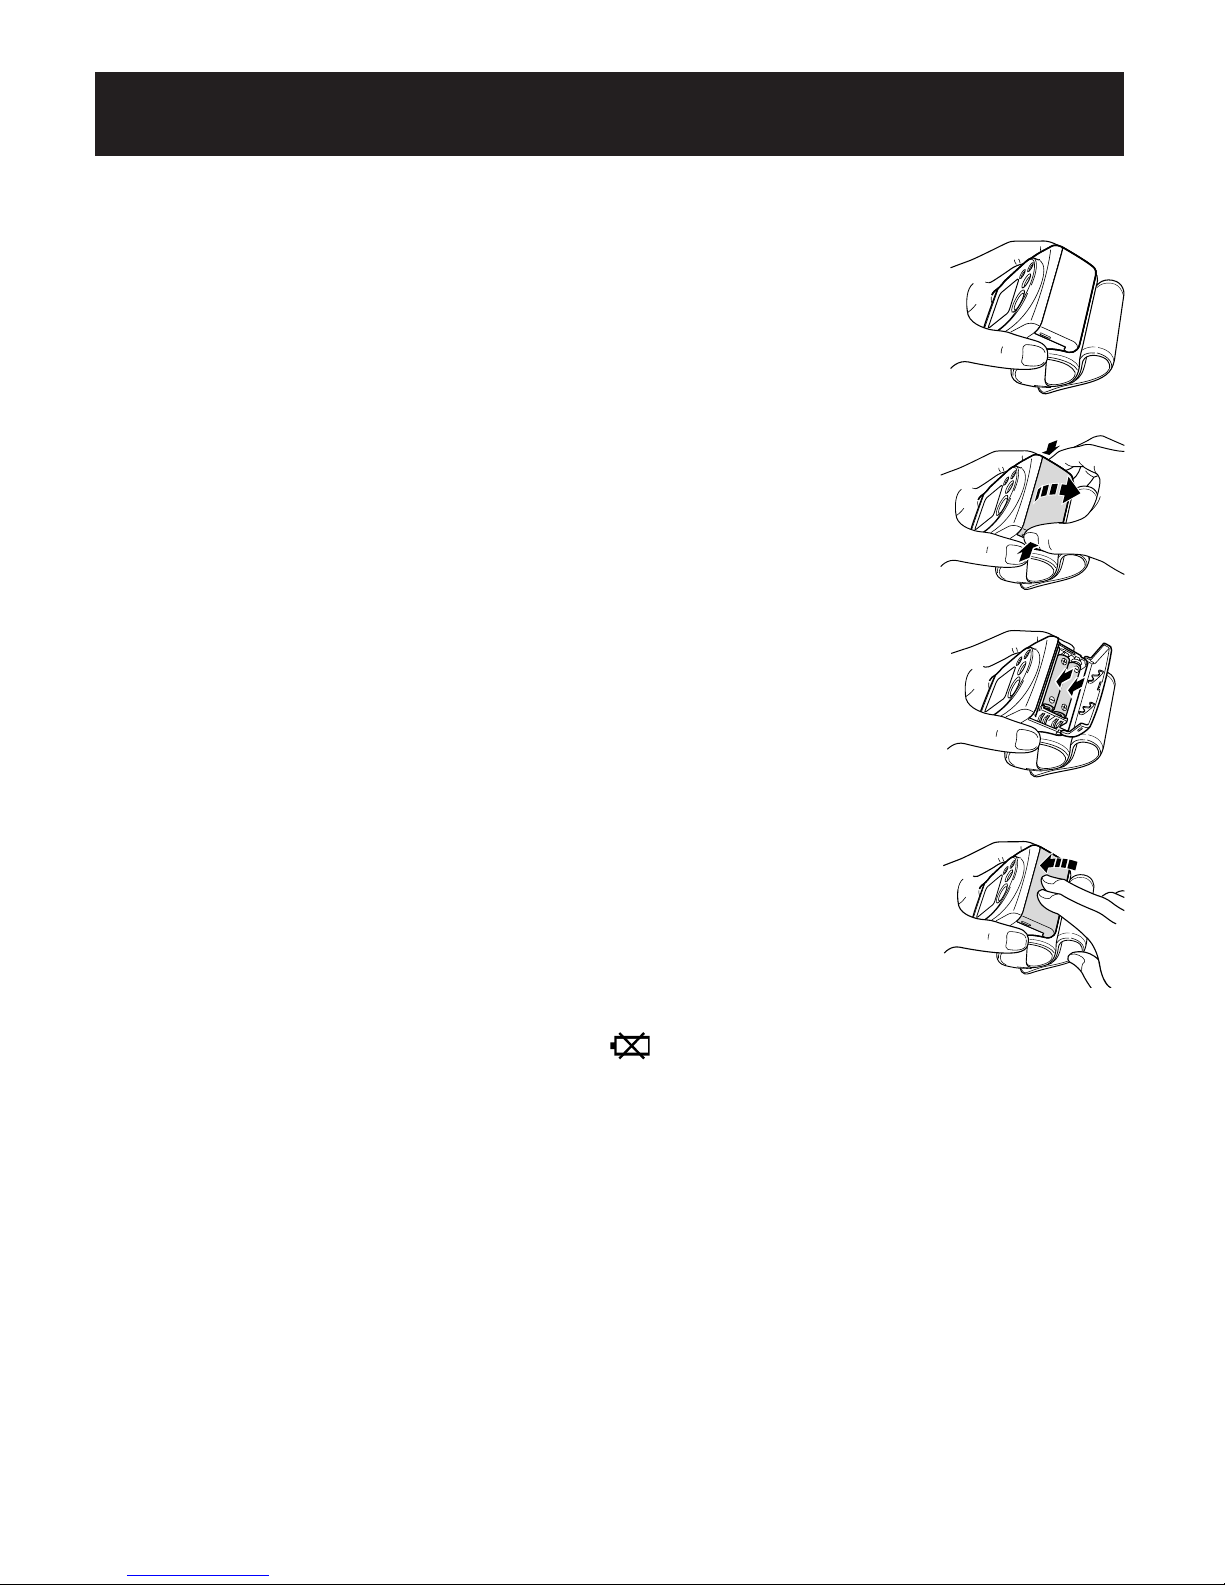
Omron HEM-629 User manual

INSTRUCTION MANUAL
PORTABLE WRIST
BLOOD PRESSURE
MONITOR
Model HEM-629
ENGLISH ESPAÑOL

2
TABLE OF CONTENTS
Introduction ……………………………………………………………3
Important Safety Notes ………………………………………………4
Know Your Unit ………………………………………………………5
Battery Installation/Replacement ……………………………………6
Suggestions Before Measuring Blood Pressure ………………………7
How to Set Date and Time ……………………………………… 8-10
How To Apply The Wrist Cuff ………………………………………11
How To Take A Measurement ………………………………………12
How to Use the Memory Function …………………………………13
Error Indicators ………………………………………………………14
FCC Statement ………………………………………………………15
Care and Maintenance ………………………………………………16
Warranty Information ………………………………………………17
Specifications …………………………………………………………18
Notes ………………………………………………………………… 19

3
INTRODUCTION
Thank you for purchasing the Omron HEM-629 Portable Wrist Blood
Pressure Monitor.
Fill-in for future reference
DATE PURCHASED: ______________
SERIAL NUMBER: ________________
Staple your purchase receipt here.
The monitor is compact and easy-to-use at home, at work, and during
travel. Perfect for people who frequently monitor their own blood pressure.
The Omron HEM-629 digital blood pressure monitor uses the oscillometric
method of blood pressure measurement. This means the monitor detects your
blood’s movement through your brachial artery and converts the
movements into a digital reading. An oscillometric monitor does
not need a stethoscope so the monitor is simple to use.
Clinical research has proven a direct relationship between blood pressure
in the wrist and blood pressure in the arm. Changes in wrist blood pressure
reflect changes in arm blood pressure because the arteries in the wrist and
the arm are close to each other. Frequently measuring the blood pressure
in your wrist will provide your physician with an accurate indication
of changes in your blood pressure.
The Omron HEM-629 Portable Wrist Blood Pressure Monitor is
intended for home use.
SAVE THESE INSTRUCTIONS

4
IMPORTANT SAFETY NOTES
To assure the correct use of the product basic safety measures should
always be followed including the precautions listed below:
Consult your physician before measuring blood pressure at the wrist
if you have any of the following conditions: severe hypertension,
severe diabetes, severe arteriosclerosis, severe kidney disease,
or vascular disease that may compromise circulation.
Read all information in the instruction book and any other literature
included in the box before using the unit.
Contact your physician for specific information about your blood
pressure. Follow the instructions of your healthcare provider.
Operate the unit only as intended. Do not use for any other purpose.
The unit is intended for use in measuring blood pressure and pulse
rate in adult patient population. Do not use on infants.
Do not use a cellular phone near the unit. It may result
in operational failure.
Changes or modifications not approved by the manufacturer will
void the user warranty. Do not disassemble or attempt to repair
the unit or components.

5
KNOW YOUR UNIT
Systolic Blood Pressure
Diastolic Blood Pressure/Pulse Rate
START/STOP Button
Battery Replacement Indicator
Wrist Cuff
Date/Time ADJUST Button
MEMORY Button
Memory
Mark
Date/Time SET Button
Battery Cover

6
1. Hold the main unit with the Battery Cover facing upward.
2.Remove the Battery Cover. Hold both ends of the
Battery Cover and open the cover towards the
direction of the arrow.
3.Install two “AAA” size batteries so the (+)
positive and (-) negative polarities match the polarities
of the battery compartment.
4. Close the Battery Cover. Press the Battery Cover with
your fingertips as shown in the figure to the right.
The cover clicks when it closes.
NOTE: If the Low Battery Indicator ( ) appears on the display,
replace both batteries at the same time.
Long-life alkaline batteries are recommended.
BATTERY INSTALLATION/REPLACEMENT

7
SUGGESTIONS BEFORE
MEASURING BLOOD PRESSURE
1. Avoid eating, smoking, and exercising for 30 minutes before
taking a measurement. Rest for at least 15 minutes before
taking the measurement.
2. Stress raises blood pressure. Avoid taking measurements
during stressful times.
3. The cuff can be applied to your left or right wrist.
4. Measurements should be taken in a quiet place. You should be
in a relaxed, seated position.
5. Position the unit at heart level throughout the measurement.
6. Remain still and do not talk during the measurement.
7. Keep a record of your blood pressure and pulse readings for your
physician. A single measurement does not provide an accurate
indication of your true blood pressure. You need to take and record
several readings over a period of time. Try to measure your blood
pressure at the same time each day or consistency.
8. Wait 2-3 minutes between measurements. The wait time allows the
arteries to return to the condition prior to taking the blood pressure
measurement. You may need to increase the wait time depending on
your individual physical characteristics.

8
HOW TO SET THE DATE AND TIME
1. Press the SET button or the ADJUST button to
display the clock.
2. Press and hold the SET button for more than
1 second to display the year.
3. TO SET THE YEAR press the ADJUST button.
• Each time you press the ADJUST button the display
increments by one year.
• Press and hold the ADJUST button to advance
to the current year faster.
• The year can be set between 2001 and 2030.
When the display reaches 2030 it will return
to the year 2001.
• Press the SET button to set the current year.
The Blood Pressure Monitor automatically stores up to 21 measurement
values. The memory function stores the date and time with the
measurement values.
• Set the monitor to the current date and time before taking
a measurement for the first time.
• If the correct date and time is not set, a default date and time will
display with the measurement values.
• You cannot change the date and time during a measurement.
The year flashes on the display.
The month flashes on the display.

9
HOW TO SET THE DATE AND TIME (Continued)
4. TO SET THE MONTH press the ADJUST button.
• Each time you press the ADJUST button the
display increments by one month.
• Press and hold the ADJUST button to advance
to the current month faster.
• When the display reaches 12 it will return to 01.
• Press the SET button to set the current month.
5. TO SET THE DAY press the ADJUST button.
• Press the ADJUST button to advance
the day by one day.
• Press the ADJUST button to move the day
backward by one day.
• Once the display reaches 31,
it will return to 1.
The day flashes on the display.
The hour flashes on the display.

10
HOW TO SET THE DATE AND TIME (Continued)
6. TO SET THE HOUR press the ADJUST button.
• AM 12 indicates midnight and PM 12 indicates noon.
• Each time you press the ADJUST button the display
increments by one hour.
• Press and hold the ADJUST button to advance
to the current hour faster.
• Press the SET button to set the current hour.
7. TO SET THE MINUTE press the ADJUST button.
• Each time you press the ADJUST button the display
increments by one minute.
• Press and hold the ADJUST button to advance
to the current minute faster.
• When the display reaches 60 it will return to 00.
• Press the SET button to set the current minute.
8. Press the START/STOP button to turn the power off.
The minute flashes on the display.
The date and time is set.

11
HOW TO APPLY THE WRIST CUFF
How to wrap the wrist cuff is one of the important points
for correct measurement.
• Wrap the cuff snugly on your wrist.
• Wrap the wrist cuff directly against your skin,
Be careful not to catch clothing between the cuff and your skin.
How to wrap the wrist cuff on your left wrist
1. Place the wrist cuff by leaving clearance of 1/2 inch
(the clearance almost equal to the width of an
index finger) between the edge of the wrist cuff
and the bottom of the palm as shown in the
figure to the right.
2. Wrap the wrist cuff upward holding the edge of the
wrist cuff so that it can be wrapped snugly.
3. Lightly press the velcro with your finger so that
it is fastened tightly.
Taking a measurement on your right wrist
You can measure your blood pressure on your right
wrist. Wrap the wrist cuff as shown in the
figure to the right.

12
HOW TO TAKE A MEASUREMENT
1. Press the START/STOP button. After all the characters
on the display are turned on, the monitor starts
inflating for measurement.
2. Check the measured values. When the
measurement finishes, the deflation mark
flashes and the wrist cuff deflates.
3. To stop measurement press the
START/STOP button to turn off the power.
• Even if you forget to press the
START/STOP button, the power will
turn itself off automatically in approximately 2 minutes.
SYSTOLIC mm Hg
DIASTOLIC mm Hg
PULSE/min
4.The monitor exhausts the residual air when
the measurement is complete. The Heart
Symbol (♥) stops flashing and your blood
pressure and pulse rate display alternately.

13
HOW TO USE THE MEMORY FUNCTION
The Blood Pressure Monitor stores up to 21 measurement
values with the date and time.
1. Press the MEMORY button to display the most
recent measurement values. Blood Pressure and
Pulse Rate alternate on the display.
2. Press the MEMORY button again to display
previous measurement values. Blood Pressure
and Pulse Rate alternate on the display for
each previous measurement.
3. Press and hold the MEMORY button to
display only Blood Pressure values. All values
currently stored in the memory will display
beginning with the most recent value.
4. Press the START/STOP button to turn the power off.
How to delete the memory
1. Press the MEMORY button to display the
stored contents.
2. Press the both MEMORY button and the
START/STOP button simultaneously for
more than 2 seconds.
• All stored contents will be deleted.
NOTE: Measurements are retained in memory even after
the batteries are removed for battery replacement.

14
ERROR INDICATORS
Batteries are worn out.
The wrist cuff is not held
at the level of the heart.
The wrist cuff is not
wrapped snugly.
Air is leaking from the
wrist cuff.
Trouble caused by
abnormality in function.
Please contact the OMRON
Healthcare Customer Service
Replace the batteries with
new ones.
Wrap the wrist cuff correctly.
Please contact the OMRON
Healthcare Customer Service
Measure your blood pressure
again in correct posture.
Nothing is displayed
when you press the
START/STOP button
Error Indicator Correction
Cause
Insert the batteries correctly.
The directions of polarities
of inserted batteries
(+ and –) are wrong.
Too much stress is applied
on your shoulder or arm.
Relax and take
measurement again.
You are talking
or moving your hands
during measurement.
Remain still during
measurement.
Blood pressure values
are displayed before the
monitor inflates to the
required value.

15
FCC STATEMENT
NOTE:
POTENTIAL FOR RADIO/TELEVISION INTERFERENCE (for U.S.A. only)
This product has been tested and found to comply with the limits for a Class B
digital device, pursuant to part 15 of the FCC rules.
These limits are designed to provide reasonable protection against harmful
interference in a residential installation. The product generates, uses, and can
radiate radio frequency energy and, if not installed and used in accordance
with the instructions, may cause harmful interference to radio communications.
However, there is no guarantee that interference will not occur in a particular
installation. If the product does cause harmful interference to radio or television
reception, which can be determined by turning the product on and off, the user
is encouraged to try to correct the interference by one or more
of the following measures:
• Reorient or relocate the receiving antenna
• Increase the separation between the product and the receiver.
• Connect the product into an outlet on a circuit different from that to which
the receiver is connected.
• Consult the dealer or an experienced radio/TV technician for help.
POTENTIAL FOR RADIO/TELEVISION INTERFERENCE
(for Canada only)
This digital apparatus does not exceed the Class B limits for radio noise
emissions from digital apparatus as set out in the interference-causing
equipment standard entitled “ Digital Apparatus”, ICES-003 of the Canadian
Department of Communications.
Cet appareil numérique respecte les limites de bruits radioeléctriques applicables
aux appareils numériques de Clase B prescrites dans la norme sur le materiel
brouilleur: “Appareils Numériques”, ICES-003 édictée par
le minister des communications.
Changes or modifications not expressly approved by the party responsible
for compliance could void the user’s authority to operate the equipment.

16
CARE AND MAINTENANCE
To keep your digital blood pressure monitor in the best condition and
protect the unit from damage follow the directions listed below:
Clean the monitor with a soft dry cloth. Do not use any abrasive or
volatile cleaners. Do not attempt to clean the cuff. Never immerse the
monitor or any components in water.
Store the monitor in a safe and dry location. Do not fold the cuff
tightly. Do not subject the monitor to extreme hot or cold
temperatures, humidity and direct sunlight.
Avoid subjecting the monitor to strong shocks, such as dropping the
unit on the floor.
Remove the batteries if the unit will not be used for three months or
longer. Always replace all the batteries with new ones at the same time.
Use the unit consistent with the instruction provided in this manual.
Use only authorized parts and accessories.

17
WARRANTY INFORMATION
Your Omron HEM-629 Portable Wrist Blood Pressure Monitor, excluding the
monitor cuff, is warranted to be free from defects in materials and workmanship
appearing within 5 years, when used in accordance with the instructions provided
with the monitor. The monitor cuff is warranted to be free from defects in materials
and workmanship appearing within one year, when the monitor is used in
accordance with the instructions provided with the monitor. The above
warranties extend only to the original retail purchaser.
We will, at our option, repair or replace without charge any monitor or monitor
cuff covered by the above warranties. Repair or replacement is our only
responsibility and your only remedy under the above warranties.
To obtain warranty service, ship the monitor and all of the components, together
with proof of purchase and a note explaining the problem with $5.00 for return
shipping and insurance to:
Omron Healthcare, Inc.
Attn: Repair Department
300 Lakeview Parkway
Vernon Hills, IL 60061
Be sure to include the model number, your name and your phone number on the
enclosed note and any other correspondence.
ALL IMPLIED WARRANTIES, INCLUDING BUT NOT LIMITED TO
THE IMPLIED WARRANTIES OF MERCHANTABILITY AND FITNESS
FOR PARTICULAR PURPOSE, ARE LIMITED TO THE DURATION OF
THE APPLICABLE WRITTEN WARRANTY ABOVE. Some states do not
allow limitations on how long an implied warranty lasts, so the above limitation
may not apply to you.
OMRON SHALL NOT BE LIABLE FOR LOSS OF USE OR ANY OTHER
INCIDENTAL, CONSEQUENTIAL OR INDIRECT COSTS, EXPENSES
OR DAMAGES. Some states do not allow the exclusion or limitation of incidental
or consequential damages, so the above exclusions may not apply to you.
This warranty gives you specific legal rights, and you may also have other rights
which may vary from state to state.
FOR CUSTOMER SERVICE:
Visit our website at: www.omronhealthcare.com
Call toll free: 1-800-634-4350
LIMITED WARRANTIES

18
SPECIFICATIONS
Model: Omron HEM-629
Display: Digital Display
Measurement Range: Pressure: 0 to 299mmHg
Pulse: 40 to 180/minute
Accuracy/Calibration: Pressure: ±3mmHg or 2% of reading
Pulse: ±5% of reading
Inflation: Automatic by electric pump
Deflation: Automatic rapid deflation
Rapid Pressure Release: Automatic pressure release valve
Pressure Detection: Capacitive pressure sensor
Measurement Method: Oscillometric method
Pulse Wave Detection: Capacitive pressure sensor
Power Source: 2 "AAA" batteries
Battery Life: Approximately 300 times of measurement when using
alkaline batteries (when the monitor is used three times
a day inflating 170 mmHg at room temperature of 72ºF)
Operating Temperature/Humidity: 50°F to 104°F (10°C to 40°C)
30 to 85% RH maximum
Storage Temperature/Humidity: -4°F to 140°F (-20°C to 60°C)
10 to 95% RH maximum
Console Weight: Approximately 4.8 oz. (136g) without batteries
Outer Dimensions: Approximately 3" (w) x 1 5/6" (h) x 2 4/5" (d)
(76mm x 47mm x 71mm)
Cuff Dimensions: Approximately 3" x 12" (76mm x 304mm)
Wrist Circumference Range: Approximately 5 1/3" x 7 2/3" (135mm x 195mm)
Contents: Storage Case, Instruction Manual, 2 "AAA" batteries
These specifications are subject to change without notice for purposes of improvement.

19
NOTES

Manufactured by:
OMRON HEALTHCARE, INC.
300 Lakeview Parkway
Vernon Hills, Illinois 60061
www.omronhealthcare.com
Copyright © 2003 Omron Healthcare, Inc.
Made in China
HEM-629SMINST Rev A
Other manuals for HEM-629
4
Table of contents
Languages:
Other Omron Blood Pressure Monitor manuals

Omron
Omron BP4350 User manual

Omron
Omron M7 Intelli IT User manual

Omron
Omron M2 Compact User manual

Omron
Omron M6 Comfort User manual

Omron
Omron IntelliSense HEM-907 User manual

Omron
Omron M2 Compact User manual

Omron
Omron R5 Prestige User manual

Omron
Omron RS6 User manual

Omron
Omron M3 Intellisense User manual

Omron
Omron M6 Comfort User manual