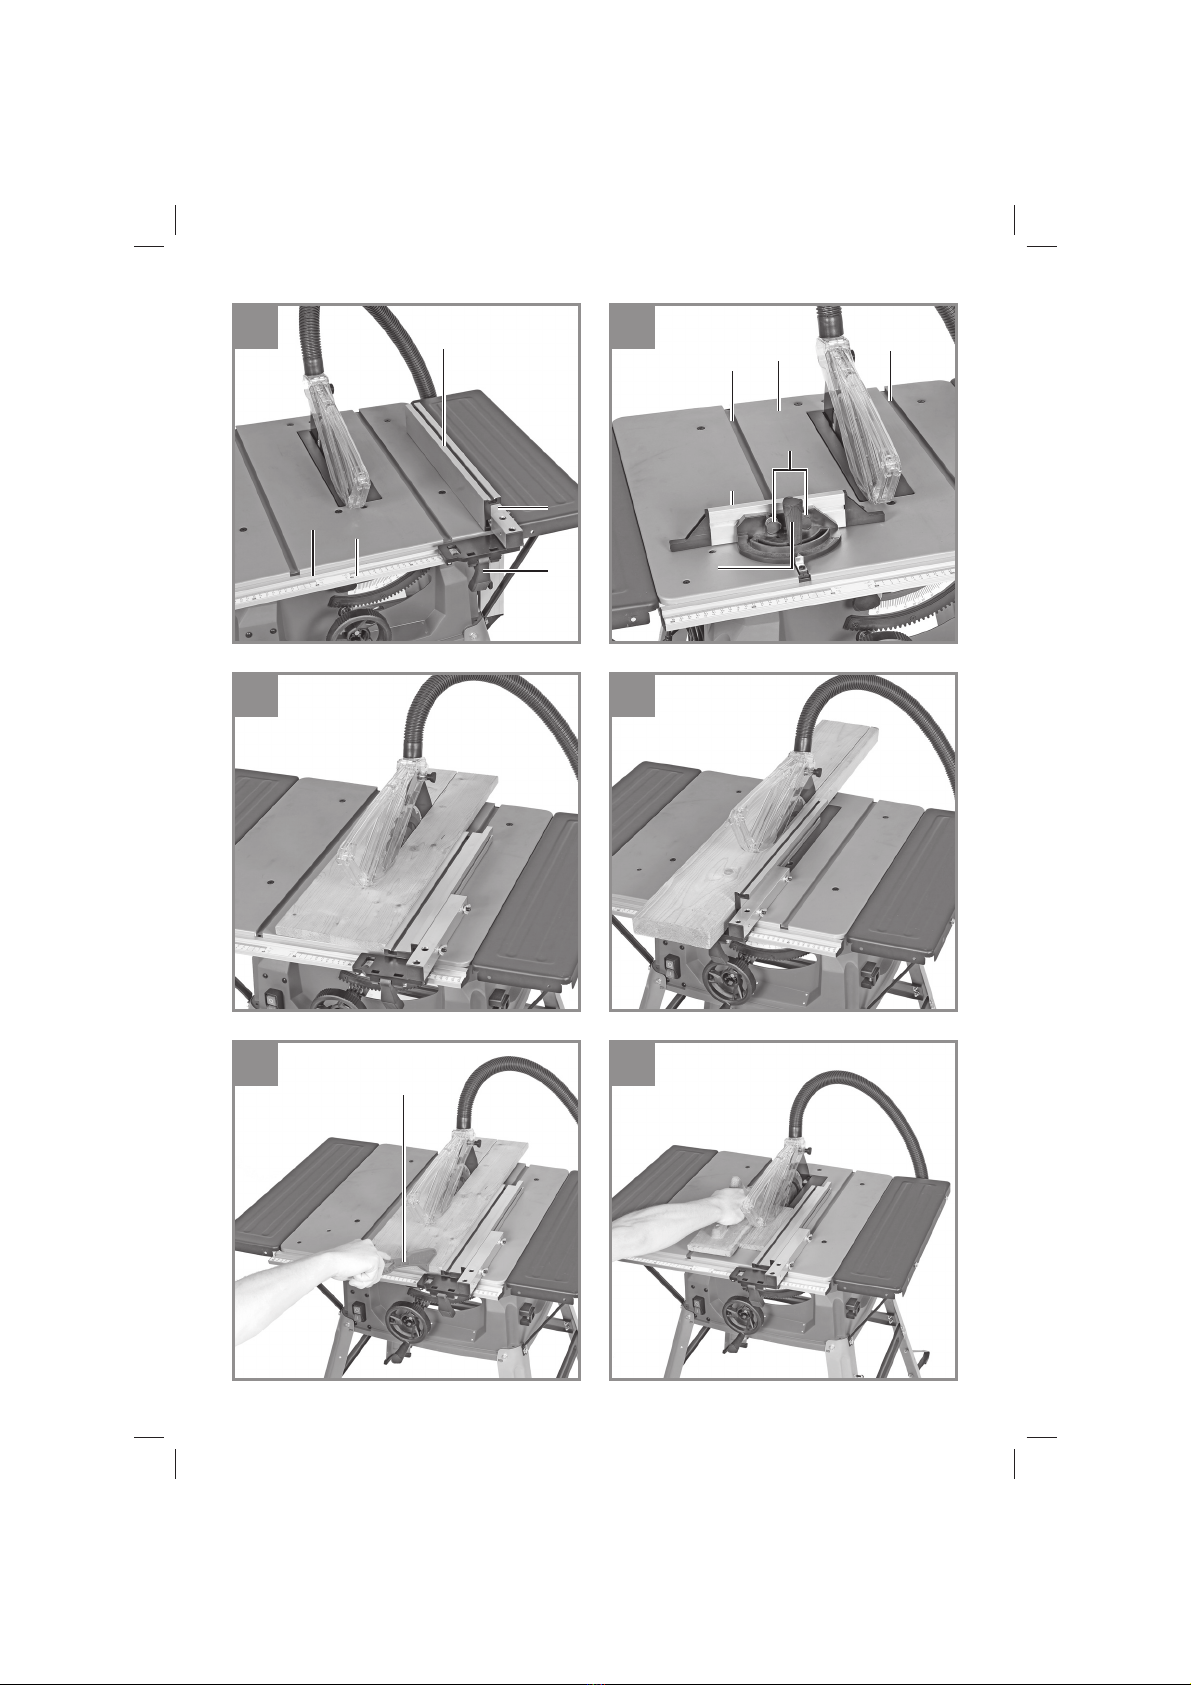
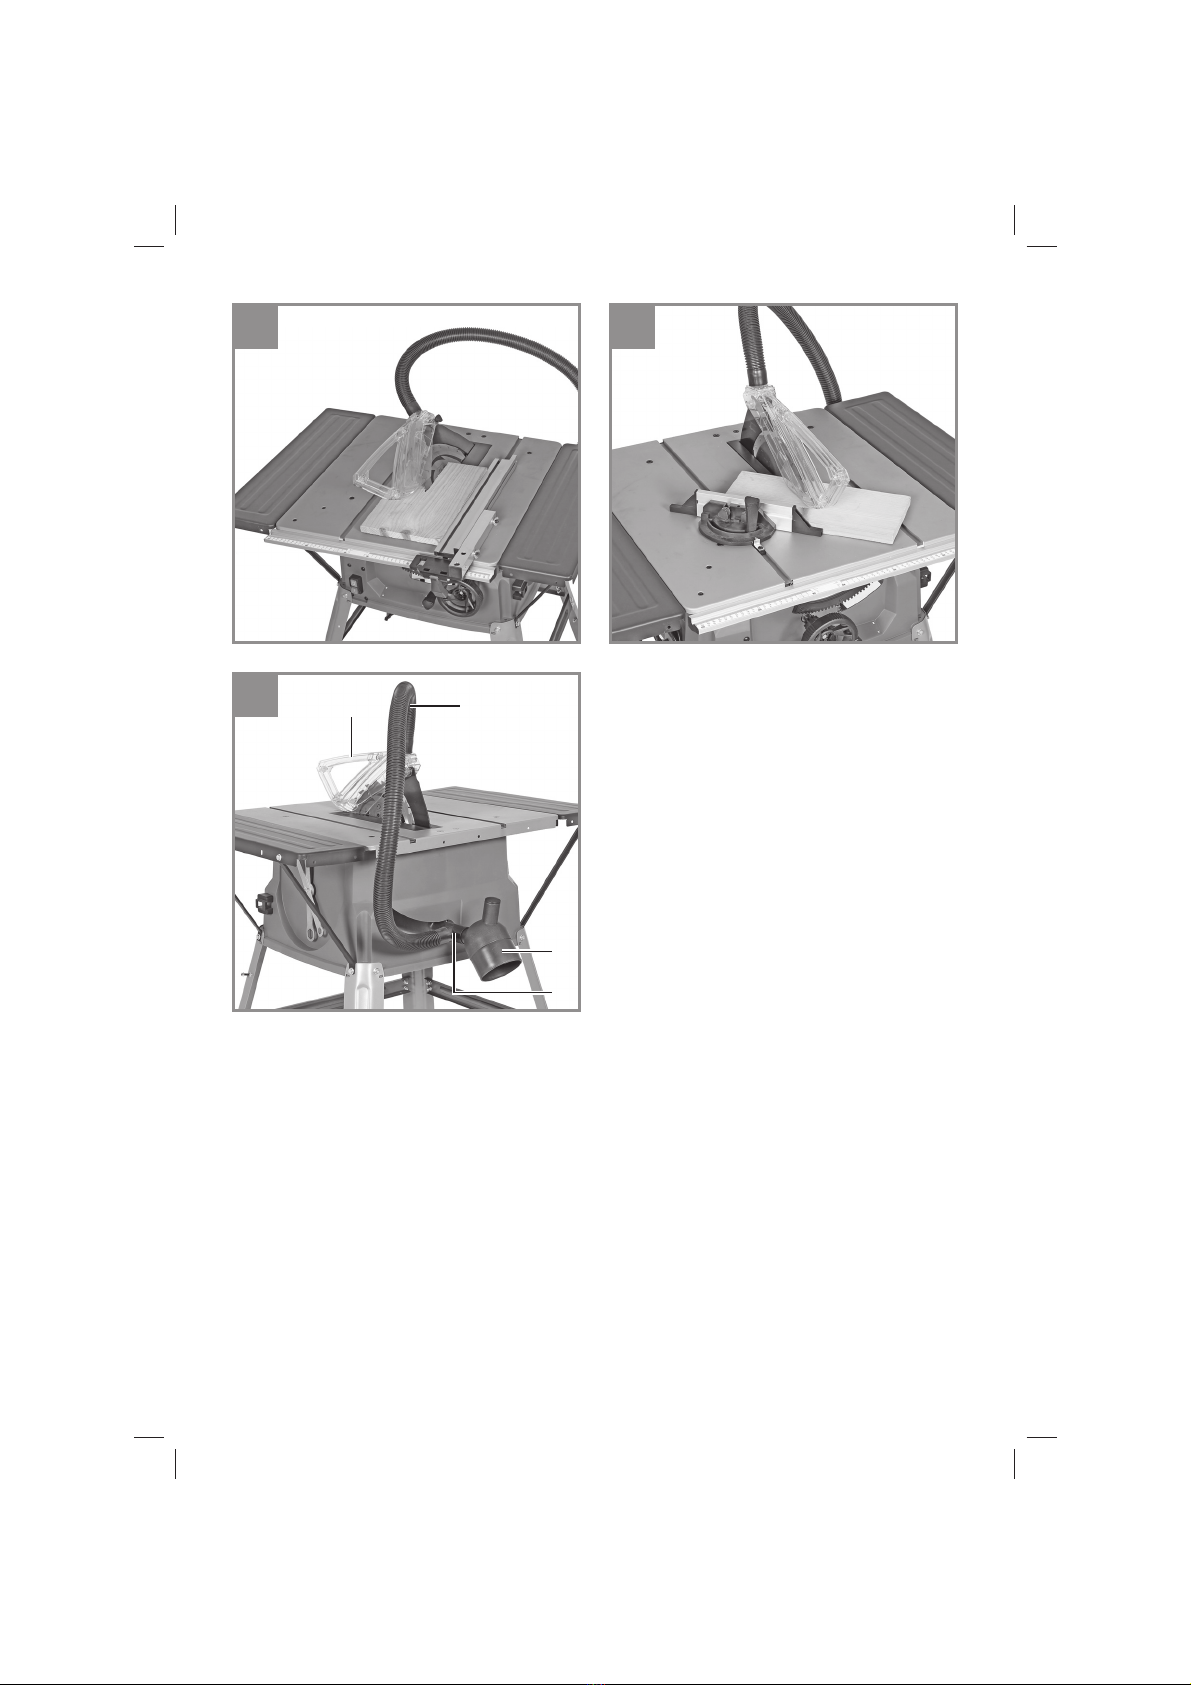
Ozito TSF-1211U User manual

TSF-1211U
Art.-Nr.: 43.405.42 I.-Nr.: 11029
7
GB Original operating instructions
Bench-type circular saw
Anl_TSF_1211U_SPK7.indb 1Anl_TSF_1211U_SPK7.indb 1 05.11.2019 14:37:1405.11.2019 14:37:14

- 2 -
1a
1b 1c
49 1 14 4 5 10 2 23
47
11
37
13
30 31 29
3
8
48
9
12
7
14 3 13 5
49 30 31 29
7
10
38
50
39
48
47
2
37
Anl_TSF_1211U_SPK7.indb 2Anl_TSF_1211U_SPK7.indb 2 05.11.2019 14:37:1605.11.2019 14:37:16

- 3 -
1d 2
3a 3b
4a 4b
45
46
43
47
37
29
31
30
13
29 29
29
44
10 5 4 2 1 14 49
49
16
38
39
38
43
28
43,44
31
30
30
3031
29
31
Anl_TSF_1211U_SPK7.indb 3Anl_TSF_1211U_SPK7.indb 3 05.11.2019 14:37:1705.11.2019 14:37:17

- 4 -
4c 5a
5b 6
7a 7b
13
43,44
29
b
a
143
50
48 43 49
aabb
48 50 50 4849
1
29
43
39
38
29
43,44
37
45,2x46
3
29
Anl_TSF_1211U_SPK7.indb 4Anl_TSF_1211U_SPK7.indb 4 05.11.2019 14:37:2105.11.2019 14:37:21

- 5 -
8 9a
9b 10
11a 11b
30
47
49
13
31
2
1650
37
48
36
2
16
6
17
19
40
38 5 19 40
415
Anl_TSF_1211U_SPK7.indb 5Anl_TSF_1211U_SPK7.indb 5 05.11.2019 14:37:2505.11.2019 14:37:25

- 6 -
11c 12
13 14
15a 15b
49 4
518 1
17 6
2
4
15
18
5
38 439
23
7
39
38
14
3
Anl_TSF_1211U_SPK7.indb 6Anl_TSF_1211U_SPK7.indb 6 05.11.2019 14:37:3205.11.2019 14:37:32

- 7 -
16 17
18a 18b
18c 19a
11
34 9 41 42 35 12 4
8
45°
28
22
7
26
26
23 12
7
32 26
32 26
23
28 22
7
12
25
27
Anl_TSF_1211U_SPK7.indb 7Anl_TSF_1211U_SPK7.indb 7 05.11.2019 14:37:3605.11.2019 14:37:36

- 8 -
19b 20
21a 21b
22 23
23
28 22
7
12
33
24
21
21
1
20
3
Anl_TSF_1211U_SPK7.indb 8Anl_TSF_1211U_SPK7.indb 8 05.11.2019 14:37:4105.11.2019 14:37:41

- 9 -
24 25
26 2
c
10
16
Anl_TSF_1211U_SPK7.indb 9Anl_TSF_1211U_SPK7.indb 9 05.11.2019 14:37:4605.11.2019 14:37:46

GB
- 10 -
Danger! - Read the operating instructions to reduce the risk of inquiry
Caution! Wear ear-muffs. The impact of noise can cause damage to hearing.
Caution! Wear safety goggles. Sparks generated during working or splinters, chips and dust emitted
by the device can cause loss of sight.
Caution! Wear a breathing mask. Dust which is injurious to health can be generated when working on
wood and other materials. Never use the device to work on any materials containing asbestos!
Caution! Risk of injury! Do not reach into the running saw blade.
Anl_TSF_1211U_SPK7.indb 10Anl_TSF_1211U_SPK7.indb 10 05.11.2019 14:37:4805.11.2019 14:37:48

GB
- 11 -
Danger!
When using the equipment, a few safety pre-
cautions must be observed to avoid injuries and
damage. Please read the complete operating
instructions and safety regulations with due care.
Keep this manual in a safe place, so that the in-
formation is available at all times. If you give the
equipment to any other person, hand over these
operating instructions and safety regulations as
well.We cannot accept any liability for damage
or accidents which arise due to a failure to follow
these instructions and the safety instructions.
1. Safety regulations
General safety information for power tools
Warning!
Read all the safety information, instructions,
illustrations and technical data provided on
or with this power tool. Failure to adhere to the
following instructions may result in electric shock,
fire and/or serious injury.
Keep all the safety information and instruc-
tions in a safe place for future use.
The term „power tool“ used in the safety informati-
on and instructions refers to power tools operated
from the mains power supply (with a power cable)
and to battery operated power tools (without a
power cable).
1. Workplace safety
a) Keep your work area clean and well lit.
Untidy or unlit work areas can result in acci-
dents.
b) Do not use this power tool in an area
where there is a risk of explosion and
where there are inflammable liquids,
gases or dust. Power tools generate sparks
that can ignite dust or vapors.
c) Keep children and other people away
from the power tool while you are using
it. If you are distracted you may lose control
of the power tool.
2. Electrical safety
a) The plug on the power tool must fit into
the socket. The socket must not be modi-
fied in any way. Do not use adapter plugs
together with power tools with a protecti-
ve earth. Unmodified plugs and matching so-
ckets will reduce the risk of an electric shock.
b) Avoid body contact with earthed surfaces
such as pipes, heating systems, stoves
and refrigerators. There is an increased risk
of suffering an electric shock if your body is
earthed.
c) Keep the power tool out of the rain and
away from moisture. The ingress of water
into an electric power tool increases the risk
of an electric shock.
d) Do not use the power cable for a purpose
for which it is not designed, for example
to carry the power tool, hang it up or to
pull the plug out of the socket. Keep the
power cable away from heat, oil, sharp
edges and moving parts. Power cables that
are damaged or tangled increase the risk of
an electric shock.
e) If you use an electric power tool out-
doors, use only extension cables that are
suitable for outdoor use. The use of an
extension cable which is suitable for outdoor
use reduces the risk of an electric shock.
f) If you cannot avoid using the power tool
in a damp location, use a residual current
device (RCD) circuit breaker. The use of a
residual current device (RCD) circuit breaker
will reduce the risk of suffering an electric
shock.
3. Safety of persons
a) Be careful, watch what you are doing and
be sensible and responsible when using
an electric power tool. Never use the po-
wer tool if you are tired or under the influ-
ence of drugs, alcohol or medication. One
moment of inattention when using the electric
tool can result in serious injuries.
b) Wear personal safety equipment and
always wear safety goggles. Wearing per-
sonal safety equipment such as dust masks,
non-slip safety shoes, a helmet or ear plugs,
depending on the type and application of the
tool, reduces the risk of injury.
c) Make sure that the tool cannot start up
accidentally. Ensure that the power tool is
switched offbefore you connect it to the
power supply and/or connect the battery
pack, pick it up or carry it. If you have your
finger on the switch while carrying the power
tool or if you connect the power tool to the
power supply while it is switched on, this may
cause accidents.
d) Remove all adjusting tools or wrenches
before you switch on the power tool. Any
tool or wrench in a rotating part of the power
Anl_TSF_1211U_SPK7.indb 11Anl_TSF_1211U_SPK7.indb 11 05.11.2019 14:37:4905.11.2019 14:37:49

GB
- 12 -
tool could cause injuries.
e) Avoid abnormal working postures. Make
sure you stand squarely and keep your
balance at all times. This will enable you to
control the power tool better in unexpected
situations.
f) Wear suitable clothes. Never wear loose
fitting clothes or jewelry. Keep hair and
clothing away from moving parts. Loose
clothing, jewelry or long hair can be caught by
moving parts.
g) If dust extraction devices and dust coll-
ection devices can be fitted, they must be
connected and must be used correctly.
The use of a dust extractor can reduce the
dangers posed by dust.
h) Do not allow yourself to be lulled into a
false sense of security and do not ignore
the safety regulations covering electric
power tools, even if you are familiar with
the power tool after having used it many
times. Carelessness can lead to serious inju-
ries in just a fraction of a second.
4. Using and handling the power tool
a) Do not overload your power tool. Use the
correct electric tool for the job in hand.
The correct tool will enable you to work better
and more safely within the specific perfor-
mance range.
b) Do not use an electric power tool if the
switch is defective. An electric power tool
that cannot be switched on or offis dange-
rous and must be repaired.
c) Pull the plug out of the socket and/or
remove the removable battery pack be-
fore making any adjustments to the tool,
changing plug-in tool parts or putting the
power tool down. These precautions will
prevent the power tool starting accidentally.
d) Keep unused electric tools out of the
reach of children. Do not allow people
who are not familiar with the power tool
or who have not read these instructions
to use the power tool. Electric tools are
dangerous if they are used by inexperienced
people.
e) Look after power tools and plug-in tools
with care. Check that moving parts
function correctly and do not jam, and
whether any parts are broken or dama-
ged such that they adversely affect the
function of the power tool. Have damaged
parts repaired before you use the power
tool. Many accidents are caused by poorly
maintained electric tools.
f) Keep cutting tools sharp and clean. Ca-
refully maintained cutting tools with sharp
cutting edges will jam less and are easier to
control.
g) Use the power tool, plug-in tools, etc.
as set out in these instructions. Take ac-
count of the conditions in your work area
and the job in hand. Using electric tools for
purposes other than the one for which they
are designed can result in dangerous situa-
tions.
h) Keep the handles and grip surfaces dry,
clean and free from oil and grease. If the
handles and grip surfaces are slippery, it will
not be possible to operate and control the
power tool safely in unforeseen situations.
5. Service
a) Have your power tool repaired only by
trained personnel using only genuine
spare parts. This will ensure that your power
tool remains safe to use.
Special safety information for bench-type
circular saws
1) Safety information relating to the safety
guards
a) Leave the safety guards fitted in place.
Safety guards must always be in proper
working order and fitted correctly. Loose,
damaged or defective safety guards must be
repaired or replaced.
b) Always use the saw blade safety guard
and the splitter when performing sepa-
ration cuts. For separation cuts in which the
saw blade cuts right through the workpieces
thickness, the safety guard and other safety
equipment reduce the risk of injuries.
c) Do not use this saw to cut rebates or
grooves. For design reasons, the saw is not
suitable for such work.The splitter must never
be removed, because it prevents jamming
and kickbacks.
d) Before switching on the power tool, make
sure that the saw blade does not touch
the safety guard, splitter or workpiece.
Accidental contact between these compo-
nents and the saw blade could lead to dange-
rous situations.
e) Adjust the splitter in accordance with the
description in these operating instruc-
tions. Incorrect clearances, position or align-
ment may be the reason why the splitter fails
Anl_TSF_1211U_SPK7.indb 12Anl_TSF_1211U_SPK7.indb 12 05.11.2019 14:37:4905.11.2019 14:37:49

GB
- 13 -
to prevent a kickback effectively.
f) For the splitter to work, it must be en-
gaged with the workpiece. The splitter
is ineffective when cutting workpieces that
are too short to be engaged with the splitter.
Under these conditions a kickback cannot be
prevented by the splitter.
g) Use the right saw blade for the splitter.
For the splitter to work properly, the saw blade
diameter must match the splitter, the saw pla-
te of the saw blade must be thinner than the
splitter and the tooth pitch must be greater
than the thickness of the splitter.
2) Safety information for sawing
a) DANGER: Do not let your hands and fin-
gers come anywhere near the saw blade
or the sawing area. It just takes one moment
of inattention or a slip and your hand could be
directed towards the saw blade, which could
result in serious injuries.
b) Only feed the workpiece to the saw bla-
de or cutting tool against the direction
of rotation. If the workpiece is fed in in the
same direction as the direction of rotation of
the saw blade above the table, this could lead
to both the workpiece and your hand being
drawn in to the saw blade.
c) Never use the miter stop to feed in the
workpiece when performing longitudinal
cuts, and never use the parallel stop
in addition for setting the length when
performing cross cuts with the miter
stop. Feeding the workpiece in with both the
parallel stop and the miter stop at the same
time increases the likelihood of the saw blade
getting jammed, which will result in kickback.
d) When performing longitudinal cuts,
always apply the infeed force on the
workpiece between the stop rail and the
saw blade. Use a push stick if the gap
between the stop rail and the saw blade
is less than 150 mm, and a push block if
the gap is less than 50 mm. Work aids of
this kind help ensure that your hand is kept at
a safe distance from the saw blade.
e) Only use the supplied push stick of the
manufacturer or one which has been
manufactured in accordance with instruc-
tions. The push stick ensures that your hand
is kept at a sufficient distance from the saw
blade.
f) Never use a damaged or partially sawn
push stick. If the push stick is damaged, it
could break, causing your hand to come into
contact with the saw blade.
g) Do not perform your work “free-handed”.
Always use the parallel stop or the miter
stop to position and feed in the workpi-
ece. “Free-handed” means using your hand
to support or feed in the workpiece with the
parallel stop or miter stop. Free-handed sa-
wing leads to misalignment, jamming and
kickbacks.
h) Never reach over or into a rotating saw
blade. Reaching for a workpiece could lead
to accidental contact with the rotating saw
blade.
i) Provide support for long and/or wide
workpieces behind and/or at the side of
the saw table, so that they stay horizontal.
Long and/or wide workpieces have a tenden-
cy to fall offat the edge of the saw table; this
leads to a loss of control, the jamming of the
saw blade and kickbacks.
j) Feed the workpiece in smoothly. Do not
bend or twist the workpiece. If the saw
blade becomes jammed, switch offthe
power tool immediately, pull out the pow-
er plug and rectify the cause of the jam. If
the saw blade becomes jammed because of
the workpiece, this could cause a kickback or
cause the motor to block.
k) Do not remove the sawn material while
the saw is running. Sawn material could be-
come stuck between the saw blade and the
stop rail or in the saw blade and cause your
fingers to be drawn into the saw blade if you
attempt to remove it. Switch offthe saw and
wait until the saw blade has come to a stand-
still before removing the material.
l) For longitudinal cuts on workpieces thin-
ner than 2 mm, use an additional parallel
stop which has contact with the table sur-
face. Thin workpieces can get wedged under
the parallel stop and cause kickback.
m) Avoid overheating of the saw blade and/
or burn marks on the workpiece. Push the
workpiece smoothly into the saw blade and
do not stop during the cut.
3) Causes of kickbacks and related safety
information
A kickback is the sudden reaction of the workpie-
ce resulting from a caught, jammed saw blade or
a cut performed at an angle in the workpiece rela-
tive to the saw blade, or when part of the workpie-
ce becomes jammed between the saw blade and
the parallel stop or any other fixed object. In most
cases when kickback occurs, the workpiece gets
Anl_TSF_1211U_SPK7.indb 13Anl_TSF_1211U_SPK7.indb 13 05.11.2019 14:37:4905.11.2019 14:37:49

GB
- 14 -
caught by the rear section of the saw blade, gets
lifted from the saw table and thrown in the direc-
tion of the operator. Kickback is the result of the
bench-type circular saw being used incorrectly or
wrongly. It can be prevented by suitable precau-
tions, as described below.
a) Never position yourself in a direct line
with the saw blade. Always stand to the
side of the saw blade, at the side with the
stop rail. In the event of kickback, the work-
piece can be thrown at high speed towards
persons who are standing in line with the saw
blade.
b) Never reach into or behind the saw blade
to pull or support the workpiece. This
could lead to accidental contact with the saw
blade, or kickback could cause your fingers to
be drawn into the saw blade.
c) Never hold and press a workpiece against
the rotating saw blade when you want to
saw the workpiece. Pressing the workpiece
against the saw blade when sawing workpie-
ce will result in jamming and kickback.
d) Align the stop rail parallel to the saw bla-
de. If the stop rail is not properly aligned, the
workpiece will press against the saw blade
and cause kickback.
e) Do not use this saw to cut rebates or
grooves. For design reasons, the saw is not
suitable for such work.The splitter must never
be removed, because it prevents jamming
and kickbacks.
f) Be particularly careful when sawing in
areas into which you cannot see on work-
pieces which have been joined together.
The plunge-cutting saw blade may saw into
objects which could cause kickback.
g) Support large panels to reduce the risk
of a kickback by a jammed saw blade.
Large panels may sag under their own weight.
Panels must be provided with support at all
points where they project over the table sur-
face.
h) Do not work on any workpieces which are
twisted, knotted or warped or do not have
a straight edge on which they can be
guided with a miter stop or along a stop
rail. A warped, knotted or twisted workpiece
is instable and will lead to the misalignment of
the kerf with the saw blade, and jamming and
kickback.
i) Never saw several workpieces stacked
one on top of the other or one after the
other. The saw blade could catch one or
more parts and cause kickback.
j) Do not start the saw if the saw is in the
workpiece. If the saw blade is jammed it may
lift the workpiece and cause kickback when
the saw is restarted.
k) Keep the saw blades clean, sharp and
adequately set. Never use bent saw bla-
des or saw blades with cracked or broken
teeth. Saw blades which are sharp and pro-
perly set minimize jamming, blockages and
kickback.
4) Safety information for the operation of
bench-type circular saws
a) Switch offthe bench-type circular saw
and disconnect it from the mains power
supply before you remove the table in-
sert, change the saw blade, adjust the
splitter or the saw blade safety guard
and when the machine is left unattended.
Precautions are intended to help prevent ac-
cidents.
b) Never leave the bench-type circular saw
running unattended. Switch offthe power
tool and do not leave it before it has come
to a complete standstill. A saw which is left
running unattended is an uncontrolled dan-
ger.
c) Set the saw up at a location which is le-
vel and well-lit and where you can stand
steadily and keep your balance. The loca-
tion where you set it must provide suffici-
ent space for you to handle your larger
workpieces easily. Untidiness, unlit work
areas and uneven, slippery floors can lead to
accidents.
d) Remove wood sawings and sawdust re-
gularly from under the saw table and/or
from the dust extractor. Accumulations of
sawdust are combustible and can self-ignite.
e) Secure the bench-type circular saw. If the
bench-type circular saw is not properly secu-
red, it could move or topple over.
f) Remove all adjusting tools, residual
wood, etc., from the bench-type circular
saw before you switch it on. Distractions or
possible jams can be dangerous.
g) Always use saw blades of the correct
size and with a suitable mounting hole
(diamond-shaped or round). Saw blades
that do not match the mounting parts of the
saw will not rotate truly and will result in a loss
of control.
h) Never use damaged or the incorrect saw
blade assembly material such as, e.g.
flanges, washers, screws or nuts. This saw
Anl_TSF_1211U_SPK7.indb 14Anl_TSF_1211U_SPK7.indb 14 05.11.2019 14:37:4905.11.2019 14:37:49

GB
- 15 -
blade assembly material has been specially
designed for your saw, for safe operation and
optimum performance.
i) Never get onto the bench-type circular
saw and never use the bench-type cir-
cular saw as a step stool. Serious injuries
could occur if the power tool topples over or
if you come into contact with the saw blade
accidentally.
j) Make sure that the saw blade is fitted in
the correct direction of rotation. Do not
grinding wheels or wire brushes with the
bench-type circular saw. If the saw blade
is fitted incorrectly or accessories are used
which are not recommended, this could lead
to serious injuries.
5) Additional safety information
1. Only use a saw blade which has the external
diameter and hole diameter specified in the
original operating instructions (“Technical
data” section).
2. Use only blades with rotating speeds which
are equal to or higher than the rotating speed
marked on the power tool.
3. Use only a saw blade with a diameter which
is the same as specified on the saw.
4. Use the correct saw blade for the material you
are working on.
5. Use only saw blades which are recommen-
ded by the manufacturer which, if they are
intended for cutting wood or similar materials,
comply with EN 847-1.
6. Only fit blades which are well sharpened and
have no cracks or deformations.
7. Faulty saw blades must be replaced immedi-
ately.
8. It must be possible for the blade to run freely.
9. Check the saw blade guard for damage and
wear each time before using the saw.
10. The saw blade guard must lower again auto-
matically under its own weight after each cut.
The saw blade guard must lift when the work-
piece is pushed in the direction of the saw
blade.
11. Damaged or faulty safety devices have to be
replaced immediately.
12. It is imperative to make sure that all devices
which cover the saw blade are in good wor-
king order.
13. Never dismantle the machine‘s safety devices
or render them inoperative.
14. Refit all guards and safety devices immedia-
tely after you have completed any repairs or
maintenance work.
15. Keep the push stick or handle for a push
block at the machine at all times, even when
you are not using them. Slot the push stick or
the push block into its holder when not in use.
16. The sawing of angles/wedges is only per-
mitted if an appropriate auxiliary stop (cross
stop) is used.
17. If the table insert is worn, replace it. – Pull out
the power plug –
18. If necessary, wear suitable personal protec-
tion equipment.This could consist of:
a. Ear plugs to prevent the risk of damaging
your hearing
b. A breathing mask to avoid the risk of inha-
ling hazardous dust
c. Always wear gloves when handling saw
blades and rough materials.Whenever
practicable, saw blades must be carried in a
container.
19. Use only the transport devices to move the
equipment. Never use the guards for handling
or moving the equipment.
20. While you are moving the machine it is best
to cover the top part of the blade, e.g. with the
guard.
21. Give these safety instructions to all persons
who work on the machine.
22. Do not use this saw to cut fire wood.
23. Do not use this saw to cross-cut roundwood.
24. The machine is equipped with a safety switch
to prevent it from being switched on again
accidentally after a power failure.
25. If you need to use an extension cable, make
sure its conductor cross-section is big
enough for the saw‘s power consumption.
Minimum cross-section 1.5 mm².
26. If you use a cable reel, the complete cable
must be pulled offthe reel.
27. Never load the machine so much that it cuts
out.
28. Always press the workpiece firmly against the
saw table.
29. Make sure that off-cuts do not catch on the
saw blade crown. Risk of catapulting!
30. Be sure to observe the safety information
and operating and maintenance instructions
issued by the manufacturer, as well as the
dimensions listed in the Technical Data.
31. It is imperative to observe the accident pre-
vention regulations in force in your area as
well as all other generally recognized rules of
safety.
32. Note the information published by your pro-
fessional associations.
33. Operators must be at least 18 years of age.
Anl_TSF_1211U_SPK7.indb 15Anl_TSF_1211U_SPK7.indb 15 05.11.2019 14:37:4905.11.2019 14:37:49

GB
- 16 -
34. Never remove loose splinters, chips or jam-
med pieces of wood when the saw blade is
running.
35. To rectify faults or remove jammed pieces of
wood, always switch offthe machine first. –
Pull out the power plug –
36. Persons working on the machine should not
be distracted.
37. Keep your workplace clean of wood scrap
and any unnecessary objects.
38. Before you use the machine for the first time,
check that the voltage marked on the rating
plate is the same as your supply voltage.
39. Check the power cable. Never use a faulty or
damaged power cable.
40. Operate the saw only with a suitable vacuum
extraction system or a standard industrial va-
cuum cleaner.
41. Keep unused electric tools out of the reach of
children. Do not allow people who are not fa-
miliar with the tool or who have not read these
instructions to use the tool. Electric tools are
dangerous if they are used by inexperienced
people.
42. Keep your cutting tools sharp and clean.
Carefully maintained cutting tools with sharp
cutting edges will jam less and are easier to
control.
43. Have your tool repaired only by trained per-
sonnel using only genuine spare parts.This
will ensure that your tool remains safe to use.
44. All covers and safety devices have to be pro-
perly fitted before the equipment is switched
on.
45. When working with wood that has been pro-
cessed before, watch out for foreign bodies
such as nails or screws etc.
46. Before you actuate the On/Offswitch, make
sure that the saw blade is correctly fitted
and that the equipment‘s moving parts run
smoothly.
47. Keep handles dry, clean and free from oil and
grease.
Keep this safety information in a safe place!
2. Layout and items supplied
2.1 Layout (Fig. 1-26)
1. Saw table
2. Saw blade guard
3. Push stick
4. Blade
5. Splitter
6. Table insert
7. Complete parallel stop
8. Hand wheel
9. Locking grip for saw blade angle
10. Extraction hose
11. On/Offswitch
12. Eccentric lever
13. Rubber foot
14. Cross stop
15. Screw for saw blade
16. Extractor adapter on housing
17. Countersunk head screw
18. Hole (splitter)
19. Fastening screw for splitter
20. Locking screw for cross stop
21. Slot in saw table
22. Scale (cutting width)
23. Stop rail for parallel stop
24. Stop rail for cross stop
25. Slot in stop rail, upright
26. Knurled screw for parallel stop
27. Slot in stop rail, flat
28. Guide rail system
29. Leg
30. Cross strut
31. Longitudinal strut
32. Screw for parallel stop
33. Knurled screw for cross stop
34. Adjustment screw (0°)
35. Adjustment screw (45°)
36. Cap on saw blade guard
37. Additional leg
38. Wrench, size 10/13 mm
39. Wrench, size 10/21 mm
40. Fastening plate
41. Pointer (angular setting)
42. Scale (angular setting)
43. Hexagon screw M6
44. Nut M6
45. Socket head screw M5
46. Nut M5
47. Strut for table width extension (left)
48. Strut for table length extension (right)
49. Table width extension
50. Tubular brace
Anl_TSF_1211U_SPK7.indb 16Anl_TSF_1211U_SPK7.indb 16 05.11.2019 14:37:5005.11.2019 14:37:50

GB
- 17 -
2.2 Items supplied
Please check that the article is complete as
specified in the scope of delivery. If parts are
missing, please contact our service center or the
sales outlet where you made your purchase at
the latest within 5 working days after purchasing
the product and upon presentation of a valid bill
of purchase. Also, refer to the warranty table in
the service information at the end of the operating
instructions.
• Open the packaging and take out the equip-
ment with care.
• Remove the packaging material and any
packaging and/or transportation braces (if
available).
• Check to see if all items are supplied.
• Inspect the equipment and accessories for
transport damage.
• If possible, please keep the packaging until
the end of the guarantee period.
Danger!
The equipment and packaging material are
not toys. Do not let children play with plastic
bags, foils or small parts. There is a danger of
swallowing or suffocating!
• Saw blade guard
• Push stick
• Splitter
• Complete parallel stop
• Extraction hose
• Rubber foot (4x)
• Cross stop
• Leg (4x)
• Cross strut (2x)
• Longitudinal strut (2x)
• Additional leg (2x)
• Wrench, size 10/13 mm
• Wrench, size 10/21 mm
• Hexagon screw, size M6 (32x)
• Nut, size M6 (24x)
• Socket head screw M5
• Nut, size M5 (2x)
• Strut for table width extension (left) (2x)
• Strut for table length extension (right) (2x)
• Table width extension (2x)
• Tubular brace (4x)
• Original operating instructions
• Safety information
3. Proper use
The bench-type circular saw is designed for the
slitting and cross-cutting (only with the cross
stop) of all types of timber commensurate with the
machine‘s size.The equipment is not to be used
for cutting any type of round wood.
The equipment is to be used only for its prescri-
bed purpose. Any other use is deemed to be a
case of misuse.The user / operator and not the
manufacturer will be liable for any damage or inju-
ries of any kind caused as a result of this.
Please note that our equipment has not been de-
signed for use in commercial, trade or industrial
applications. Our warranty will be voided if the
machine is used in commercial, trade or industrial
businesses or for equivalent purposes.
The equipment is to be operated only with suita-
ble saw blades (saw blades made of HM or CV)
It is prohibited to use any type of HSS saw blade
and cutting-offwheel.
To use the equipment properly you must also
observe the safety information, the assembly
instructions and the operating instructions to be
found in this manual.
All persons who use and service the equipment
have to be acquainted with these operating
instructions and must be informed about the
equipment‘s potential hazards. It is also imperati-
ve to observe the accident prevention regulations
in force in your area.The same applies for the
general rules of health and safety at work.
The manufacturer will not be liable for any chan-
ges made to the equipment nor for any damage
resulting from such changes. Even when the
equipment is used as prescribed it is still impossi-
ble to eliminate certain residual risk factors.
The following hazards may arise in connection
with the machine‘s construction and design:
• Contact with the saw blade in the uncovered
saw zone.
• Reaching into the running saw blade (cut
injuries).
• Kick-back of workpieces and parts of work-
pieces.
• Saw blade fracturing.
• Catapulting of faulty carbide tips from the saw
blade.
• Damage to hearing if essential ear-muffs are
not used.
Anl_TSF_1211U_SPK7.indb 17Anl_TSF_1211U_SPK7.indb 17 05.11.2019 14:37:5005.11.2019 14:37:50

GB
- 18 -
• Harmful emissions of wood dust when used
in closed rooms.
4. Technical data
AC motor ..................................220-240V ~ 50Hz
Power P ..................S1 1800 W · S6 25% 2000 W
Idling speed n0..................................... 5000 rpm
Carbide saw blade ..........Ø 250 x Ø 30 x 2.8 mm
Number of teeth............................................... 24
Table size ......................................583 x 563 mm
Table width extension left/right ......583 x 165 mm
Cutting height max............................ 85 mm / 90°
........................................................ 65 mm / 45°
Height adjustment .................... infinite 0 - 85 mm
Tilting saw blade .......................... infinite 0° - 45°
Cross stop angle ....................... infinite -60° - 60°
Extractor connection .............................Ø 36 mm
Weight ........................................... approx. 18 kg
Protection class: ........................................... II/쓑
Thickness of the splitter .......................... 2.0 mm
Operating mode S6 25%: Continuous operation
with idling (cycle time 10 minutes).To ensure that
the motor does not become excessively hot, it
may only be operated for 25% of the cycle at the
specified rating and must then be allowed to idle
for 75% of the cycle.
Danger!
Noise
The noise emission values were measured in ac-
cordance with EN 62841.
Operation
LpA sound pressure level ........................ 94 dB(A)
KpA uncertainty ........................................ 3 dB(A)
LWA sound power level ........................ 107 dB(A)
KWA uncertainty ........................................ 3 dB(A)
Wear ear-muffs.
The impact of noise can cause damage to hea-
ring.
The stated noise emission values were measured
in accordance with a set of standardized criteria
and can be used to compare one power tool with
another.
The stated noise emission values can also be
used to make an initial assessment of exposure.
Warning:
The noise emission levels may vary from the level
specified during actual use, depending on the
way in which the power tool is used, especially
the type of workpiece it is used for.
Keep the noise emissions and vibrations to a
minimum.
• Only use appliances which are in perfect wor-
king order.
• Service and clean the appliance regularly.
• Adapt your working style to suit the appliance.
• Do not overload the appliance.
• Have the appliance serviced whenever ne-
cessary.
• Switch the appliance off when it is not in use.
Limit the operating time!
All stages of the operating cycle must be conside-
red (for example, times in which the electric tools
are switched offand times in which the tool is
switched on but operates without load).
Caution!
Residual risks
Even if you use this electric power tool in
accordance with instructions, certain resi-
dual risks cannot be rules out. The following
hazards may arise in connection with the
equipment’s construction and layout:
1. Lung damage if no suitable protective dust
mask is used.
2. Damage to hearing if no suitable ear protec-
tion is used.
Anl_TSF_1211U_SPK7.indb 18Anl_TSF_1211U_SPK7.indb 18 05.11.2019 14:37:5005.11.2019 14:37:50

GB
- 19 -
5. Before starting the equipment
Before you connect the equipment to the mains
supply make sure that the data on the rating plate
are identical to the mains data.
Warning!
Always pull the power plug before making
adjustments to the equipment.
• Unpack the bench-type circular saw and
check it for damage which may have occurred
in transit.
• The machine has to be set up where it can
stand firmly, e.g. on a work bench, or it must
be bolted to a strong base.
• All covers and safety devices have to be pro-
perly fitted before the machine is switched on.
• It must be possible for the saw blade to run
freely.
• When working with wood that has been pro-
cessed before, watch out for foreign bodies
such as nails or screws etc.
• Before you actuate the On/Off switch, make
sure that the saw blade is correctly fitted and
that the machine’s moving parts run smoothly.
6. Assembly
Danger! Pull out the power plug before carry-
ing out any maintenance, resetting or assem-
bly work on the circular saw!
6.1 Assembling the base frame (Fig. 3-4)
Danger! Make allowance for the weight of the
machine and arrange another person to help you
if necessary!
• Turn the bench-type circular over and set the
saw down on the floor or on some other work
surface. Important! Place suitable material
(e.g. packaging material) between the table
surface and the surface on which it is stood to
prevent any damage to the table surface.
• Important! Only fasten all the screw connec-
tions between the base frame and machine
loosely at first. Wait until you have returned
the bench-type circular saw to its working po-
sition before tightening the screw connections
securely. This is so that you can be sure the
base frame is aligned level with the surface
on which it is stood.
• Use the hexagon screws (43) to fasten the
four legs (29) loosely to the saw.
• Then, using the hexagon screws (43) and the
nuts (44), fasten the longitudinal struts (31)
and the cross-struts (30) loosely to the legs.
Make sure that the shorter struts (30) are fas-
tened to the side of the saw.
• Plug the rubber feet (13) onto the legs (29).
6.2 Assembling the table width extension
(Fig. 5, 6)
• Use the hexagon screws (43) and the nuts
(44) to fasten the table width extensions (49)
loosely to the saw table (1) at position (a).
• Fit the tubular braces (50) to the table width
extensions (49) and secure them loosely to
the saw table (1) with the hexagon screws
(43).
• Insert the struts (47, 48) between the tubular
brace (50) and table width extension (49) and
secure them loosely with the hexagon screw
(43).
• Important! The struts for the left and right-
hand sides are different in length.You there-
fore have to fit the long struts (47) on the left-
hand side of the saw table (1) and the short
struts (48) on the right-hand side.
• Remove the hexagon screws (43) from the
legs (29) on the left and right-hand side of the
saw to enable the struts (47, 48) to be fitted to
the base frame.
• Fasten the struts (47, 48) loosely to the legs
(29) with hexagon screws (43), but do not
tighten.
• Align the table width extensions (49) level
with the saw table (1).
• Then tighten the screw connections referred
to in 6.2. Use both the wrenches (38) and (39)
to do this.
6.3 Standing the bench-type circular saw up-
right (Fig. 2, 7-9)
• Turn the machine over so that it stands on its
legs.
• The bench-type circular saw must be stood
on a flat surface.
• Then tighten all loose screw connections. Use
both the wrenches (38) and (39) to do this.
• Screw the additional legs (37) to the rear legs
(29) so that they point towards the rear of the
machine. Use the hexagon screws (43) and
the nuts (44) to fasten them.
• Warning! Don not fit the additional legs (37)
too far away from the surface on which the
machine stands; they are intended to provide
protection against tipping over.
• Fit the socket head screw (45) with the two
nuts (46) to the front right leg (29).This is
Anl_TSF_1211U_SPK7.indb 19Anl_TSF_1211U_SPK7.indb 19 05.11.2019 14:37:5005.11.2019 14:37:50

GB
- 20 -
used as a holder for the push stick (3).
• To enable the machine to be used with the
suction hose (10), the cap (36) on the saw
blade guard (2) must be removed first.To
do this, undo the screw using a crosstip
screwdriver.
• Then connect the saw blade guard (2) and
the side connection of the extractor adapter
on the housing (16) to the suction hose (10).
• A crosstip screwdriver and hex key are not
supplied with the product.
6.4 Changing the table insert (Fig. 10, 12)
• To prevent increased likelihood of injury, the
table insert should be changed whenever it is
worn or damaged.
• Take off the saw blade guard (2) (see 6.6).
• Remove the countersunk head screw (17).
• Take out the worn table insert (6).
• Fit the replacement table insert by following
the above in reverse.
6.5 Fitting/replacing the splitter (Fig. 11, 12)
• Using the hand wheel (8), set the blade (4) to
max. cutting depth, move to 0° position and
lock in place.
• Remove the saw blade guard (2) (see 6.6).
• Take out the table insert (6) (see 6.4).
• Slacken the fastening screw (19) until the gap
between the fastening plate (40) and the sup-
port surface opposite is approx. 5 mm.
• Caution! Do not completely undo the faste-
ning plate (40).
• Insert the splitter (5) in the gap, push it right
down as far as it goes and then secure it
with the fastening screw (19). Make sure that
the splitter has been fitted straight and not
wobbly.
• The splitter (5) must be positioned in the cen-
ter along an imaginary line extending behind
the saw blade (4), so that it is not possible for
the material to get jammed.
• The gap between the blade (4) and the split-
ter (5) should be 3 mm to 8 mm. (Fig. 11c).
• Refit the table insert (6) and the saw blade
guard (2) (see 6.4, 6.6)
6.6 Fitting/changing the saw blade guard
(Fig. 13)
• Mount the saw blade guard (2) on the splitter
(5) so that the screw fits through the hole (18)
in the splitter.
• Then insert the screw on the saw blade guard
(2) through the hole (18) and tighten it.
• Important! The maximum depth that the
screw can be screwed in has been preset at
the factory, so that the saw blade guard (2) is
always able to move freely.
• Warning! The saw blade guard (2) must al-
ways lower to the workpiece automatically
under its own weight.
6.7 Fitting/changing the saw blade (Fig. 14)
• Before changing the saw blade: Pull out the
power plug!
• Wear work gloves to prevent injury when
changing the saw blade.
• Using the hand wheel (8), set the saw blade
(4) to the maximum cutting depth.
• Remove the saw blade guard, table insert
and splitter (see 6.6, 6.4, 6.5)
• Undo the screw (15) with a wrench (38) on
the screw (15) itself and a second wrench
(39) on the motor shaft to apply counter-
pressure.
• Caution! Turn the screw (15) in the direction
of rotation of the saw blade.
• Take off the outer flange and pull the old saw
blade (4) off the inner flange.
• Clean the blade flange thoroughly before fit-
ting the new blade.
• Fit and fasten the new saw blade (4) in rever-
se order.
• Important! Note the running direction.The
cutting angle of the teeth must point in run-
ning direction, i.e. forwards (see the arrow on
the blade guard).
• Refit and set the splitter, table insert and saw
blade (see 6.5, 6.4, 6.6).
• Check to make sure that all safety devices
are properly mounted and in good working
condition before you begin working with the
saw again.
• Warning! Every time that you change the saw
blade, check that the saw blade guard (2)
opens and closes again in accordance with
requirements. Also check that the saw blade
(4) spins freely in the saw blade guard (2).
• Warning! Every time that you change the saw
blade (4), check to see that it spins freely in
the table insert (6) in both perpendicular and
45° angle settings.
• Warning!You should replace the table insert
(6) immediately whenever it is worn or dama-
ged (see 6.4).
• Warning! The work to change and align the
saw blade (4) must be carried out correctly.
Anl_TSF_1211U_SPK7.indb 20Anl_TSF_1211U_SPK7.indb 20 05.11.2019 14:37:5005.11.2019 14:37:50
Other manuals for TSF-1211U
2
This manual suits for next models
1
Table of contents
Other Ozito Saw manuals

Ozito
Ozito MCS-355 User manual

Ozito
Ozito OZMCS2000WB User manual

Ozito
Ozito OZSCMS1600WA User manual

Ozito
Ozito OZCS1800WA User manual

Ozito
Ozito CMS-1810 User manual

Ozito
Ozito CMS-1621S User manual

Ozito
Ozito PXRSS-400 User manual

Ozito
Ozito CSW-7000 User manual

Ozito
Ozito CSL-235 User manual

Ozito
Ozito PXCMSS-210 User manual

Ozito
Ozito RSR-850 User manual

Ozito
Ozito MSW-3000U User manual

Ozito
Ozito CSL-018 User manual

Ozito
Ozito JSW-6100 User manual

Ozito
Ozito SCMS-8MSS User manual

Ozito
Ozito RSW-5100 User manual

Ozito
Ozito UMS-1810 S User manual

Ozito
Ozito SCMS-1812 User manual

Ozito
Ozito MCS-2355U User manual

Ozito
Ozito SCMS-107 User manual