2Introduction
8
2.0 Introduction
The Palintest SKW 400 Professional Soil Management
Kit is a soil management laboratory packaged
within a waterproof robust case for field use.
Based on simplified and rapid soil test methods, the
SKW 400 uses a number of analytical techniques
to provide critical information for macronutrients
and micronutrients for effective soil and agronomy
management.
The key techniques used are provided by the Soiltest
10 Bluetooth photometer, Multiparameter Pocket
Sensor and the Palintest Tablet Count method.
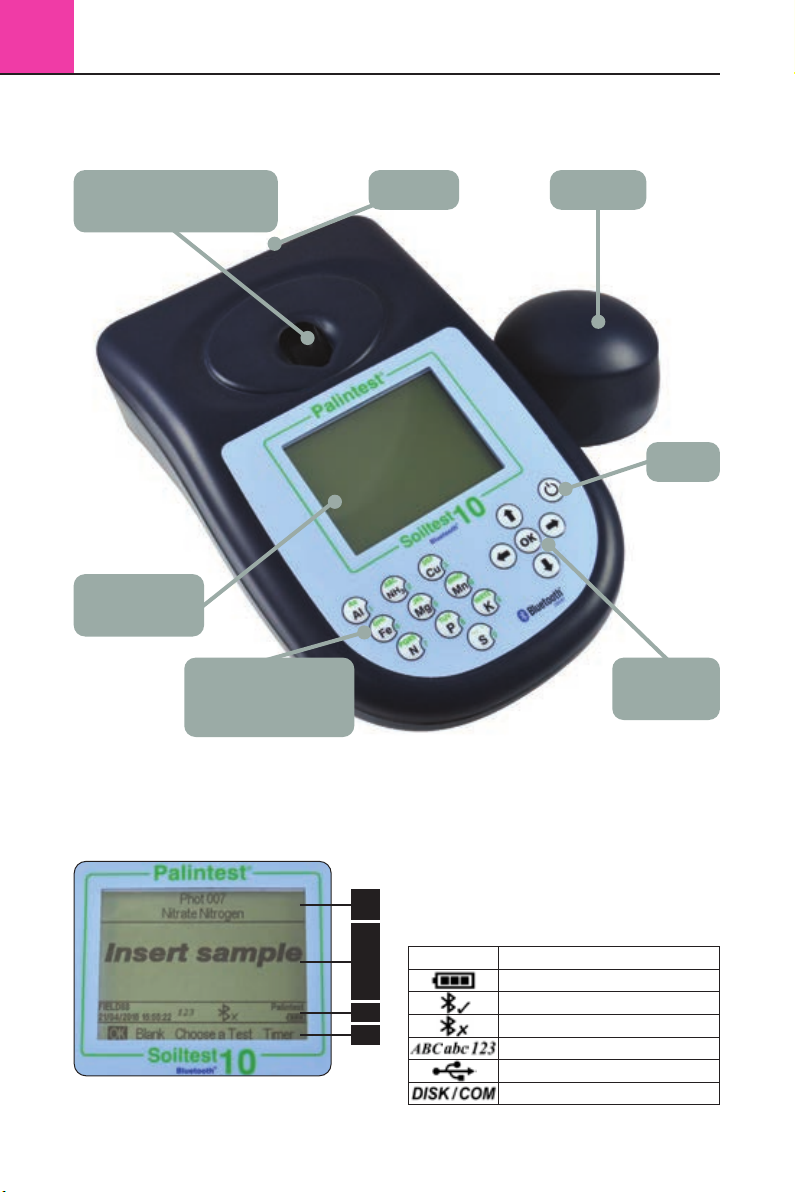
Soiltest 10 Bluetooth
The Soiltest 10 Bluetooth is a direct-reading,
waterproof photometer for determining key soil
fertility parameters. Designed for both portable
and laboratory use, the Soiltest 10 Bluetooth
should always be used with genuine Palintest
Soil Reagents for optimal performance.
The fundamental operating techniques applied
to the Soiltest 10 Bluetooth are based on the
principles of optical absorbance and scattering
of visible light of specific wavelengths.
Optical absorbance techniques are based on creating
visible colours with specific analytes upon reaction
following an extraction process. The intensity of colour
produced is measured with the Soiltest 10 and
the data compared to the stored calibration data.
Optical scattering techniques produce small
particles to scatter the source beam, the amount
of scatter providing a result for the concentration
of parameter under test.
For more information regarding the science behind
both photometric and turbidimetric analysis
technology please visit www.palintest.com/know.
The Soiltest 10 is provided with programmed methods
for a comprehensive range of soil fertility parameters.
Upon choosing a test the instrument automatically
selects the required parameters for accurate analysis
including wavelength and reaction time. Upon
completion of some tests optional follow-on tests
are available and results can be converted to alternative
units of expression e.g. mg/l to ppm, N or NO3.
The Soiltest 10 Bluetooth offers a choice of
connectivity to download all or selected results and/
or upload up to 30 User Defined Tests. Choose from
Bluetooth 4.0 wireless connectivity or USB connection.
Bluetooth 4.0 (also known as Bluetooth SMART or Low
Energy) connection allows seamless data exchange
using the Palintest Aqua Pal app, available for iOS
and Android devices. See Appendix 5 for more details.
USB connection via the port located at the rear
of the instrument provides a choice of either
‘Hard Disk’ mode or serial communication mode.
See Section 4.6 for more details.
The Soiltest 10 Bluetooth offers a choice of either
mains power via the USB port or using three
1.5V ‘AA’ batteries (supplied).
The Soiltest 10 Bluetooth is supported with
a two year warranty and a full range of service,
calibration and technical support. Support
resources are available at www.palintest.com
relating to both products and applications.
Multiparameter Pocket Sensor
Soil pH, Conductivity and salinity are key
parameters for soil fertility management and are
determined using electrochemical measurement
techniques with the Multiparameter Pocket Sensor
included within the SKW 400 Professional Soil
Management Kit.
The Multiparameter Pocket Sensor is a waterproof
electrochemical meter designed for portable or
laboratory use. The dual LCD display will show
both parameter (pH, conductivity or TDS) plus
the temperature of the sample under test.
Operating using electrochemical techniques, the
Multiparameter Pocket Sensor does not require a
filtered sample but does require a ‘wet’ sample.
Palintest methods for soil pH and conductivity are
based on a 5:1 extraction using Deionised water only.
Palintest Tablet Count Method
Ideal for higher concentrations the Tablet Count
method from Palintest provides a simple visual
approach to determining the Calcium and Chloride
concentration of soils following extraction.
Adding tablets one at a time until a visible colour
change occurs is similar to standard laboratory titration,
the tablets replacing the usual liquid format for the
titrant. Count the number of tablets required to effect
the colour change and calculate the result accordingly.
SKW400CompleteSoilManagement_ZI INST SKW 400 EN_Aw 3/6/15 14:59 Page 8