PASCO PS-3210A User manual

Wireless Conductivity Sensor (PS-3210A)
Introduction
The Wireless Conductivity Sensor measures conductivity over a
range from 0 to 40,000 microsiemens/centimeter (µS/cm),
double the range of older versions. The probe is able to work in
a variety of solutions. Measurements are transmitted wirelessly
via Bluetooth and recorded and displayed by PASCO software
on a connected wireless device, such as a tablet or computer.
The Wireless Conductivity Sensor is powered by a replaceable
three volt coin cell battery (included) and is well-suited for
continuous recording and discrete measurements. The sensor is
designed to optimize the battery usage time.
Since each sensor has a unique device ID number, more than
one Wireless Conductivity Sensor can be connected to a
computer or tablet at the same time.
The sensor housing is water-resistant, but immersing it in liquid
may cause a loss of wireless connection. Only the Conductivity
Probe should be placed into the substance being measured.
Features
Battery Status LED
Indicates the battery level of the sensor by blinking red at
low power.
ON/OFF button
Press to turn the sensor on. Press and briefly hold to turn
the sensor off. Note that the sensor automatically turns
itself off after several minutes of inactivity if not connected.
Bluetooth Status LED
Indicates the status of the sensor’s Bluetooth connection.
Bluetooth LED Status
Red blink Ready to pair
Green blink Connected
Yellow blink Logging data
For information on remote data logging, see the PASCO
Capstone or SPARKvue online help.
Device ID number
Use this to identify the sensor when connecting via
Bluetooth.
Water-resistant gasket
Protects the sensor’s internal components from water
damage in the event the sensor is exposed to water.
Sensor housing
Tolerates temperatures in the range of -15°C to +50°C.
Probe
Tolerates temperatures in the range of 0°C to 80°C.
Background
Electrolytic conductivity is defined as the ability of a liquid to
conduct electrical current. In conductive solvents, dissolved ions
are the principle conductors of electricity. By selecting the
appropriate electrode, one can easily measure the electrical
conductivity of liquids ranging from ultra-pure water to extremely
salty solutions.
How well a solution conducts electricity is dependent on the
following parameters:
•Concentration of ions
•Mobility of ions
•Valence of ions
•Solution temperature
The Wireless Conductivity Sensor determines the electrical
conductivity (EC) of a solution by measuring the alternating
current (AC) flowing through a circuit when an AC signal is
applied to a 2-cell electrode submerged in the solution.
The accuracy of conductive measurements depends on the
following factors:
•Absence of contamination
•Resistance of the electrodes to polarization
•Consistent electrode geometry (cell constant) between
calibration and measurement
•Consistent temperature between calibration and
measurement
Other features
•Data from the Wireless Conductivity Sensor can be used to
determine Total Dissolved Solids (TSD).
•The sensor measures temperature and automatically
compensates for it.
Sensor theory
Conductance is the reciprocal of resistance. Conductivity is the
specific conductance of a material, or the conductance
measured between the opposite faces of a one centimeter cube
of a material.
The electrode cell in the end of the Conductivity Probe is
constructed of an insulating material embedded with stainless
steel pins. These metal contacts serve as sensing elements and
are placed at fixed distances apart.
Get the software
You can use the sensor with SPARKvue or PASCO Capstone
software. If you’re not sure which to use, visit
pasco.com/products/guides/software-comparison.
SPARKvue is available as a free app for Chromebook, iOS, and
Android devices. We offer a free trial of SPARKvue and
Capstone for Windows and Mac. To get the software, go to
pasco.com/downloads or search for SPARKvue in your device’s
app store.
Product Guide | 012-14997C
1

If you have installed the software previously, check that you have
the latest update:
SPARKvue
Go to Main Menu > Check for Updates
PASCO Capstone
Go to Help > Check for Updates.
Check for a firmware update
SPARKvue
1. Press the power button until the LEDs turn on.
2. Open SPARKvue.
3. Select Sensor Data on the Welcome Screen.
4. From the list of available devices, select the sensor that
matches your sensor’s device ID. A notification appears if a
firmware update is available. Click Yes to update the
firmware.
5. Close SPARKvue when the update is complete.
PASCO Capstone
1. Press and hold the power button until the LEDs turn on.
2. Open PASCO Capstone.
3. Click Hardware Setup.
4. From the list of available devices, select the sensor that
matches your sensor’s device ID. A notification appears if a
firmware update is available. Click Yes to update the
firmware.
5. Close Capstone when the update is complete.
Set up the software
SPARKvue
Connecting the sensor to a tablet or computer:
1. Turn on the Wireless Conductivity Sensor. Check to make
sure the Bluetooth Status LED is blinking red.
2. Open SPARKvue, then click Sensor Data.
3. From the list of available wireless devices on the left, select
the device which matches the device ID printed on your
Wireless Conductivity Sensor.
Collecting data using SPARKvue:
1. Select the measurements you intend to record from the
Select Measurements for Templates menu by clicking the
check box next to the relevant measurements' names.
2. Click Graph in the Templates section to open the
Experiment Screen. The graph’s axes will auto-populate
with the selected measurements.
3. Click Start to begin recording data.
PASCO Capstone
Connecting the sensor to a computer:
1. Turn on the Wireless Conductivity Sensor. Check to make
sure the Bluetooth Status LED is blinking red.
2. Open Capstone, then click Hardware Setup in the
Tools palette.
3. From the list of Available Wireless Devices, click the
device which matches the device ID printed on your
Wireless Conductivity Sensor.
Collecting data using Capstone:
1. Double-click the Graph icon in the Displays palette to
create a new blank graph display.
2. To assign measurements to the graph’s axes, click each
<Select Measurement> box and select an appropriate
measurement from the list.
3. Click Record to begin collecting data.
Setting the ion coefficient
Electrical conductivity (EC) measured in microsiemens per
centimeter (µS/cm) can be converted to Total Dissolved Solids
(TDS) in parts per million (ppm) using an ion coefficient. This
coefficient is determined by the ions in the solution, the specific
mixture of which is frequently unknown. The following ranges are
recommended, with any value from 0.01 to 0.99 acceptable.
•0.5 to 0.57 for potassium chloride (KCl), which is the most
common calibration standard.
•0.45 to 0.5 for sodium chloride (NaCl), commonly used for
testing brackish water and seawater.
•0.65 to 0.85 for the 442™ solution (40% sodium
bicarbonate, 40% sodium sulfate, and 20% sodium
chloride) that is used to simulate natural freshwater (rivers,
lakes, wells, etc.). [Developed by the Myron L Company.]
The software’s default coefficient is 0.65. The value of the
coefficient is stored in the sensor.
To set the ion coefficient, connect the sensor to SPARKvue or
Capstone as described above, then follow these steps:
SPARKvue
1. From the Sensor Data screen, enable the measurement of
Total Dissolved Solids.
2. Select a Template to open the Experiment Screen.
3. From the bottom left of the Experiment Screen, click the
Live Data Bar for Total Dissolved Solids, then click
Configure Sensor.
4. Enter the appropriate value in the Ion Coefficient box.
PASCO Capstone
1. From the Hardware Setup tool, click the Properties
button next to the Wireless Conductivity Sensor to open the
Properties window.
2. Enter the appropriate value in the Ion Coefficient box.
Wireless Conductivity Sensor | PS-3210A
2

Sample conductivity values
The following table provides the typical conductivity of common
aqueous solutions at a temperature of 25°C.
Solution Conductivity (µS/cm)
Drinking water 50 to 1,000
Wastewater 900 to 9,000
KCl solution (0.01 M) 1,400
Potable water maximum 1,500
Brackish water 1,000 to 80,000
Industrial process water 3,000 to 140,000
Calibrating the sensor
The Wireless Conductivity Sensor is calibrated at the factory
and does not require initial calibration. However, the sensor can
be calibrated in SPARKvue or Capstone, using two standard
solutions of known conductivity. To calibrate the sensor, connect
it to SPARKvue or Capstone, then follow the steps below.
SPARKvue
1. From the Experiment Screen, click Show Hardware
Setup , then select the Calibrate icon under the
Conductivity Sensor to open the Calibrate Sensor menu.
2. For the new calibration settings, ensure that the sensor is
Wireless Conductivity Sensor, the measurement is
Conductivity (µS/cm), and the calibration type is 2 point
(Adjust Slope and Offset), then click Continue.
3. Insert the Conductivity Probe into a beaker containing your
first standard solution. Wait for the value of conductivity
recorded in the Sensor Value box under Calibration
Point 1 to stabilize.
4. Under Calibration Point 1, enter the known conductivity of
the first standard solution into the Standard Value box,
then click Set Calibration.
5. Remove the Conductivity Probe from the first beaker, rinse
with de-ionized water, then insert the probe into a beaker
containing the second standard solution. Wait for the value
of conductivity recorded in the Sensor Value box under
Calibration Point 2 to stabilize.
6. Under Calibration Point 2, enter the known conductivity of
the second standard solution into the Standard Value box,
then click Set Calibration.
7. Check New Calibration to ensure the resulting calibration
is appropriate, then click OK to finish.
PASCO Capstone
1. Select Calibration from the Tools palette.
2. Ensure that Conductivity is selected in the dropdown box,
then click Next.
3. Ensure that Two Standards (2 point) is selected from the
list of calibration types, then click Next.
4. Insert the Conductivity Probe into a beaker containing your
first standard solution. Wait for the value of conductivity
recorded in the Current Value box to stabilize.
5. Enter the known conductivity of the first standard solution
into the Standard Value box, then click Set Current Value
to Standard Value.
6. Remove the Conductivity Probe from the first beaker, rinse
with de-ionized water, then insert the probe into a beaker
containing the second standard solution. Wait for the value
of conductivity recorded in the Current Value box to
stabilize.
7. Enter the known conductivity of the second standard
solution into the Standard Value box, then click Set
Current Value to Standard Value.
8. Review your new calibration to ensure it is appropriate,
then click Finish.
Battery usage
The Wireless Conductivity Sensor contains a three volt coin cell
battery (CR2032). Battery life is very important to making the
sensor simple and always ready to use. Therefore, like all
PASCO wireless products, the Wireless Conductivity Sensor is
designed for long battery life. For example, after several minutes
of inactivity, the sensor turns itself off to preserve the battery.
The included battery should provide more than one year of
battery life, but the actual amount depends on factors such as
the data collection sampling rate.
Sensor storage
If the sensor will be stored for several months, we recommended
that you remove the battery and store it separately to avoid
damaging the sensor in case of a battery leak.
Product Guide | 012-14997C
3

Battery removal and replacement
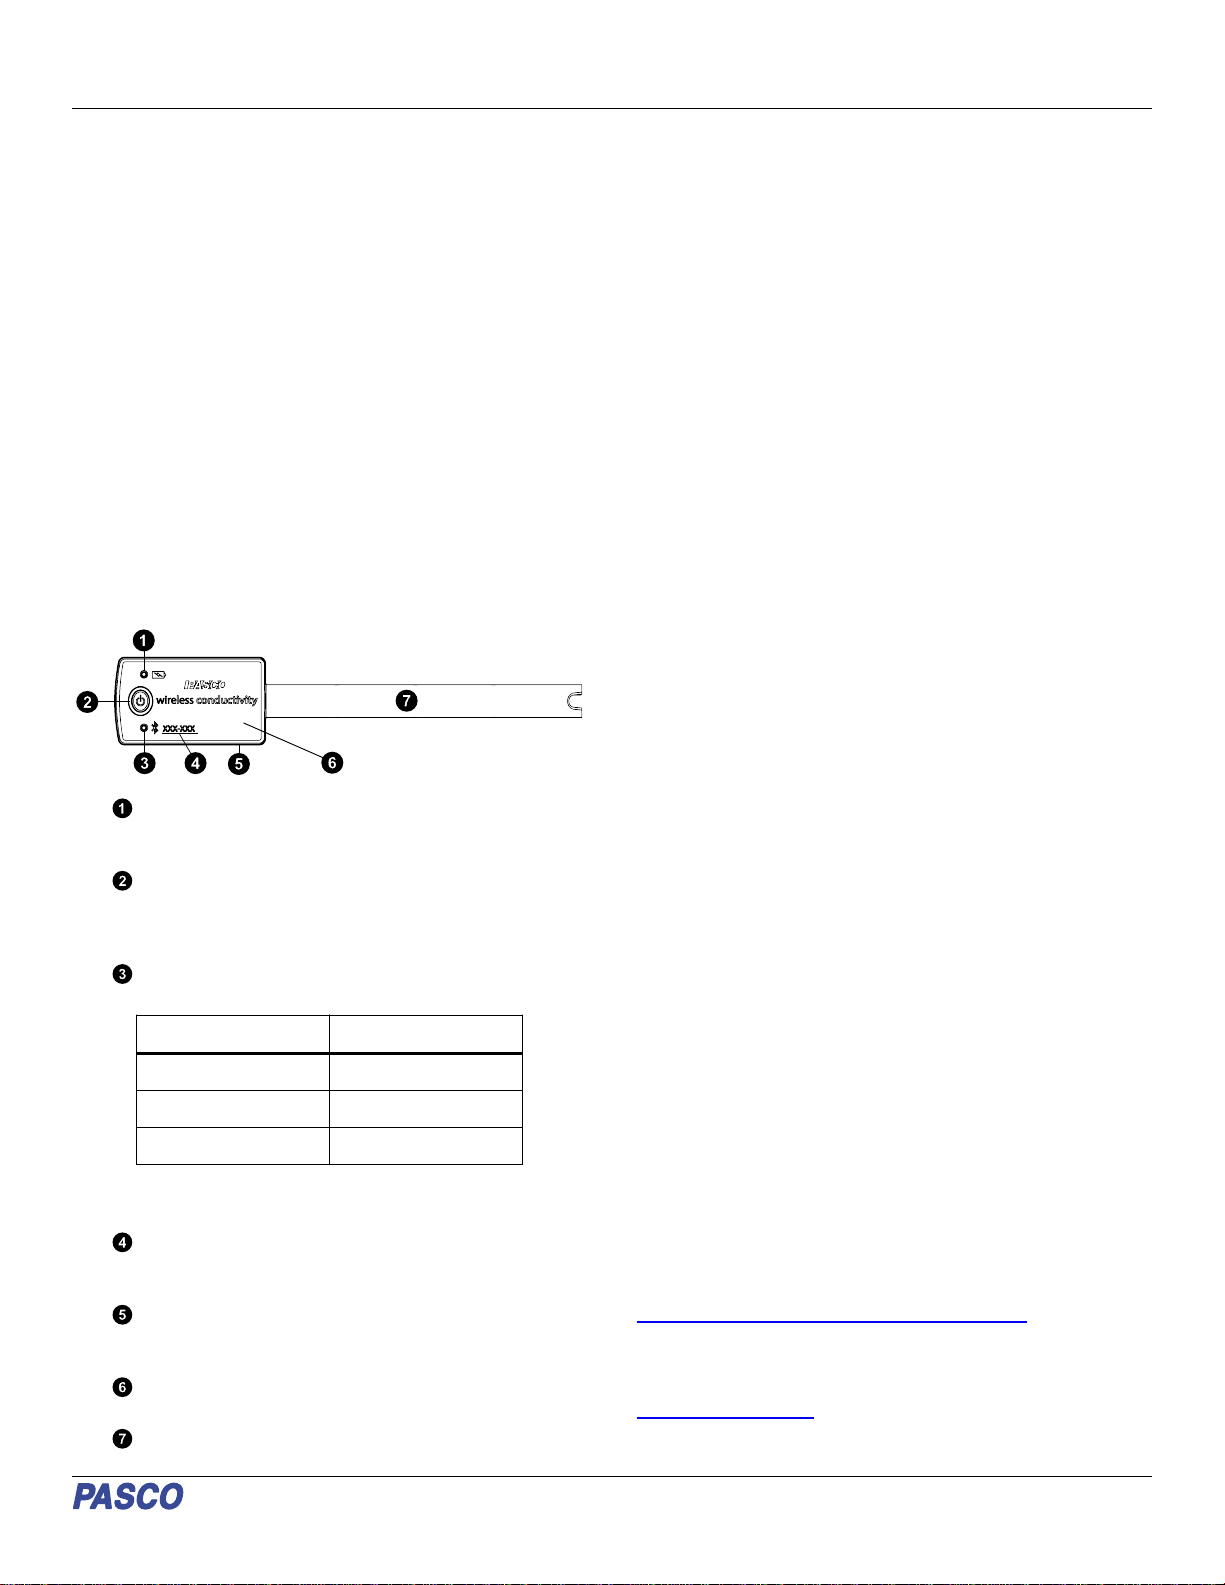
If the sensor’s Battery Status LED blinks red, the battery may
need to be replaced. Replacing the battery requires removing
the Battery Compartment Door on the bottom of the sensor,
removing the old battery, installing a new battery of the same
type, and replacing the Battery Compartment Door. This
procedure requires a coin and a CR2032 three volt battery, such
as those included in the PS-3504 Coin Cell Battery Pack.
NOTE: This type of battery is also commonly
available in electronic and commercial stores.
Removing the Battery Compartment Door
Coin
Slot
Second mark
Hold the sensor with the bottom
side up. Insert a coin into the
slot and use it to turn the
Battery Compartment Door
counterclockwise until the
indicator on the door is aligned
with the second mark on the
sensor.
Turn the sensor so the bottom
side is down, allowing the
Battery Compartment Door to
drop into the palm of your hand.
Make sure that the battery door
gasket stays on the door. The gasket is an "O-ring" that is held
in place by the tabs on the door. Do not touch the inside of the
battery compartment, as this may damage the sensor.
Replacing the battery
Gasket ("O-ring")
Tab
Battery
(CR2032)
Battery
Compartment Door
Do not touch!
Remove the used battery from the Battery Compartment Door
and replace it with a new battery of the same type. Note that the
battery is held in place by the small tabs on the door. The side of
the battery with the "+" on it should be against the door.
Replacing the Battery Compartment Door
First mark
Put the Battery Compartment Door,
along with the new battery, back onto
the sensor. Align the indicator on the
door with the second mark, then use
the coin in the slot to turn the door
clockwise until the indicator is aligned
with the first mark on the sensor.
When disposing of the battery, follow
the battery disposal guidelines under
Regulatory information.
Troubleshooting
•If the sensor loses Bluetooth connection and will not
reconnect, try cycling the ON button. Press and briefly hold
the button until the status LEDs blink, then release the
button.
•If the sensor stops communicating with the computer
software or tablet application, try restarting the software or
application.
•If the problem persists, press and hold the ON button for
ten seconds, then release the button. Turn on the sensor in
the usual way.
•If the above instructions do not fix the problem, turn
Bluetooth off and back on for your computer or tablet, then
retry the connection process.
Conductivity Probe maintenance
If readings become variable or well outside the expected range,
use the eraser of a No.2 pencil to clean the pins by pushing
each pin into the eraser material and removing. Repeat until no
film appears around the puncture holes. Rinse and dry the
conductivity probe before putting the sensor away for storage.
The probe fits in the Electrode Support (PS-3505).
Cleaning
When cleaning the probe, select an appropriate solvent for the
contaminants to which the probe is exposed:
•For general deep cleaning, use 0.1 M nitric acid.
•For oils, hot water with dish detergent can be used for
cleaning.
•For solutions containing lime or other hydroxides, clean
with a 5-10% solution of hydrochloric acid. When a stronger
cleaning solution is required, use concentrated hydrochloric
acid mixed into 50% isopropanol.
•For solutions containing algae and bacteria, use chlorine
bleach.
Clean by dipping or immersing the end of the probe in the
cleaning solution, agitating for two or three minutes, and rinsing
first with tap water and then several times with distilled or
deionized water.
Before measurement, immerse the probe in distilled water,
gently tap out any trapped air bubbles, soak for at least an hour
in distilled water, and recalibrate.
Software help
The SPARKvue and PASCO Capstone Help provide additional
information on how to use this product with the software. You
can access the help within the software or online.
SPARKvue
Software: Main Menu > Help
Online: help.pasco.com/sparkvue
PASCO Capstone
Software: Help > PASCO Capstone Help
Online: help.pasco.com/capstone
Wireless Conductivity Sensor | PS-3210A
4

Specifications and accessories
Visit the product page at pasco.com/product/PS-3210A to view
the specifications and explore accessories. You can also
download experiment files and support documents from the
product page.
Experiment files
Download one of several student-ready activities from the
PASCO Experiment Library. Experiments include editable
student handouts and teacher notes. Visit
pasco.com/freelabs/PS-3210A.
Technical support
Need more help? Our knowledgeable and friendly Technical
Support staff is ready to answer your questions or walk you
through any issues.
Chat pasco.com
Phone 1-800-772-8700 x1004 (USA)
+1 916 462 8384 (outside USA)
Email support@pasco.com
Regulatory information
Limited warranty
For a description of the product warranty, see the Warranty and Returns page at
www.pasco.com/legal.
Copyright
This document is copyrighted with all rights reserved. Permission is granted to non-
profit educational institutions for reproduction of any part of this manual, providing
the reproductions are used only in their laboratories and classrooms, and are not
sold for profit. Reproduction under any other circumstances, without the written
consent of PASCO scientific, is prohibited.
Trademarks
PASCO and PASCO scientific are trademarks or registered trademarks of PASCO
scientific, in the United States and in other countries. All other brands, products, or
service names are or may be trademarks or service marks of, and are used to
identify, products or services of, their respective owners. For more information visit
www.pasco.com/legal.
Product end-of-life disposal
This electronic product is subject to disposal and recycling regulations that
vary by country and region.
It is your responsibility to recycle your electronic equipment per your local
environmental laws and regulations to ensure that it will be recycled in a
manner that protects human health and the environment.
To find out where you can drop off your waste equipment for recycling, please
contact your local waste recycle or disposal service, or the place where you
purchased the product.
The European Union WEEE (Waste Electronic and Electrical Equipment) symbol
on the product or its packaging indicates that this product must not be disposed of
in a standard waste container.
CE statement
This device has been tested and found to comply with the essential requirements
and other relevant provisions of the applicable EU Directives.
FCC statement
This device complies with part 15 of the FCC Rules.
Operation is subject to the following two conditions:
(1) This device may not cause harmful interference, and (2) this device must accept
any interference received, including interference that may cause undesired
operation.
Battery disposal
Batteries contain chemicals that, if released, may affect the environment
and human health.
Batteries should be collected separately for recycling and recycled at a
local hazardous material disposal location adhering to your country and
local government regulations.
To find out where you can drop off your waste battery for recycling, please contact
your local waste disposal service, or the product representative.
The battery used in this product is marked with the European Union symbol for
waste batteries to indicate the need for the separate collection and recycling of
batteries.
Product Guide | 012-14997C
5
Table of contents
Other PASCO Accessories manuals

PASCO
PASCO PS-3517 User manual

PASCO
PASCO PasPort PS-2106A User manual

PASCO
PASCO PS-3209 User manual

PASCO
PASCO PS-3517 User manual

PASCO
PASCO PasPort PS-2102 User manual

PASCO
PASCO ME-8953 User manual

PASCO
PASCO PS-3202 User manual

PASCO
PASCO PS-3228 User manual

PASCO
PASCO PASPort PS-2120 User manual

PASCO
PASCO PS-2154A User manual

PASCO
PASCO PS-3208 User manual

PASCO
PASCO Pasport PS-2109 User manual

PASCO
PASCO PS-3224 User manual

PASCO
PASCO PS-3213 User manual

PASCO
PASCO PS-3208 User manual

PASCO
PASCO PS-3248 User manual

PASCO
PASCO CI-6555 User manual

PASCO
PASCO PASPORT PS-2124A User manual

PASCO
PASCO PAS Port PS-2103A User manual

PASCO
PASCO CI-6538 User manual