manuals.online logo
Brands
  1. Home
  2. •
  3. Brands
  4. •
  5. Percussion Play
  6. •
  7. Musical Instrument
  8. •
  9. Percussion Play Soprano Quartet User manual

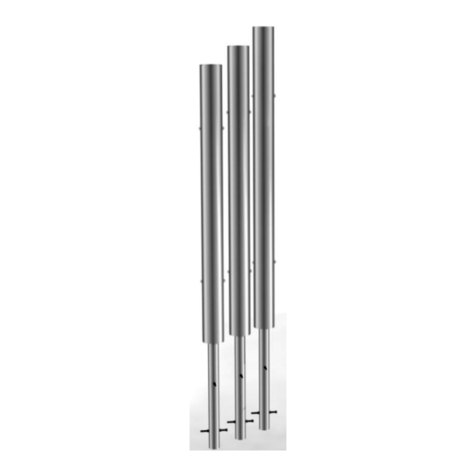
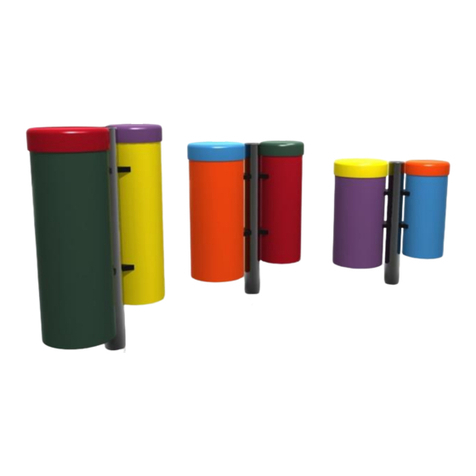
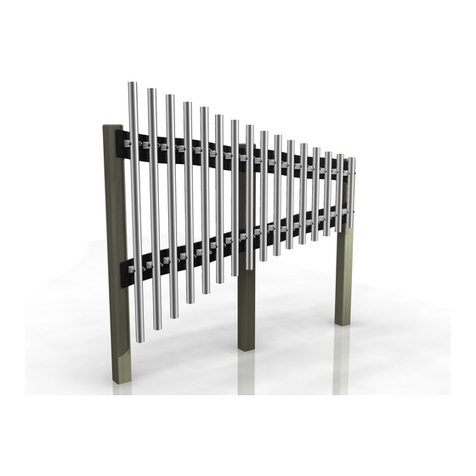
Percussion Play Soprano Quartet User manual

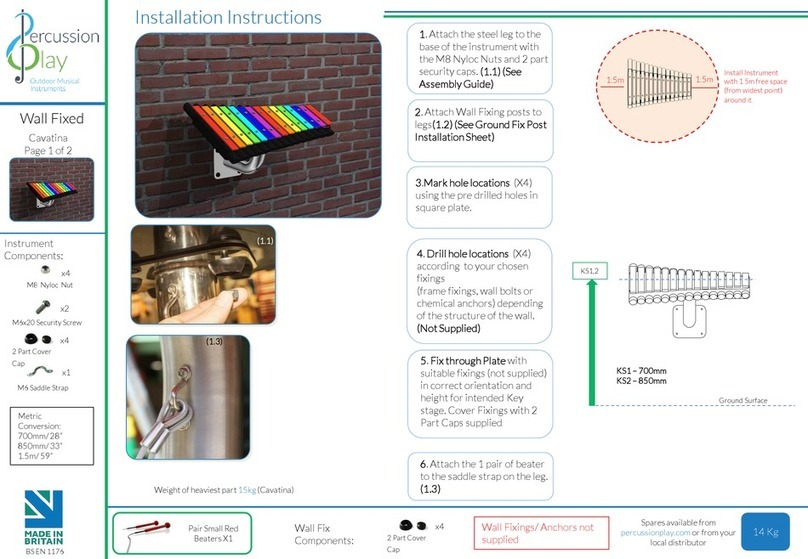
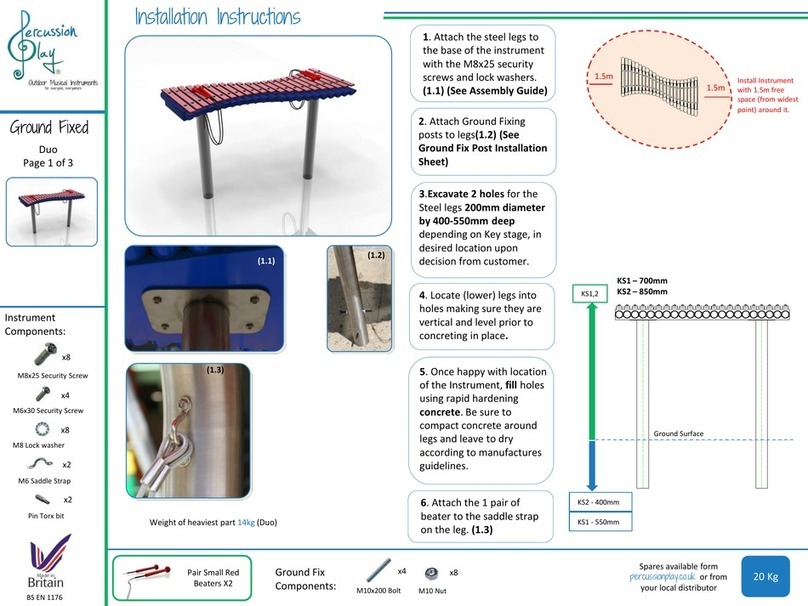
1.Attach thesteellegs to the
baseoftheinstrumentwith
theM8NylocNuts and 2part
securitycaps. (1.1) (See
Assembly Guide) Install Instrument
with1.5m free space
(fromwidestpoint)
around it.
1.5m
GroundFixed
KS2 -400mm
Ground Surface
KS1,2
KS1 -550mm
KS1–700mm
KS2–850mm
InstallationInstructions
2.Attach Ground Fixingposts
to legs(1.2) (See Ground Fix
PostInstallation Sheet)
5.Oncehappywithlocationof
theInstrument, fill holesusing
rapidhardening concrete.Be
sure to compactconcrete
around legs andleave to dry
accordingto manufactures
guidelines.
3.Excavate1hole fortheSteel
legs 250mm diameterby400-
550mm deep dependingon
Keystage, indesiredlocation
upondecisionfrom customer.
4.Locate(lower) legs into
holesmakingsure they are
verticaland levelpriorto
concretingin place.
(1.1) (1.2)
Instrument
Components:
M10x200 Bolt
x2
M10 Nut
x4
6.Attach the1pairofbeater
to thesaddlestrap ontheleg.
(1.3)
Ground Fix
Components:
(1.3)
14 Kg
PairSmall Red
Beaters X1
Cadenza
Page1of3
1.5m
Weightofheaviest part 7kg(Cadenza)
BSEN1176
MetricConversion:
250mm/ 10”
300mm/ 12”
450mm/ 18”
700mm/ 28”
850mm/ 33”
1.5m/ 59”
M8 NylocNut
x4
M6x20 SecurityScrew
x2
M6 SaddleStrap
x1
2PartCover Cap
x4
Sparesavailable from
percussionplay.com orfrom your
localdistributor
COMPONENTS LIST:
2PartCoverCapX4
M10NutX4
M10x200ThreadedBarX2
SaddleStrapX1
M6x20PintorxX2
M8NylocnutX4
PPCADEFRONT PPCADESIDE
GroundFixed
Assembly GuidePPCADE
(1.1)
M10x200 Bolt
x2
M10 Nut
x4
Ground Fix
Components: 14 Kg
PairSmall Red
Beaters X1
Cadenza
Page2of3
BSEN1176
ThreadLock Solution
Required(NotSupplied)
ThreadLock Solution
Required(NotSupplied)
Instrument
Components:
M8 NylocNut
x4
M6x20 SecurityScrew
x2
M6 SaddleStrap
x1
2PartCover Cap
x4
TX 30 Driver Bit
x1 TX 40 Driver Bit
x1
Tools:
Sparesavailable from
percussionplay.com orfrom your
localdistributor
GroundFixed
Components:
GroundFixPostInstallation
M10x200 Bolt
x2
x4
400mm min depth
Cadenza
Page3of3
BSEN1176
InsertM10x200 Threaded
barintopredrilledholes
inGroundFixingPost
FixM10x200Threaded
barinplaceusingM10
Nuts
Fillholewithfastdrying
concretetomanufacturers
specifications.
350
50
350
250
Aggregate
Concrete
Excavateaholewitha
250mmdiametertapering
downto350mmdiameter
and350mmdepth
Compactbaseofholewith
50mmof aggregate.
LowergroundFixpost
attachedof instrument
intohole(check
instrumentstraightand
levelbeforefillingwith
concrete)
123
45
Foundationsshouldnot presentahazard.Thesefoundationsare
recommendedasaguide, formore informationonfoundation
details forvarioussurfacesee Part7ofBSEN1176.
MetricConversion:
50mm/ 2”
250mm/ 10”
350mm/ 14”
400mm/ 16”
450mm/ 18”
Install
Instrument
with1.5m free
space(from
widestpoint)
around it.
1.5m
1.5m
GroundFixed
BabelDrum
Page1of3
M10x200 Threadedbar
x3
M10 BZP Nut
x6
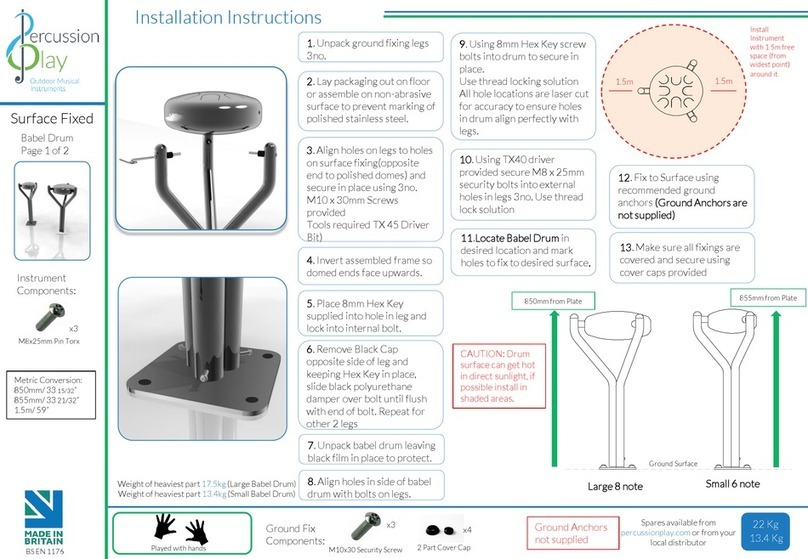
1.Unpackground fixinglegs
3no.
x2
x2
x2
x3
KS2 400mm
Ground Surface
KS1 –700mm
KS2 –870mm
Adult-1070mm
Adult
InstallationInstructions
Large8note Small 6note
Playedwithhands
22 Kg
13.4 Kg
KS2
Adult400mm
KS2 600mm
KS1 770mm
KS1 570mm
Ground Fix
Components:
Weightofheaviest part 17.5kg(Large Babel Drum)
Weightofheaviest part 13.4kg(Small Babel Drum)
BSEN1176
MetricConversion:
200mm/ 8”
400mm/ 16”
570mm/ 22”
600mm/ 24”
700mm/ 28”
770mm/ 30”
870mm/ 34”
1070mm/ 42”
1.5m/ 59”
CAUTION:Drum
surfacecangethot
indirect sunlight,if
possibleinstall in
shadedareas.
Sparesavailable form
percussionplay.com orfrom your
localdistributor
2.Laypackagingouton floor
orassembleonnon-abrasive
surfaceto preventmarkingof
polishedstainless steel.
3.Align holeson legs
(oppositeend to polished
domes)and secure in place
using3no. M10 x 200mm
threadedbarand 6no. M10
nuts provided
Tools required2no. 17mm
metricspanner/wrench (11/16
inch oralternativelyusing
adjustablewrench)
4.Invertassembledframeso
domed endsfaceupwards.
5.Place8mm HexKey
suppliedinto holeinlegand
lockinto internalbolt.
6.Remove M10 nuton
oppositesideoflegand
keepingHexKeyinplace,slide
blackpolyurethanedamper
over bolt until flushwith end
ofbolt. Repeatforother 2legs
8.Align holesin sideofbabel
drum with bolts on legs.
9.Using8mm HexKeyscrew
bolts into drum to secure in
place.
Usethread lockingsolution
All holelocationsare laser cut
foraccuracyto ensure holesin
drum alignperfectlywith legs.
7.Unpackbabeldrum leaving
blackfilminplaceto protect.
10.UsingTX40 driver provided
secure M8x 25mm security
bolts into externalholesin
legs 3no. Usethread lock
solution
Instrument
Components:
M8x25mm Pin Torx
x3
GroundFixed
BabelDrum
Page2of3
Assembly GuidePPBDL-S
Playedwithhands
Instrument
Components:
M10x200 Threadedbar
x3
M10 BZP Nut
x6
Ground Fix
Components: 22 Kg
13.4 Kg
BSEN1176
Sparesavailable form
percussionplay.com orfrom your
localdistributor
M8x25mm Pin Torx
x3
1 2 3
ThreadLock Solution
Required
ThreadLock Solution
Required
Hex T Key x1 TX 40 Driver Bit
x1
Tools:
Remove M10
Nutsbefore
installingDrum
250
450
350
InsertM10x200 Threaded
barintopredrilledholes
inFrameofBabel Drum
usingM10 BZPNuts
Excavateaholeswitha
250mmdiametertapering
downto350mm diameter
and 450mmdepth
Compactbaseofholewith
50mm of aggregate.
Lowerground Fixpost
attachedtoinstrument
intohole(check
instrumentstraight and
level beforefillingwith
concrete) Fillholewithfastdrying
concretetomanufacturers
specifications.
40050
IfDrumneedsto
bepositioned
loweradeeper
holecanbe
excavated.
GroundFixed
GroundFixInstallation
(1.1)
12
3
4
BabelDrum
Page3of3
M10x200 ThreadedBar
x3
M10 BZP Nut
x6
Components:
BSEN1176
Foundationsshouldnot presentahazard.Thesefoundationsare recommendedasaguide,
formore informationonfoundationdetails forvarioussurfacesee Part7ofBSEN1176.
MetricConversion:
50mm/ 2”
250mm/ 10”
350mm/ 14”
400mm/ 16”
450mm/ 18”
GroundFixed
Freechimes
Alto/ Soprano
Page1of4
Components:
1. Carefully lay2xlegs ona level
surface and checkdistance
between legsis equal.Lineup
pre drilledholesinthe
backboardswith theholesinlegs
and ensure theinstrumentis
alignedsquare with thelegs. Fix
inplaceusing M10x50mmscrews
supplied(see installationguide)
3.Excavate2holes onsiteof
installationminimum 600mm
deep (adjust depth accordingto
agerangeforintendedplayers)
4. Carefully raise the instrument
fromtheground withlegs
attached andlocate(lower) legs
intoholes makingsure they are
verticaland levelpriorto
concretingin place.(See Ground
Fix Sheet)
InstallationInstructions
5.Oncehappywithlocationand
levels, fill holesusingrapid
hardening concrete.Be sure to
compactconcretearound legs
and leave to dry accordingto
manufacturesguidelines
6.Beaterscan befixedto
Steelposts with fixings
provided
KS1,2,
KS1–800mm
KS2–950mm
Adult -1200mm
Ground Surface
PairSmall
Beaters X1 16 Kg
BSEN1176
1.5m
Weightofheaviest part 8.35kg(Freechimes)
1.5m
600mm
Install Instrument
with1.5m free space
(fromwidestpoint)
around it.
M6x20mm
SecureScrew
X4
EyeStraps
X2
M10x50mm
SecureScrew
X4
M10x200 ThreadedBar
x4
M10 Nut
x8
Ground Fix
Components:
MetricConversion:
600mm/ 24”
800mm/ 31”
950mm/ 37”
1200mm/ 47”
1.5m/ 59”
Sparesavailable form
percussionplay.com orfrom your
localdistributor
2.Attach Ground Fixingposts to
legs (See Ground FixPost
Installation Sheet)
M10x70 SecurityScrew
x2
M10 BarrelNut
x2
COMPONENTSLIST:
SaddleStrapX2
M10x50PintorxX4
M10NutX8
M10x200 Threaded Bar X4
M6x20PintorxX4
M10x70PintorxX2
M10 Barrel NutPintorxX2
GroundFixed
Assembly GuidePPFREC
16 Kg
BSEN1176
Freechimes
Alto/ Soprano
Page2of4
PairSmall
Beaters X1
TX 30 Driver Bit
x1 TX 45 Driver Bit
x1
Tools:
Components:
M6x20mm
SecureScrew
X4
EyeStraps
X2
M10x50mm
SecureScrew
X4
Ground Fix
Components:
ThreadLock Solution
Required(NotSupplied)
ThreadLock Solution
Required(NotSupplied)
Sparesavailable form
percussionplay.com orfrom your
localdistributor
M10x200 ThreadedBar
x4
M10 Nut
x8
M10x70 SecurityScrew
x2
M10 BarrelNut
x2
InsertM10x200Threaded
barintopredrilled holes
inGroundFixingPost
FixM10x200Threaded
barinplaceusingM10
Nuts
Excavate11holeswitha
250mmdiametertapering
downto350mmdiameter
and650mm depth
Compactbaseofholewith
50mmofaggregate.
LowergroundFixpost
attachedtoinstrument
intohole(check
instrumentstraightand
levelbeforefillingwith
concrete)
Fixholewithfastdrying
concretetomanufacturers
specifications.
LocatetheGroundfix Post
intothelegofthe
instrument.
FixinstrumenttoGround
fixpostusingM10bolt
andBarrelNutanduse
threadlockingsolution
topreventfixingsworking
loose.
650
50
350
250
Aggregate
Concrete
GroundFixed
GroundFixPostInstallation
(1.1)
1 2 3
56
600mm max depth
7
4
M10x200 ThreadedBar
x4
M10 BZP Nut
x8
M10 BarrelNut
x2
M10x70 SecurityScrew
x2
Components: Ground fixtube
protrudes 300mm from
ground surfacethat
inserts intothe base of
the chime post
TX 45 Driver Bit
Tools:
x2
BSEN1176
ThreadLock Solution
Required(NotSupplied)
ThreadLock Solution
Required(NotSupplied)
Foundationsshouldnot presentahazard.Thesefoundationsare recommended
asaguide, formore informationon foundationdetails forvarioussurfacesee
Part7ofBSEN1176.
MetricConversion:
50mm/ 2”
100mm/ 4”
250mm/ 10”
350mm/ 14”
600mm/ 24”
650mm/ 26”
Freechimes
Alto/ Soprano
Page3of4
Excavate2holeswitha250mmdiameter
taperingdownto350mmdiameterand
minium650mmdepth
Compactbaseofhole with50mm of
aggregate.LowergroundFixposts
attachedtoinstrumentintohole (check
instrumentstraightandlevel,andat
correctheightbeforefillingwith
concrete)
Carefullylay2xlegsonalevelsurface.
Lineuppredrilledholesinthe
backboardswiththelegsandensurethe
instrumentisalignedsquarewiththe
legs.Fixinplaceusing8x70mmscrews
supplied
Fillholeswithfastdryingconcrete to
manufacturersspecifications.If posts
protrudeaboveinstrumenttheycanbe
cutdown
650
350
250
50 600
GroundFixInstallation
(1.1)
1
23 4
GroundFixed
BSEN1176
Freechimes
Alto/ Soprano
Page4of4
Foundationsshouldnot presentahazard.Thesefoundationsare
recommendedasaguide, formore informationonfoundation
details forvarioussurfacesee Part7ofBSEN1176.
Minimuminstallationdepthrequired 650mm,tosetheightof
instrumentburydeeperuntil optimumplayingheightisachieved.
MetricConversion:
50mm/ 2”
250mm/ 10”
350mm/ 14”
600mm/ 24”
472mm/ 1ft6 37/64 “
709mm/ 2ft3 29/32 “
GroundFixed
5.Oncehappywithlocationof
theInstrument, fill holeusing
rapidhardening concrete.Be
sure to compactconcrete
around legs andleave to dry
accordingto manufactures
guidelines.
2.Attach Ground Fixings to
legs(1.2) (See Ground FixPost
Installation Sheet)
3.Excavate1hole fortheSteel
leg 250mm diameterby
300mm deep,indesired
locationupondecisionfrom
customer.
4.Locate(lower) legs into hole
makingsure they are vertical
and levelpriorto concretingin
place.
1.Attach thesteellegto each
ofthecongaswith the
M10x30 securityscrews,
square washersand PU
mounts. (1.1) (See Assembly
Guide)
300mm
Ground Surface
S,M,L
Small –800mm
Medium–800mm
Large-800mm
InstallationInstructions
(1.1) (1.2)
Instrument
Components:
M10x50 SecurityScrew
x4
M10x50x3Square washer
x4
M10x200 Bolt
x2
M10 Nut
x4
Ground Fix
Components:
PU200 Mount
PU250 Mount
x2
x2
Install Instrument
with1.5m free space
(fromwidestpoint)
around it.
1.5m
1.5m
Playedwithhands
Congas
Page1of3
Weightofheaviest part 3.8kg(Large drumSmall Congas)
Weightofheaviest part 4.5kg(Large drumMediumCongas)
Weightofheaviest part 5.2kg(Large drumLarge Congas)
BSEN1176
14.8 Kg
15 Kg
20 Kg
MetricConversion:
250mm/ 10”
400mm/ 16”
800mm/ 31”
1.5m/ 59”
Sparesavailable form
percussionplay.com orfrom your
localdistributor
PPCONGFRONT PPCONGSIDE
PPCONGPLAN
M10x50PintorxX4
M10x50x3squarewasherX4
M10NutX4
M10x200ThreadedBarX2
COMPONENTSLIST:
PUMOUNT200 X2
PUMOUNT250 X2
GroundFixed
Instrument
Components:
Assembly GuidePPCONG
(1.1)
Ground Fix
Components:
M10x30 SecurityScrew
x4
M10x50x3Square washer
x4
M10x200 Bolt
x2
M10 Nut
x4
PU200 Mount
PU250 Mount
x2
x2
Playedwithhands
Congas
Page2of3
TX 45 Driver Bit
Tools:
x1
BSEN1176
14.8 Kg
15 Kg
20 Kg
ThreadLock Solution
Required(NotSupplied)
ThreadLock Solution
Required(NotSupplied)
ThreadLock Solution
Required(NotSupplied)
Sparesavailable form
percussionplay.com orfrom your
localdistributor
InsertM10x200 Threaded
barintopredrilledholes
inGroundFixingPost
FixM10x200Threaded
barinplaceusingM10
Nuts
Fillholewithfastdrying
concretetomanufacturers
specifications.
350
50
350
250
Aggregate
Concrete
Excavateaholewitha
250mmdiametertapering
downto350mmdiameter
and350mmdepth
Compactbaseofholewith
50mmof aggregate.
LowergroundFixpost
attachedof instrument
intohole(check
instrumentstraightand
levelbeforefillingwith
concrete)
GroundFixed
Components:
GroundFixPostInstallation
M10x200 Bolt
x2
x4
300mm min depth
BSEN1176
123
45
Foundationsshouldnot presentahazard.Thesefoundationsare
recommendedasaguide, formore informationonfoundation
details forvarioussurfacesee Part7ofBSEN1176.
MetricConversion:
50mm/ 2”
250mm/ 10”
350mm/ 14”
400mm/ 16”
450mm/ 18”
Congas
Page3of3

Other Percussion Play Musical Instrument manuals

Percussion Play CAVATINA Service manual

Percussion Play

Percussion Play CAVATINA Service manual

Percussion Play Babel Drum Service manual

Percussion Play

Percussion Play Babel Drum Service manual

Percussion Play Congas User manual

Percussion Play

Percussion Play Congas User manual

Percussion Play Harmony Bells User manual

Percussion Play

Percussion Play Harmony Bells User manual

Percussion Play Duo User manual

Percussion Play

Percussion Play Duo User manual

Percussion Play Cadenza User manual

Percussion Play

Percussion Play Cadenza User manual

Percussion Play PPMIRC User manual

Percussion Play

Percussion Play PPMIRC User manual

Percussion Play Ground Fixed Marimba User manual

Percussion Play

Percussion Play Ground Fixed Marimba User manual

Percussion Play TUTTI User manual

Percussion Play

Percussion Play TUTTI User manual

Percussion Play Surface Fixed User manual

Percussion Play

Percussion Play Surface Fixed User manual

Percussion Play OPC300 User manual

Percussion Play

Percussion Play OPC300 User manual

Percussion Play Rainbow Trio Chimes User manual

Percussion Play

Percussion Play Rainbow Trio Chimes User manual

Percussion Play Ground Fixed User manual

Percussion Play

Percussion Play Ground Fixed User manual

Percussion Play Ground Fixed Grand Marimba User manual

Percussion Play

Percussion Play Ground Fixed Grand Marimba User manual

Percussion Play Congas User manual

Percussion Play

Percussion Play Congas User manual

Percussion Play Quintet Ensemble User manual

Percussion Play

Percussion Play Quintet Ensemble User manual

Percussion Play Duo User manual

Percussion Play

Percussion Play Duo User manual

Percussion Play PPCONG User manual

Percussion Play

Percussion Play PPCONG User manual

Percussion Play Capella User manual

Percussion Play

Percussion Play Capella User manual

Percussion Play Surface Fixed Tubular Bells User manual

Percussion Play

Percussion Play Surface Fixed Tubular Bells User manual

Percussion Play Emperor Chimes User manual

Percussion Play

Percussion Play Emperor Chimes User manual

Percussion Play Soprano Pentatonic User manual
Percussion Play

Percussion Play Soprano Pentatonic User manual

Percussion Play Sansa Rimba User manual

Percussion Play

Percussion Play Sansa Rimba User manual

Percussion Play Freechimes Symphony User manual

Percussion Play

Percussion Play Freechimes Symphony User manual

Popular Musical Instrument manuals by other brands

Yamaha TRB-6II Service manual

Yamaha

Yamaha TRB-6II Service manual

Yamaha RY30 operating manual

Yamaha

Yamaha RY30 operating manual

Galileo Milano 3G owner's manual

Galileo

Galileo Milano 3G owner's manual

Korg TRITON Musical Instrument user guide

Korg

Korg TRITON Musical Instrument user guide

thomann DP-85 Arranger owner's manual

thomann

thomann DP-85 Arranger owner's manual

Alternate Mode malletKAT PRO With Sounds manual

Alternate Mode

Alternate Mode malletKAT PRO With Sounds manual

Bontempi 15 4911 owner's manual

Bontempi

Bontempi 15 4911 owner's manual

Peavey Cirrus operating guide

Peavey

Peavey Cirrus operating guide

Yamaha Clavinova CLP-20 owner's manual

Yamaha

Yamaha Clavinova CLP-20 owner's manual

padpimps ELECTRICBASS Installation & user guide

padpimps

padpimps ELECTRICBASS Installation & user guide

Clavitech TG8865 user manual

Clavitech

Clavitech TG8865 user manual

Technics SX-PX33V manual

Technics

Technics SX-PX33V manual

Roland FP-10 owner's manual

Roland

Roland FP-10 owner's manual

Yamaha Electone CSY-2A Guide

Yamaha

Yamaha Electone CSY-2A Guide

Yamaha Silent Piano SC2 owner's manual

Yamaha

Yamaha Silent Piano SC2 owner's manual

Suzuki G-33 Easy Assembly Guide

Suzuki

Suzuki G-33 Easy Assembly Guide

Kawai MR370 owner's manual

Kawai

Kawai MR370 owner's manual

Vangoa BANJO user guide

Vangoa

Vangoa BANJO user guide

manuals.online logo
manuals.online logoBrands
  • About & Mission
  • Contact us
  • Privacy Policy
  • Terms and Conditions

Copyright 2025 Manuals.Online. All Rights Reserved.