IMPORTANT SAFETY INSTRUCTIONS
WARNING – DISCONNECT FROM POWER BEFORE
OPENING FOR SERVICING
PRODUCT DESCRIPTION
This PestWest Mantis Uplight is made using the highest
quality materials. The bodywork is sprayed with
conformal polyester powder-coated nish over a zintex
(rust-resistant) steel chassis.
UNPACKING YOUR UNIT
Each unit is carefully inspected and packed before leaving
our factory. Before discarding the outer carton, examine
for obvious evidence of transport damage. Remove the
unit and pay particular attention to the removal of all
packing materials including any transit packing. Including
the release paper o the glue board.
MODE OF OPERATION
The PestWest Mantis Uplight y trap operates on the
principal that most ying insects are attracted to light,
particularly to the ultra violet (UV) end of the light
spectrum. Since insects are still very active and will y at
night, traps should be left operating continuously, i.e.: 24
hours a day.
SITING
It is impossible to give one set of recommendations
to cover all requirements or situations. These general
guidelines are given in the knowledge that some of
them apparently conict with others. Users should adopt
those that best t their needs or seek expert advice. As a
general rule:
1. Electric y traps should be positioned so as to
minimize competition from other light sources, so do
not mount adjacent to windows. In food areas, mount
the trap close to, but not directly over, exposed food
or food preparation surfaces (preferably to attract
ies away from food preparation areas).
2. Observe where the ies tend to congregate and if
possible, put your y trap, in or close to that area.
3. Position traps in an“interception”position from the
principal point of y entry - normally doors and/or
windows. In food establishments, ies are more likely
to come in through the back door rather than the
front, because that is where the kitchen refuse and
garbage cans are kept.
4. Mount the trap in a convenient location for changing
the glue board; do not place over working machinery
where access may be dicult or dangerous.
COVERAGE
Areas of attraction of ies/coverage are given in the
instructions for each unit. It should be borne in mind that
the brighter the surrounding day light, the greater the
number of units, which may be required for a given area.
MAINTENANCE
To maintain the attractive appearance of the units, they
should be cleaned/wiped down as often as required.
Use a cloth dampened with water and detergent or
a proprietary cleaner. Do not use scouring pads or
abrasives.
INSTALLATION INSTRUCTIONS
Select the optimum position for the ytrap using the
guidelines given (see“Siting”). This PestWest Mantis
Uplight has 2 keyhole slots on the rear panel, to permit
wall mounting using the screws and masonry plugs
supplied. The units are tted with a 6 foot input cable and
operate from a 110-120 volt 60Hz supply. If it is necessary
to extend the input cable, it is recommended that a
certied electrician perform this work. Should a moulded-
on plug be removed from the lead supplied, this must be
disposed of safely. Ensure that once installed, the power
lead is adequately secured. Before installing any Mantis,
please remove all packaging.
Using the unit as a template, mark o the 2 xing points
onto the mounting surface. Using the screws and plastic
plugs provided, x the Uplight body horizontally in place.
NB: If the wall is of plasterboard, stud partition etc,
suitable blind type xings must be used to ensure the unit
will be securely positioned.
Once the unit is installed, you will need to remove the
backing paper from the glue boards to reveal the glued
surface. This is most easily achieved before the glue board
is slotted into the unit.
GROUNDING INSTRUCTIONS
This appliance must be grounded. In the event of
malfunction or breakdown, grounding provides a path
of least resistance for electric current to reduce the
risk of electric shock. This appliance is equipped with a
cord having an equipment -grounding conductor and
a grounding plug. The plug must be plugged into an
appropriate outlet that is properly installed and grounded
in accordance with all local codes and ordinances.
DANGER – Improper connection of the equipment-
grounding conductor can result in a risk of electric
shock. The conductor with insulation having an outer
surface that is green with or without yellow stripes is the
equipment-grounding conductor. If repair or replacement
of the cord or plug is necessary, do not connect the
equipment-grounding conductor to a live terminal. Check
with a qualied electrician or serviceman if the grounding
instructions are not completely understood, or if in doubt
as to whether the appliance is properly grounded. Do not
modify the plug provided with the appliance – if it will not
t the outlet, have a proper outlet installed by a qualied
electrician.
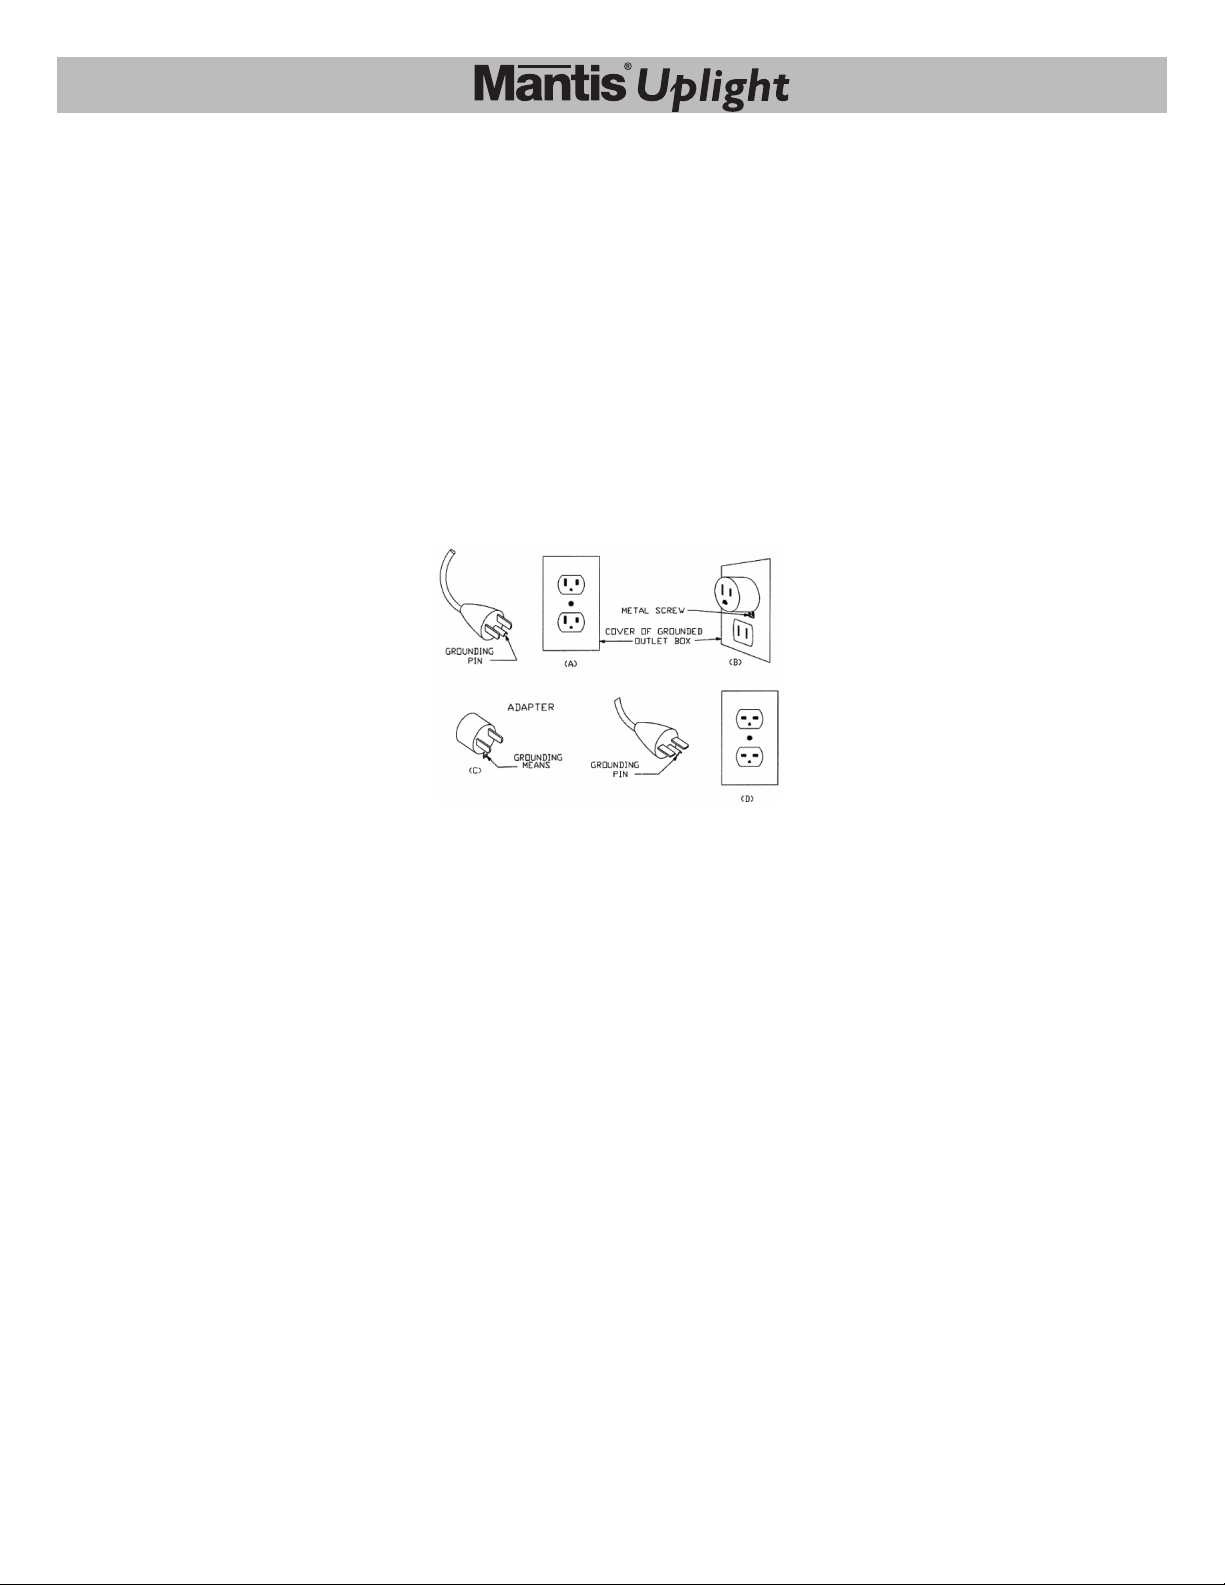
Figure 1 – Grounding Methods
This appliance is for use on a nominal 120V circuit, and has
a grounding plug that looks like the adaptor illustrated in
sketch A Figure 1. A temporary adaptor, which looks like
the adaptor illustrated in sketches B and C, may be used
to connect this plug to a 2-pole receptacle a shown in
sketch B if a properly grounded outlet is not available. The
temporary adaptor should be used only until a properly
grounded outlet can be installed by a qualied electrician.
The green colored rigid ear, lug, and the like, extending
from the adaptor must be connected to a permanent
ground such as a properly grounded outlet box cover.
Whenever the adaptor is used, it must be held in place by
the metal screw.
IMPORTANT SAFETY INSTRUCTIONS
WARNING – when using electric appliances, basic
precautions should always be followed, including the
following:
a) Read all the instructions before using the appliance.
b) Only use adaptors and attachments recommended or
sold by the manufacturer
c) Do not use outdoors.
d) To disconnect this appliance, remove plug from
outlet
e) Do not unplug by pulling on cord. To unplug, grasp
the plug, not the cord.
f) Unplug from outlet before serving for cleaning.
g) Do not operate the appliance with a damaged cord
or plug, or after the appliance malfunctions or is
dropped or damaged in any manner. Return the
appliance to the nearest authorized service facility
for examination, repair, or electrical or mechanical
adjustment.
PRECAUTIONS
All PestWest traps are fully insulated, Class I appliances,
nevertheless, sensible precautions should be observed:
• Do not install where dangerous concentrations of
ammable gases or dusts are likely to occur.
• Ensure the unit is properly grounded.
• Avoid working on the machines while they are still
connected to the mains.
• Ensure that operators have an adequate and secure
working platform when working on the machines.
• Do not allow the glue board to become over-lled
with dead insects. Change at regular intervals as
required by the catch or at least every 8 weeks.
RENEWING STICKY BOARDS
ALWAYS UNPLUG THE MACHINE BEFORE SERVICING.
Due to insect contamination the glue boards should be
changed when full or at least every eight weeks. PestWest
Mantis range all use the same size of board.
Always t PestWest glue boards to ensure peak eciency.
Remove the backing paper from the new board in a
single swift motion; otherwise it will tend to remain rmly
attached. Should this occur, re-apply the peeled back
section and repeat.
Other brands of glue boards may not have eective UV
inhibitors that PestWest brand incorporates in this system,
there fore it is recommended that ONLY PestWest brand
glue boards and suggested components be installed in
the systems.
While the recommended eight-week board replacement
cycle remains unaltered, the eective life of the glue for
a wide range of insects is enhanced. Whether you are
changing your lamps every 12 months and re-using your
shield or tting it for the rst time.
Mantis Uplight - This unit must be used with black glue
boards. Simply remove the used glue board from the
machine by pulling out of the Uplight cover. Fold the
replacement glue board slightly along its perforated line
to improve insertion into the unit and remove the backing
paper. Insert the new glue board edges under the guides
with the sticky side facing the lamps.
UV LAMP REPLACEMENT
Lamps are most attractive to the target ying insects
when less than one year. This is because the UV light
emitted by the lamps at a wavelength of 350-375
nanometres diminishes with use. Light of this wavelength
is invisible to the human eye. The blue/violet colored
light, which we can see is not at all representative of the
actual UV light emissions. Daily switching on and o of
the lamps results in an even faster loss of the eective UV
emission.
THEREFORE IT IS MOST EFFECTIVE TO LEAVE THE
UNITS SWITCHED ON CONTINUOUSLY AND TO
CHANGE THE LAMPS AT LEAST ONCE PER YEAR
(PREFERABLY AT THE ONSET OF INCREASED FLIGHT
ACTIVITY AFTER THE WINTER).
PestWest oer both standard and shatter resistant
(coated) lamps. The shatter resistant lamp is intended
for use in glass exclusion zones. The coating on
lamps supplied with our units is of the highest quality
available, using a material that is both UV and operating
temperature tolerant while allowing high emissions of the
critical (365nm) wavelength of light. Replacements should
be of similar performance.
Mantis Uplight – Grasp the lamp and rotate in either
direction (90°). After 2 clicks are heard, the lamp may be
removed by sliding out of the lamp holder. Fitting the
new lamp is a reversal of the above procedure. For optimal
performance, it is the recommendation of the lamp
manufacturer to replace the starter every time you replace
the lamp to keep fresh components in the machine at all
times.
REPLACEMENT PARTS
Quantum BL 15W X 18”T8 Standard lamp
Product code: 130-000160/TUB15W430
Quantum BL 15W X 18”T8 Shatter resistant lamp
Product code: 130-000171/TUB15W490
Classic premium black glue board
Product code: 135-000047/BOACHA850
Other alternative glue boards available, visit www.
pestwest.com
Starters: Series Starter S22
Product code: 800-000292
THIS PRODUCT IS INTENDED FOR
COMMERCIAL USE ONLY
SAVE THESE INSTRUCTIONS