pewag RSC User guide

Mounting instruction
for RSC
Hinweise Fahrzeugherstellerdaten und beiliegende Warnhinweise beachten!
Einsatzbereich PKW. Für Reparaturen wenden Sie sich bitte an den Fachhandel.
Technische Anpassungen und Farbänderungen vorbehalten.
Note Please refer to the vehicle manufacturer’s information and warnings! For use
with passenger cars only. For repairs, please contact your specialist dealer. Please be
advised that all products are subject to technical adjustments and changes in colour.
Avertissement Respectez les préconisations du constructeur ! Usage prévu
pour véhicules de tourisme. Pour toute réparation veuillez contacter votre revendeur.
Sous réserve de modifications techniques et changement de couleur.
Instructies a.u.b aanwijzingen in uw auto instructieboekje en bijgaande
informatie goed lezen. Geschikt voor personenwagens. Voor reparaties, kunt u
terecht bij uw dealer. Technische aanpassingen en kleurwijzigingen voorbehouden.
Avvertenze Osservate quanto indicato nel manuale uso e manutenzione
della ditta costruttrice del mezzo! Ambito d´impiego: autovetture. Per riparazione
rivolgetevi esclusivamente a rivenditori autorizzati. Si prega di voler prestare
attenzione a possibili adeguamenti tecnici e cambi di colore.
Upozornění bejte pokynů a varování výrobce vozu týkající se použití
sněhových řetězů. Použití pouze pro osobní automobily. Ohledně opravy se obraťte
na autorizovaného prodejce. U produktu může dojít k technické úpravěa změně barvy.
Upozornenie Dbajte na pokyny a varovania od výrobcu vozidla týkajúcich
sa použitia snehových reťazí. Použitie iba pre osobné vozidlá. V prípade opravy sa
obráťte na autorizovaných predajcov. Pri produkte môže prísť k technickéj úprave a
zmene farby.
Uwaga Łańcuchy przeznaczone są tylko do samochodów osobowych. Należy
stosować się do zapisów i ostrzeżeń zawartych w instrukcji obsługi pojazdu!
W kwestii ewentualnych napraw należy skontaktować się z autoryzowanym
dystrybutorem. Firma pewag zastrzega sobie prawo do zmian technicznych służących
ulepszeniu produktu.
DE
EN
FR
NL
IT
CZ
SK
PL

2
Content
1a
17 19
21/22
17 19
21/22
4 5
6
3a 3b 3c
1b
*
**
*
2b
2a

3
2
2
5
/
4
5
-
1
7
50
mounting video
225/45-17
see next page
-1
195/80-13 840 -4
205/75-13 840 -2
175/80-14 840 -2
185/75-14 840 -1
205/70-14 840 -4
215/65-14 840 -2
235/60-14 840 -2
175/75-15 840 -4
185/70-15 840 -3
195/65-15 840 -1
215/60-15 840 -3
235/55-15 840 -3
195/60-16 840 -3
205/55-16 840 0
215/55-16 840 -4
225/50-16 840 0
235/50-16 840 -4
205/50-17 840 -2
225/45-17 840 -1
235/45-17 840 -4
245/40-17 840 -2
255/40-17 840 -2
265/40-17 840 -4
205/45-18 840 -4
215/40-18 840 0
225/40-18 840 -2
255/35-18 840 -2
265/35-18 840 -4
295/30-18 840 -1
215/35-19 840 -1
225/35-19 840 -3
245/30-19 840 0
255/30-19 840 -2
265/30-19 840 -4
225/30-20 840 -4
205/80-13 850 -4
185/80-14 850 -2
195/75-14 850 -1
tire
dimension chain
size element-
adaption
215/70-14 850 -4
245/60-14 850 -1
185/75-15 850 -4
195/70-15 850 -3
205/65-15 850 -1
225/60-15 850 -2
265/50-15 850 0
275/50-15 850 -3
175/70-16 850 -2
185/65-16 850 0
205/60-16 850 -2
225/55-16 850 -3
245/50-16 850 -2
185/60-17 850 -3
205/55-17 850 -4
215/50-17 850 0
225/50-17 850 -4
245/45-17 850 -2
275/40-17 850 -2
215/45-18 850 -2
235/40-18 850 0
245/40-18 850 -2
275/35-18 850 -1
285/35-18 850 -4
235/35-19 850 0
245/35-19 850 -3
275/30-19 850 -1
285/30-19 850 -3
245/30-20 850 -3
195/80-14 860 -2
205/75-14 860 -1
225/70-14 860 -3
265/60-14 860 -4
175/80-15 860 0
tire
dimension chain
size element-
adaption
195/75-15 860 -4
205/70-15 860 -2
215/65-15 860 0
225/65-15 860 -4
235/60-15 860 -1
285/50-15 860 -2
175/75-16 860 -3
195/65-16 860 0
205/65-16 860 -4
215/60-16 860 -1
235/55-16 860 -1
255/50-16 860 0
265/50-16 860 -3
185/65-17 860 -4
215/55-17 860 -2
235/50-17 860 -2
255/45-17 860 0
285/40-17 860 0
295/40-17 860 -2
215/50-18 860 -4
225/45-18 860 0
235/45-18 860 -2
255/40-18 860 0
265/40-18 860 -3
295/35-18 860 -1
225/40-19 860 0
235/40-19 860 -3
255/35-19 860 0
265/35-19 860 -2
295/30-19 860 0
225/35-20 860 -1
255/30-20 860 0
275/30-20 860 -4
205/80-14 870 -2
tire
dimension chain
size element-
adaption
215/75-14 870 -1
235/70-14 870 -3
185/80-15 870 0
205/75-15 870 -4
215/70-15 870 -2
245/60-15 870 0
255/60-15 870 -3
275/55-15 870 -2
295/50-15 870 0
185/75-16 870 -2
195/70-16 870 -1
215/65-16 870 -3
225/60-16 870 0
235/60-16 870 -4
245/55-16 870 0
255/55-16 870 -3
205/60-17 870 0
215/60-17 870 -4
225/55-17 870 -1
245/50-17 870 0
255/50-17 870 -3
275/45-17 870 -1
205/55-18 870 -2
225/50-18 870 -2
245/45-18 870 0
255/45-18 870 -3
275/40-18 870 0
285/40-18 870 -3
245/40-19 870 -1
255/40-19 870 -3
275/35-19 870 0
285/35-19 870 -2
295/35-19 870 -4
225/40-20 870 -4
1
2
3
Prepare A

4
tire
dimension chain
size element-
adaption
195/80-13 840 -4
205/75-13 840 -2
175/80-14 840 -2
185/75-14 840 -1
205/70-14 840 -4
215/65-14 840 -2
235/60-14 840 -2
175/75-15 840 -4
185/70-15 840 -3
195/65-15 840 -1
215/60-15 840 -3
235/55-15 840 -3
195/60-16 840 -3
205/55-16 840 0
215/55-16 840 -4
225/50-16 840 0
235/50-16 840 -4
205/50-17 840 -2
225/45-17 840 -1
235/45-17 840 -4
245/40-17 840 -2
255/40-17 840 -2
265/40-17 840 -4
205/45-18 840 -4
215/40-18 840 0
225/40-18 840 -2
255/35-18 840 -2
265/35-18 840 -4
295/30-18 840 -1
215/35-19 840 -1
225/35-19 840 -3
245/30-19 840 0
255/30-19 840 -2
265/30-19 840 -4
tire
dimension chain
size element-
adaption
225/30-20 840 -4
205/80-13 850 -4
185/80-14 850 -2
195/75-14 850 -1
215/70-14 850 -4
245/60-14 850 -1
185/75-15 850 -4
195/70-15 850 -3
205/65-15 850 -1
225/60-15 850 -2
265/50-15 850 0
275/50-15 850 -3
175/70-16 850 -2
185/65-16 850 0
205/60-16 850 -2
225/55-16 850 -3
245/50-16 850 -2
185/60-17 850 -3
205/55-17 850 -4
215/50-17 850 0
225/50-17 850 -4
245/45-17 850 -2
275/40-17 850 -2
215/45-18 850 -2
235/40-18 850 0
245/40-18 850 -2
275/35-18 850 -1
285/35-18 850 -4
235/35-19 850 0
245/35-19 850 -3
275/30-19 850 -1
285/30-19 850 -3
245/30-20 850 -3
195/80-14 860 -2
tire
dimension chain
size element-
adaption
205/75-14 860 -1
225/70-14 860 -3
265/60-14 860 -4
175/80-15 860 0
195/75-15 860 -4
205/70-15 860 -2
215/65-15 860 0
225/65-15 860 -4
235/60-15 860 -1
285/50-15 860 -2
175/75-16 860 -3
195/65-16 860 0
205/65-16 860 -4
215/60-16 860 -1
235/55-16 860 -1
255/50-16 860 0
265/50-16 860 -3
185/65-17 860 -4
215/55-17 860 -2
235/50-17 860 -2
255/45-17 860 0
285/40-17 860 0
295/40-17 860 -2
215/50-18 860 -4
225/45-18 860 0
235/45-18 860 -2
255/40-18 860 0
265/40-18 860 -3
295/35-18 860 -1
225/40-19 860 0
235/40-19 860 -3
255/35-19 860 0
265/35-19 860 -2
295/30-19 860 0
tire
dimension chain
size element-
adaption
225/35-20 860 -1
255/30-20 860 0
275/30-20 860 -4
205/80-14 870 -2
215/75-14 870 -1
235/70-14 870 -3
185/80-15 870 0
205/75-15 870 -4
215/70-15 870 -2
245/60-15 870 0
255/60-15 870 -3
275/55-15 870 -2
295/50-15 870 0
185/75-16 870 -2
195/70-16 870 -1
215/65-16 870 -3
225/60-16 870 0
235/60-16 870 -4
245/55-16 870 0
255/55-16 870 -3
205/60-17 870 0
215/60-17 870 -4
225/55-17 870 -1
245/50-17 870 0
255/50-17 870 -3
275/45-17 870 -1
205/55-18 870 -2
225/50-18 870 -2
245/45-18 870 0
255/45-18 870 -3
275/40-18 870 0
285/40-18 870 -3
245/40-19 870 -1
255/40-19 870 -3
tire
dimension chain
size element-
adaption
275/35-19 870 0
285/35-19 870 -2
295/35-19 870 -4
225/40-20 870 -4
245/35-20 870 -1
255/35-20 870 -3
285/30-20 870 -1
215/80-14 880 -3
225/75-14 880 0
195/80-15 880 0
215/75-15 880 -4
225/70-15 880 -1
195/75-16 880 -2
205/70-16 880 -1
225/65-16 880 -2
245/60-16 880 -3
295/50-16 880 -3
185/70-17 880 0
225/60-17 880 -3
235/55-17 880 0
245/55-17 880 -3
215/55-18 880 -1
235/50-18 880 0
245/50-18 880 -3
275/45-18 880 -4
295/40-18 880 -1
235/45-19 880 -1
245/45-19 880 -4
275/40-19 880 -4
245/40-20 880 -4
265/35-20 880 -1
275/35-20 880 -3
245/35-21 880 -4
285/30-21 880 -4

5
Prepare B
3a 3b 4 5 6
21 üû
ü
û
û
ü

6
Kundeninformation
Das Anpassen der Kette vor der Fahrt ist unbedingt notwendig,
da dies die Montage der Kette bei winterlichen Verhältnissen
beträchtlich vereinfacht. Nur wenn die Kette optimal an den Reifen
und die Felge angepasst ist, ist ein reibungsloses und schnelles
Montieren möglich.
Verpackungsinhalt
1) Adapter für Befestigung an der Radmutter
a) Klemmen mit Schlüsselweite 17, 19
und 21/22 mm
b) Hülsen für Klemmen
2a+b) Abstandhalter
3a) Schraube lang
3b) Schraube mittel
3c) Schraube kurz
4+5) Werkzeug für Größenanpassung der Kette
6) Schraubenschlüssel
*) Gekennzeichnete Teile sind ggf. vormontiert
Anpassung der Kette an die
Dimension (Prepare A)
Für einige Reifengrößen ist eine Anpassung der Schneeketten-
größe notwendig. Lesen Sie Ihre Reifendimension ab, suchen Sie
diese in der hinten angeführten Anpassungstabelle und entfernen
Sie ggf. Verstellelemente (gelb markiert) mit dem beigefügten
Werkzeug wie in der Abbildung gezeigt.
Erklärung: ok = keine Anpassung notwendig, -1 = 1 Element
entfernen, -2 = 2 Elemente entfernen usw. Bei Entfernung von 2
Elementen, immer zwei diagonal voneinander liegende Elemente
entfernen. Bewahren Sie die entfernten Teile auf – die Kette kann
für andere Reifendimensionen wiederverwendet werden.
Hinweis: Angaben sind allgemein gültig und nicht verbindlich.
Diese resultieren aus unseren Tests und Erfahrungen.
Daher ist eine Testmontage vor dem ersten Einsatz dringend zu
empfehlen. Nach ca. 50 m Fahrt Sitz der Kette prüfen. Ev. weitere
Anpassungen vornehmen, d.h. weitere Verstellelemente entfernen,
wenn sich die Kette nicht auf den Reifen zieht.
Anpassung Adapter (Prepare B)
Um den Adapter anzupassen, entfernen Sie Radkappenabdeck-
ungen und Radmutterkappen. Reinigen Sie ggf. den Radbolzen
bzw. diesen Felgenbereich von Schmutz und Eis bevor Sie den
Adapter montieren. Bewegen Sie den Schiebeschalter der Ratsche
auf die Position „open“ und ziehen Sie das Seil, an dem der Adapter
hängt, aus. Um das zu machen, bewegen Sie den Schiebeschalter
so weit wie möglich Richtung „open“. Dann bewegen sie ihn leicht
in Richtung „drive“ zurück und danach kann er bis zum Schluss in
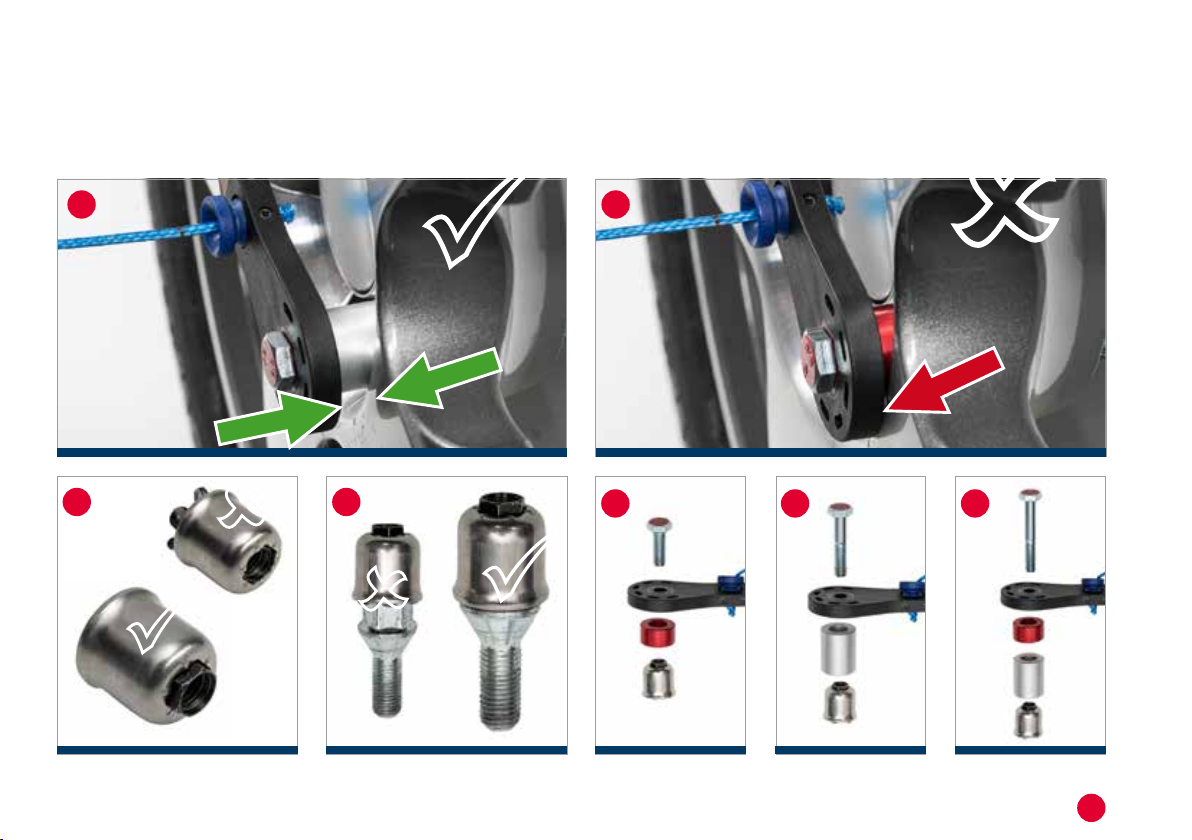
Richtung „open“ bewegt werden. Nun überprüfen Sie, ob der auf
der Kette vormontierte Adapter auf die Radmutter passt. Berührt
der Adapter die Felge wie in Abb. 2 gezeigt, muss der Adapter
verlängert werden (siehe Abb. 4-6). Grundsätzlich gilt: Adapter so
nah als möglich an die Felge schrauben (siehe Abb. 1), ohne dass
dieser die Felge berührt. Ende der Anpassung.
Abb. 3a: Der Sechskant der Klemme muss komplett durch die
Öffnung der Hülse geschoben werden, damit die Klemme
korrekt an der Radmutter befestigt werden kann.
Abb. 3b: Die Klemme muss gerade und vollständig auf den
Sechskant der Radmutter aufgesetzt werden, damit eine
sichere Befestigung erzielt werden kann.
DE

7
DE
Arme der
Kette
Schiebeschalter
Handrad
Ratsche
Laufnetz
Abb. 4: Vormontiert: kurz
Abb. 5: Alternative: mittel ->
Abstandshalter und Schraube tauschen
Abb. 6: Alternative: lang -> Abstandshalter ergänzen und
Schraube tauschen.
Montage für den Einsatz
1. Entfernen Sie Radkappenabdeckungen und Radkappenmuttern.
Entfernen Sie jeglichen Schmutz, Schnee oder Eis. Öffnen Sie
die Arme der bereits angepassten Kette und legen Sie diese über
den Reifen. Schieben Sie alle Arme und das Laufnetz so weit als
möglich auf die Reifenlauffläche.
2. Bewegen Sie den Schiebeschalter der Ratsche nach rechts
in die Position „open“. Um dies zu machen, bewegen Sie den
Schiebeschalter so weit wie möglich Richtung „open“. Dann
bewegen sie ihn leicht in Richtung „drive“ zurück und danach
kann er bis zum Schluss in Richtung „open“ geschoben werden.
3. Nun ziehen Sie das Seil, an dem der Adapter hängt, so weit als
möglich heraus.
4. Setzen Sie jetzt den Adapter auf die Radschraube und ziehen Sie
den Adapter mit dem mitgelieferten Schraubenschlüssel so fest
als möglich. Der Pfeil des Adapters muss wie in Abb. 4a, also zur
Felgenmitte, ausgerichtet sein.
5. Bewegen Sie den Schiebeschalter der Ratsche nach links in
die Position „drive“.
6. Drücken und drehen Sie gleichzeitig das Handrad im
Uhrzeigersinn bis im Anzeigefeld der Pfeil vollständig erscheint
und die Pfeilspitzen sich gegenüberliegen.
7. Drücken Sie die gesamte Ratsche (Abb. 7) Richtung Felge bis Sie
mehrere (4-6) Klicks hören um den Abstand zwischen Ratsche und
Felge zu verringern (Abb. 8).
8. Achtung: Fahren Sie nun zügig los, hierbei sollten die Reifen
jedoch nicht durchdrehen.
Sollte ein zügiges Anfahren nicht möglich sein und/oder sich
die Kette nicht automatisch auf den Reifen ziehen, fahren Sie
½ Radumdrehung und schieben Sie den noch nicht komplett
montierten Teil der Kette auf den Reifen.
Überprüfen Sie den Sitz der Kette nach ca. 50 m.
Demontage
1. Stoppen Sie das Fahrzeug, ohne dabei auf einem der vier Arme
zu stehen.
2. Bewegen Sie den Schiebeschalter der Ratsche nach rechts
in die Position „open“. Um dies zu machen, bewegen Sie den
Schiebeschalter so weit wie möglich Richtung „open“. Dann
bewegen sie ihn leicht in Richtung „drive“ zurück und danach
kann er bis zum Schluss in Richtung „open“ geschoben werden.
Währenddessen drücken Sie die Ratsche gleichzeitig leicht
Richtung Felge.
3. Schrauben Sie den Adapter mit dem Schraubenschlüssel los und
nehmen Sie ihn von der Radmutter.
4. Fassen Sie mit ihren Händen die Kunststoffarme der Kette und
ziehen Sie diese nach vorne vom Reifen herunter.
5. Legen Sie die Kette neben das Rad und fahren Sie langsam von
der Kette, um diese vollständig zu entfernen.
Produkt-
beschreibung

8
Customer Information
It is absolutely necessary to adjust the chain before first use. As a
result mounting is easier in the course of winter conditions. Smooth
and quick mounting is possible only when chain is optimally
adapted to tire and rim.
Content
1) Adapter for fastening to the wheel nut
a) Clamp with wrench width 17, 19 and 21/22 mm
b) Sleeve for clamp
2a+b) Spacer
3a) Screw long
3b) Screw medium
3c) Screw short
4+5) Tools for size adjustment
6) Wrench
*) pre-assembled
Chain Adjustment to the
Dimension (Prepare A)
For some tire sizes an adjustment of the chain dimension is
necessary. Check your tire dimension, look for it in the dimension
setup table at the end, and remove, if necessary, the specified
number of adjustment elements (yellow) with enclosed tools as
shown in the figure.
Explanation: ok = no adjustment necessary, -1 = remove 1
element, -2 = remove 2 elements etc.
For removing 2 or 4 elements, always remove the opposite
elements. Keep the removed parts –this chain can be reused for
other tire dimension. Note: These instructions are generally valid
and non-binding and are results of tests and our experience.
Therefore, a fitting test before the first use is urgently
recommended.
Check the fit of the chain after approx. 50m. Readjust if needed
(remove more adjustment elements if the chain does NOT pull
automatically on the tire).
Adapter Adjustment (Prepare B)
To adjust the adapter, remove the wheel cover and wheel nut caps.
Remove any dirt, snow or ice. Move the slide switch of the ratchet
to the “open” position and pull out the cable on which the adapter
is fixed. To do this, move the slide switch as much as possible in
the direction“open”. After that, move it slightly back in direction
“drive” and then you can move it to the end of direction “open”.
Now check whether the pre-assembled adapter fits onto the wheel
nut. If the adapter touches the rim as shown in figure 2, the adapter
has to be elongate (see fig. 4-6).As a basic principle: screw the
adapter as close as possible to the rim (see fig. 1) without touching
it. End of adjustment.
Fig. 3a: The hexagon of the clamp has to be pushed completely
through the opening of the sleeve. So the clamp can be
fastened correctly to the wheel nut.
Fig. 3b: The clamp must be placed straight and completely on the
hexagon nut of the wheel nut for secure attachment.
Fig. 4: Pre-mounted: short.
Fig. 5: Alternative: medium -> change spacer and screw.
Fig. 6: Alternative: long -> add spacer and change screw.
EN

9
EN
Arms of
chain
Slide switch
Hand wheel
Ratchet
Chain mesh
Mounting for use
1. Remove the wheel cover and nut caps. Remove any dirt, snow or
ice. Open the arms of the adjusted chain and place them over the
tire. Now put all arms and the chain mesh as far as possible on
the tire.
2. Move the slide switch of the ratchet to the “open” position. To do
this, move the slide switch as much as possible in the direction
“open”. After that, move it slightly back in direction “drive” and
then you can move it to the end of direction “open”.
3. Now pull out the adapter’s rope as far as possible.
4. Place the adapter on the wheel bolt and tighten the adapter
as firmly as possible using the supplied wrench. Check if the
adapter’s arrow is directed towards the centre of the rim as shown
in fig. 4a.
5. Move the slide switch of the ratchet to the “drive” position.
6. Push the hand wheel and turn it simultaneously clockwise until the
indicator display shows the arrow in full and the tips of the arrows
are facing each other.
7. Push the entire ratchet (fig. 7) towards the rim until you hear
several (4-6) clicks to decrease the distance between the ratchet
and the rim (fig. 8).
8. Set the vehicle quickly in motion, in such way that the tires do
not spin. The chain is automatically drawn onto the tire.
If a quick start is not possible and/or the chain does not automatically
pull onto the tire, drive forwards to complete approx. ½ turn of the
wheel. Now pull these parts of the chain which are not completely
mounted, onto the tire.
Check the fit of the chain after approx. 150ft or 50m.
Demounting
1. Stop the vehicle. Do not stand on one of the arms.
2. Move the slide switch of the ratchet to the “open” position. To do
this, move the slide switch as much as possible in the direction
“open”. After that, move it slightly back in direction “drive” and
then you can move it to the end of direction “open”. While doing
this, push the entire ratchet slightly towards the rim.
3. Screw off the adapter with the wrench and take it off the wheel nut.
4. Grab the arms of the chain with your hands and pull the chain
(towards you) off the tire.
5. Place the chain next to the tire and drive off the chain at walking
speed to remove it completely.
Product Description

10
Informations client
Il est impératif de régler la chaîne avant sa première utilisation. Cela en
facilite le montage dans des conditions hivernales. Un montage fluide
et rapide n’est possible que si la chaîne est parfaitement adaptée au
pneu et à la jante du véhicule.
Contenu de l’emballage
1)
Adaptateur (*pré-assemblé ) pour fixation à l’écrou de la roue
a) Pince avec ouvertures de clé de 17, 19 et 21/22 mm
b) Manchon pour pince
2a+b) Pièce intercalaire (*pré-assemblé )
3a) Vis longue
3b) Vis moyenne
3c) Vis courte
4+5) Outils pour ajustement de la taille
6) Clé
Ajustement à dimension de la
chaîne (Etape A)
Certaines tailles de pneus exigent un ajustement de la dimension de
la chaîne. Vérifiez la dimension de votre pneu, recherchez-la dans le
tableau des dimensions de ces instructions, et enlevez au besoin
le nombre spécifié d’éléments de réglage (en jaune) avec les outils
fournis, comme indiqué dans l’illustration.
Explication : 0 = pas d’ajustement nécessaire, -1 = enlever 1 élément,
-2 = enlever 2 éléments etc.
Si vous devez enlever 2 éléments, il faut enlever 2 éléments
diamétralement opposés. Conservez les pièces enlevées – cette chaîne
peut être réutilisée pour d’autres dimensions de pneus. Indication :
Ces indications sont à caractère général et non contractuelles ; elles
sont le résultat de tests et de notre expérience. Il est donc obligatoire
d’effectuer un contrôle de l’ajustement avant la première utilisation.
Vérifiez la tenue de la chaîne au bout de 50 m environ. Réajustez-la au
besoin (enlevez d’autres éléments de réglage si la chaîne ne s’étire PAS
automatiquement sur le pneu).
Ajustement de l’adaptateur (Etape B)
Pour ajuster l’adaptateur, enlevez l’enjoliveur et les capuchons d’écrous
de la roue. Enlevez éventuellement la saleté, la neige ou la glace.
Déplacez l’interrupteur à glissière du cliquet en position « open » et
enlevez le câble auquel l’adaptateur est fixé. Pour ce faire, déplacez
le bouton à glissière du cliquet le plus possible dans le sens « open ».
Faites-le ensuite revenir légèrement en direction de « drive » ; alors
seulement, vous pourrez le mettre entièrement en position « open ».
Vérifiez alors si l’adaptateur pré-assemblé correspond à l’écrou de la
roue. Si l’adaptateur touche la jante comme indiqué sur l’illustration 2,
l’adaptateur doit être rallongé (voir les illustrations 4 à 6). Principe de
base : vissez l’adaptateur au plus près de la jante (voir l’illustration 1)
sans qu’il la touche. Fin de l’ajustement.
I
llustration 3a : La tête hexagonale de la pince doit être intégralement
enfoncée dans l’ouverture de manchon. Cela permet de
fixer correctement la pince à l’écrou de la roue.
Illustration 3b : Pour une fixation sécurisée, la pince doit être placée dans
l’axe et à fond sur la tête hexagonale de l’écrou de la roue.
Illustration 4 : Pré-assemblé : court
Illustration 5 : Alternative : moyen->changer de pièce intercalaire et
de vis
Illustration 6 : Alternative : long -> ajouter une pièce intercalaire et
changer de vis.
FR

11
FR
Bras de la
chaîne
Bouton rouge
Bouton à
glissière
Cliquet
Filet de la
chaîne
Montage pour utilisation
1. Enlevez l’enjoliveur et les capuchons des écrous. Enlevez
éventuellement la saleté, la neige ou la glace. Ouvrez les bras
de la chaîne ajustée et placez-les sur le pneu. Poussez ensuite
aussi loin que possible tous les bras et le filet de la chaîne sur
le pneu.
2. Déplacez le bouton à glissière du cliquet en position « open ». Pour
ce faire, déplacez le bouton à glissière du cliquet le plus possible
dans le sens « open ». Faites-le ensuite revenir légèrement en
direction de « drive » ; alors seulement, vous pourrez le mettre
entièrement en position « open ».
3. Ensuite, enlevez autant que possible la corde de l’adaptateur.
4. Placez l’adaptateur sur le boulon de la roue et serrez l’adaptateur
aussi fermement que possible en utilisant la clé fournie. Vérifiez
que la flèche de l’adaptateur pointe bien vers le centre de la jante,
comme indiqué sur l’illustration 4a.
5. Mettez l’interrupteur à glissière du cliquet en position « drive ».
6. Appuyez sur le bouton rouge et tournez-le en le maintenant appuyé
dans le sens horaire. Lâchez-le dès que vous voyez la flèche
complète sur l’afficheur. Les deux flèches doivent être face à face.
7. Pour réduire la distance entre le cliquet et la jante (illustration 8),
poussez le cliquet entier (illustration 7) en direction de la jante
jusqu’à ce que vous entendiez plusieurs clics (4 à 6).
8. Attention : Faites avancer le véhicule rapidement de manière
à ce que les pneus ne patinent pas. La chaîne se tend
automatiquement sur le pneu.
Si un démarrage rapide n’est pas possible et/ou si la chaîne ne s’étale
pas automatiquement sur le pneu, avancez d’un demi-tour de roue
environ. Arrangez alors sur le pneu les parties de la chaîne qui ne sont
pas entièrement en place.
Vérifiez la tenue de la chaîne au bout de 150 pieds ou 50 m environ.
Démontage
1. Arrêtez le véhicule. Vérifiez que vous n’êtes pas arrêté l’un des bras.
2. Mettez bouton à glissière du cliquet en position « open ». Pour ce
faire, déplacez l’interrupteur à glissière du cliquet le plus possible
dans le sens « open ». Faites-le ensuite revenir légèrement en
direction de « drive » ; alors seulement, vous pourrez le mettre
entièrement en position « open ». Dans le même temps, poussez
légèrement le cliquet entier en direction de la jante.
3. Dévissez l’adaptateur avec la clé et enlevez-le de l’écrou de la roue.
4. Saisissez les bras de la chaîne et retirez la chaîne du pneu en la
tirant vers vous.
5. Placez la chaîne à côté du pneu. Faites démarrer le véhicule et
roulez au pas afin de libérer complètement la chaîne et la récupérer.
Description
du produit

12
Klantinformatie
Het is absoluut noodzakelijk dat de ketting vóór het eerste gebruik wordt
aangepast. Op die wijze is de montage in winterse omstandigheden
eenvoudiger. Een vlotte en snelle montage is uitsluitend mogelijk indien
de ketting optimaal is aangepast aan de band en velg.
Verpakkingsinhoud
1) Adapter voor aanspannen van de slotmoer
a) Klem met moersleutelbreedte 17, 19 en 21/22 mm
b) Huls voor klem
2a+b) Afstandshouder
3a) Bout lang
3b) Bout medium
3c) Bout kort
4+5) Gereedschap voor het aanpassen van de ketting
6) Steeksleutel voor adapter montage
*) Standaard Montage
Aanpassing van de ketting aan de
bandenmaat (Zie afbeelding A)
Voor sommige bandenmaten is een aanpassing van de ketting-
afmeting vereist. Controleer de afmeting van uw banden, zoek deze
op in de afmetingtabel achterin de montagehandleiding en verwijder
indien noodzakelijk het opgegeven aantal aanpassingselementen
(geel) met de meegeleverde gereedschappen, zoals getoond in de
afbeelding.
Uitleg: oké = geen aanpassing vereist, -1 = verwijder 1 element, -2 =
verwijder 2 elementen, enz.
Wanneer je twee elementen moet verwijderen, verwijder dan twee
diagonale elementen. Bewaar de verwijderde onderdelen – de
ketting kan opnieuw gebruikt worden voor andere bandenmaten.
Opmerking: deze instructies zijn algemeen geldig en niet bindend en
zijn het resultaat van testen en onze ervaring. Daarom wordt dringend
aanbevolen, vóór het eerste gebruik een passingstest uit te voeren.
Controleer of de ketting na ongeveer 50 m nog past. Pas indien nodig
opnieuw aan (verwijder meer aanpassingselementen indien de ketting
NIET automatisch op de band getrokken wordt).
Aanpassingsadapter (Zie afbeelding B)
Om de adapter aan te passen, verwijdert u de wieldop en evt. aanwezige
kunststof wielboutdoppen. Verwijder al het vuil, sneeuw en ijs. Zet de schuif op
de ‘open’ stand en trek de kabel naar buiten waaraan de adapter bevestigd
is. Hiervoor beweegt u de schuif zoveel mogelijk in de richting ‘open’.
Nadien beweegt u hem ietwat terug in de richting ‘drive’ en vervolgens kunt
u hem tot het eind van de ‘open’ stand bewegen. Controleer nu of de vooraf
gemonteerde adapter op de slotmoer past. Indien de adapter de velg raakt
zoals in afbeelding 2, moet de adapter aangepast worden (zie afbeelding 4-6).
Als uitgangspunt: monteer de adapter zo dicht mogelijk tegen de velg (zie
afbeelding 1) zonder dat hij deze aanraakt. Einde aanpassing.
Afb. 3a: De zeshoek van de klem moet geheel door de opening van de
huls worden gedrukt, zodat de klem correct aan de slotmoer
vastgemaakt kan worden.
Afb. 3b: Voor een veilige bevestiging moet de klem recht en compleet op
de zeshoekige moer van de slotmoer geplaatst worden.
Afb. 4: Vooraf gemonteerd: adapter + bout kort
Afb. 5: Alternatief: adapter + bout medium -> afstandshouder en bout
vervangen.
Afb. 6: Alternatief: adapters + bout lang -> afstandshouder toevoegen
en bout vervangen.
NL

13
Montage voor gebruik
1. Verwijder de wieldop en de evt. aanwezige kunststof wiel-
boutdoppen. Verwijder al het vuil, sneeuw en ijs. Open de armen
van de aangepaste ketting en plaats deze over de band. Plaats
nu alle armen en het kettingnet zo ver mogelijk over de band.
2. Zet de schuif op de ‘open’ stand. Hiervoor beweegt u de schuif
zoveel mogelijk in de richting ‘open’. Nadien beweegt u hem
ietwat terug in de richting ‘drive’ en vervolgens kunt u hem tot
het eind van de ‘open’ stand bewegen.
3. Trek nu de kabel van de adapter zo ver mogelijk naar buiten.
4. Plaats de adapter op de slotbout en span de adapter met de
meegeleverde steeksleutel zo strak mogelijk aan. Controleer of
de pijl van de adapter naar het midden van de velg wijst, zoals
getoond in afbeelding 4a.
5. Beweeg de schuif richting de ‘drive’ stand.
6. Druk op de handmatige kettingspanner en draai het gelijktijdig in
de richting van de klok totdat het indicatordisplay de pijl volledig
toont en de punten van de pijlen naar elkaar wijzen.
7. Duw de gehele spanner (afbeelding 7) in de richting van de velg
totdat u meerdere (4-6) kliks hoort om de afstand tussen de
spanner en de velg te verkleinen (afbeelding 8).
8. Verplaats het voertuig enkele omwentelingen (let op: banden
mogen niet spinnen). De ketting wordt automatisch over de
band getrokken.
Indien een snelle start niet mogelijk is en/of de ketting niet auto-
matisch op de band getrokken wordt, rijdt u voorwaarts zodat het
wiel ongeveer ½ slag draait. Trek nu die delen van de ketting op het
wiel die nog niet volledig gemonteerd zijn.
Controleer of de ketting past na ongeveer 50 m of 150 voet.
Demontage
1. Stop het voertuig. Sta niet op een van de armen.
2. Zet de schuif in de ‘open’ stand. Hiervoor beweegt u de schuif
zoveel mogelijk in de richting ‘open’. Nadien beweegt u hem
ietwat terug in de richting ‘drive’ en vervolgens kunt u hem tot
het eind van de richting ‘open’ bewegen. Terwijl u dit doet, duwt
u de gehele kettingspanner ietwat naar de velg toe.
3. Schroef de adapter er met de steeksleutel af en verwijder hem
van de slotmoer.
4. Pak met uw handen de armen van de ketting vast en trek de
ketting van de band af (naar u toe).
5. Plaats de ketting naast de band en rijd de ketting eraf tegen
wandelsnelheid om hem geheel te verwijderen.
Product
Description
NL
Ketting
armen
Schuif
Handmatige
kettingspanner
Spanner
Kettingnet

14
Informazioni per il cliente
È assolutamente necessario regolare la catena prima del primo
utilizzo. Di conseguenza, il montaggio in condizioni invernali
risulterà più facile. Un montaggio semplice e veloce è possibile
solo se la catena è stata adattata in modo ottimale al pneumatico e
al cerchio.
Contenuto della confezione
1) Adattatore per il fissaggio al dado della ruota
a) Pinza con apertura di chiave di 17, 19 e 21/22 mm
b) Manicotto per pinza
2a+b) Distanziale
3a) Vite lunga
3b) Vite media
3c) Vite corta
4+5) Strumenti per la regolazione della misura
6) Chiave
*) premontato
Regolazione della catena in base
alle dimensioni (Preparare A)
P
er alcune misure di pneumatici è necessario regolare le dimensioni
della catena. Controllare le dimensioni dello pneumatico del proprio
veicolo, cercarle nella tabella di configurazione delle dimensioni
in fondo e rimuovere da ogni catena, se necessario, il numero
di elementi (gialli) di regolazione specificato con gli strumenti in
dotazione, come mostrato nella figura.
Legenda: ok = nessuna regolazione necessaria, -1 = rimuovere 1
elemento, -2 = rimuovere 2 elementi ecc.
Conservare i pezzi rimossi: questa catena può essere riutilizzata per
pneumatici di altre dimensioni. Nota: queste istruzioni hanno validità
generale, non sono vincolanti e sono il frutto di test e della nostra
esperienza. Si raccomanda pertanto di effettuare un montaggio
di prova prima di utilizzare la catena per la prima volta.
Controllare il montaggio della catena dopo ca. 50 m. Regolare di
nuovo se necessario (rimuovere altri elementi di regolazione se la
catena NON si dispone automaticamente sul pneumatico).
Regolazione dell’adattatore
(Preparare B)
Per regolare l‘adattatore, rimuovere il copricerchio e i copridadi.
Togliere eventuale sporco, neve o ghiaccio. Portare il dispositivo
di chiusura del cricchetto in posizione “open” ed estrarre il cavo
su cui è fissato l‘adattatore. Per fare ciò, portare il dispositivo
di chiusura il più possibile nella direzione “open”. Dopodiché,
portarlo leggermente indietro nella direzione “drive” e poi portarlo
nella direzione “open” fino in fondo. Controllare se l‘adattatore
premontato si adatta al dado della ruota. Se l‘adattatore tocca
il cerchio, come mostrato in figura 2, l‘adattatore deve essere
allungato (vedi fig. 4-6). Come regola generale, bisogna avvitare
l‘adattatore il più vicino possibile al cerchio (vedi fig. 1) senza
toccarlo. La regolazione è così conclusa. Fig. 3a: L‘esagono della
pinza deve essere spinto completamente attraverso l‘apertura del
manicotto. In questo modo la pinza può essere fissata correttamente
al dado della ruota.
IT

15
Fig. 3b:La pinza deve essere posizionata dritta e interamente sulla
testa esagonale del dado della ruota per un fissaggio sicuro.
Fig. 4: Premontato: corto
Fig. 5: Variante: medio->cambiare il distanziale e la vite
Fig. 6: Variante: lungo->aggiungere il distanziale e cambiare la vite
Montaggio per l’utilizzo
1. Rimuovere il copricerchio e i copridadi. Togliere eventuale sporco,
neve o ghiaccio. Aprire i bracci della catena, una volta regolata,
e posizionarli sopra il pneumatico. Poi, disporre la maglia e tutti i
bracci della catena il più possibile sulla superficie del pneumatico.
2. Portare il dispositivo di chiusura del cricchetto in posizione “open”.
Per fare ciò, portare il dispositivo di chiusura il più possibile nella
direzione “open”. Dopodiché, portarlo leggermente indietro nella
direzione “drive” e poi portarlo nella direzione “open” fino in fondo.
3. Estrarre il più possibile il cavo dell’adattatore.
4. Posizionare l‘adattatore sul bullone della ruota e stringere l‘adattatore
il più saldamente possibile servendosi della chiave in dotazione.
Verificare che la freccia dell’adattatore sia diretta verso il centro del
cerchio come mostrato in fig. 4a.
5. Portare il dispositivo di chiusura del cricchetto in posizione “drive”.
6. Premere il volantino e contemporaneamente ruotarlo in senso orario
fino a quando il simbolo dell‘indicatore non mostra la freccia per
intero e le punte delle frecce sono rivolte l‘una verso l‘altra.
7. Spingere l‘intero cricchetto (fig. 7) contro il cerchio fino a sentire
diversi (4-6) scatti per diminuire la distanza tra il cricchetto e il
cerchio (fig. 8).
8. Attenzione: Mettere in movimento il veicolo rapidamente,
in modo che le gomme non slittino. La catena si sistema
automaticamente sul pneumatico.
Se non è possibile una partenza rapida e/o la catena non si
sistema automaticamente sul pneumatico, procedere in avanti per
completare circa ½ giro della ruota. Sistemare poi sul pneumatico
le parti della catena che non si sono completamente montate.
Controllare il montaggio della catena dopo ca. 50 m.
Smontaggio
1. Arrestare il veicolo. Fare in modo che la ruota non poggi su uno
dei bracci.
2. Portare il dispositivo di chiusura del cricchetto in posizione “open”. Per
fare ciò, portare il dispositivo di chiusura il più possibile nella direzione
“open”. Dopodiché, portarlo leggermente indietro nella direzione
“drive” e poi portarlo nella direzione “open” fino in fondo. Nel fare
questo, spingere leggermente l‘intero cricchetto contro il cerchio.
3. Svitare l‘adattatore con la chiave e toglierlo dal dado della ruota.
4. Afferrare i bracci della catena con le mani e tirare la catena verso di sé
togliendola dal pneumatico.
5. Posizionare la catena accanto al pneumatico e procedere a passo
d’uomo per rimuovere la catena completamente.
Descrizione del
prodotto
Bracci della
catena
Dispositivo di
chiusura
Volantino
Cricchetto
Maglia della
catena
IT

16
Informace pro zákazníka
Před prvním použitím je nutné přizpůsobit sněhový řetěz rozměru
pneumatiky. Díky tomu bude montáž v zimních podmínkách
snazší. Snadná a rychlá montáž je možná jen tehdy, když je řetěz
optimálně přizpůsoben pneumatice a ráfku.
Obsah balení
1) Adaptér pro upevnění matice kola
a) Spona s klíčem 17, 19 a 21/22 mm
b) Objímka spony
2a+b) Rozpěrka
3a) Šroub dlouhý
3b) Šroub střední
3c) Šroub krátký
4+5) Nástroje pro nastavení velikosti
6) Klíč
*) předmontováno
Seřízení řetězu podle rozměru
(příprava A)
Pro některé rozměry pneumatik je nutné přizpůsobit rozměr řetězu.
Zjistěte rozměr vaší pneumatiky, vyhledejte ho v tabulce nastavení
rozměrů a podle potřeby pomocí přiložených nástrojů odstraňte
stanovený počet seřizovacích elementů (žluté) podle obrázku.
Vysvětlení: OK = seřízení není nutné, -1 = odstraňte 1 prvek, -2
= odstraňte 2 prvky atd. Pokud je třeba odstranit dva elementy,
odstraňte dva diagonálně ležící elementy. Demontované prvky
uschovejte, abyste tento řetěz mohli použít i pro jiný rozměr
pneumatiky. Poznámka: Tyto pokyny mají obecnou platnost, nejsou
závazné a jsou založeny na našich testech a zkušenostech.
Důrazně doporučujeme provést zkušební montáž před prvním
použitím.
Po přibližně 50 metrech jízdy zkontrolujte řetěz, jestli je správně
napnutý. Podle potřeby upravte seřízení. (Odstraňte více
seřizovacích prvků, pokud se řetěz automaticky NENATÁHNE na
pneumatiku.)
Seřízení adaptéru (příprava B)
Při seřizování adaptéru sundejte kryt kola a krytky matic kol.
Odstraňte nečistoty, sníh nebo led. Přestavte posuvný přepínač
ráčny do polohy „open“ a vytáhněte kabel, na kterém je adaptér
upevněný. Přitom přemístěte posuvný přepínač co možná nejdále
ve směru „open“. Potom ho přesuňte lehce zpět ve směru „drive“,
abyste ho nakonec mohli přestavit na doraz ve směru „open“.
Během tohoto postupu přitlačujte celou ráčnu lehce k ráfku. Nyní
zkontrolujte, jestli se předmontovaný adaptér hodí na matici kola.
Pokud se adaptér dotýká ráfku podle obrázku 2, adaptér se musí
prodloužit (viz obr. 4-6). Základní princip: Přišroubujte adaptér co
nejblíže k ráfku (viz obr. 1) tak, aby se ho nedotýkal. Konec seřízení.
Obr. 3a: Šestihran spony musí být úplně protlačen otvorem objímky.
Sponu tak lze správně upevnit k matici kola.
Obr. 3b: Aby byla spona řádně namontovaná, musí být v přímé
poloze úplně nasazená na šestihranu matice kola.
Obr. 4: Předmontováno: krátký
Obr. 5: Alternativní: střední -> vyměňte rozpěrku a šroub
Obr. 6: Alternativní: dlouhý -> přidejte rozpěrku a vyměňte šroub
CZ

17
CZ
Montáž k použití
1. Demontujte kryt kola a krytky matic. Odstraňte nečistoty, sníh
nebo led. Otevřete ramena seřizovaného řetězu a vložte ho na
pneumatiku. Nyní dejte všechna ramena a síť řetězu co nejdále
na pneumatiku.
2. Přestavte posuvný přepínač ráčny do polohy „open“. Přitom
přemístěte posuvný přepínač co možná nejdále ve směru
„open“. Potom ho přesuňte lehce zpět ve směru „drive“, abyste
ho nakonec mohli přestavit na doraz ve směru „open“. Během
tohoto postupu přitlačujte celou ráčnu lehce k ráfku.
3. Nyní co nejvíce vytáhněte lanko adaptéru.
4. Upněte adaptér na šroub kola a pevně utáhněte adaptér pomocí
dodaného klíče. Zkontrolujte, jestli šipka adaptéru ukazuje ke
středu ráfku podle obrázku 4a.
5. Přestavte posuvný přepínač ráčny do polohy „jízda“.
6. Tlačte na ruční kolo a současně jím otáčejte po směru
hodinových ručiček tak, aby indikační zobrazení ukazovalo celou
šipku a špičky šipek byly proti sobě.
7. Zatlačte celou ráčnu (obr. 7) směrem k ráfku, až uslyšíte několik
cvaknutí (4 až 6), aby se zmenšila vzdálenost mezi ráčnou a
ráfkem (obr. 8).
8. Pozor: Rychle uveďte vozidlo do pohybu tak, aby při tom
neprokluzovaly pneumatiky. Řetěz se automaticky navleče
na pneumatiku.
Pokud nelze provést rychlý start anebo se řetěz nenatáhne
automaticky na pneumatiku, popojeďte dopředu o přibližně
½ otáčky. Nyní vytáhněte ty části řetězu, které nejsou úplně
namontované na pneumatice.
Po ujetí přibližně 50 metrů (150 stop) zkontrolujte řetěz, jestli je
správně napnutý.
Demontáž
1. Zastavte vozidlo. Vozidlo nesmí stát na některém ramenu.
2. Přestavte posuvný přepínač ráčny do polohy „open“. Přitom
přemístěte posuvný přepínač co možná nejdále ve směru „open“.
Potom ho přesuňte lehce zpět ve směru „drive“, abyste ho
nakonec mohli přestavit na doraz ve směru „open“.
3. Klíčem odšroubujte adaptér a sundejte ho z matice kola.
4. Rukama uchopte ramena řetězu a stáhněte řetěz z pneumatiky
(směrem k sobě).
5. Položte řetěz vedle pneumatiky a rychlostí chůze z něj sjeďte,
abyste ho mohli úplně demontovat.
Popis
výrobku
Ramena
řetězu
Posuvný
přepínač
Dopínací
systém
Ráčna
Síť řetězu

18
Informácia pre zákazníka
Pred prvým použitím je absolútne nevyhnutné prispôsobiť rozmery
reťaze kolesám. Vďaka tomu bude osadenie reťaze v zimných
mesiacoch jednoduchšie. Jednoduché a rýchle osadenie je
možné len vtedy, keď je reťaz optimálne prispôsobená konkrétnej
pneumatike a ráku.
Obsah balenia
1) Adaptér na upevnenie k matici kolesa
a) Svorka s rozmermi kľúča 17, 19 a 21/22 mm
b) Puzdro na svorku
2a + 2b) Dištančná vložka
3a) Dlhá skrutka
3b) Stredne dlhá skrutka
3c) Krátka skrutka
4 + 5) Náradie na upravenie rozmeru
6) Kľúč
*) Dodáva sa zmontované
Prispôsobenie rozmerov reťaze v
závislosti od veľkosti kolies (príprava A)
Pre niektoré veľkosti kolies je potrebné rozmery reťaze najskôr
prispôsobiť. Skontrolujte rozmery pneumatík, vyhľadajte tieto
rozmery v tabuľke rozmerov na konci tohto návodu a v prípade
potreby pomocou priloženého náradia odstráňte uvedený počet
nastavovacích prvkov (žltých), ako to je znázornené na obrázku.
Vysvetlivky: ok = upravenie nie je potrebné, -1 = odstráňte jeden
nastavovací prvok, -2 = odstráňte 2 nastavovacie prvky atď.
Odstránené nastavovacie prvky si odložte – reťaz budete môcť
neskôr použiť aj na iné kolesá. Poznámka: Tieto pokyny sú len
všeobecné a nie sú záväzné. Sú výsledkom našich testov a
skúseností. Preto dôrazne odporúčame pred prvým použitím
reťaze vykonať test presnosti osadenia.
Osadenie reťaze skontrolujte po prejdení približne 50 m. V prípade
potreby reťaz dodatočne upravte (ak sa NENAVINIE na koleso
automaticky, tak odstráňte viac nastavovacích prvkov).
Nastavenie adaptéra (príprava B)
Aby ste mohli správne nastaviť adaptér, musíte najskôr zložiť kryt kolesa
a ochranné kryty matíc. Odstráňte prípadné nečistoty, sneh alebo ľad.
Posuvný ovládač západkového mechanizmu presuňte do polohy „open“
(otvorené) a vytiahnite lanko, na ktorom je adaptér pripevnený. Urobíte
to tak, že ho posuniete čo možno najviac do polohy „open“ (otvorené),
potom ho jemne posuňte späť smerom k polohe „drive“ (jazda) a
nakoniec ho posuňte až nadoraz do polohy „open“ (otvorené). Celý čas
pritom jemne tlačte západkový mechanizmus oproti ráku pneumatiky.
Teraz si overte, či už zmontovaný adaptér dobre prilieha k matici kolesa.
Ak sa adaptér dotýka ráka, ako je to znázornené na obrázku 2, tak
je potrebné ho trošku odsadiť (pozri obr. 4 – 6). V zásade by ste mali
priskrutkovať adaptér čo najtesnejšie k ráku, ale nesmie sa ho dotýkať
(pozri obr. 1). Tým je nastavovanie dokončené.
Obr. 3a: Šesťhran svorky úplne pretlačte cez otvor na puzdre. Svorku
potom budete môcť správne upevniť na maticu kolesa.
Obr. 3b: Svorka musí byť umiestnená rovno a úplne na šesťhrannú
maticu kolesa, aby bolo zaručené bezpečné upevnenie.
Obr. 4: Vopred zmontované: krátka skrutka.
Obr. 5: Alternatíva: stredne dlhá skrutka -> vymeňte dištančnú vložku a
skrutku.
SK

19
SK
Obr. 6: Alternatíva: dlhá skrutka -> pridajte dištančnú vložku a vymeňte
skrutku.
Osadenie reťaze
1. Zložte kryt kolesa a ochranné kryty matíc. Odstráňte prípadné
nečistoty, sneh alebo ľad. Roztiahnite ramená rozmerovo
prispôsobenej reťaze a priložte ich k pneumatike.
Následne ramená aj reťazovú sieť natiahnite čo najďalej na
pneumatiku.
2. Posuvný ovládač západkového mechanizmu presuňte do polohy
„open“ (otvorené). Urobíte to tak, že ho posuniete čo možno
najviac do polohy „open“ (otvorené), potom ho jemne posuňte
späť smerom k polohe „drive“ (jazda) a nakoniec ho posuňte až
nadoraz do polohy „open“ (otvorené). Celý čas pritom jemne tlačte
západkový mechanizmus oproti ráku pneumatiky.
3. Teraz čo najviac vytiahnite lanko adaptéra.
4. Adaptér umiestnite na skrutku kolesa a čo najsilnejšie dotiahnite
pomocou priloženého kľúča. Skontrolujte, či šípka na adaptéri
smeruje do stredu ráka, ako je to znázornené na obr. 4a.
5. Posuvný ovládač západkového mechanizmu presuňte do polohy
„drive“ (jazda).
6. Zatlačte otočný ovládač a otáčajte ho v smere hodinových ručičiek,
pokiaľ sa v otvore indikátora nezobrazí celá šípka, pričom hroty
oboch šípok musia smerovať k sebe.
7. Zatlačte celý západkový mechanizmus (obr. 7) k ráku, kým
nebudete počuť niekoľko (4 – 6) zacvaknutí, čo zmenší vzdialenosť
medzi západkovým mechanizmom a rákom (obr. 8).
8. Upozornenie: Vozidlo rýchlo uveďte do pohybu tak, aby pri
tom neprekĺzavali pneumatiky. Reťaz sa automaticky navinie
na pneumatiku.
Ak nie je možné rýchlo naštartovať alebo ak sa reťaz automaticky
nenavinie na pneumatiku, tak uveďte vozidlo do pohybu smerom
dopredu približne o polovicu otáčky kolesa. Tie časti reťaze, ktoré nie
sú úplne osadené, natiahnite na pneumatiku.
Po približne 50 metroch skontrolujte osadenie reťaze.
Zloženie reťaze
1. Zastavte vozidlo. Koleso nesmie stáť na jednom z ramien.
2. Posuvný ovládač západkového mechanizmu presuňte do polohy
„open“ (otvorené). Urobíte to tak, že ho posuniete čo možno
najviac do polohy „open“ (otvorené), potom ho jemne posuňte späť
smerom k polohe „drive“ (jazda) a nakoniec ho posuňte až nadoraz
do polohy „open“ (otvorené).
3. Adaptér odskrutkujte pomocou kľúča a zložte ho z matice kolesa.
4. Ramená reťaze chyťte do rúk a reťaz stiahnite (smerom k sebe) z
pneumatiky.
5. Reťaz položte vedľa pneumatiky a vozidlo uveďte do pomalého
pohybu, aby ste kolesom úplne vyšli z reťaze.
Opis produktu
Ramená
reťaze
Posuvný ovládač
Otočný
ovládač
Západkový me-
chanizmus
Reťazová sieť

20
Informacje dla użytkownika
Dopasowanie łańcuchów przed pierwszym ich użyciem jest
bezwzględnie konieczne. Ułatwi to ich szybsze zakładanie w warunkach
zimowych. Sprawne zakładanie łańcuchów wymaga ich wcześniejszego
optymalnego dopasowania do rozmiaru opon oraz felg.
Zawartość opakowania
1) Adapter montowany do śruby/nakrętki w kole
a) Zacisk do śrub/nakrętek kół 17, 19 i 21/22 mm
(element wewnętrzny)
b) Zacisk do śrub/nakrętek kół 17, 19 i 21/22 mm
(element zewnętrzny)
2a+b) Pierścienie dystansowe
3a) Śruba długa
3b) Śruba średnia
3c) Śruba krótka
4+5) Narzędzia do regulacji długości łańcuchów
6) Klucz
*) Elementy zamontowane fabrycznie
Regulacja długości łańcuchów
(przygotowanie A)
W przypadku niektórych rozmiarów opon dopasowanie długości
łańcuchów jest konieczne. Sprawdź rozmiar opony, odnajdź go
w tabeli rozmiarów i w razie potrzeby usuń wskazaną liczbę
elementów regulacyjnych (żółtych) za pomocą dostarczonych
narzędzi zgodnie z ilustracją.
Objaśnienie: OK = regulacja nie jest konieczna, -1 = usuń 1
element, -2 = usuń 2 elementy itd.
W przypadku, kiedy musisz usunąć dwa żółte elementy zrób to
w sposób symetryczny; zmodykuj długość dwóch przeciwległych
siatek jezdnych łańcuchów rozdzielonych ramionami. Zachowaj
niepotrzebne elementy po to, aby w przyszłości można było
użytkować łańcuchy również na innym rozmiarze ogumienia.
Uwaga: Zalecenia powyższe mają charakter ogólny i nie są
zobowiązujące; wynikają z testów i naszego doświadczenia.
Wobec tego stanowczo zalecamy wstępne dopasowanie
łańcuchów przed pierwszym ich użyciem.
Po przejechaniu około 50 metrów sprawdź dopasowanie
łańcuchów. W razie potrzeby dopasuj łańcuchy ponownie
(usuń kolejne elementy regulacyjne [żółte], jeżeli łańcuchy NIE
„naskakują” automatycznie na opony).
Dopasowanie długości adaptera
(przygotowanie B)
Aby wyregulować długość adaptera, zdejmij najpierw kołpaki
i kapturki nakrętek kół. Usuń zanieczyszczenia, śnieg oraz lód. Ustaw
przełącznik suwakowy napinacza w pozycji „OPEN”
i wyciągnij linkę, na której zamocowany jest adapter. W tym celu
przesuń przełącznik suwakowy dwuetapowo: najpierw jak najdalej
w kierunku pozycji „OPEN”. Potem przesuń go nieco z powrotem
w kierunku pozycji „DRIVE”, a następnie ponownie przesuń do końca
w kierunku pozycji „OPEN”. Następnie sprawdź, czy fabrycznie
zmontowany adapter pasuje do nakrętki koła. Jeżeli adapter styka się
z felgą, jak wskazano na ilustracji 2, należy go wydłużyć (rys. 4-6).
Podstawowa zasada: adapter po dokręceniu ma znajdować się jak
najbliżej felgi (rys. 1) ale nie może stykać się z nią. Koniec regulacji.
Fig. 3a: Sześciokątny element wewnętrzny zacisku należy wsunąć
całkowicie w element zewnętrzny zacisku. Dzięki temu zacisk
będzie można dobrze zamocować do śruby/nakrętki koła.
PL
Table of contents
Languages:
Other pewag Automobile Accessories manuals

pewag
pewag AUSTRO-S User manual

pewag
pewag Universal ED User manual

pewag
pewag servostar User guide

pewag
pewag FM 73 User guide

pewag
pewag Profilift AOR 10 User manual

pewag
pewag erzberg User guide

pewag
pewag AUSTRO-S User manual

pewag
pewag starmove User manual

pewag
pewag helt perfekt User guide

pewag
pewag forstgrip User guide