manuals.online logo
Brands
  1. Home
  2. •
  3. Brands
  4. •
  5. Phytec
  6. •
  7. Computer Hardware
  8. •
  9. Phytec i.MX7 PEB-D-RPI User manual

Phytec i.MX7 PEB-D-RPI User manual

PHYTEC
Page 1
i.MX7: Evaluating the PEB-D-RPI Expansion Board
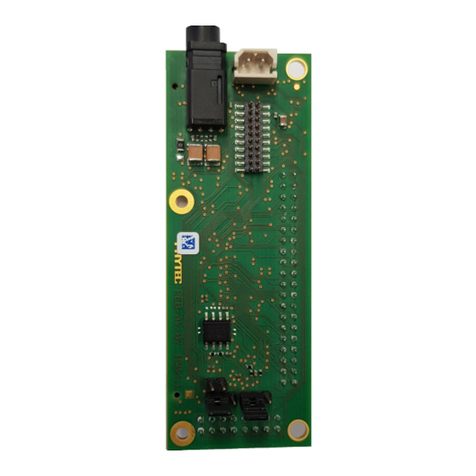
The phyBOARD-Zeta kit includes an expansion board (PEB-D-RPI) designed to facilitate the easy evaluation of certain interfaces available on PHYTEC i.
MX7 platforms. The following sections will detail how to use these features in the environments in which they are supported. These instructions assume
that you have properly connected the expansion board to the carrier board and have booted into a supported environment (U-Boot and/or Linux) using
BSP version PD18.2.0 or newer. If you are looking for information regarding Raspberry Pi HAT support, please see i.MX7: Raspberry Pi HAT Support with
The expansion board has the following features:PEB-D-RPI Expansion Board.
PEB-D-RPI Expansion Board Interfaces
USB to Serial UART Interface
Sending Serial Data Over USB
Enable UART1 as Console in Linux
Configuring UART1 as Default Console in U-Boot and Linux
4KB EEPROM
Buttons
LEDs
Raspberry Pi-compatible 40-pin Header
GPIO and Interface Signals Map
Jumpers
Toggling GPIOs Connected to 40-pin Header
ARM JTAG 20-pin Debug Interface Header
Unpopulated Expansion Signal Pin Headers
PEB-D-RPI Expansion Board Interfaces
Use the following as a reference for the connector interfaces on the PEB-D-RPI expansion board that will be used in this document.
USB to Serial UART Interface
The i.MX7 is configured by default to use UART5 for console input and output over the carrier board X2 connector shown in the Connector Interfaces
section of the .i.MX7 Quickstart The USB to Serial UART interface on the PEB-D-RPI expansion board allows the use of UART1 and UART2 for serial data
over connector X6 shown in the above section. However, only UART1 is configured in the BSP by default becausePEB-D-RPI Expansion Board Interfaces
UART2 is used by the M4 core in PHYTEC's FreeRTOS software.
Sending Serial Data Over USB
PHYTEC
Page 2
To send console data over USB, first connect the USB cable to the expansion board connector X6 and your host PC and power on the i.MX7 to boot into
Linux. After booting, your host PC should have access to a serial port that can be connected to with a standard serial console program. Connect to the
new serial port and run the following commands on the target over the UART5 serial connection. The first command sets the baud rate for UART1 and the
second sends character data to UART1.
Target (Linux)
stty -F /dev/ttymxc0 115200
echo 'Testing UART1!' > /dev/ttymxc0
You should see 'Testing UART1!' output on the UART1 USB serial console. If not, check the USB serial port settings on the host PC and ensure that it is
configured for 115200 baud rate.
Enable UART1 as Console in Linux
To enable UART1 as an additional console in Linux, run the following commands. Note that this setting will persist between boots but will not affect the
default console in U-Boot and Linux.
Target (Linux)
systemctl enable [email protected]
systemctl start [email protected]
Configuring UART1 as Default Console in U-Boot and Linux
If you would like to use UART1 as the default console in U-Boot and Linux, boot into U-Boot and test the Linux configuration by running the following
commands:
Target (U-Boot)
env set console=ttymxc0
boot
You should see the normal Linux boot output on the USB serial console. You should also be able to login, send commands, and receive expected output.
If you would like to use UART1 , modify the U-Boot file 'include/configs/mx7d_phyboard_zeta.h' to match the following lines andas the default console
recompile and re-deploy U-Boot onto your boot media:
Host (include/configs/mx7d_phyboard_zeta.h)
#define CONFIG_MXC_UART_BASE UART1_IPS_BASE_ADDR
Host (include/configs/mx7d_phyboard_zeta.h)
#define CONFIG_CONS_INDEX 1
Host (include/configs/mx7d_phyboard_zeta.h)
/* under the define for CONFIG_EXTRA_ENV_SETTINGS */
"console=ttymxc0\0"
4KB EEPROM
This device allows you to use the I C4 interface to write and read small amounts of persistent data. The EEPROM is registered under the 'i2c4' node in the
2
expansion board Linux device tree file 'imx7-peb-d-rpi.dtsi' and is accessible as a file in Linux's sysfs directory structure. To write to and read from the 4KB
EEPROM on the expansion board, run the following commands on the target:
PHYTEC
Page 3
Target (Linux)
echo 'Testing EEPROM!!' > /sys/class/i2c-dev/i2c-3/device/3-0056/eeprom
hexdump -c -n 16 /sys/class/i2c-dev/i2c-3/device/3-0056/eeprom
You should see the values you wrote to the EEPROM displayed on your console in hexdump format.
Buttons
These buttons (S1 and S2) serve as an example of using GPIO pins as inputs to facilitate user input. The two buttons are registered under their own node,
'phytec_buttons', in the expansion board Linux device tree file 'imx7-peb-d-rpi.dtsi' and their status is accessible in Linux's debugfs directory structure. To
poll the status of the buttons, run the following command on the target:
Target (Linux)
cat /sys/kernel/debug/gpio | grep pebdrpi_button
You should see the current state of the GPIO pins connected to the active-low buttons displayed on your console. Additionally, you should see the change
in state if you run this command with one, or both, of the buttons held down.
LEDs
These LEDS (D1 and D2) serve as an example of using GPIO pins as outputs to control a device or devices. The two LEDs are registered under their own
node, 'phytec_leds', in the expansion board Linux device tree file 'imx7-peb-d-rpi.dtsi' and their status and control are accessible in Linux's sysfs directory
structure. To turn the LEDs on and off, run the following commands on the target:
Target (Linux)
cd /sys/class/leds
echo 0 > pebdrpi_led_1/brightness
echo 1 > pebdrpi_led_1/brightness
echo 0 > pebdrpi_led_2/brightness
echo 1 > pebdrpi_led_2/brightness
You should see the individual LEDs turn off and on based upon which digit you echoed and to which LED you echoed. If you would like to impress your
friends or co-workers with your technical prowess, run the following commands on the target:
Target (Linux)
for i in `seq 1 20`; do
echo 0 > pebdrpi_led_1/brightness
echo 1 > pebdrpi_led_2/brightness
sleep 0.5
echo 1 > pebdrpi_led_1/brightness
echo 0 > pebdrpi_led_2/brightness
sleep 0.5
done
echo 0 > pebdrpi_led_1/brightness
Raspberry Pi-compatible 40-pin Header
This header (X11) serves as Raspberry Pi HAT hardware support and as a convenient location to connect to GPIO or other interface signals that are
routed to the expansion board. If you are looking for information regarding Raspberry Pi HAT support, please see i.MX7: Raspberry Pi HAT Support with
PEB-D-RPI Expansion Board.
GPIO and Interface Signals Map
The following tables show the GPIO bank and pin and Raspberry Pi-compatible interface signals mapping to the 40-pin header on the PEB-D-RPI
expansion board:
PHYTEC
Page 4
GPIOs
Pin Function Pin Number Pin Function
VCC_3V3MEM 1 2 VDD_5V0
I2C1_SDA 3 4 VDD_5V0
I2C1_SCL 5 6 GND
GPIO4_IO21 7 8 GPIO4_IO5
GND 9 10 GPIO4_IO4
GPIO4_IO20 11 12 GPIO5_IO15
GPIO4_IO22 13 14 GND
GPIO4_IO23 15 16 GPIO1_IO15
VCC_3V3MEM 17 18 GPIO1_IO14
GPIO6_IO20 19 20 GND
GPIO6_IO19 21 22 GPIO5_IO11
GPIO6_IO21 23 24 GPIO6_IO22
GND 25 26 GPIO5_IO9
I2C4_SDA 27 28 I2C4_SCL
GPIO5_IO14 29 30 GND
GPIO1_IO02 31 32 GPIO5_IO13
GPIO4_IO18 33 34 GND
GPIO5_IO16 35 36 GPIO4_IO19
GPIO4_IO16 37 38 GPIO4_IO17
GND 39 40 GPIO5_IO17
Interface Signals
Pin Function Pin Number Pin Function
VCC_3V3MEM 1 2 VDD_5V0
I2C1_SDA 3 4 VDD_5V0
I2C1_SCL 5 6 GND
SPI2_MOSI 7 8 UART3_TX
GND 9 10 UART3_RX
SPI2_SCLK 11 12 SAI2_TX_BCLK
SPI2_MISO 13 14 GND
SPI2_SS0 15 16 GPIO1_IO15
VCC_3V3MEM 17 18 GPIO1_IO14
SPI3_MOSI 19 20 GND
SPI3_MOSI 21 22 GPIO5_IO11
SPI3_SCLK 23 24 SPI3_SS0
GND 25 26 SPI3_SS2
I2C4_SDA 27 28 I2C4_SCL
GPIO5_IO14 29 30 GND
PWM2_OUT 31 32 SAI2_RX_BCLK
SPI1_MISO 33 34 GND
SAI2_TX_SYNC 35 36 SPI1_SS0
SPI1_SCLK 37 38 SPI1_MOSI
GND 39 40 SAI2_TX_DATA0
The pin functions highlighted in blue are fixed and can not or should not be changed.
PHYTEC
Page 5
Jumpers
The 40-pin header also features a method to toggle the selection of specific Raspberry Pi-compatible interface signals to certain pins to support different
Raspberry Pi HATs using soldered jumpers. The following table details the pins and signals that the jumpers control:
Jumper Pin Default Signal (position 1+2) Alternative Signal (position 2+3)
J5 31 PWM2_OUT SAI2_TX_BCLK
J6 33 SPI1_MISO SAI2_TX_SYNC
J7 35 SD2_DATA2 SPI1_MISO
J8 37 SPI1_SCLK SAI2_TX_DATA0
J9 40 SD2_DATA3 SPI1_SCLK
J10 12 SD2_DATA1 PWM2_OUT
J11 29 GPIO5_IO14 SPI1_MOSI
J12 38 SPI1_MOSI GPIO5_IO14
Toggling GPIOs Connected to 40-pin Header
When a Raspberry Pi HAT isn't connected, you can use PHYTEC's RPi.GPIO Python library (included with BSP version PD18.2.0 or later) to control
GPIOs connected to the 40-pin header. By default, only the following pins are configured for GPIO use in the PEB-D-RPI device tree file: 7, 11, 12, 13, 15,
16, 18, 22, 29, 32, 35, 40. For information on how to enable more GPIOs, please reference i.MX7: Raspberry Pi HAT Support with PEB-D-RPI Expansion
.Board
To set pin 7 on the 40-pin header to be a GPIO output and toggle its value, open your Python interpreter on the target and input the following code:
Target (Python Interpreter)
import RPi.GPIO as GPIO
GPIO.setmode(GPIO.BOARD)
GPIO.setup(7, GPIO.OUT)
GPIO.output(7, GPIO.HIGH)
GPIO.output(7, GPIO.LOW)
GPIO.cleanup()
exit()
Using a digital multimeter or other suitable device, you can see the value on pin 7 of the 40-pin header go from 0 to 3.3 V and back to 0 V using the above
code. You can also toggle GPIOs using the libgpiod utilities installed to the BSP file system. To toggle the same pin using libgpiod utilities, run the
following commands on the target:
Target (Linux)
gpioset 3 21=1
gpioset 3 21=0
The above commands toggle GPIO chip 4, pin 21, which is routed to pin 7 of the 40-pin header on the PEB-D-RPI expansion board.
ARM JTAG 20-pin Debug Interface Header
This header (X5) allows you to connect an ARM JTAG 20-pin compatible debugger to the i.MX7. PHYTEC has tested the JTAG header and interface using
an ARM DSTREAM debugger along with ARM DS-5 Development Studio. You will need to reference the documentation provided by the manufacturer of
your debugger to configure and connect your debugger to the debug header.
Unpopulated Expansion Signal Pin Headers
These unpopulated headers (X12 and X13) can be used to access expansion board signals that are not brought out to the Raspberry Pi-compatible 40-pin
header. The following tables show the signals brought out to the unpopulated headers:
Connector X12
Signal Pin Number Signal
VCC_3V3MEM 1 2 VDD_5V0
PHYTEC
Page 6
GND 3 4 GND
SD2_DATA0 5 6 SD2_DATA3
SD2_DATA1 7 8 SD2_CLK
SD2_DATA2 9 10 SD2_CMD
SPI1_MISO 11 12 SPI1_MOSI
GND 13 14 GND
UART7_TX 15 16 UART7_RX
UART7_RTS 17 18 UART7_CTS
SPI1_SCLK 19 20 SPI1_SS0
X_POR_B 21 22 GND
X_SPI3_MISO 23 24 X_SPI3_SCLK
X_SPI3_MOSI 25 26 X_SPI3_SS0
GND 27 28 GND
X_SD2_CD_B 29 30 X_PWM2
X_SD2_WP 31 32 X_CAN2_TX
X_RD2_RESET_B 33 34 X_CAN2_RX
X_MX7_ONOFF 35 36 X_PMIC_PWRON
GND 37 38 GND
X_UART1_TX 39 40 X_UART3_TX
X_UART1_RX 41 42 X_UART3_RX
X_UART2_TX 43 44 X_UART6_TX
X_UART2_RX 45 46 X_UART6_RX
GND 47 48 GND
Connector X13
Signal Pin Number Signal
VCC_3V3MEM 1 2 VDD_5V0
X_I2C4_SDA 3 4 X_SNVS_TAMPER0
X_I2C4_SCL 5 6 GND
GND 7 8 X_GPIO2_30
X_NAND_CE1_B 9 10 X_NAND_CE2_B
X_NAND_CE0_B 11 12 X_NAND_CE3_B
X_NAND_DQS 13 14 X_NAND_READY_B
X_NAND_WP_B 15 16 GND
GND 17 18 EXP_CONN_MUX7
EXP_CONN_MUX1 19 20 EXP_CONN_MUX8
EXP_CONN_MUX2 21 22 EXP_CONN_MUX9
EXP_CONN_MUX3 23 24 GND
GND 25 26 EXP_CONN_MUX10
EXP_CONN_MUX4 27 28 EXP_CONN_MUX11
EXP_CONN_MUX5 29 30 EXP_CONN_MUX12
EXP_CONN_MUX6 31 32 GND
GND 33 34 X_GPIO2_10
X_ADC_IN0 35 36 X_GPIO2_11
X_ADC_IN1 37 38 X_GPIO2_12
X_ADC_IN2 39 40 X_GPIO2_13
X_ADC_IN3 41 42 X_GPIO2_14
GND 43 44 GND
PHYTEC
Page 7
X_USB_H_DATA 45 46 X_MDIO_D
X_USB_H_STROBE 47 48 X_MDIO_CLK

Other Phytec Computer Hardware manuals

Phytec KEIL nanoMODUL-STM32F103 Programming manual

Phytec

Phytec KEIL nanoMODUL-STM32F103 Programming manual

Phytec phyCORE-LPC3180 User manual

Phytec

Phytec phyCORE-LPC3180 User manual

Phytec phyCORE-MPC5554 User manual

Phytec

Phytec phyCORE-MPC5554 User manual

Phytec phyCORE-MPC5676/57 Series User manual

Phytec

Phytec phyCORE-MPC5676/57 Series User manual

Phytec phyCORE-i.MX 8M Mini User manual

Phytec

Phytec phyCORE-i.MX 8M Mini User manual

Phytec phyCORE-AM335 Series User manual

Phytec

Phytec phyCORE-AM335 Series User manual

Phytec phyCORE-TC399 User manual

Phytec

Phytec phyCORE-TC399 User manual

Phytec L-843e.A1 User manual

Phytec

Phytec L-843e.A1 User manual

Phytec ATOM phyCORE-Z500P(T) User manual

Phytec

Phytec ATOM phyCORE-Z500P(T) User manual

Phytec L-808e.A4 User manual

Phytec

Phytec L-808e.A4 User manual

Phytec L-1017e.A3 i.MX 8M Plus User manual

Phytec

Phytec L-1017e.A3 i.MX 8M Plus User manual

Phytec L-1029e.A1 User manual

Phytec

Phytec L-1029e.A1 User manual

Phytec phyGATE Tauri-L User manual

Phytec

Phytec phyGATE Tauri-L User manual

Phytec phyCORE-LPC3180 Programming manual

Phytec

Phytec phyCORE-LPC3180 Programming manual

Phytec phyCORE MPC5676 Series User manual

Phytec

Phytec phyCORE MPC5676 Series User manual

Phytec phyCORE-AM62Ax User manual

Phytec

Phytec phyCORE-AM62Ax User manual

Phytec L-1009e.A2 phyCORE-i.MX 8M Plus User manual

Phytec

Phytec L-1009e.A2 phyCORE-i.MX 8M Plus User manual

Phytec phyFLEX-i.MX 6 User manual

Phytec

Phytec phyFLEX-i.MX 6 User manual

Phytec phyCORE-PXAG49 Programming manual

Phytec

Phytec phyCORE-PXAG49 Programming manual

Phytec L-863e.A2 phyCORE-i.MX 8M User manual

Phytec

Phytec L-863e.A2 phyCORE-i.MX 8M User manual

Phytec phyCORE-i.MX 8M Mini User manual

Phytec

Phytec phyCORE-i.MX 8M Mini User manual

Phytec Cosmic-AM335 Series User manual

Phytec

Phytec Cosmic-AM335 Series User manual

Phytec phyCORE-LPC3250 User manual

Phytec

Phytec phyCORE-LPC3250 User manual

Phytec phyCORE-i.MX 8M Plus User manual

Phytec

Phytec phyCORE-i.MX 8M Plus User manual

Popular Computer Hardware manuals by other brands

Eurotech EmbeddedDNA An0031 manual

Eurotech

Eurotech EmbeddedDNA An0031 manual

Euresys Coaxlink Duo PCIe/104-EMB Hardware manual

Euresys

Euresys Coaxlink Duo PCIe/104-EMB Hardware manual

PLX Technology PEX 8114RDK-R Hardware reference manual

PLX Technology

PLX Technology PEX 8114RDK-R Hardware reference manual

IBASE Technology IP413 Series user manual

IBASE Technology

IBASE Technology IP413 Series user manual

HP Model 744 - VME Workstation manual

HP

HP Model 744 - VME Workstation manual

Keithley 7012-S instruction manual

Keithley

Keithley 7012-S instruction manual

AXIOMTEK AX93291 Quick installation guide

AXIOMTEK

AXIOMTEK AX93291 Quick installation guide

Panasonic TY-FB11DD - Monitor Terminal Expansion Board Specifications

Panasonic

Panasonic TY-FB11DD - Monitor Terminal Expansion Board Specifications

Avalue Technology EMS-CDV Quick reference guide

Avalue Technology

Avalue Technology EMS-CDV Quick reference guide

NetComm NP5430 user guide

NetComm

NetComm NP5430 user guide

TRENDnet TEG-PCITXR Quick installation guide

TRENDnet

TRENDnet TEG-PCITXR Quick installation guide

Western Digital WDXT-140 installation guide

Western Digital

Western Digital WDXT-140 installation guide

3Com Token Ring Getting started guide

3Com

3Com Token Ring Getting started guide

OCTOMINER X12 ULTRA V3 troubleshooting guide

OCTOMINER

OCTOMINER X12 ULTRA V3 troubleshooting guide

Ositech comm Trumpcard Data/Fax Modem User's guide and reference

Ositech comm

Ositech comm Trumpcard Data/Fax Modem User's guide and reference

ST STEVAL-SCR002V1 user manual

ST

ST STEVAL-SCR002V1 user manual

Ampro Corporation LITTLE BOARD P5X Hardware user manual

Ampro Corporation

Ampro Corporation LITTLE BOARD P5X Hardware user manual

Icy Box IB-2242SSK manual

Icy Box

Icy Box IB-2242SSK manual

manuals.online logo
manuals.online logoBrands
  • About & Mission
  • Contact us
  • Privacy Policy
  • Terms and Conditions

Copyright 2025 Manuals.Online. All Rights Reserved.